
Chicken Recipes
Huli Huli Chicken Recipe: Hawaiian-Style Grilled Chicken

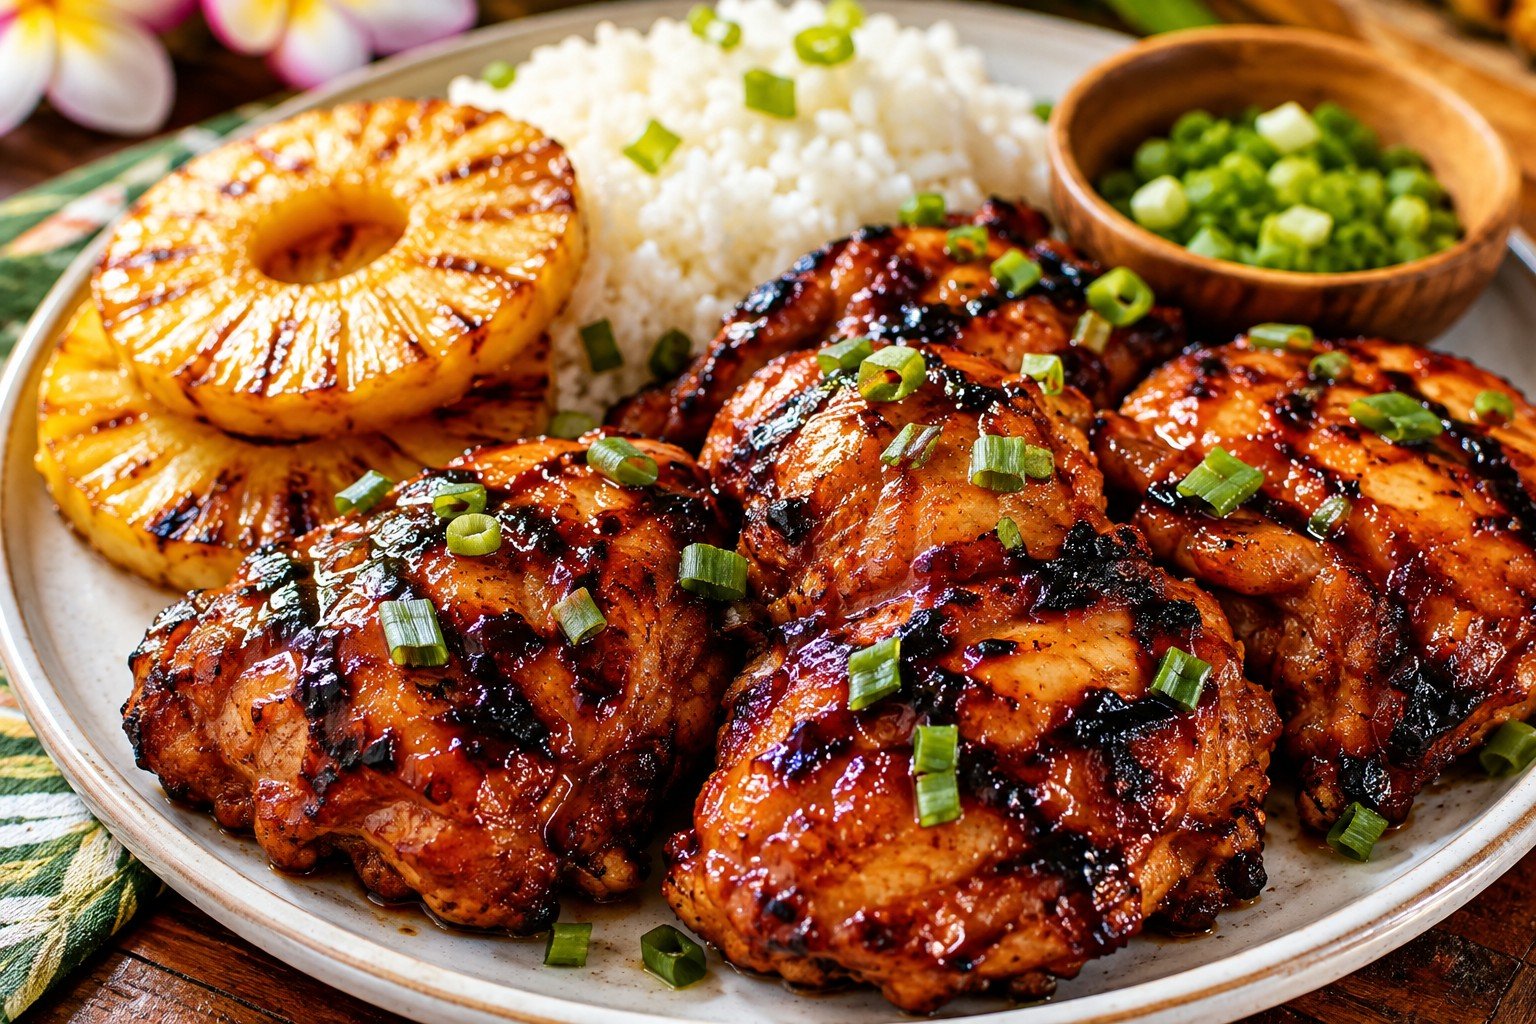
Huli Huli Chicken is a Hawaiian-inspired grilled chicken recipe that brings together everything you want in a great barbecue meal: juicy chicken, a sweet and savory marinade, smoky grilled edges, and a glossy caramelized glaze. The marinade combines pineapple juice, soy sauce, brown sugar, ketchup, garlic, ginger, vinegar, and a few simple seasonings. After several hours of marinating, the chicken goes onto a hot grill where the sugars caramelize and create those irresistible browned edges. Add grilled pineapple and a scoop of rice, and you have a tropical-style dinner that feels special without being difficult.
What I especially like about this recipe is how practical it is for a family meal or cookout. Most of the work happens ahead of time, so you can marinate the chicken earlier in the day and simply grill it when you’re ready to eat. Boneless chicken thighs are my first choice because they stay juicy and handle the grill beautifully, but other cuts can work too. The key is controlling the heat because the sweet marinade can brown quickly. Once you get that part right, Huli Huli Chicken is an easy way to turn an ordinary chicken dinner into something memorable.
Why You’ll Love This Recipe
There are plenty of reasons to keep Huli Huli Chicken in your regular grilling rotation.
- Big tropical flavor: Pineapple juice gives the marinade a fruity sweetness without making the chicken taste like dessert.
- Sweet and savory balance: Soy sauce and vinegar keep the brown sugar and ketchup from becoming overly sweet.
- Juicy chicken: Boneless chicken thighs are naturally forgiving and stay tender on the grill.
- Excellent caramelization: The sugary marinade creates a beautiful sticky glaze and lightly charred edges.
- Great for entertaining: Most of the preparation can be done several hours ahead.
- Family-friendly: The marinade has plenty of flavor without relying on very spicy ingredients.
- Easy to customize: You can use chicken breasts, drumsticks, wings, skewers, or even adjust the recipe for oven cooking.
- Perfect with tropical sides: Grilled pineapple, coconut rice, macaroni salad, and fresh salads all work beautifully.
Ingredients for Huli Huli Chicken recipe
Main Ingredients
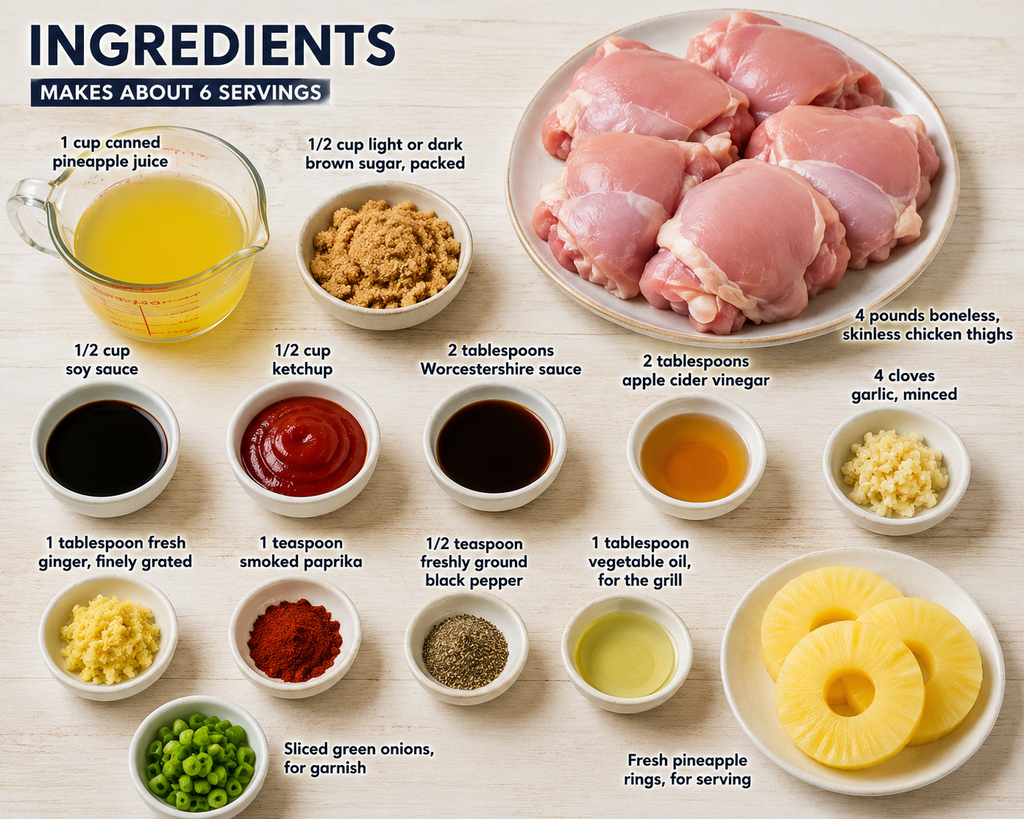
For about 6 servings, you’ll need:
- 4 pounds boneless, skinless chicken thighs
- 1 cup canned pineapple juice
- 1/2 cup light or dark brown sugar, packed
- 1/2 cup soy sauce
- 1/2 cup ketchup
- 2 tablespoons Worcestershire sauce
- 2 tablespoons apple cider vinegar
- 4 cloves garlic, minced
- 1 tablespoon fresh ginger, finely grated
- 1 teaspoon smoked paprika
- 1/2 teaspoon freshly ground black pepper
- 1 tablespoon vegetable oil, for the grill
- Fresh pineapple rings, for serving
- Sliced green onions, for garnish
Ingredient Notes & Substitutions
Chicken thighs: Boneless, skinless thighs are ideal because they are juicy and develop excellent caramelized edges. Bone-in thighs can also be used, but they need additional cooking time. Chicken breasts work too, although they are leaner and can dry out more easily.
Pineapple juice: Use canned or shelf-stable pineapple juice for the most reliable result. Fresh pineapple contains bromelain, an enzyme that can break down proteins and may make chicken overly soft if it sits in the marinade for too long. Canned pineapple juice is a simple choice for this recipe.
Soy sauce: Regular soy sauce gives the marinade a deep savory flavor. Light soy sauce can also be used. For a gluten-free version, choose a certified gluten-free tamari.
Brown sugar: Light and dark brown sugar both work. Dark brown sugar provides a slightly deeper molasses flavor, while light brown sugar gives a cleaner sweetness.
Ketchup: It may seem unusual in a chicken marinade, but ketchup adds sweetness, acidity, tomato flavor, and body to the glaze.
Worcestershire sauce: This adds another layer of savory flavor and complements the pineapple and soy sauce.
Apple cider vinegar: A little acidity helps balance the sweetness and keeps the marinade from tasting heavy.
Fresh ginger and garlic: Fresh ingredients make a noticeable difference here. Grated ginger gives the marinade a bright, warm flavor, while fresh garlic adds savory depth.
Smoked paprika: This is optional but useful when you’re cooking on a standard gas or charcoal grill and want an extra layer of smoky flavor.
Fresh pineapple: Grill pineapple rings alongside the chicken and serve them as a side. Canned pineapple rings can be used when fresh pineapple isn’t available.
Equipment Needed for Huli Huli Chicken Recipe
You don’t need much equipment for this recipe:
- Outdoor grill or grill pan
- Large resealable food-safe bag or covered container
- Small bowl or measuring jug
- Whisk
- Tongs
- Instant-read meat thermometer
- Pastry brush for basting
- Clean plate for cooked chicken
- Aluminum foil for resting
A meat thermometer is especially useful. Chicken can vary considerably in size, and checking the internal temperature is much more reliable than judging doneness by cooking time alone.
Step-by-Step Instructions
1. Prepare the Marinade
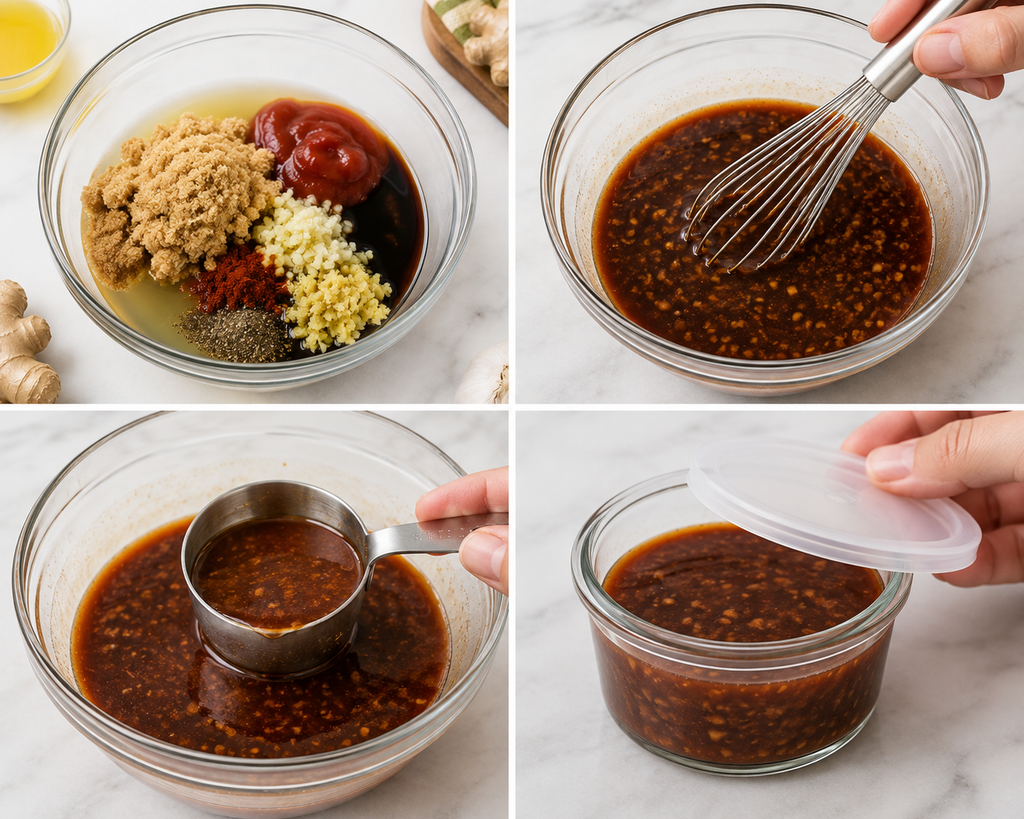
Add the pineapple juice, brown sugar, soy sauce, ketchup, Worcestershire sauce, apple cider vinegar, garlic, ginger, smoked paprika, and black pepper to a bowl or large measuring jug.
Whisk until the brown sugar is mostly dissolved and the mixture is evenly combined.
Before adding the chicken, reserve about 1/2 cup of the marinade in a clean container. Cover it and refrigerate it. This portion will be used later for basting.
This step is important for food safety. Once the marinade has touched raw chicken, it should not be brushed directly onto cooked or partially cooked chicken unless it has first been thoroughly cooked.
2. Marinate the Chicken

Place the chicken thighs in a large resealable bag or suitable covered container. Pour the remaining marinade over the chicken and turn the pieces until they are evenly coated.
Seal the bag and refrigerate for 4 to 6 hours, or preferably overnight.
For the best balance of flavor and texture, avoid letting the chicken sit in this marinade for more than about 24 hours. The soy sauce can make the chicken increasingly salty, while the acidic ingredients continue affecting the texture.
3. Prepare the Grill for Huli Huli Chicken

When you’re ready to cook, take the chicken out of the refrigerator while you prepare the grill.
Preheat the grill to medium-high heat after cleaning the grates. Lightly oil them to help prevent sticking.
Because the marinade contains brown sugar and ketchup, don’t assume that the hottest possible grill will give the best result. You want enough heat to create caramelization without scorching the outside before the center is cooked.
4. Grill the Chicken

Remove the chicken from the marinade and allow excess marinade to drip off. Discard the marinade that held the raw chicken.
Place the chicken thighs on the grill. Cook for about 5 to 6 minutes on the first side, depending on their size and the heat of your grill.
Turn the chicken and continue cooking for several minutes.
Once the chicken has developed some color and is nearly cooked through, reduce the heat. Brush it generously with the reserved marinade.
Turn the chicken and continue grilling, brushing and turning as needed, until the glaze becomes shiny and caramelized.
The exact cooking time will vary, but boneless thighs often take around 15 to 20 minutes total. To determine the thickest portion of the meat, always use an instant-read thermometer.
5. Check the Internal Temperature
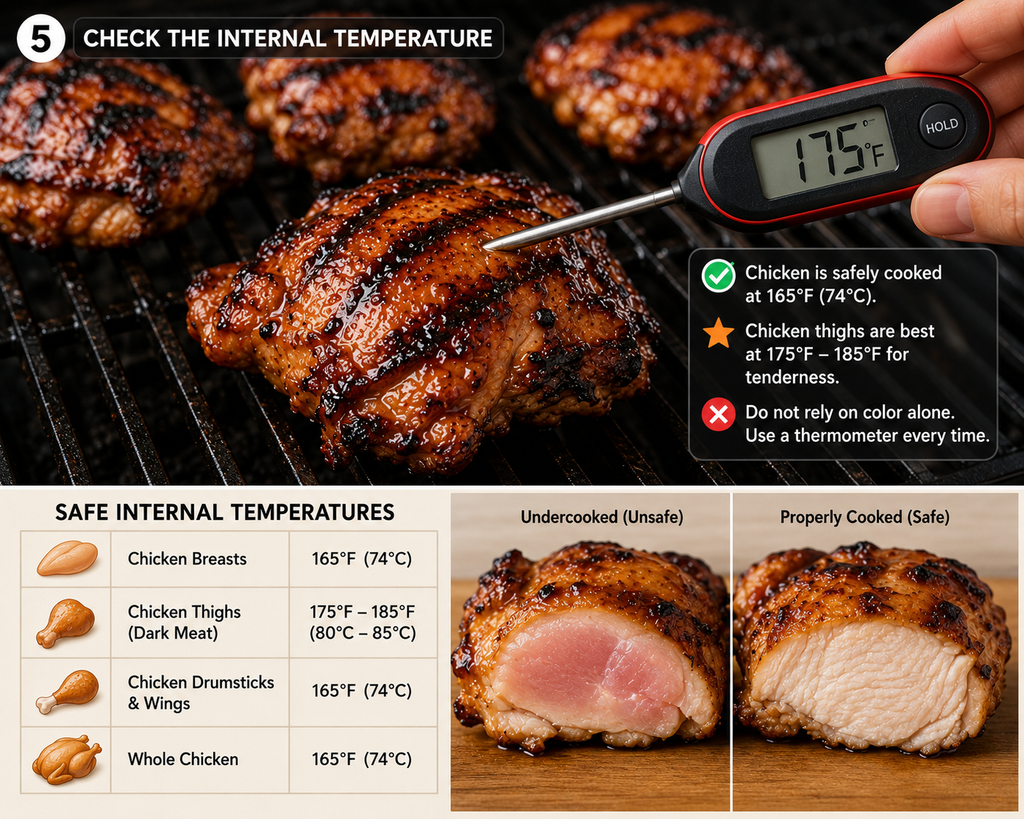
Chicken is considered safely cooked when the thickest portion reaches 165°F (74°C). Chicken thighs are often enjoyable at a somewhat higher temperature because additional cooking can make the dark meat more tender.
Avoid relying only on color. A browned exterior does not necessarily mean the center is cooked, and a thermometer removes much of the guesswork.
6. Grill the Pineapple
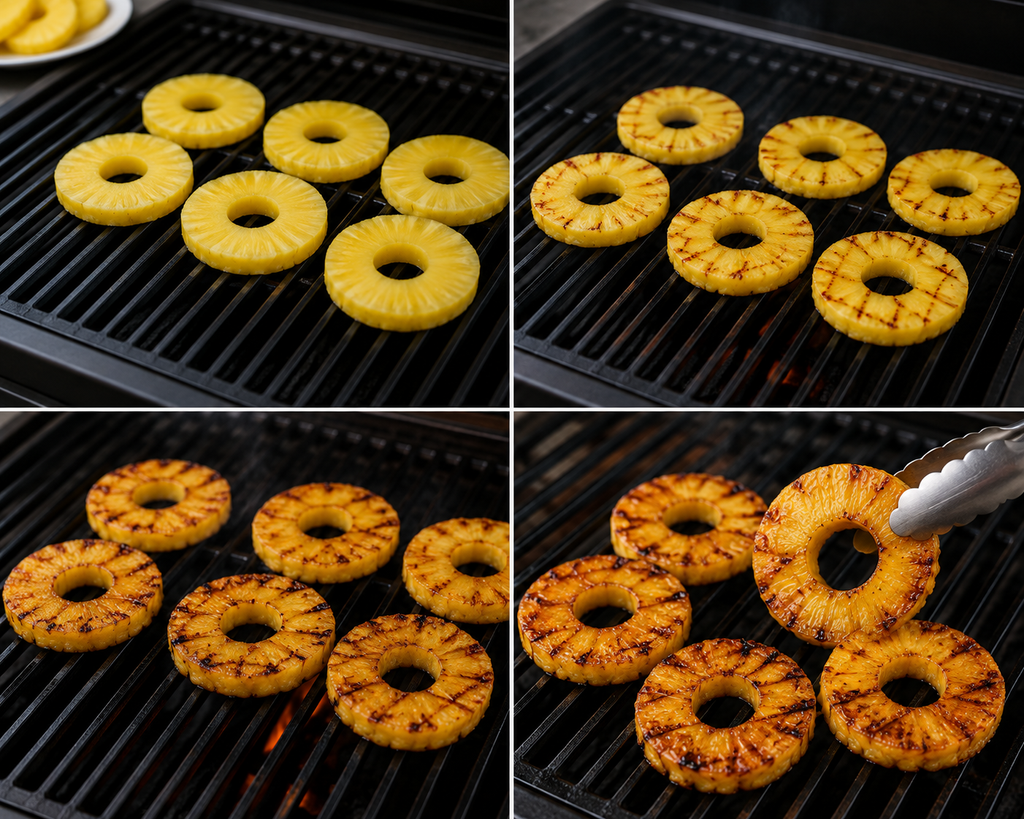
While the chicken cooks, place pineapple rings on a clean section of the grill.
Grill them for a few minutes per side, leaving them undisturbed long enough to develop clear grill marks.
Once the pineapple is warm, lightly caramelized, and marked by the grill, remove it.
7. Rest and Serve the Huli Huli Chicken
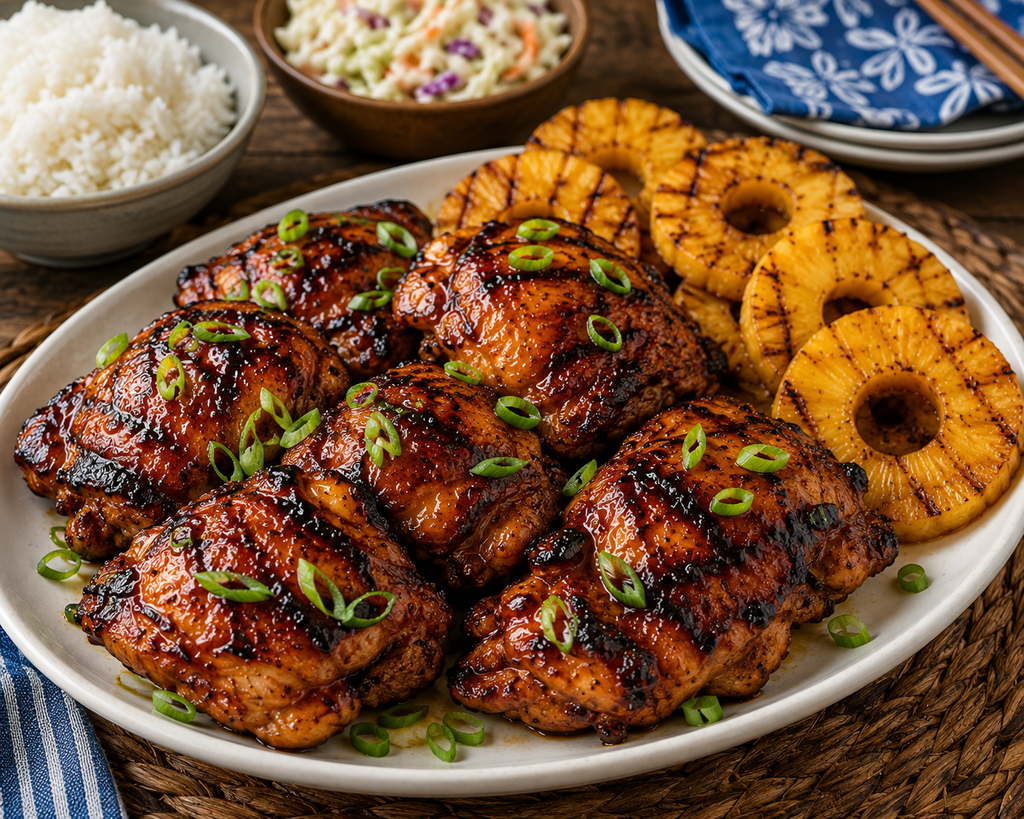
After the chicken is cooked, move it to a fresh platter and cover it loosely with foil. Let it rest for about 5 to 10 minutes before slicing or serving.
Garnish with sliced green onions and serve with the grilled pineapple and your favorite tropical sides.
Expert Tips
Control the Heat
The biggest challenge with Huli Huli Chicken is the sugary marinade. Brown sugar and ketchup can caramelize quickly, which is delicious when controlled but can turn bitter if they burn.
If the outside of the chicken is turning too dark while the center still needs time, move the chicken to a cooler part of the grill or to an indirect heat area.
Reserve Marinade Before Adding Chicken
Always remove the portion needed for basting before the chicken goes into the marinade.
If you forget, don’t brush raw-chicken marinade directly onto the cooked chicken. Instead, bring the used marinade to a full simmer and cook it thoroughly before using it as a sauce.
Don’t Skip the Marinating Time
You can technically cook the chicken after a shorter marinating period, but several hours gives the flavors more time to develop.
If possible, prepare the chicken the night before. Then dinner preparation becomes much easier the next day.
Use a Thermometer
Chicken thighs vary in thickness, so cooking times are only a guideline. A thermometer gives you a much better indication of when the chicken is ready.
Don’t Overcrowd the Grill
Leave enough space between the chicken pieces for heat to circulate. Overcrowding can cause steaming instead of proper browning.
Let the Chicken Rest
Resting gives the meat a few minutes to settle after cooking. It also makes the chicken easier to slice without immediately losing its juices.
Recipe Variations
Huli Huli Chicken Breasts
Chicken breasts are a leaner option. Pound very thick breasts to a more even thickness so they cook more consistently. Watch them carefully because they can dry out sooner than thighs.
Huli Huli Chicken Wings
Use the same marinade for chicken wings. Because wings are smaller, monitor them closely and adjust the cooking time according to their size.
Huli Huli Chicken Drumsticks
Drumsticks are another excellent choice for grilling. They need more time than boneless thighs, so use a thermometer to confirm that they are fully cooked.
Huli Huli Chicken Skewers
Cut boneless chicken into large pieces and thread them onto skewers with chunks of pineapple and bell pepper. This creates a fun cookout option and makes the recipe easy to portion.
Gluten-Free Huli Huli Chicken
Replace regular soy sauce with gluten-free tamari. Also check the labels of ketchup and Worcestershire sauce to make sure the products you use meet your dietary requirements.
Oven-Baked Huli Huli Chicken
If the weather isn’t suitable for grilling, the oven works well.
Preheat the oven to 375°F. Arrange the marinated chicken in a single layer on a lightly greased baking pan. Bake for roughly 25 minutes, depending on the size of the pieces.
Brush the chicken with the reserved marinade toward the end. For more caramelization, place it under the broiler briefly, watching closely because the sugary glaze can burn quickly.
Air Fryer Huli Huli Chicken
For smaller batches, an air fryer is another convenient option. Cook the chicken at approximately 375°F, turning it during cooking and brushing with reserved marinade near the end. Because air fryers vary, use the internal temperature rather than a fixed cooking time as your final guide.
Serving Suggestions
Huli Huli Chicken has a naturally tropical flavor, so sides with fresh, bright, or creamy flavors work particularly well.
Classic Hawaiian-Inspired Sides
- Steamed white rice
- Coconut jasmine rice
- Hawaiian macaroni salad
- Grilled pineapple
- Creamy coleslaw
Fresh and Light Sides
- Mango and avocado salad
- Cucumber salad
- Green salad with a citrus dressing
- Grilled vegetables
- Fresh pineapple salsa
For a Complete Bowl
Slice the chicken and serve it over rice with grilled pineapple, shredded cabbage, cucumber, avocado, and a drizzle of the cooked Huli Huli sauce.
This is also a great way to use leftovers. The sweet-savory chicken works particularly well with cold vegetables and rice.
Storage & Reheating
Remaining Huli Huli Chicken should be refrigerated in an airtight container. For best quality, use it within three to four days.
To reheat, gently reheat each serving in the microwave until well heated. To keep the chicken from drying out, you may alternatively reheat it in a covered skillet over low heat with a tiny splash of water.
Avoid reheating the entire batch more than once. Warm only the portion you intend to consume instead.
Freezing
You can store cooked Huli Huli Chicken in a freezer-safe bag or airtight container. For better texture, remove as much excess air as possible before freezing.
You can also freeze raw chicken in its marinade. If doing this, freeze it immediately after preparing the marinade and chicken. Thaw it safely in the refrigerator before cooking.
Common Mistakes to Avoid
- Using fresh pineapple juice for a long marinade: Fresh pineapple contains enzymes that can affect the texture of chicken. Canned pineapple juice is a more reliable choice.
- Using marinade that touched raw chicken: Reserve a clean portion before adding the chicken, or cook contaminated marinade thoroughly before using it.
- Overheating the grill might cause the sweet glaze to burn before the chicken is done.
- Basting too early: Wait until the chicken is partly cooked and nearly done before generously applying the reserved glaze.
- Skipping the thermometer: Cooking time varies with chicken size, grill temperature, and equipment.
- Marinating for too long: Overnight is convenient and flavorful, but keeping the chicken in the marinade beyond about a day can make it overly salty.
- Cutting immediately after grilling: Give the chicken several minutes to rest before serving.
- Moving pineapple constantly: Leave pineapple rings undisturbed long enough to develop attractive grill marks.
Frequently Asked Questions
What does Huli Huli mean?
“Huli” means “turn” in Hawaiian. The name refers to the traditional cooking style in which the chicken is turned repeatedly while being cooked and basted.
Can I use chicken breast instead of thighs?
Yes. Chicken breast works well, but it is leaner and less forgiving than thighs. To help it cook evenly, choose pieces of similar thickness and monitor the internal temperature carefully.
How long should I marinate Huli Huli Chicken?
For optimal taste, marinate the chicken for at least four to six hours. Overnight is even better when you have time. Avoid keeping it in the marinade for longer than about 24 hours.
Can I use fresh pineapple juice?
For this recipe, canned or shelf-stable pineapple juice is the better choice. Fresh pineapple contains bromelain, an enzyme that can break down proteins and potentially make chicken too soft during a long marinade.
Can I cook Huli Huli Chicken without a grill?
Absolutely. You can bake it in the oven, use an indoor grill pan, or prepare smaller portions in an air fryer. The grill provides the most authentic smoky character, but the marinade still gives the chicken plenty of flavor with other cooking methods.
Is Huli Huli Chicken spicy?
Not usually. The traditional flavor profile is primarily sweet, savory, tangy, and smoky. This version doesn’t depend on hot peppers, so it is suitable for people who prefer mild flavors.
Can I reuse the leftover marinade?
Do not reuse marinade that has touched raw chicken unless you first bring it to a thorough boil and cook it safely. The easiest approach is to reserve the amount needed for basting before adding the raw chicken.
What is the best side dish for Huli Huli Chicken?
White rice, coconut rice, Hawaiian macaroni salad, grilled pineapple, and coleslaw are excellent choices. For a lighter meal, pair the chicken with a fresh mango salad or grilled vegetables.
Nutrition Information (Approximate)
The following values are estimates and can vary depending on the chicken cut, portion size, amount of marinade consumed, and specific brands of ingredients.
Approximate nutrition per serving:
- Calories: 650–825 kcal
- Protein: 50–55 g
- Carbohydrates: 30–40 g
- Fat: 35–50 g
- Saturated Fat: 10–14 g
- Sugar: 25–35 g
- Sodium: 1,200–1,600 mg
The nutrition estimate includes a generous amount of marinade and will vary considerably because not all of the marinade is necessarily consumed.
Recipe Card (Printable Summary)
Huli Huli Chicken
Prep Time: 20 minutes
Marinating Time: 4–6 hours, preferably overnight
Cook Time: 15–20 minutes
Resting Time: 5–10 minutes
Total Time: About 5 hours including minimum marinating
Servings: 6
Cooking Method: Grilling
Ingredients
- 4 pounds boneless, skinless chicken thighs
- 1 cup canned pineapple juice
- 1/2 cup brown sugar
- 1/2 cup soy sauce
- 1/2 cup ketchup
- 2 tablespoons Worcestershire sauce
- 2 tablespoons apple cider vinegar
- 4 cloves garlic, minced
- 1 tablespoon fresh ginger, grated
- 1 teaspoon smoked paprika
- 1/2 teaspoon black pepper
- Vegetable oil, for grilling
- Fresh pineapple rings, for serving
- Sliced green onions, for garnish
Instructions
- Whisk pineapple juice, brown sugar, soy sauce, ketchup, Worcestershire sauce, vinegar, garlic, ginger, smoked paprika, and black pepper together.
- Reserve about 1/2 cup of the marinade in a clean container and refrigerate.
- Coat the chicken thoroughly by adding it to the leftover marinade.
- Cover and refrigerate for 4–6 hours or overnight.
- Lightly oil the grates and preheat the grill to medium-high heat.
- Once the chicken has been taken out of the marinade, dispose of the marinade.
- Grill the chicken for about 5–6 minutes on the first side, then turn and continue cooking.
- Reduce the heat as needed and brush the chicken with the reserved marinade near the end of cooking.
- Continue turning and basting carefully until the chicken reaches at least 165°F in the thickest portion.
- Grill pineapple rings until lightly caramelized and marked.
- Rest the chicken for 5–10 minutes.
- Serve with grilled pineapple and your preferred sides after garnishing with green onions.
Conclusion
Huli Huli Chicken is proof that a simple marinade can completely transform a basic chicken dinner. The combination of pineapple juice, soy sauce, brown sugar, ketchup, garlic, ginger, and vinegar creates layers of sweet, savory, tangy flavor, while the grill adds the smoky char that makes the dish so appealing.
For the best results, use boneless chicken thighs, marinate them overnight when possible, reserve some marinade before the chicken goes in, and keep the grill temperature under control. Serve the finished chicken with grilled pineapple and rice for an easy tropical-inspired meal, or turn leftovers into bowls, salads, and wraps. Once you’ve made it, you’ll understand why this sticky, caramelized chicken is such a popular choice for backyard grilling and family dinners.

Introduction to Creamy Shrimp Pasta
Creamy Shrimp Pasta is a comforting, restaurant-style meal that combines tender shrimp, perfectly cooked pasta, and a rich garlic Parmesan sauce. Every forkful brings together savory seafood, creamy goodness, and a hint of black pepper for a satisfying dinner. Best of all, you can make this delicious meal at home with simple ingredients in about 30 minutes.
Whether you love classic shrimp Alfredo, flavorful shrimp scampi pasta, or a comforting bowl of shrimp fettuccine, this recipe gives you a great starting point. The sauce clings beautifully to the noodles without needing complicated techniques. Serve it for a quick family dinner, a cozy weekend meal, or an easy date-night dish. With a few simple tips, you can make creamy shrimp pasta that tastes special without spending hours in the kitchen.
Why You’ll Love This Creamy Shrimp Pasta Recipe
- Ready in 30 minutes: Prepare the sauce while the pasta cooks to save time.
- Rich and creamy: Heavy cream, garlic, and Parmesan create a smooth, flavorful sauce.
- Tender, juicy shrimp: A short cooking time helps prevent rubbery seafood.
- Easy to customize: Add spinach, broccoli, Cajun seasoning, or lemon for a different flavor.
- Perfect for pasta lovers: It offers the comfort of shrimp fettuccine Alfredo with a homemade touch.
- Simple ingredients: Most items are easy to find at a regular grocery store.
Ingredients for Creamy Shrimp Pasta

This recipe makes four servings.
| Ingredient | Quantity |
| Fettuccine or linguine | 12 oz (340 g) |
| Large raw shrimp, peeled and deveined | 1 lb (450 g) |
| Olive oil | 1 tbsp |
| Unsalted butter | 2 tbsp |
| Garlic, minced | 4 cloves |
| Small onion, finely chopped | 1 |
| Heavy cream | 1 cup (240 ml) |
| Freshly grated Parmesan cheese | ¾ cup (75 g) |
| Chicken or seafood broth | ¼ cup (60 ml) |
| Paprika | ½ tsp |
| Salt | To taste |
| Black pepper | ½ tsp, or to taste |
| Fresh lemon juice | 1–2 tsp |
| Fresh parsley, chopped | 2 tbsp |
| Reserved pasta water | Up to ½ cup (120 ml) |
Ingredient Notes and Substitutions
- Shrimp: Fresh or frozen shrimp both work. If using frozen shrimp, thaw completely and pat dry before cooking.
- Pasta: Fettuccine is ideal for a creamy sauce, but spaghetti, linguine, or penne are suitable alternatives.
- Heavy cream: This provides a rich texture. Half-and-half can work, although the sauce may be thinner.
- Parmesan: Freshly grated cheese usually melts more smoothly than pre-shredded varieties.
- Broth and lemon: Broth adds savory depth, while lemon juice balances the richness of the cream.
Equipment Needed for Creamy Shrimp Pasta
- Large pot for boiling pasta
- Large skillet or frying pan
- Colander
- Tongs or a wooden spoon
- Measuring cups and spoons
- Knife and cutting board
- Cheese grater
Step-by-Step Instructions for Creamy Shrimp Pasta
Step 1: Cook the Pasta
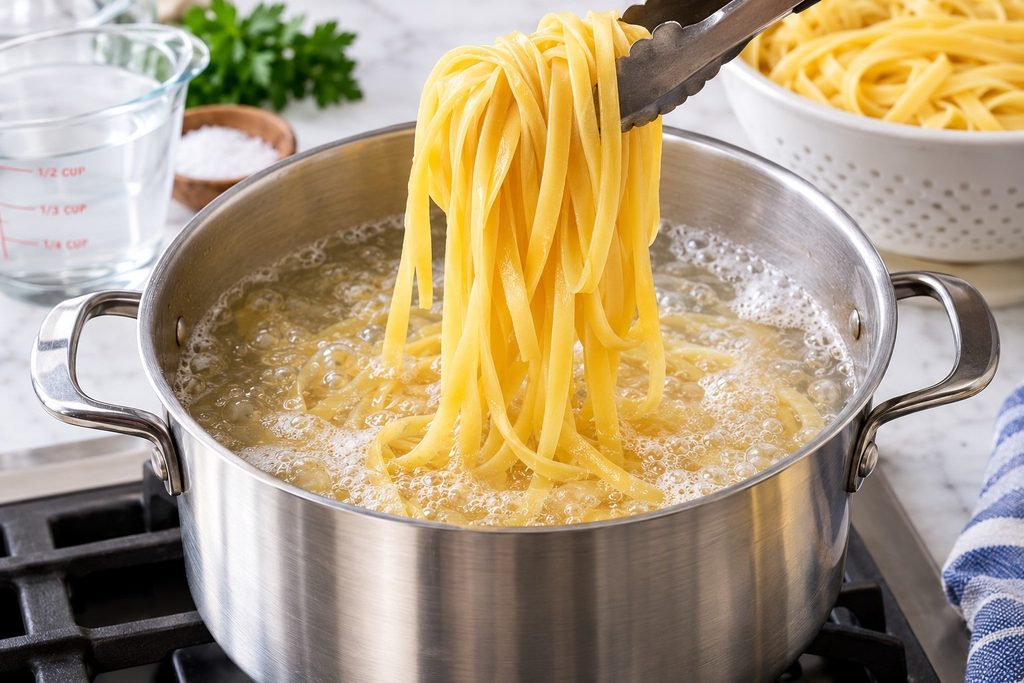
Heat a big pot of salted water till it boils. Add the fettuccine and cook according to the package directions until al dente. Set aside roughly half a cup of pasta water before draining. Drain the pasta without rinsing it, then set it aside.
Step 2: Season and Cook the Shrimp
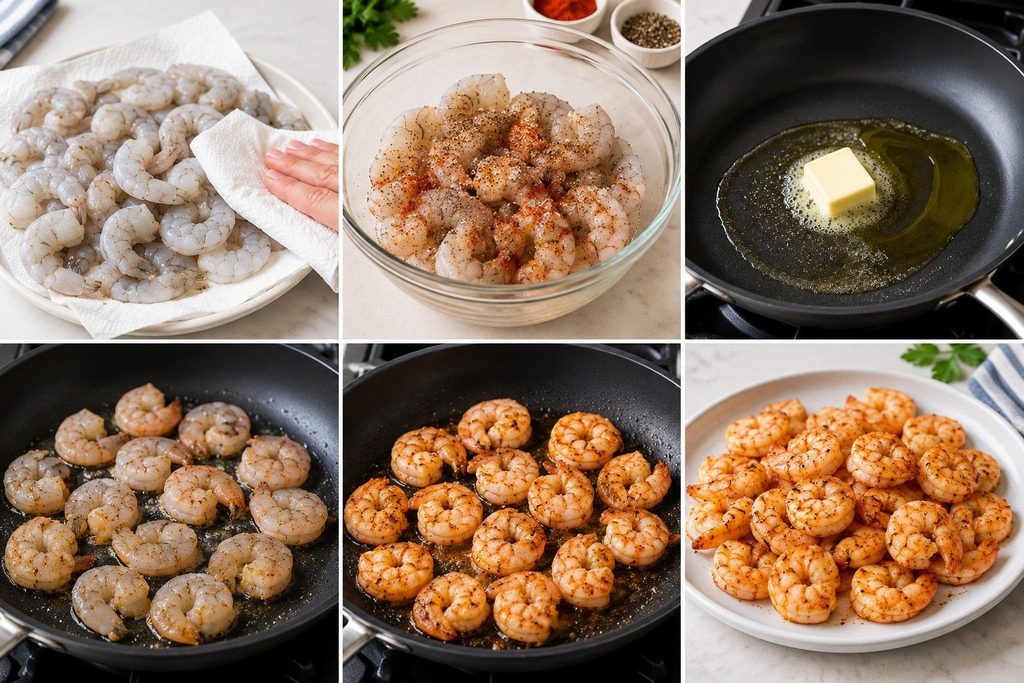
Pat the shrimp dry with paper towels. Add a little salt, black pepper, and paprika for seasoning. In a big skillet, place one tablespoon of butter and olive oil over medium-high heat.
Arrange the shrimp in a single layer and cook for approximately 1–2 minutes per side, depending on their size. Remove them once they turn pink and opaque and reach an internal temperature of 145°F (63°C). Set aside while you prepare the sauce.
Step 3: Sauté the Garlic and Onion
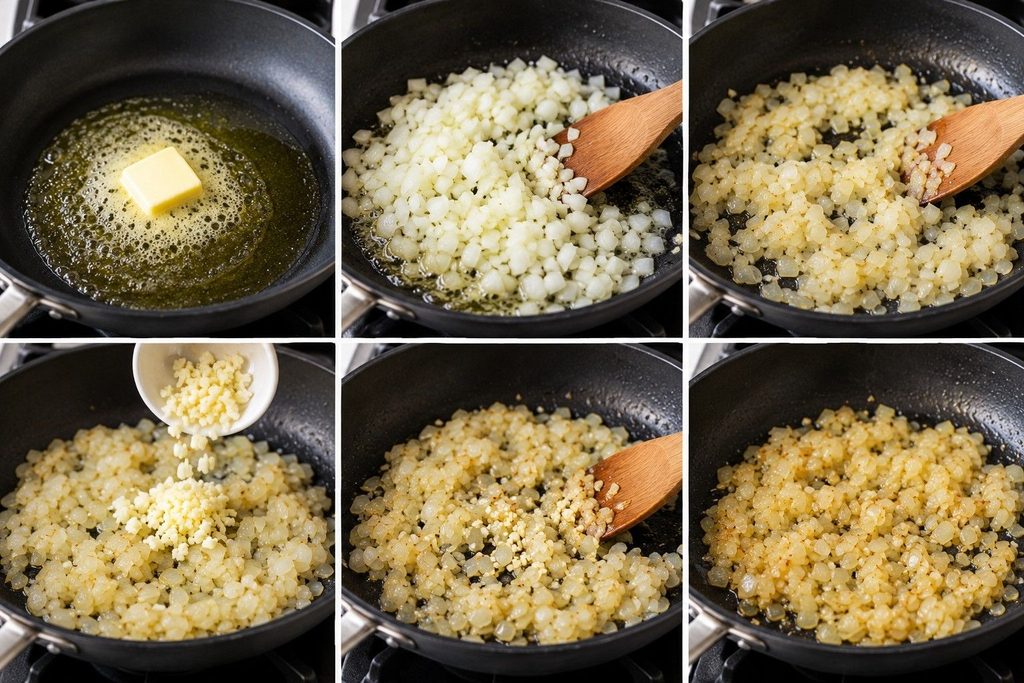
Add the remaining butter to the same skillet and lower the heat to medium. Cook the chopped onion for two to three minutes, or until it becomes tender. Add the minced garlic and heat for an additional 30 seconds, or until fragrant.
Garlic can become bitter if it is browned too much.
Step 4: Make the Creamy Parmesan Sauce
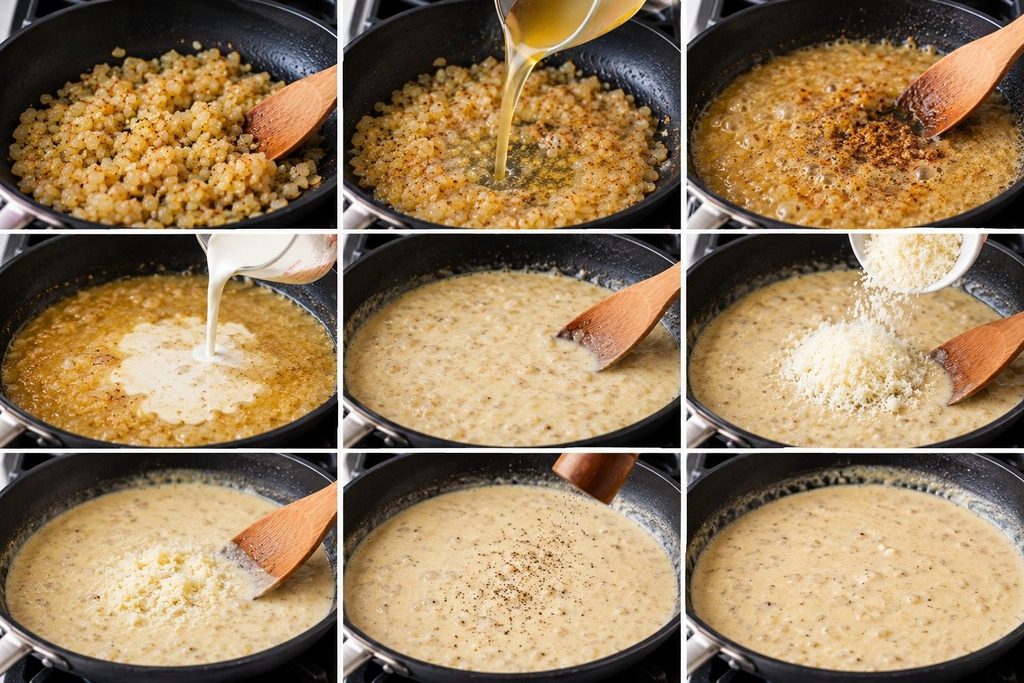
Pour in the broth and scrape up the flavorful browned bits from the bottom of the skillet. Add the heavy cream once it has briefly simmered.
Allow the sauce to gently simmer for 2–3 minutes. Reduce the heat and add the grated Parmesan cheese little by little until it melts. Season with salt and black pepper to taste.
Step 5: Combine the Pasta and Shrimp
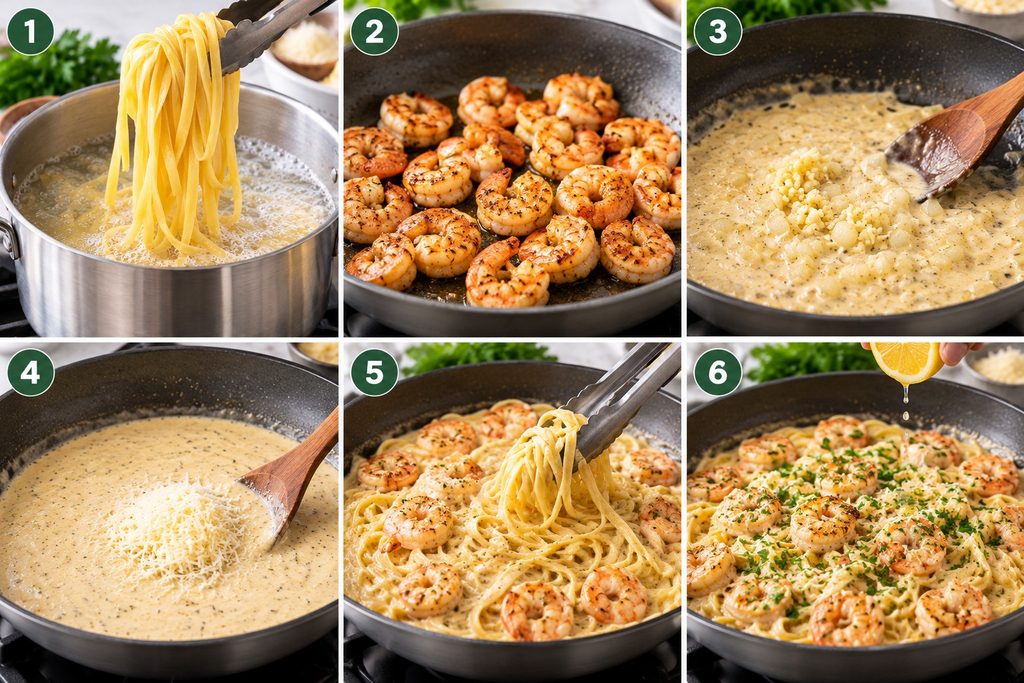
Toss the drained pasta in the sauce in the skillet. Return the cooked shrimp to the pan and gently mix.
If the sauce seems too thick, add reserved pasta water a tablespoon at a time until it reaches your preferred consistency. Stir in the lemon juice and chopped parsley.
Step 6: Serve and Enjoy
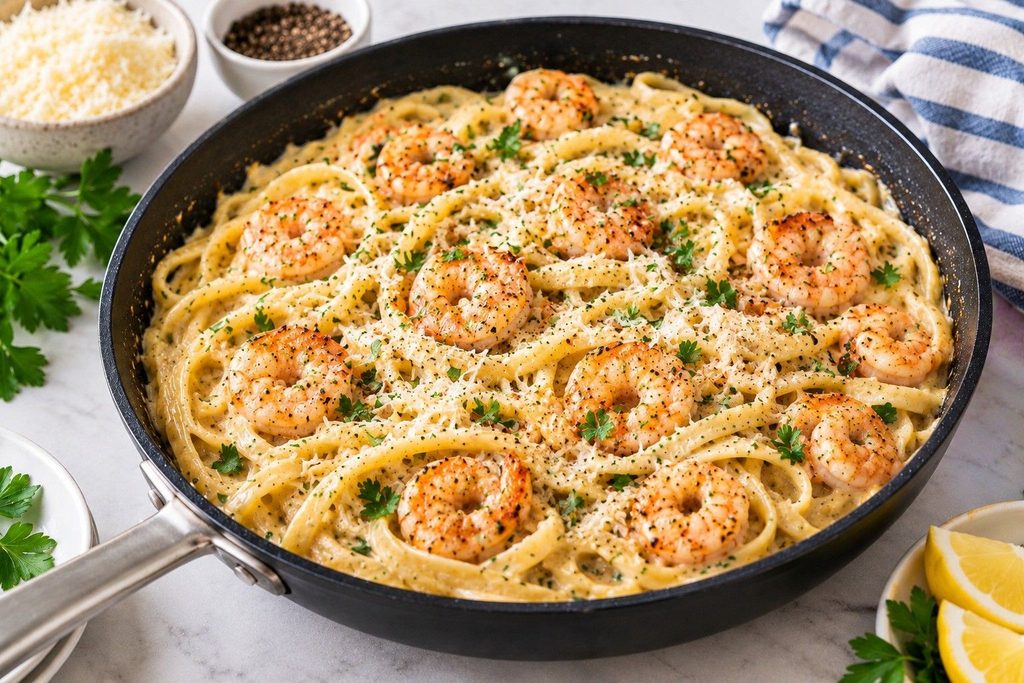
Remove the skillet from the heat. Add a little black pepper, fresh parsley, and additional Parmesan cheese. Serve immediately while the sauce is creamy and the shrimp are tender.
Expert Tips for the Best Creamy Shrimp Pasta
- Do not overcook the shrimp. Shrimp cook quickly and can become tough if left in the pan too long.
- Grate Parmesan fresh. It helps create a smoother sauce with a better cheese flavor.
- Keep the heat low after adding cheese. A hard boil can make the sauce grainy or separated.
- Save pasta water. Its starch helps the sauce cling to the noodles and makes it easier to adjust thickness.
- Balance the richness. A small squeeze of lemon brightens the cream sauce without making it too sour.
- Serve immediately. Cream-based pasta tastes best when freshly prepared.
Creamy Shrimp Pasta Recipe Variations
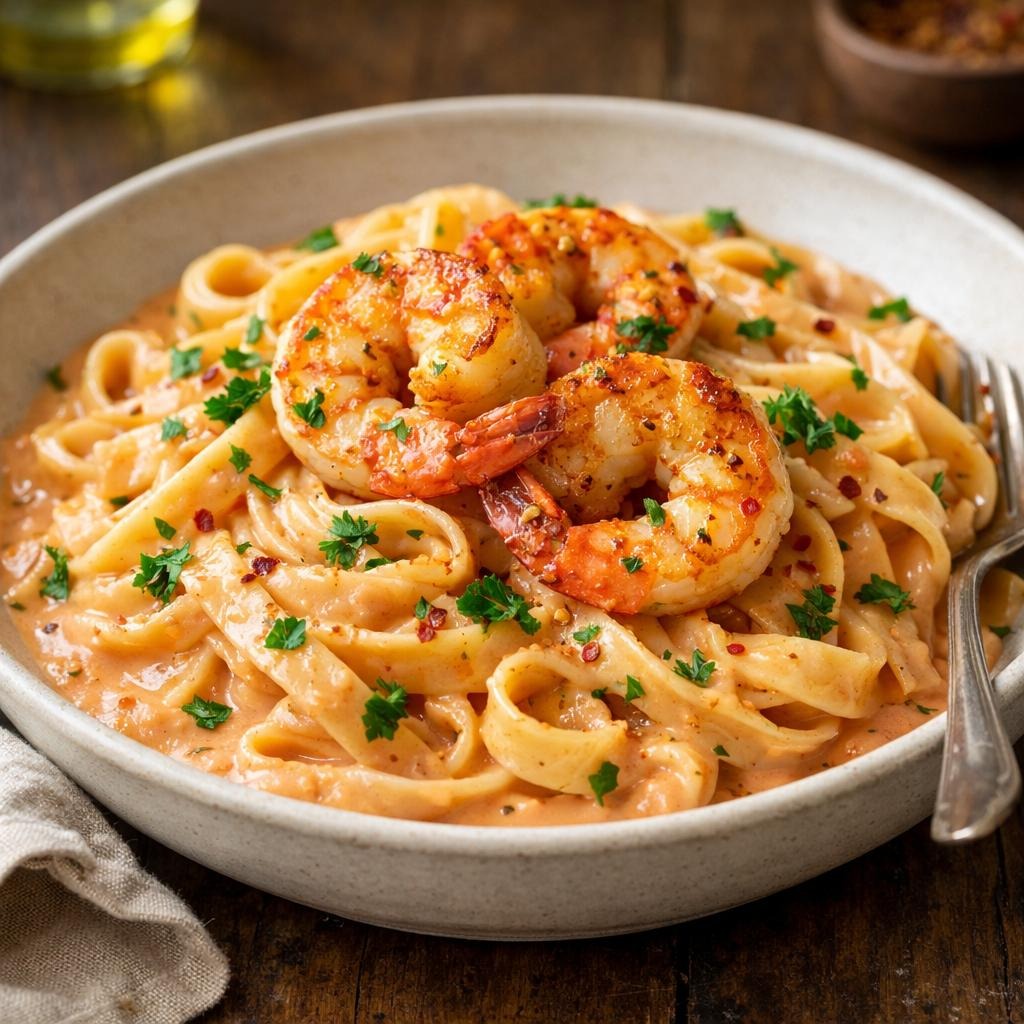
1. Cajun Shrimp Pasta
Add 1 to 2 teaspoons of Cajun seasoning when preparing the shrimp. This creates a spicy, smoky version with bold flavor.

2. Shrimp Fettuccine Alfredo
For a classic shrimp Alfredo pasta, use fettuccine and increase the Parmesan slightly. You can omit the onion and broth for a simpler Alfredo-style sauce.
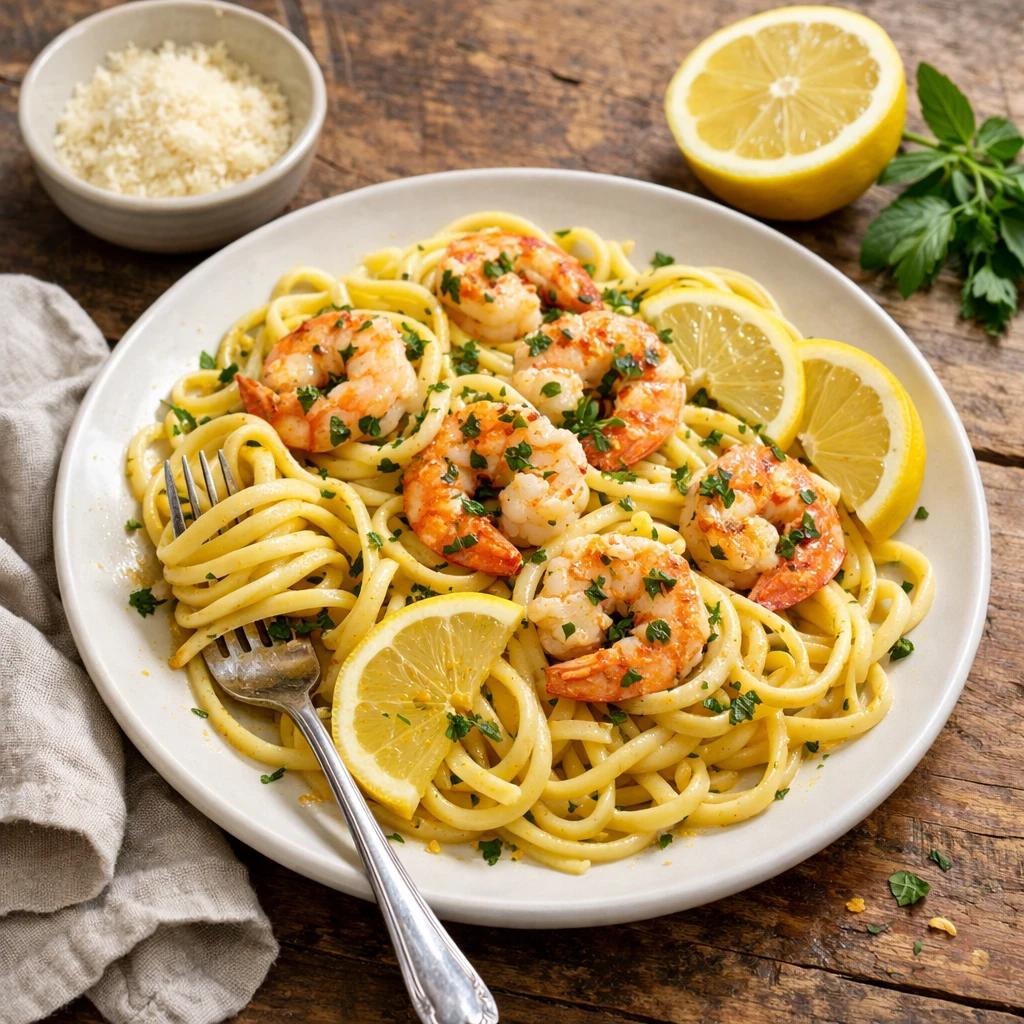
3. Lemon Garlic Shrimp Pasta
Add extra lemon zest, fresh lemon juice, and garlic. This lighter-tasting option balances the richness of the cream.

4. Shrimp and Broccoli Pasta
Stir steamed broccoli into the finished pasta for added color, texture, and vegetables.
You can also explore shrimp scampi pasta for a garlic and butter-based dish, shrimp carbonara for an egg-and-cheese sauce, or garlic prawn pasta for a seafood dinner inspired by Italian flavors. For a spicy tomato option, try arrabbiata shrimp instead.
Serving Suggestions for Creamy Shrimp Pasta
Serve this hot pasta with straightforward sides that go well with its flavorful sauce.
- Garlic bread: Perfect for soaking up extra Parmesan cream sauce.
- Green salad: A crisp contrast is created by a fresh salad dressed with lemon.
- Roasted broccoli: A savory vegetable side that pairs naturally with shrimp.
- Green salad: A crisp contrast is created by a fresh salad dressed with lemon.
- Roasted cherry tomatoes: Bring sweetness and acidity to the plate.
For a restaurant-inspired dinner, serve the pasta in warm bowls with extra Parmesan and chopped parsley.
Storage and Reheating
Refrigeration: Allow leftovers to cool, then store them in an airtight container in the refrigerator for up to two days.
Reheating: Gently reheat the pasta with a little milk, cream, or broth in a skillet over low heat. Until well hot, stir often. Another option is to use a microwave for brief periods of time, stirring in between.
Freezing: Freezing is not recommended because the cream sauce may separate and the shrimp can lose their tender texture.
For the best results, cook only as much as you expect to eat and enjoy the pasta freshly made.
Common Mistakes to Avoid
- If the shrimp are overcooked, take them out as soon as they are thoroughly cooked.
- Using high heat for the sauce: Gentle heat helps keep the cream and cheese smooth.
- Skipping the pasta water: It can help bring a thick sauce back to the right consistency.
- Adding all the cheese at once: Stir it in gradually over low heat.
- Making the sauce too thick: Add a little broth or pasta water until it coats the noodles easily.
- Adding too much salt early: Parmesan is naturally salty, so taste the sauce before adding more.
Frequently Asked Questions About Creamy Shrimp Pasta
1. Can I use frozen shrimp for creamy shrimp pasta?
Yes. You can thaw frozen shrimp in the refrigerator or in a sealed bag submerged in cold water overnight. Drain and pat dry before seasoning and cooking.
2. What pasta is best for shrimp Alfredo?
Fettuccine is a classic choice because its wide noodles hold creamy sauce well. Linguine, spaghetti, and penne are also excellent options.
3. Can I make creamy shrimp pasta without heavy cream?
Yes. Half-and-half can create a lighter sauce, although it may be thinner. To help thicken the sauce, you can also use milk and a tiny bit of flour.
4. How do I keep the Alfredo sauce from separating?
Keep the heat low after adding Parmesan, avoid boiling the finished sauce, and stir gently. Add a little reserved pasta water if needed.
5. Is creamy shrimp pasta the same as shrimp scampi pasta?
No. Creamy shrimp pasta typically uses a cream and Parmesan sauce. Traditional shrimp scampi pasta usually features garlic, butter, olive oil, lemon, and sometimes white wine, without a heavy cream base.
Nutrition Information (Approximate)

Assuming four servings from the recipe, the following estimates are per serving.
| Nutrient | Approximate Amount |
| Calories | 650 kcal |
| Protein | 38 g |
| Carbohydrates | 57 g |
| Fat | 29 g |
| Saturated Fat | 16 g |
| Fiber | 3 g |
| Sodium | 650 mg |
Actual nutrition will vary depending on the pasta brand, shrimp size, Parmesan, broth, and amount of salt used.
Recipe Card: Creamy Shrimp Pasta

- PREP TIME
- 10 minutes
- COOK TIME
- 20 minutes
- SERVINGS
4
Ingredients
- 12 oz fettuccine
- 1 lb peeled and deveined shrimp
- 1 tbsp olive oil
- 2 tbsp butter
- 4 garlic cloves, minced
- 1 small onion, chopped
- 1 cup heavy cream
- ¾ cup grated Parmesan
- ¼ cup broth
- ½ tsp paprika
- Salt and black pepper to taste
- 1 to 2 tsp lemon juice
- 2 tbsp fresh parsley
- Up to ½ cup reserved pasta water
Instructions
- Cook fettuccine until al dente. Reserve pasta water and drain.
- Season shrimp with paprika, salt, and pepper. Sauté in olive oil until pink and opaque. Set aside.
- Melt butter in the skillet. Cook onion until soft, then add garlic.
- Add broth and heavy cream. Simmer gently, then stir in Parmesan.
- Toss the pasta and shrimp in the sauce. Adjust consistency with pasta water.
- Finish with lemon juice and parsley. Serve with extra Parmesan.
Copy Recipe
Conclusion
This Creamy Shrimp Pasta is an easy, satisfying dinner that combines juicy shrimp, tender noodles, and a rich garlic Parmesan sauce. With a few everyday ingredients and about 30 minutes, you can prepare a meal that feels special without complicated cooking.
For optimal flavor, keep the heat low, do not overcook the shrimp, and garnish with fresh parsley and lemon. Whether you prefer classic shrimp Alfredo, spicy Cajun shrimp pasta, or a bright lemon garlic variation, this recipe is easy to adapt to your taste. Serve it fresh with garlic bread or a crisp salad for a delicious homemade dinner.

A Baked Ziti Recipe is a wonderful choice when you want a warm, filling dinner without the extra work of making lasagna. Tender pasta, rich tomato sauce, seasoned meat, and layers of melted cheese come together in one baking dish. Every serving is hearty, comforting, and full of flavor.
This homemade version combines a savory meat sauce with creamy ricotta, mozzarella, and Parmesan. You can prepare it with ground beef, Italian sausage, or a mixture of both. It is easy enough for a busy weeknight and satisfying enough for a family gathering. Best of all, you can assemble it ahead of time and bake it when you are ready to eat.
Why You’ll Love This Baked Ziti Recipe
- Easy to prepare: Cook the pasta and sauce, assemble the ingredients, and let the oven finish the job.
- Rich meat sauce: Tomatoes, garlic, onion, and Italian seasonings create a flavorful base.
- Cheesy and creamy: Ricotta adds softness, while mozzarella melts into a golden topping.
- Flexible ingredients: Use ziti, penne, or rigatoni depending on what you have available.
- Great for meal prep: Prepare it ahead, refrigerate it, or freeze portions for another day.
- Family-friendly: Adjust the spices and choose your preferred meat to suit different tastes.
Ingredients for Homemade Baked Ziti Recipe
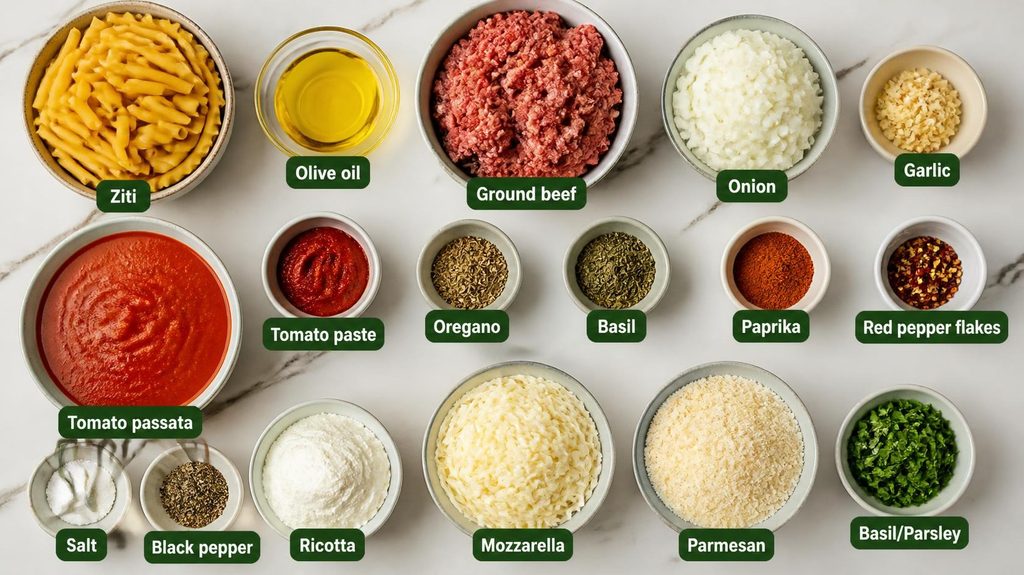
This recipe makes approximately six servings.
| Ingredient | Quantity |
| Ziti pasta or penne | 12 oz (340 g) |
| Olive oil | 1 tbsp |
| Ground beef | 1 lb (450 g) |
| Onion, finely chopped | 1 medium |
| Garlic, minced | 3 cloves |
| Tomato passata or crushed tomatoes | 24 oz (680 g) |
| Tomato paste | 2 tbsp |
| Dried oregano | 1 tsp |
| Dried basil | 1 tsp |
| Paprika | 1 tsp |
| Red pepper flakes | ¼ tsp, optional |
| Salt | ¾ tsp, or to taste |
| Black pepper | ½ tsp |
| Ricotta cheese | 1 cup (250 g) |
| Shredded mozzarella cheese | 2 cups (200 g) |
| Grated Parmesan cheese | ½ cup (45 g) |
| Fresh basil or parsley | 2 tbsp, optional |
Ingredient Notes
- Pasta: Ziti is traditional, but penne and rigatoni are excellent alternatives. Their shape makes them easy to coat with sauce.
- Ground beef: Choose lean ground beef for a balanced sauce. Drain excess fat after browning if needed.
- Tomato sauce: Passata gives the sauce a smooth texture. If using crushed tomatoes, simmer the sauce until it thickens.
- Cheese: Whole-milk ricotta creates a creamy center. Low-moisture mozzarella melts well without releasing too much water.
- Seasonings: Basil, oregano, and paprika add flavor. Adjust the red pepper flakes to control the heat.
Equipment Needed for Baked Ziti Recipe
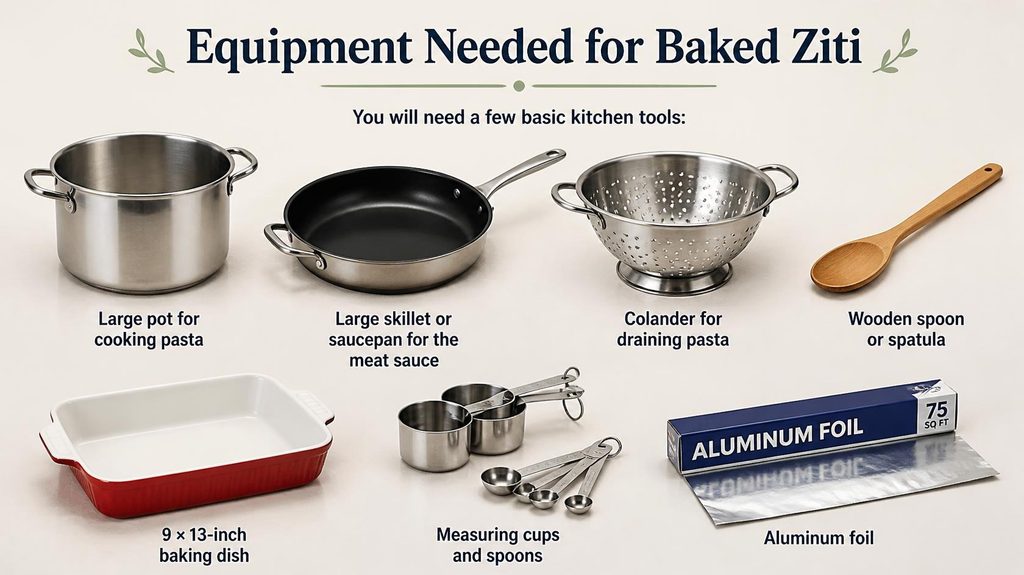
You will need a few basic kitchen tools:
- Large pot for cooking pasta
- Large skillet or saucepan for the meat sauce
- Colander for draining pasta
- Wooden spoon or spatula
- 9 × 13-inch baking dish
- Measuring cups and spoons
- Aluminum foil
Step-by-Step Instructions for Baked Ziti Recipe
Step 1: Cook the Pasta
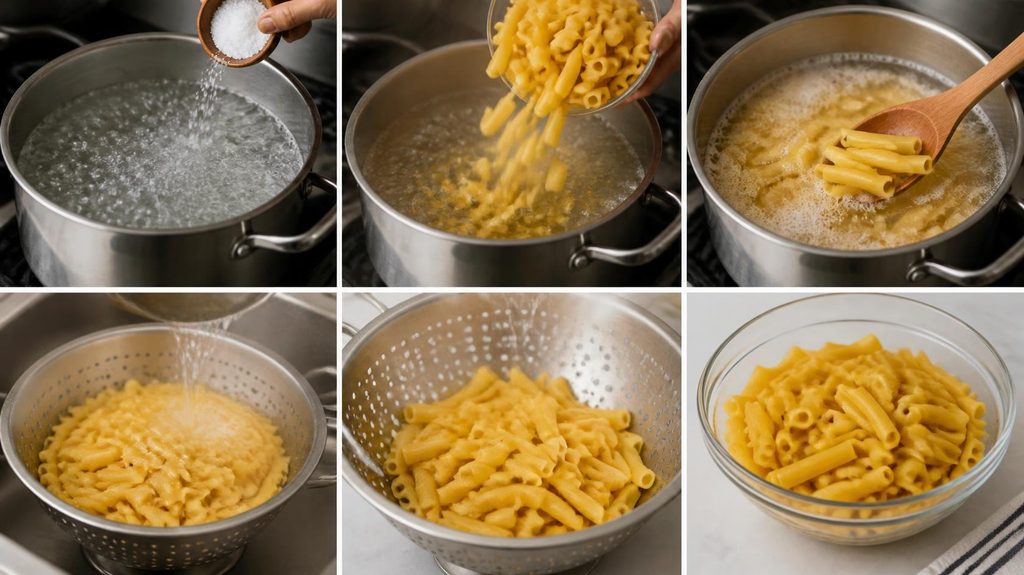
Heat a big pot of salted water till it boils. Add the ziti and cook it for about two minutes less than the package instructions recommend. The pasta should be slightly firm because it will continue cooking in the oven.
Drain well and set aside. Avoid overcooking the pasta, as soft noodles can become mushy after baking.
Step 2: Prepare the Meat Sauce
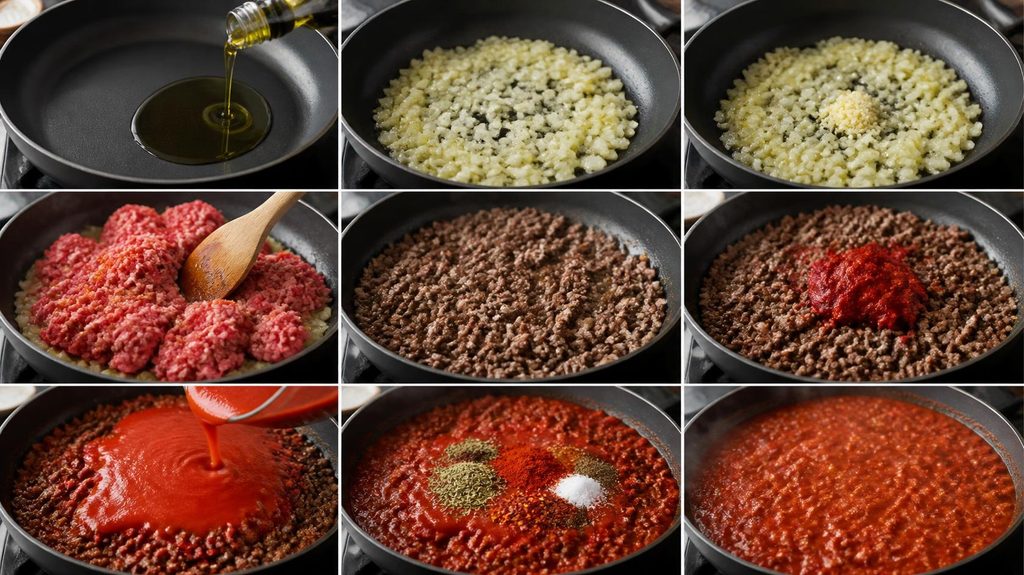
Set a large skillet over medium heat, then pour in the olive oil. Add the chopped onion and cook for three to four minutes until softened. Stir in the garlic and cook for another 30 seconds.
Add the ground beef and break it into small pieces with a wooden spoon. Cook until browned and no pink remains. Drain excess fat if necessary.
Stir in the tomato paste, passata, oregano, basil, paprika, salt, black pepper, and optional red pepper flakes. Bring the sauce to a gentle simmer and cook for 15–20 minutes, stirring occasionally, until thick and flavorful.
Step 3: Combine the Pasta and Sauce
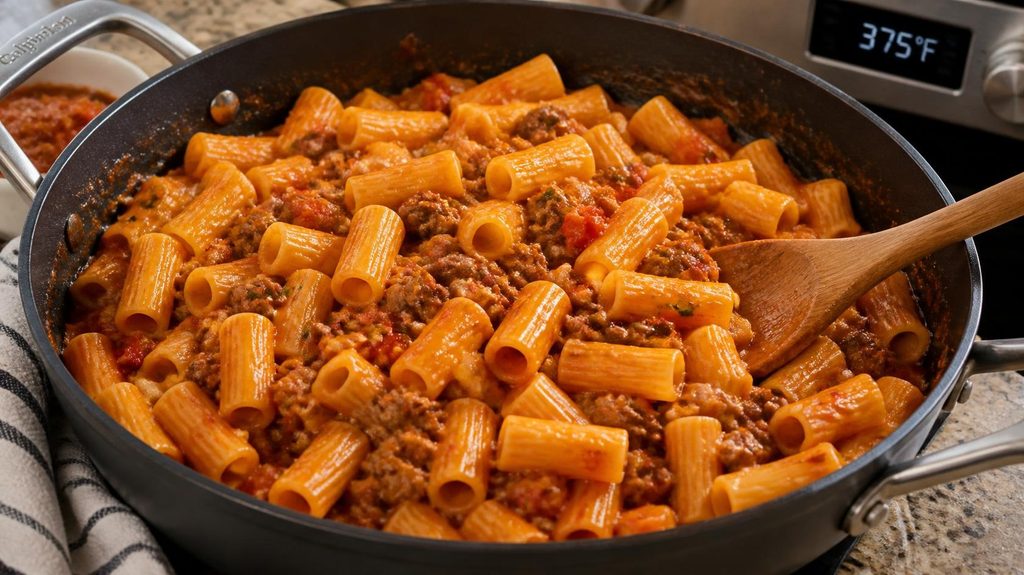
Preheat your oven to 375°F (190°C).
Add the drained pasta to the skillet if it is large enough, or combine it in a mixing bowl. Stir until the beef sauce coats the pasta evenly. Reserve a little sauce for the top if desired.
Step 4: Add the Cheese
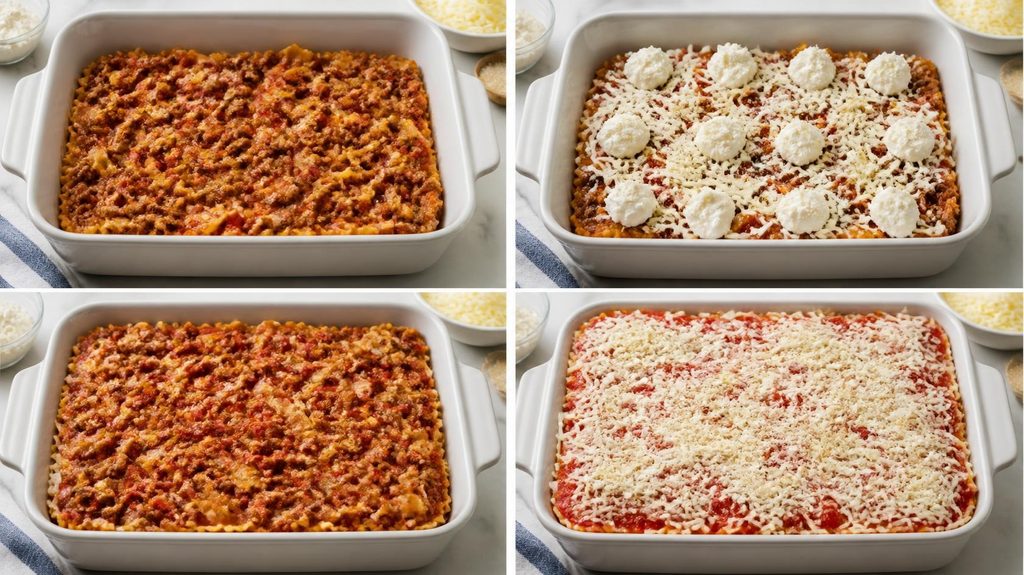
Fill the baking dish with half of the pasta mixture. Spoon small portions of ricotta over the pasta and sprinkle with some mozzarella and Parmesan.
Add the remaining pasta, followed by the reserved sauce. Finish with the remaining mozzarella and Parmesan to create a cheesy topping.
Step 5: Bake Until Golden
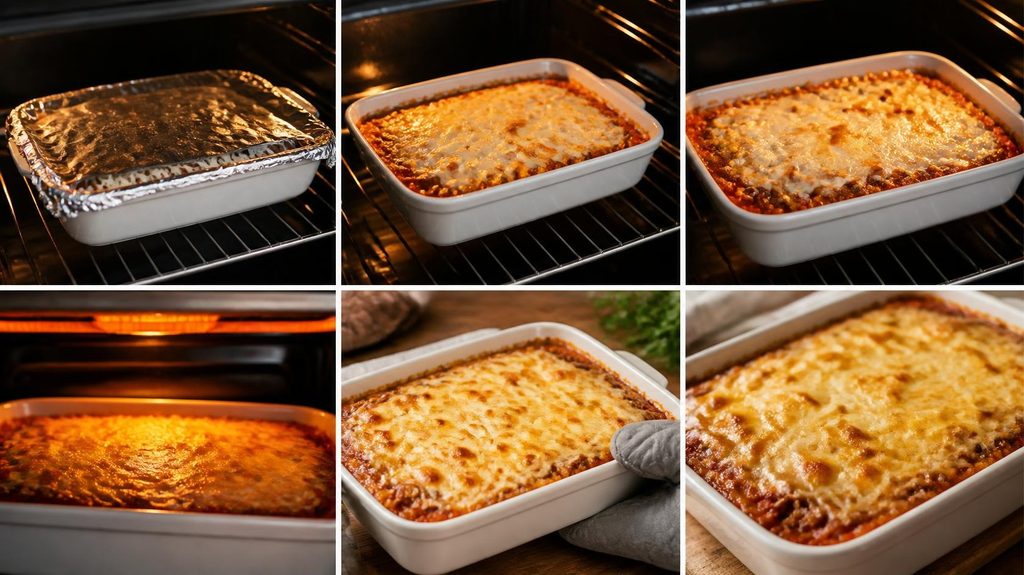
After loosely covering the dish with aluminum foil, bake it for twenty minutes. Remove the foil and bake for another 10–15 minutes, until the cheese has melted and the edges are bubbling.
For a more golden top, broil briefly at the end, watching carefully to prevent burning.
Step 6: Rest and Serve
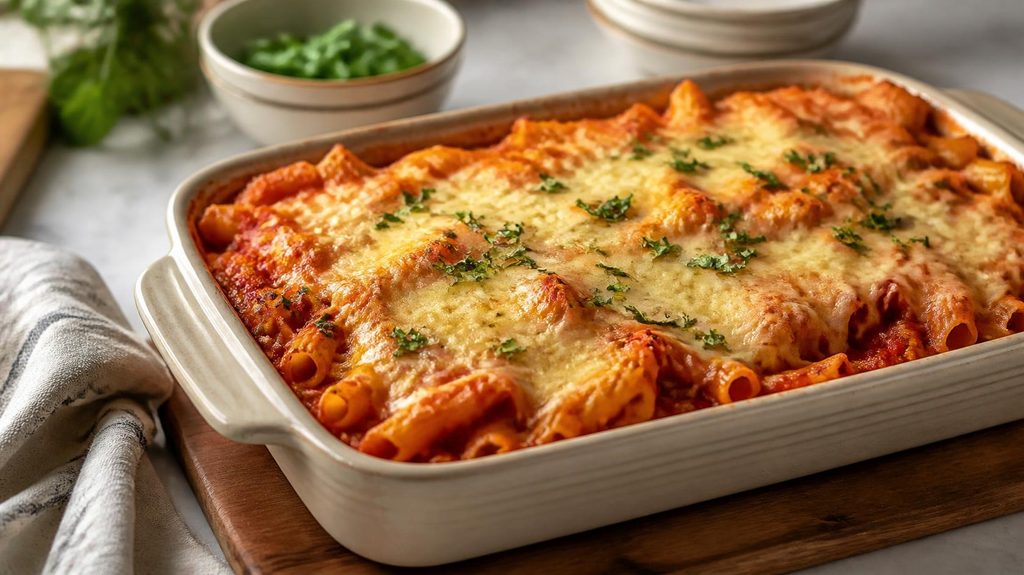
After removing the baked ziti from the oven, let it rest for 5 to 10 minutes before serving. This helps the cheese and sauce settle, making it easier to cut and serve without falling apart. Sprinkle with fresh basil or parsley, then serve while warm.
Expert Tips for Cheesy Baked Ziti Recipe
- Cook the pasta until just firm: Slightly undercooked pasta holds its shape during baking.
- Make a thick sauce: A watery sauce can leave the casserole loose. Simmer it until it coats the back of a spoon.
- Season the sauce properly: Taste before assembling and adjust the salt, pepper, and herbs.
- Use enough sauce: Pasta absorbs liquid as it bakes, so make sure every piece is coated.
- Grate cheese fresh when possible: Freshly grated Parmesan melts smoothly and adds a savory finish.
- Let it rest: A short resting period makes the casserole easier to serve without losing its structure.
Recipe Variations for Baked Ziti Recipe
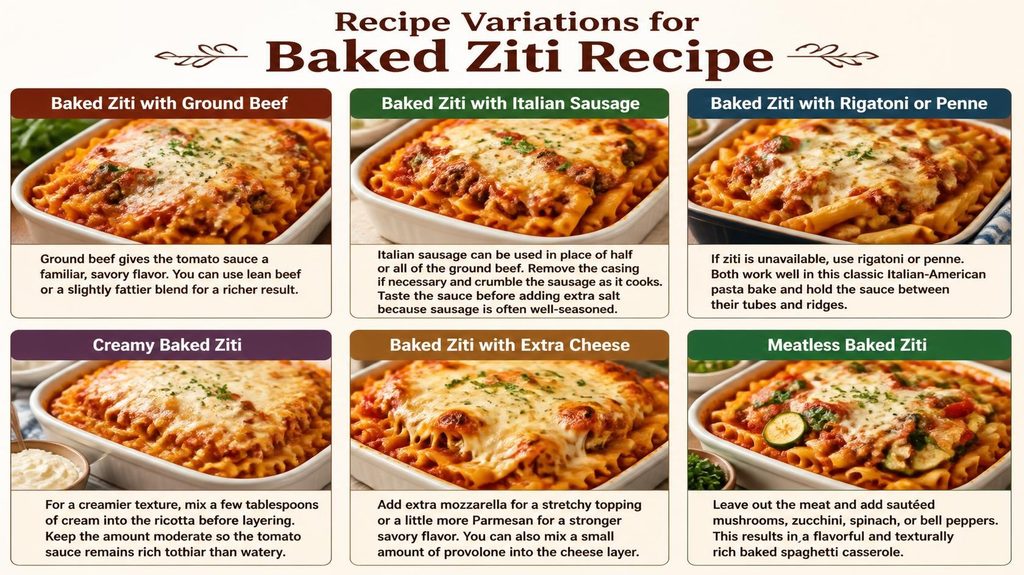
Baked Ziti with Ground Beef
Ground beef gives the tomato sauce a familiar, savory flavor. You can use lean beef or a slightly fattier blend for a richer result.
Baked Ziti with Italian Sausage
Italian sausage can be used in place of half or all of the ground beef. Remove the casing if necessary and crumble the sausage as it cooks. Taste the sauce before adding extra salt because sausage is often well-seasoned.
Baked Ziti with Rigatoni or Penne
If ziti is unavailable, use rigatoni or penne. Both work well in this classic Italian-American pasta bake and hold the sauce between their tubes and ridges.
Creamy Baked Ziti
For a creamier texture, mix a few tablespoons of cream into the ricotta before layering. Keep the amount moderate so the tomato sauce remains rich rather than watery.
Baked Ziti with Extra Cheese
Add extra mozzarella for a stretchy topping or a little more Parmesan for a stronger savory flavor. You can also mix a small amount of provolone into the cheese layer.
Meatless Baked Ziti
Leave out the meat and add sautéed mushrooms, zucchini, spinach, or bell peppers. This results in a flavorful and texturally rich baked spaghetti casserole.
Serving Suggestions for Baked Ziti Recipe
Since this dish is rich and filling, serve it with simple sides that bring freshness to the meal.
- Garlic bread or toasted baguette
- Green salad with a light vinaigrette
- Cherry tomato salad with fresh basil
- Steamed broccoli or green beans
- Roasted zucchini or bell peppers
For a complete family dinner, pair a generous portion of baked ziti with a green salad and warm garlic bread.
Storage and Reheating Baked Ziti Recipe
Refrigeration: Place leftovers in an airtight container after letting them cool. Use within three to four days after refrigerating for two hours.
Freezing: Store individual portions in freezer-safe containers for up to three months for best quality. Label them with the date.
Oven reheating: Place a portion in an oven-safe dish, cover with foil, and heat at 350°F (175°C) until steaming hot throughout. Add a spoonful of water or tomato sauce if it seems dry.
Microwave reheating: Cover loosely and heat in short intervals, stirring where possible, until hot throughout.
Make-ahead option: Assemble the casserole, cover, and refrigerate before baking. Allow extra baking time if it goes into the oven cold, and check that the center is thoroughly heated.
Common Mistakes to Avoid For Baked Ziti Recipe
- Overcooking the pasta: This can make the finished dish too soft.
- Using watery tomato sauce: Reduce the sauce before assembling the casserole.
- Adding too little seasoning: Pasta and cheese need a well-seasoned sauce to taste their best.
- Using too much wet cheese: Excess moisture can affect the casserole’s texture. Drain very wet ricotta if necessary.
- The cheese may brown before the middle heats through if it is baked uncovered the entire time. Cover first, then uncover to finish.
- Cutting immediately: Let the casserole rest so the sauce settles and portions hold together better.
Frequently Asked Questions About Baked Ziti Recipe
1. What is baked ziti?
A baked ziti recipe is an Italian-American pasta casserole made with tube-shaped pasta, tomato sauce, and cheese. Many versions include ground meat, ricotta, mozzarella, and Parmesan.
2. Can I make a baked ziti recipe without ricotta?
Yes. You can omit ricotta or replace it with small dollops of cottage cheese or a mild cream cheese mixture. The food will still be excellent despite a little alteration in texture.
3. Can I use penne instead of ziti?
Absolutely. Penne is a convenient substitute, and rigatoni also works well. Cook the pasta until slightly firm before baking.
4. Why is my baked ziti recipe dry?
The pasta may have absorbed too much liquid, or the sauce may have been too thick before baking. Coat the pasta generously with sauce and cover the dish during the first part of baking.
5. Can I prepare baked ziti recipe ahead of time?
Yes. Before baking, assemble the dish, cover it, and place it in the refrigerator. Bake it when needed, allowing extra time for a chilled casserole to heat through.
Nutrition Information for Baked Ziti Recipe
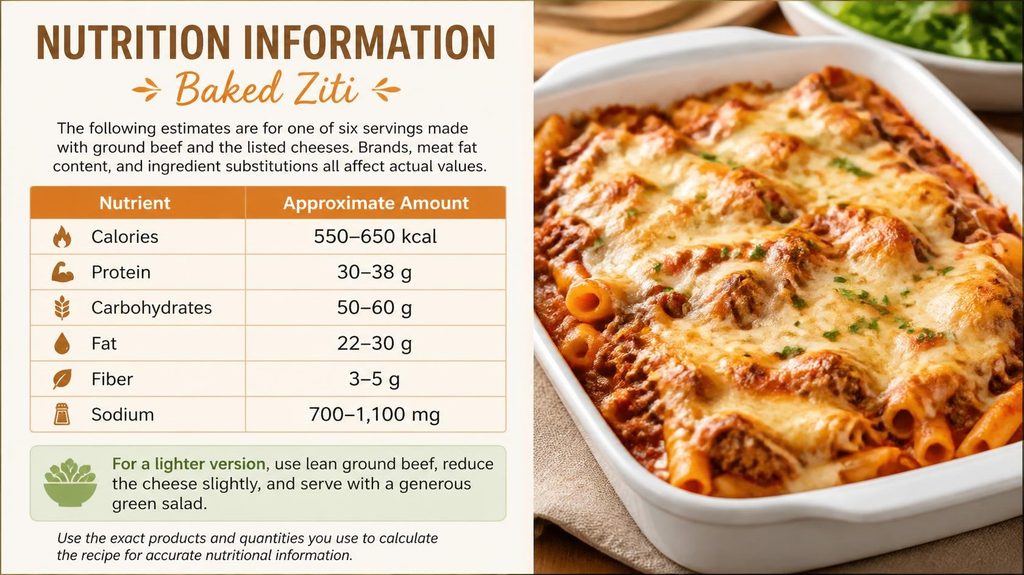
The following estimates are for one of six servings made with ground beef and the listed cheeses. Brands, meat fat content, and ingredient substitutions all affect actual values.
| Nutrient | Approximate Amount |
| Calories | 550–650 kcal |
| Protein | 30–38 g |
| Carbohydrates | 50–60 g |
| Fat | 22–30 g |
| Fiber | 3–5 g |
| Sodium | 700–1,100 mg |
For a lighter version, use lean ground beef, reduce the cheese slightly, and serve with a generous green salad. Use the exact products and quantities you use to calculate the recipe for accurate nutritional information.
Recipe Card: Easy Baked Ziti Recipe
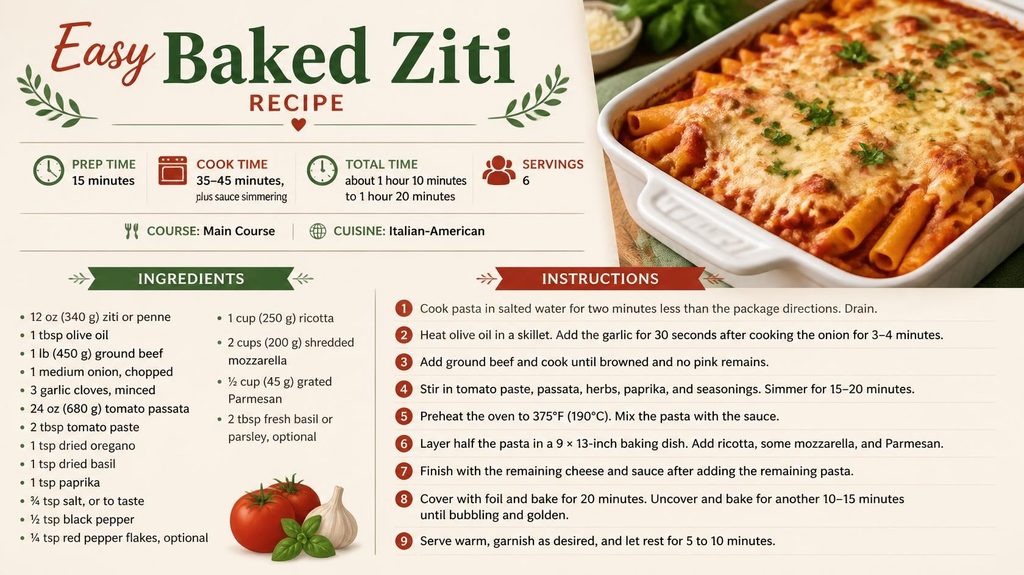
Prep Time: 15 minutes
Cook Time: 35–45 minutes, plus sauce simmering
Total time: about 1 hour 10 minutes to 1 hour 20 minutes.
Servings: 6
Course: Main Course
Cuisine: Italian-American
Ingredients
- 12 oz (340 g) ziti or penne
- 1 tbsp olive oil
- 1 lb (450 g) ground beef
- 1 medium onion, chopped
- 3 garlic cloves, minced
- 24 oz (680 g) tomato passata
- 2 tbsp tomato paste
- 1 tsp dried oregano
- 1 tsp dried basil
- 1 tsp paprika
- ¾ tsp salt, or to taste
- ½ tsp black pepper
- ¼ tsp red pepper flakes, optional
- 1 cup (250 g) ricotta
- 2 cups (200 g) shredded mozzarella
- ½ cup (45 g) grated Parmesan
- 2 tbsp fresh basil or parsley, optional
Instructions
- Cook pasta in salted water for two minutes less than the package directions. Drain.
- Heat olive oil in a skillet. Add the garlic for 30 seconds after cooking the onion for 3–4 minutes.
- Add ground beef and cook until browned and no pink remains.
- Stir in tomato paste, passata, herbs, paprika, and seasonings. Simmer for 15–20 minutes.
- Preheat the oven to 375°F (190°C). Mix the pasta with the sauce.
- Layer half the pasta in a 9 × 13-inch baking dish. Add ricotta, some mozzarella, and Parmesan.
- Finish with the remaining cheese and sauce after adding the remaining pasta.
- Cover with foil and bake for 20 minutes. Uncover and bake for another 10–15 minutes until bubbling and golden.
- Serve warm, garnish as desired, and let rest for 5 to 10 minutes.
Conclusion
This Baked Ziti Recipe brings together tender pasta, a rich homemade meat sauce, creamy ricotta, and a golden layer of melted cheese. It is simple to customize with ground beef, Italian sausage, penne, or rigatoni, making it a useful recipe for different tastes and occasions.
Prepare it for a relaxed family dinner, make it ahead for a busy evening, or freeze portions for future meals. With a well-seasoned tomato sauce and properly cooked pasta, this homemade baked ziti recipe can become a comforting favorite in your regular dinner rotation.
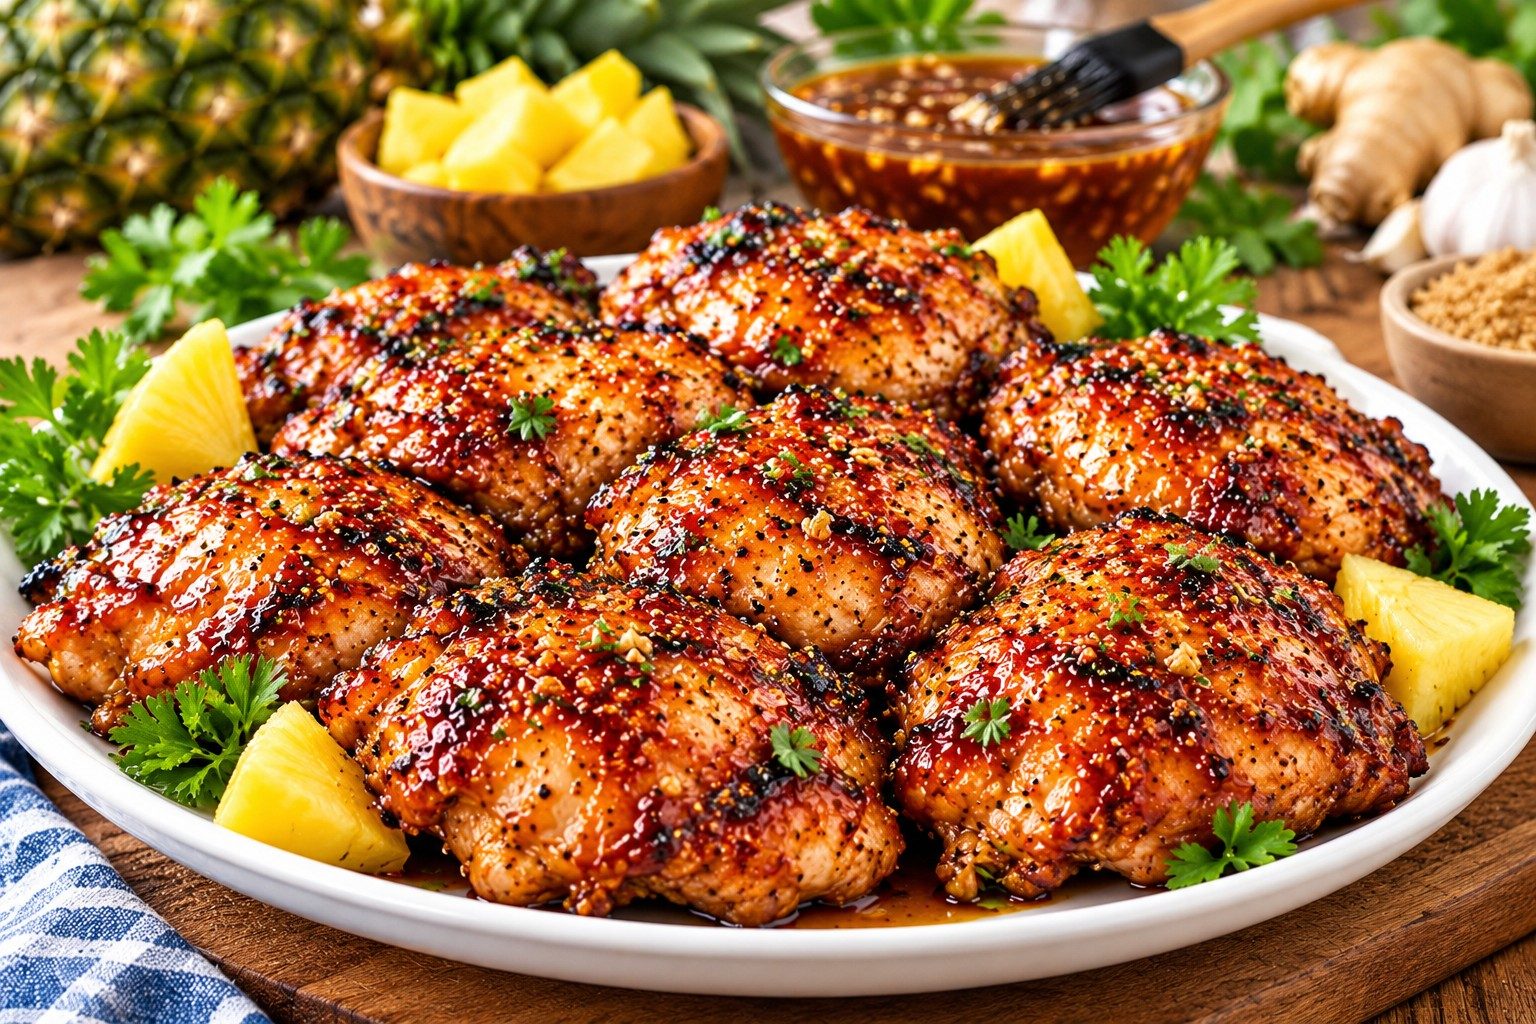
Introduction: Easy Huli Huli Chicken Recipe
This Easy Huli Huli Chicken recipe brings sweet, savory, and slightly spicy Hawaiian-inspired flavors to your dinner table. The chicken is coated in a homemade marinade made with pineapple juice, soy sauce, brown sugar, garlic, and fresh ginger. As it cooks, the marinade develops into a rich, sticky glaze that makes every bite delicious.
You can prepare this dish on an outdoor grill, a stovetop grill pan, or in the oven. Whether you are planning a summer barbecue or an easy family dinner, this recipe offers plenty of flavor without complicated cooking steps. With a little preparation and a few everyday ingredients, you can make tender, juicy chicken that pairs beautifully with rice and fresh vegetables.
Why You’ll Love This Huli Huli Chicken Recipe
- Sweet and savory flavor: Pineapple juice and brown sugar balance the salty, rich taste of soy sauce.
- Simple ingredients: Most ingredients are easy to find at your local grocery store.
- Flexible cooking methods: Make grilled chicken or try an oven-baked version.
- Great for meal prep: Marinate the chicken ahead of time for a convenient dinner.
- Easy to customize: Adjust the spice level, sweetness, and chicken cuts to suit your taste.
Ingredients for Huli Huli Chicken Recipe
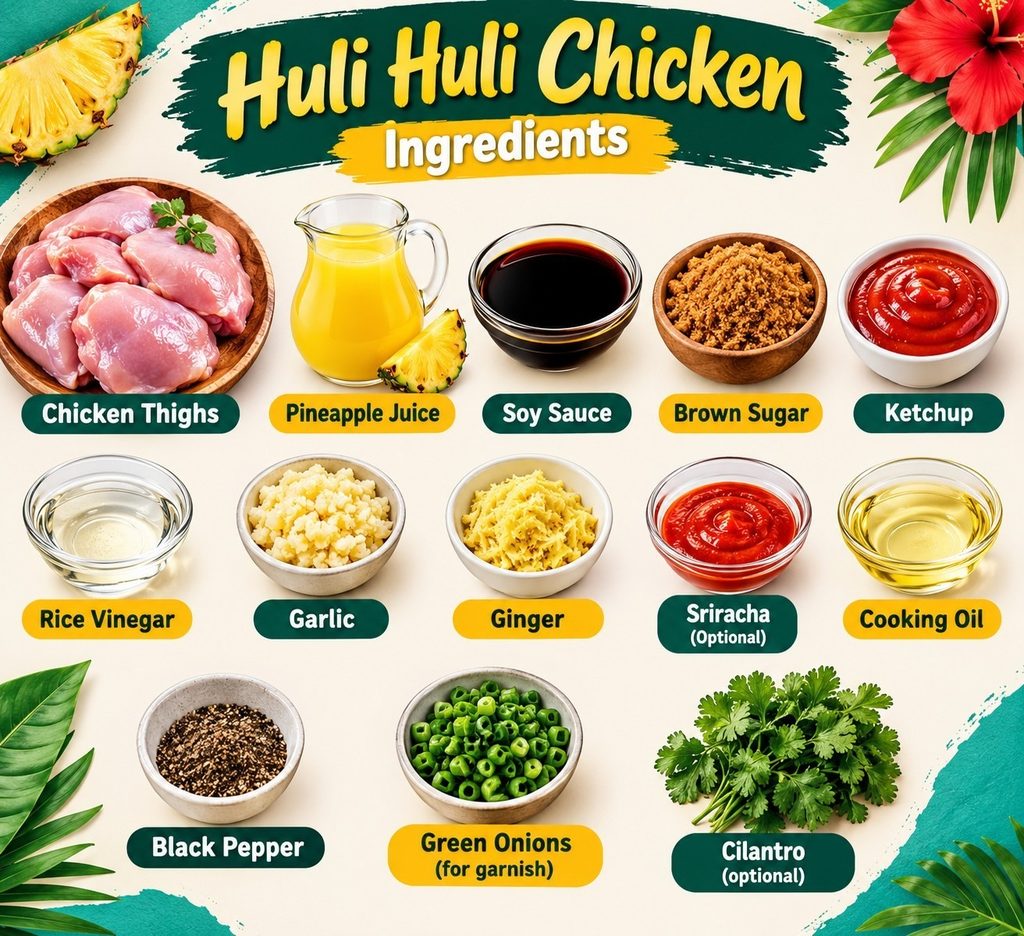
This recipe serves four people and uses boneless, skinless chicken thighs for a juicy result.
- 2 pounds (900 g) boneless, skinless chicken thighs
- 1 cup pineapple juice
- ¼ cup reduced-sodium soy sauce
- ¼ cup brown sugar, packed
- ¼ cup ketchup
- 2 tablespoons rice vinegar or white vinegar
- 3 garlic cloves, minced
- 1 tablespoon freshly grated ginger
- 1 tablespoon sriracha, optional
- 1 tablespoon neutral cooking oil, for grilling
- Black pepper, to taste
- 2 tablespoons chopped green onions, for garnish
- Fresh cilantro, optional
Ingredients for Homemade Huli Huli Chicken Marinade
The Homemade Huli Huli Chicken marinade combines fruit juice, salty soy sauce, sweet brown sugar, and aromatic seasonings. Pineapple juice adds a tropical taste, while ginger and garlic provide warmth and depth.
Use reduced-sodium soy sauce if you prefer better control over the saltiness. For a milder marinade, leave out the sriracha.
Equipment Needed for Huli Huli Chicken
- Mixing bowl
- Measuring cups and spoons
- Whisk
- Shallow dish or food-safe zip-top bag
- Grill or grill pan
- Tongs
- Instant-read meat thermometer
Step-by-Step Instructions: How to Make Huli Huli Chicken
Step 1: Prepare the Marinade
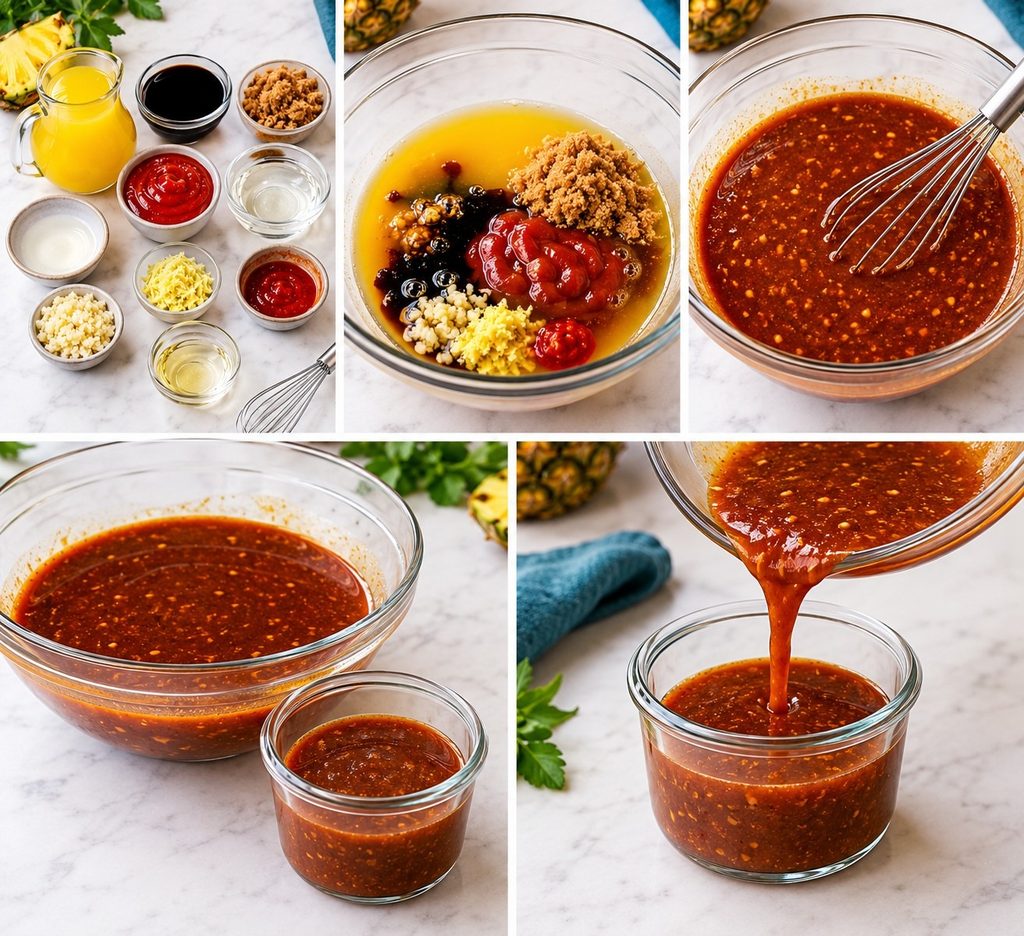
In a bowl, whisk together the pineapple juice, soy sauce, brown sugar, ketchup, vinegar, garlic, ginger, and optional sriracha. Stir until the sugar begins to dissolve.
Reserve a small portion of the marinade in a separate container before adding the raw chicken. Refrigerate it for later basting.
Step 2: Marinate the Chicken
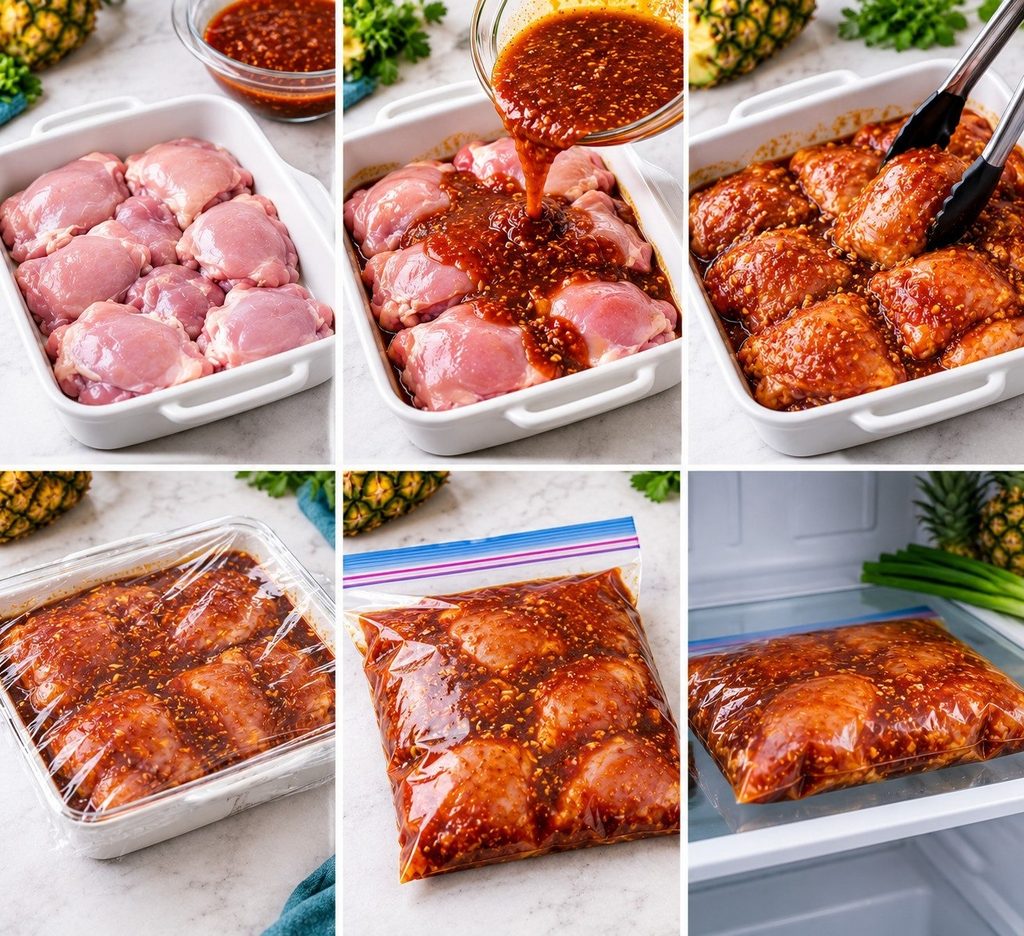
Place the chicken thighs in a shallow dish or food-safe bag. After adding the remaining marinade, flip the chicken pieces to ensure they are equally coated.
Cover and refrigerate for at least 30 minutes. Give it two to four hours to marinate for a richer taste. Avoid leaving the chicken in this acidic marinade for too long, as the texture can become soft.
Step 3: Preheat the Grill
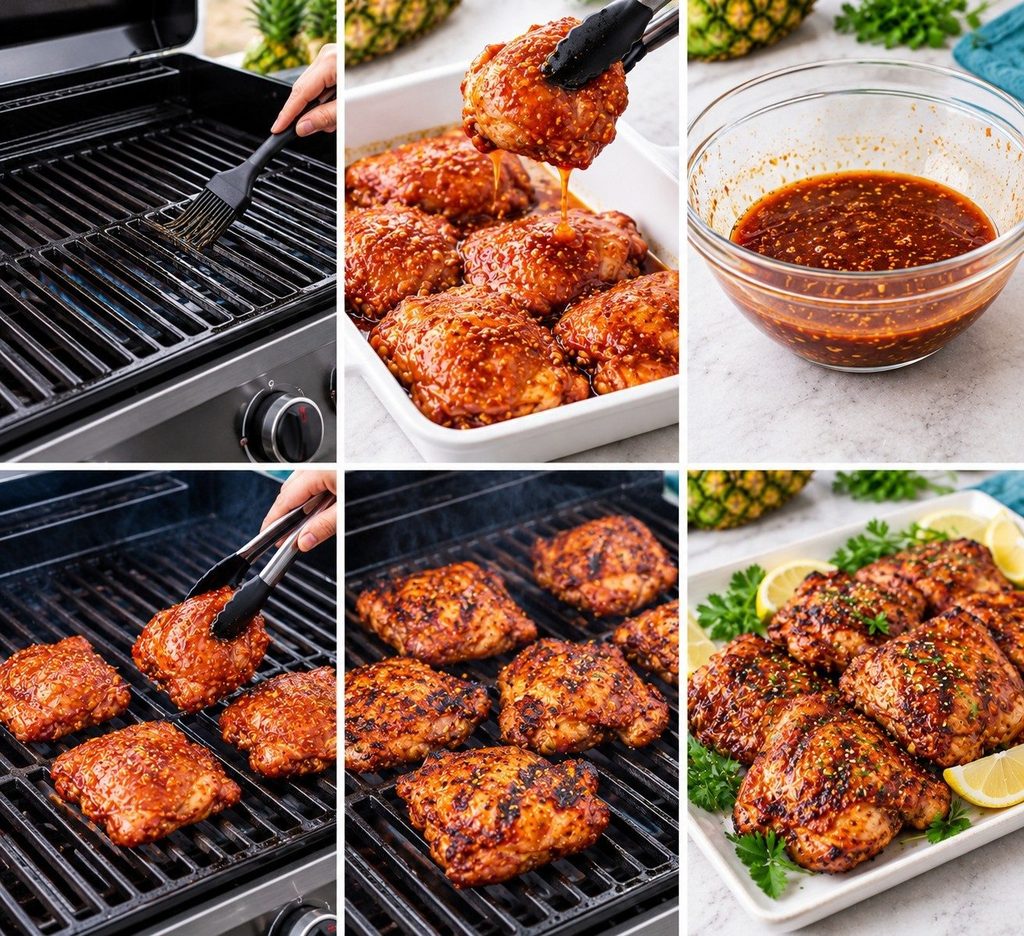
Heat an outdoor grill or grill pan to medium-high heat. Lightly oil the cooking surface to help prevent sticking.
Remove the chicken from the marinade and let the excess drip off. Discard the marinade that touched raw chicken.
Step 4: Cook Huli Huli Chicken Recipe on the Grill
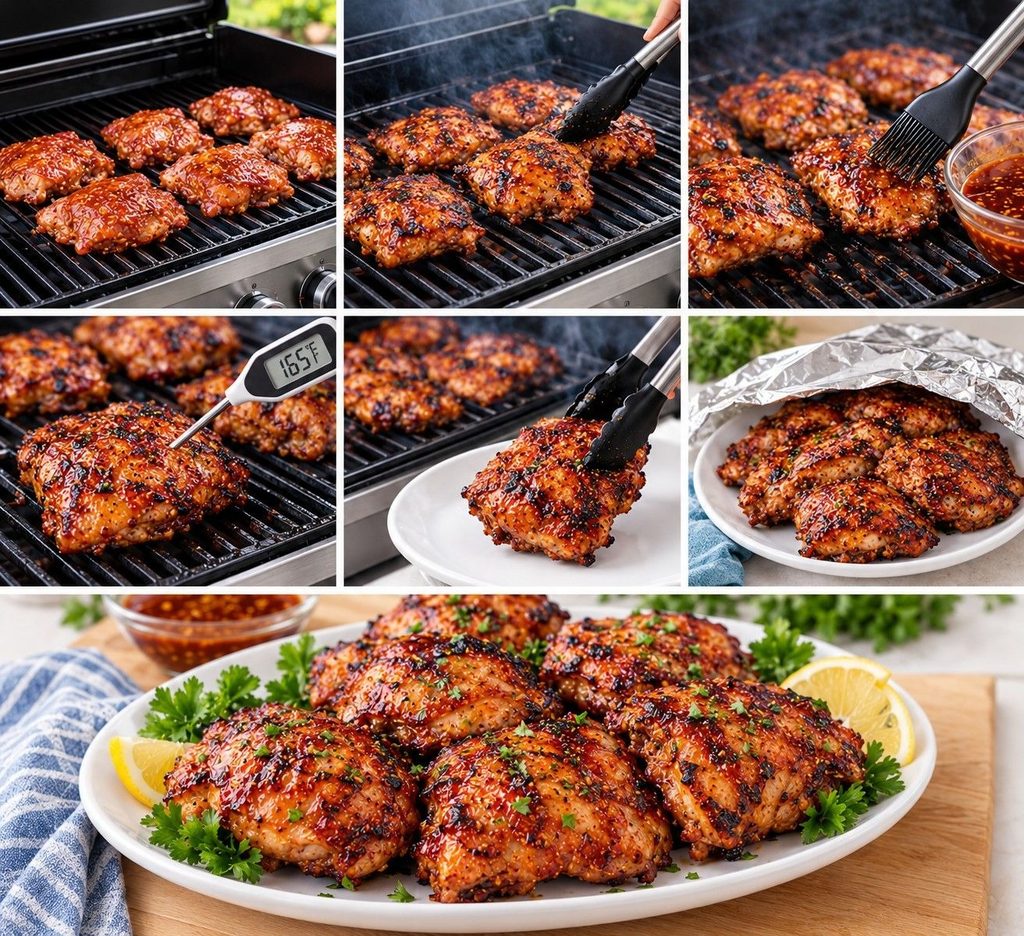
Place the chicken on the hot grill. Cook for approximately 5 to 7 minutes per side, depending on thickness.
Apply the marinade that was set aside to the chicken during the last few minutes. Watch carefully because the brown sugar can burn over high heat.
The chicken is ready when the thickest part reaches an internal temperature of 165°F (74°C). Transfer it to a clean plate and rest for 5 minutes before serving.
Step 5: Make Oven-Baked Huli Huli Chicken Recipe
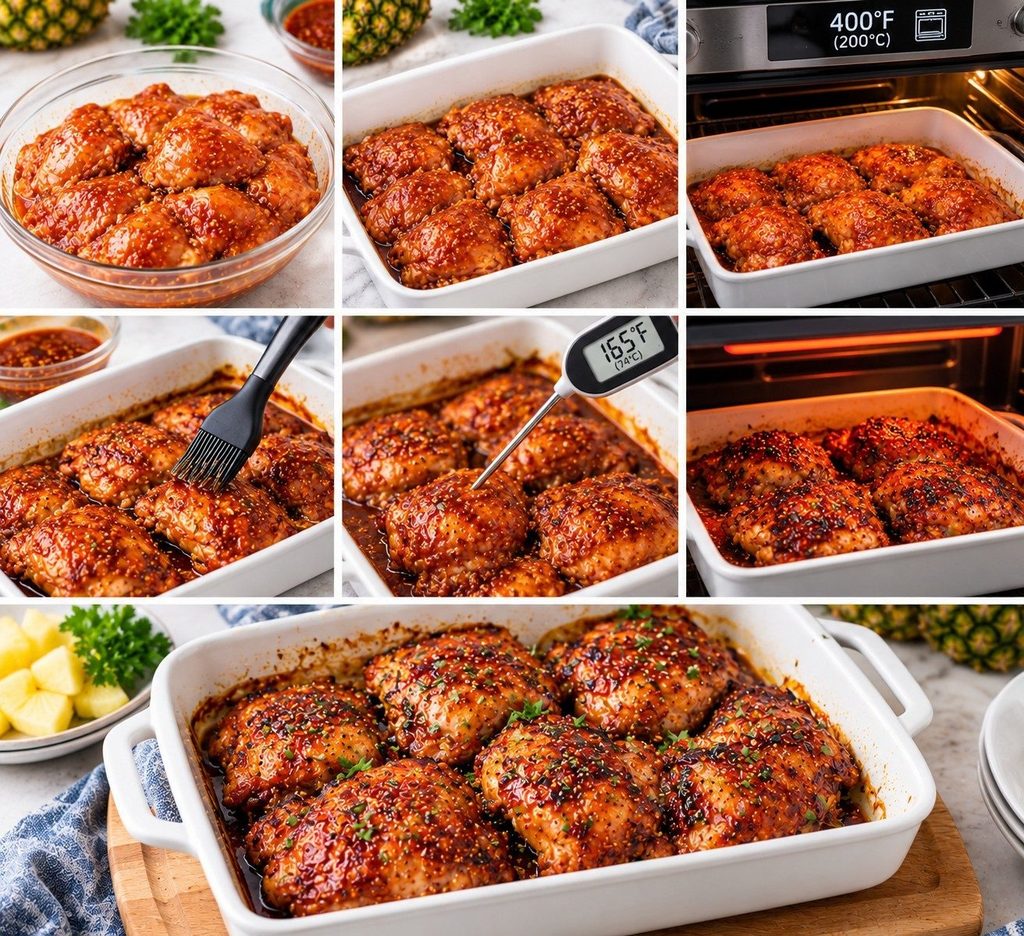
For Oven-Baked Huli Huli Chicken, preheat the oven to 400°F (200°C). Arrange the marinated chicken in a lightly greased baking dish and bake for approximately 20 to 30 minutes, depending on the thickness of the pieces.
In the last five to ten minutes, brush with the reserved marinade. Check the internal temperature with a meat thermometer, ensuring it reaches 165°F (74°C). For extra color, briefly broil the chicken while watching closely to prevent burning.
Expert Tips for the Best Huli Huli Chicken Recipe
- Choose the right chicken: Thighs are forgiving and remain juicy, making them ideal for grilling.
- Balance the flavors: Taste the unused marinade before adding the chicken and adjust the sweetness or spice if needed.
- Reserve fresh sauce: Never use raw-chicken marinade as a finishing glaze unless it has been brought to a full boil.
- Avoid excessive heat: Brown sugar caramelizes quickly, so moderate heat helps prevent a burnt exterior.
- Use a thermometer: Check the thickest part of each piece for reliable doneness.
Recipe Variations for Huli Huli Chicken recipe
Huli Huli Chicken Thighs Recipe
Chicken thighs work especially well because their higher fat content helps keep the meat moist. Bone-in thighs can also be used, but they generally need a longer cooking time.
Grilled Chicken with Pineapple Juice
For a stronger tropical flavor, serve the chicken with grilled pineapple rings. You can also replace part of the marinade’s pineapple juice with a little orange juice for a citrus twist.
Huli Huli Chicken with Brown Sugar and Soy Sauce
The combination of brown sugar and soy sauce creates the classic sweet-salty balance. Use dark brown sugar for a deeper molasses flavor or light brown sugar for a milder sweetness.
Spicy Hawaiian Chicken
For further spice, add a sprinkle of red pepper flakes or additional Sriracha. Reduce the amount if you prefer a family-friendly, mild version.
Serving Suggestions for Sweet and Savory Grilled Chicken
This Sweet and savory grilled chicken tastes excellent with simple side dishes that complement its bold glaze.
Try serving it with:
- Steamed white or brown rice
- Coconut rice
- Grilled pineapple and bell peppers
- Hawaiian-style macaroni salad
- Fresh cabbage slaw
- Roasted broccoli or green beans
For a complete meal, slice the chicken and serve it over rice with vegetables and a spoonful of freshly prepared sauce.
Common Mistakes to Avoid with Huli Huli Chicken recipe
- Skipping the marinade: Even a short marinating period helps the chicken absorb flavor.
- Overheating: Before the chicken cooks through, the sweet glaze may be burned by high heat.
- Overcooking the meat: Use a thermometer instead of relying only on cooking time.
- Reusing contaminated marinade: Keep the reserved sauce separate from the beginning.
- Cutting the chicken immediately: Resting for 5 minutes helps the juices settle before slicing.
Frequently Asked Questions About Huli Huli Chicken Recipe
1. What is Huli Huli Chicken?
Huli Huli Chicken is a Hawaiian-style chicken dish with a sweet, savory marinade and a grilled, glazed finish. The word “huli” means “turn” in Hawaiian, referring to turning the chicken while it cooks.
2. What makes the best Huli Huli sauce recipe?
The Best Huli Huli sauce recipe balances pineapple juice, soy sauce, brown sugar, garlic, ginger, and an acid like vinegar. Ketchup adds body, while optional sriracha provides heat.
3. Can I make Huli Huli Chicken recipe without a grill?
Yes. Bake it at 400°F (200°C) until the thickest part reaches 165°F (74°C). You can briefly broil it at the end for a more caramelized finish.
4. How long should I marinate Huli Huli Chicken?
Marinate for at least 30 minutes, although 2 to 4 hours usually provides more flavor. Keep the chicken refrigerated throughout marinating.
5. How do I store leftover Huli Huli Chicken?
Cool leftovers can be kept in the fridge for up to three or four days in an airtight container. Reheat until the center reaches 165°F (74°C). You can also freeze cooked chicken for longer storage.
Nutrition Information For Huli Huli Chicken Recipe
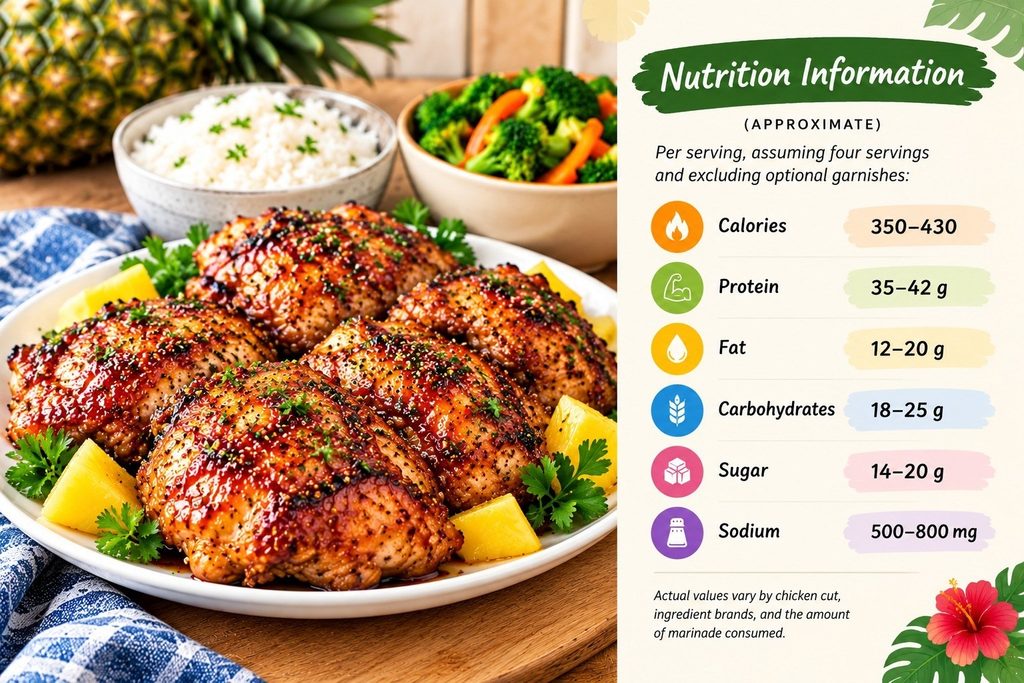
Per serving, assuming four servings and excluding optional garnishes:
- Calories: 350–430
- Protein: 35–42 g
- Fat: 12–20 g
- Carbohydrates: 18–25 g
- Sugar: 14–20 g
- Sodium: 500–800 mg
Actual values vary by chicken cut, ingredient brands, and the amount of marinade consumed.
Recipe Card: Printable Huli Huli Chicken Recipe
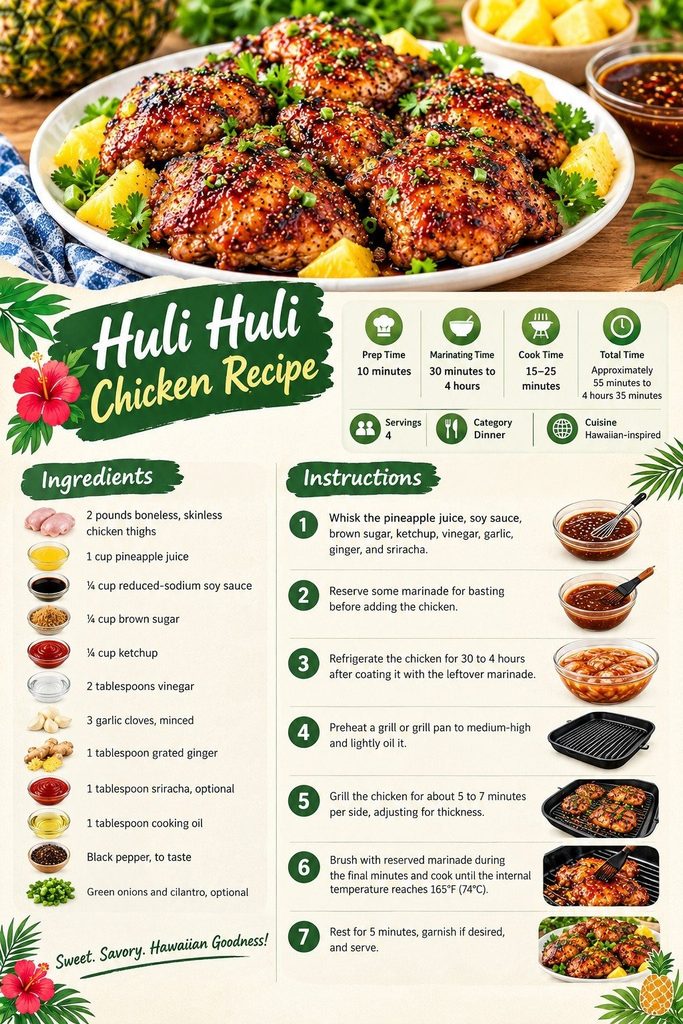
Prep Time: 10 minutes
Marinating Time: 30 minutes to 4 hours
Cook Time: 15–25 minutes
Total Time: Approximately 55 minutes to 4 hours 35 minutes
Servings: 4
Category: Dinner
Cuisine: Hawaiian-inspired
Ingredients
- 2 pounds boneless, skinless chicken thighs
- 1 cup pineapple juice
- ¼ cup reduced-sodium soy sauce
- ¼ cup brown sugar
- ¼ cup ketchup
- 2 tablespoons vinegar
- 3 garlic cloves, minced
- 1 tablespoon grated ginger
- 1 tablespoon sriracha, optional
- 1 tablespoon cooking oil
- Black pepper, to taste
- Green onions and cilantro, optional
Instructions
- Whisk the pineapple juice, soy sauce, brown sugar, ketchup, vinegar, garlic, ginger, and sriracha.
- Reserve some marinade for basting before adding the chicken.
- Refrigerate the chicken for 30 to 4 hours after coating it with the leftover marinade.
- Preheat a grill or grill pan to medium-high and lightly oil it.
- Grill the chicken for about 5 to 7 minutes per side, adjusting for thickness.
- Brush with reserved marinade during the final minutes and cook until the internal temperature reaches 165°F (74°C).
- Rest for 5 minutes, garnish if desired, and serve.
Conclusion: Easy Huli Huli Chicken Recipe
This Easy Huli Huli Chicken recipe is a delicious way to bring Hawaiian-inspired flavors into your kitchen. Its homemade marinade combines pineapple juice, brown sugar, soy sauce, garlic, and ginger for a sweet, savory glaze that complements juicy chicken thighs.
Whether you choose the Huli Huli Chicken recipe on the grill or an oven-baked method, the key is to control the heat, baste safely, and cook the chicken to the correct temperature. Serve it with rice and vegetables for a satisfying meal that is easy enough for a weeknight and special enough for a weekend gathering.

Healthy Lunch Ideas: Easy, Fresh, and Filling Meals

Creamy Shrimp Pasta Recipe in 30 minutes

Baked Ziti Recipe: Easy, Cheesy Italian-American Dinner

Huli Huli Chicken Recipe: Easy Hawaiian Grilled Chicken

Easy Diet Meal: A Healthy, High-Protein Chicken and Vegetable Bowl

Simple Fried Chicken Recipe: Crispy, Juicy, and Easy

The Best Homemade BBQ Chicken Pizza Recipe 2026

Healthy Chicken Soup Recipe With Vegetables and Tender Chicken

Classic Chicken Salad Recipe – Creamy, Flavorful And Delicious

Homemade Cream of Chicken Soup Recipe 2026
-
 Chicken Recipes1 month ago
Simple Fried Chicken Recipe: Crispy, Juicy, and Easy
-
 Baked Chicken1 month ago
The Best Homemade BBQ Chicken Pizza Recipe 2026
-
 Soups and Salad1 month ago
Healthy Chicken Soup Recipe With Vegetables and Tender Chicken
-
 Soups and Salad1 month ago
Classic Chicken Salad Recipe – Creamy, Flavorful And Delicious
-
 Soups and Salad3 weeks ago
Homemade Cream of Chicken Soup Recipe 2026
-

 Chicken Recipes1 month ago
Chicken Biryani Recipe: Flavorful and Easy to Make
-
 Chicken Recipes1 month ago
Air Fryer Chicken Wings with Crispy, Juicy, and Delicious
-
 Chicken Recipes4 weeks ago
Chicken Broccoli Pasta Bake: Creamy, Easy One-Dish Dinner