
Uncategorized
Easy Chicken Pakora Recipe (Crispy & Juicy)

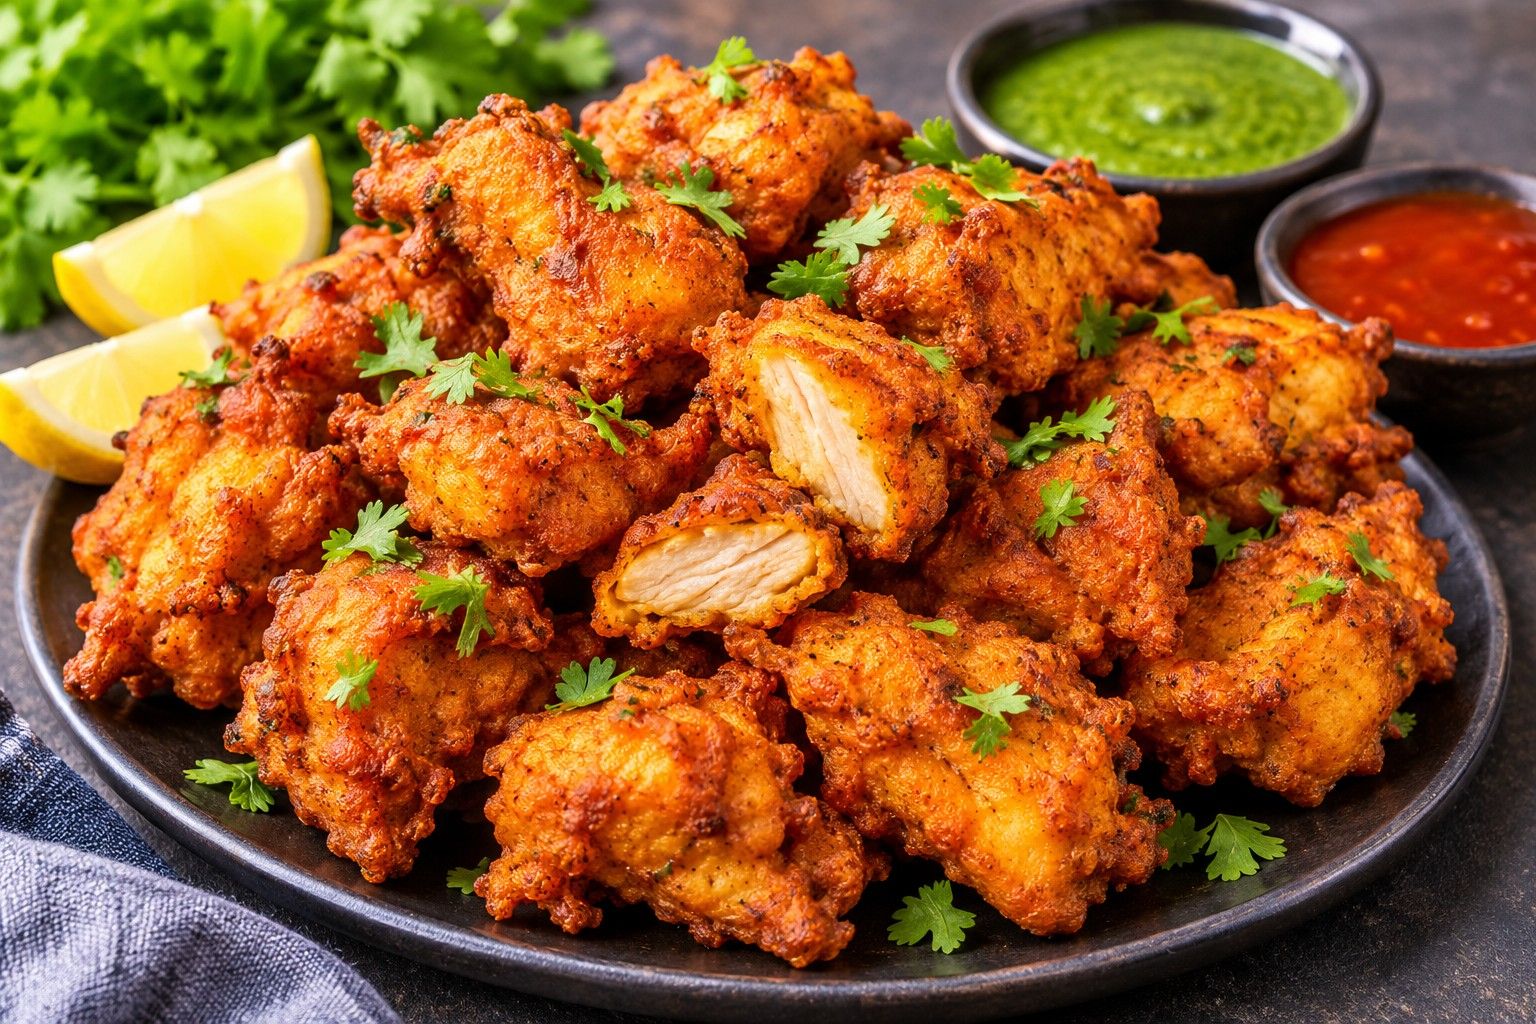
Crispy chicken pakoras are one of those snacks that are hard to stop eating. Each bite has a golden, crunchy coating with tender, juicy chicken inside. The best part is that you can make them at home with simple ingredients, fresh herbs, and everyday Indian spices.
This chicken pakora recipe combines boneless chicken with ginger, garlic, green chillies, cumin, and coriander. A mixture of gram flour, rice flour, and cornflour creates a light, crispy coating that fries beautifully. I’ve focused on the right flour balance, seasoning, and frying temperature to help you get delicious results every time. Serve them with green chutney or sweet chilli sauce for a snack everyone will enjoy.
What Is Chicken Pakora?
Chicken pakora recipe is a popular Indian snack made with small pieces of chicken coated in a seasoned flour mixture and deep-fried until golden. Gram flour, also called besan or chickpea flour, gives the coating its traditional nutty flavor.
Unlike regular fried chicken, pakoras use a spiced coating with ingredients such as cumin, coriander, ginger, garlic, and green chillies. The result is a flavorful snack with a crisp outside and juicy center. They are often served as an appetizer, party snack, or side dish with an Indian meal.
Why You’ll Love This Chicken Pakora Recipe
- Crispy coating: Rice flour and cornflour help create a crunchy outside, while gram flour adds a lovely flavor.
- Tender chicken: Bite-sized chicken pieces cook quickly and stay juicy when fried correctly.
- Full of flavor: Ginger, garlic, cumin, coriander, and chillies give every piece a delicious taste.
- Easy ingredients: You can find most of the ingredients in regular grocery stores.
- Great for sharing: These pakoras are perfect for family gatherings, parties, and evening snacks.
- Easy to customize: Adjust the chillies and spices to make them mild or spicy.
Ingredients You’ll Need for Chicken Pakora Recipe
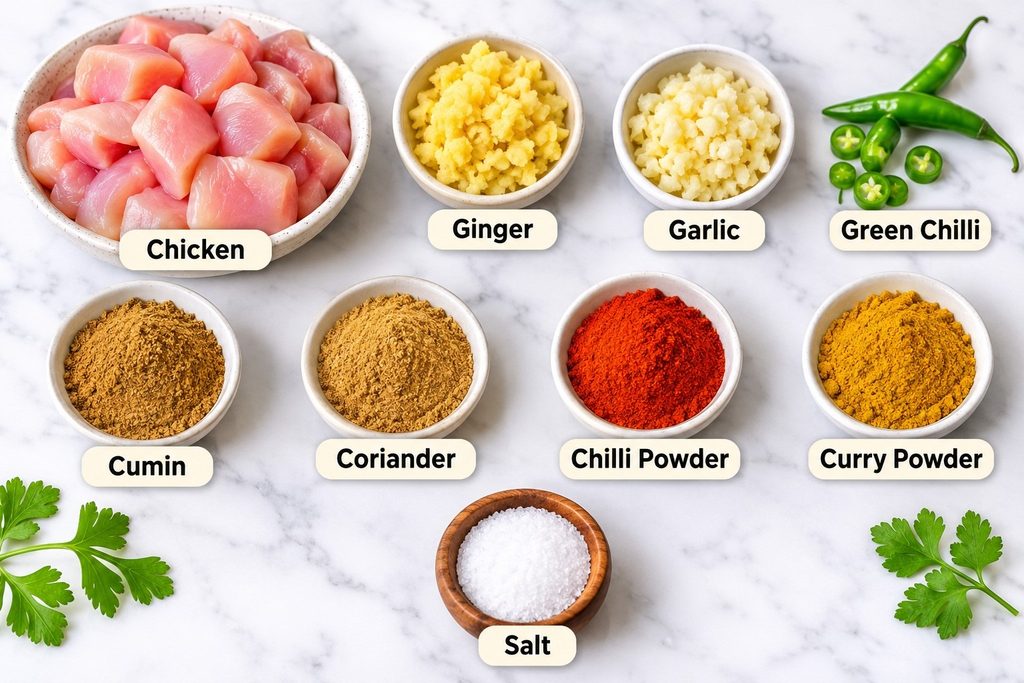
You need simple ingredients to make these homemade chicken pakoras. Each one adds flavor, texture, or helps the coating stick to the chicken.
Chicken and Marinade
- 600 g boneless chicken: Chicken thighs are my first choice because they stay juicy after frying. Chicken breast also works well. Cut the chicken into small, even pieces.
- 1 tablespoon minced ginger: Adds a warm, fresh flavor.
- 2 garlic cloves, minced: Adds a rich, savory flavor.
- 1 green chilli, finely chopped: Adds gentle heat. Use more if you enjoy spicy food.
- 1 teaspoon ground cumin: Provides an earthy flavor.
- 1 teaspoon ground coriander: Adds warmth and a traditional Indian taste.
- ½ teaspoon chilli powder: Gives the marinade extra color and spice.
- ½ teaspoon curry powder: Adds another layer of seasoning.
- ½ teaspoon salt: Brings all the flavors together.
Flour Mixture and Batter
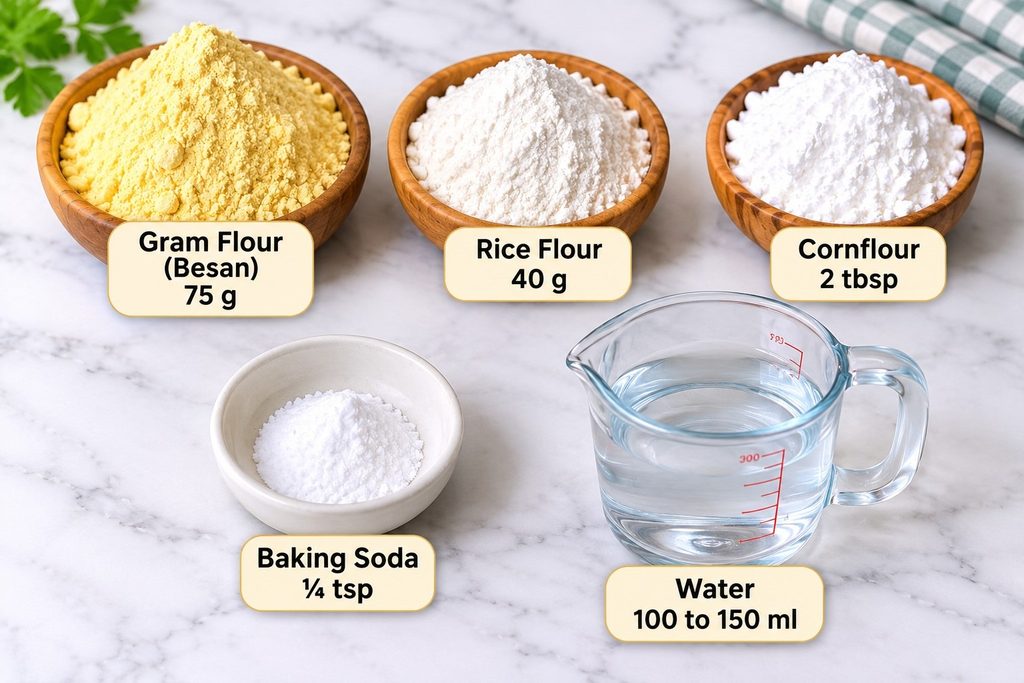
- 75 g gram flour (besan): Creates the main pakora coating and adds a mild nutty flavor.
- 40 g rice flour: Helps make the outside light and crispy.
- 2 tablespoons cornflour: Improves the crunch and helps bind the coating.
- ¼ teaspoon baking soda: Helps make the coating lighter.
- 100 to 150 ml water: Add gradually until the mixture becomes thick enough to coat the chicken.
Oil and Serving Ingredients
- Vegetable oil: Use enough for deep-frying.
- Fresh coriander: Chopped coriander adds freshness before serving.
- Green chutney or sweet chilli sauce: Both make excellent dipping sauces.
Kitchen Equipment You’ll Need for Chicken Pakora Recipe
You only need a few basic kitchen tools. Prepare a large mixing bowl for the chicken, measuring spoons for the spices, and a sharp knife and cutting board. For frying, a deep, heavy-based pan or wok is ideal. A kitchen thermometer is helpful for checking the oil temperature. You will also need a slotted spoon or tongs to remove the pakoras safely and a plate lined with kitchen paper to drain excess oil.
How to Make Chicken Pakora Recipe
Prepare and Cut the Chicken
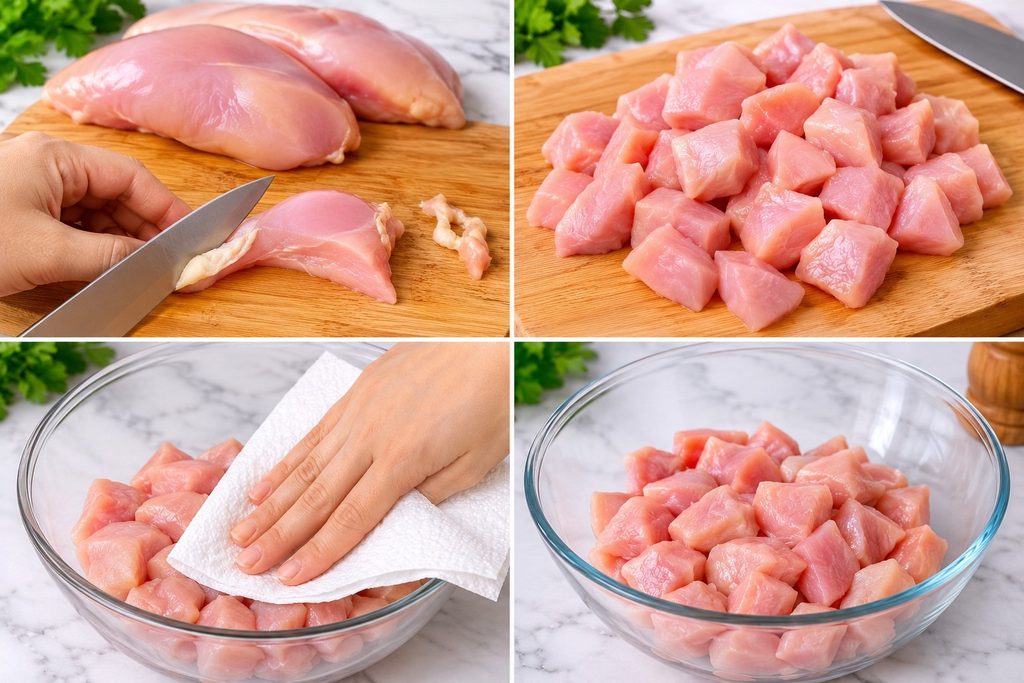
Start by removing any unwanted fat from the chicken. Cut it into small, bite-sized pieces of roughly equal size. Keeping the pieces similar helps them cook evenly and makes them easier to coat.
Place the chicken in a large mixing bowl. Pat it dry with kitchen paper if it has excess moisture. This helps the spices and flour mixture stick better.
Season and Marinate the Chicken
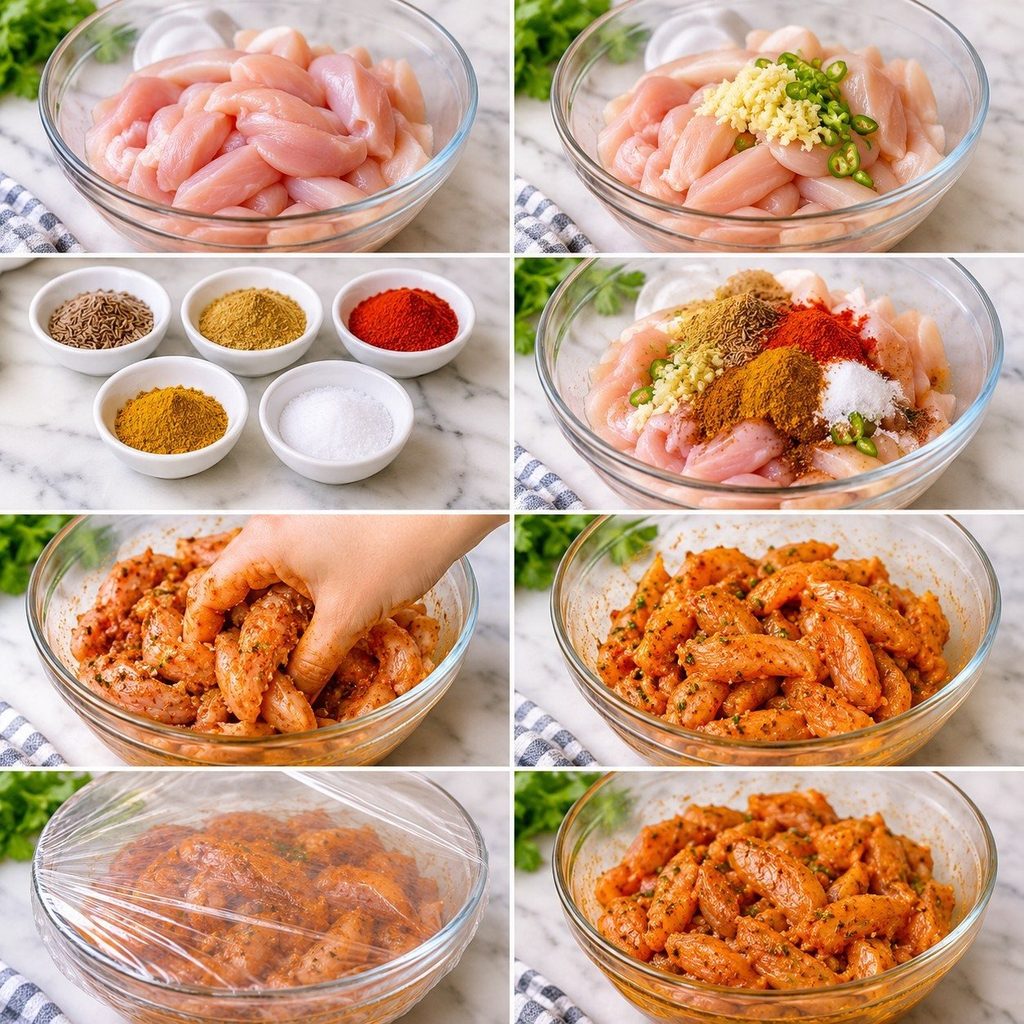
Add the minced ginger, garlic, green chilli, cumin, ground coriander, chilli powder, curry powder, and salt. Mix everything with your hands or a spoon until the chicken is evenly coated.
Cover the bowl and refrigerate for about 20 to 30 minutes. The chicken can absorb the spices and create a richer taste during this little rest period.
Prepare the Chicken Pakora Recipe Batter
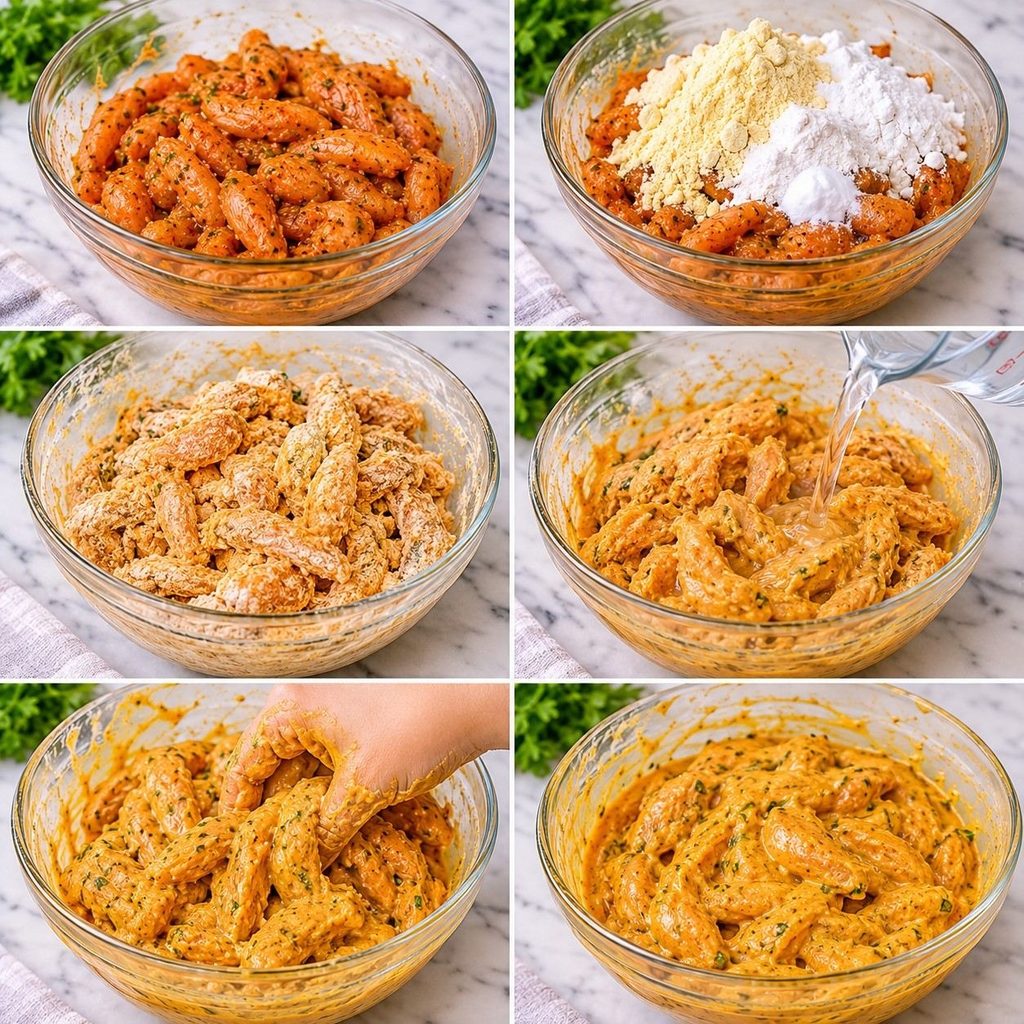
Add the gram flour, rice flour, cornflour, and baking soda to the marinated chicken. Mix well so the flour covers each piece.
Pour in the water a little at a time, mixing as you go. You may not need the full amount. The mixture should look thick and slightly sticky, with enough coating to hold the chicken pieces together.
Avoid making the batter too runny. A thick coating gives the pakoras their traditional texture and helps prevent the mixture from falling apart during frying.
Heat the Oil
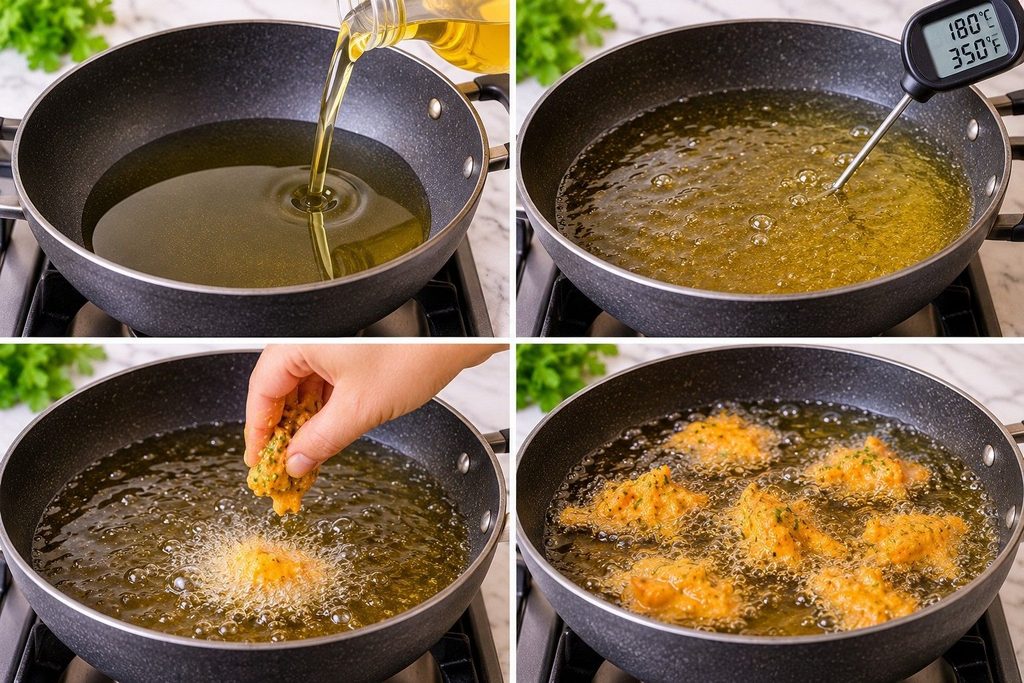
Pour vegetable oil into a deep, heavy-based pan. Keep the pan no more than one-third full to leave enough room for the oil to bubble safely.
Heat the oil to approximately 180°C (350°F). If you do not have a thermometer, drop a tiny amount of batter into the oil. It should sizzle and rise to the surface without burning quickly.
Fry Until Golden and Crispy
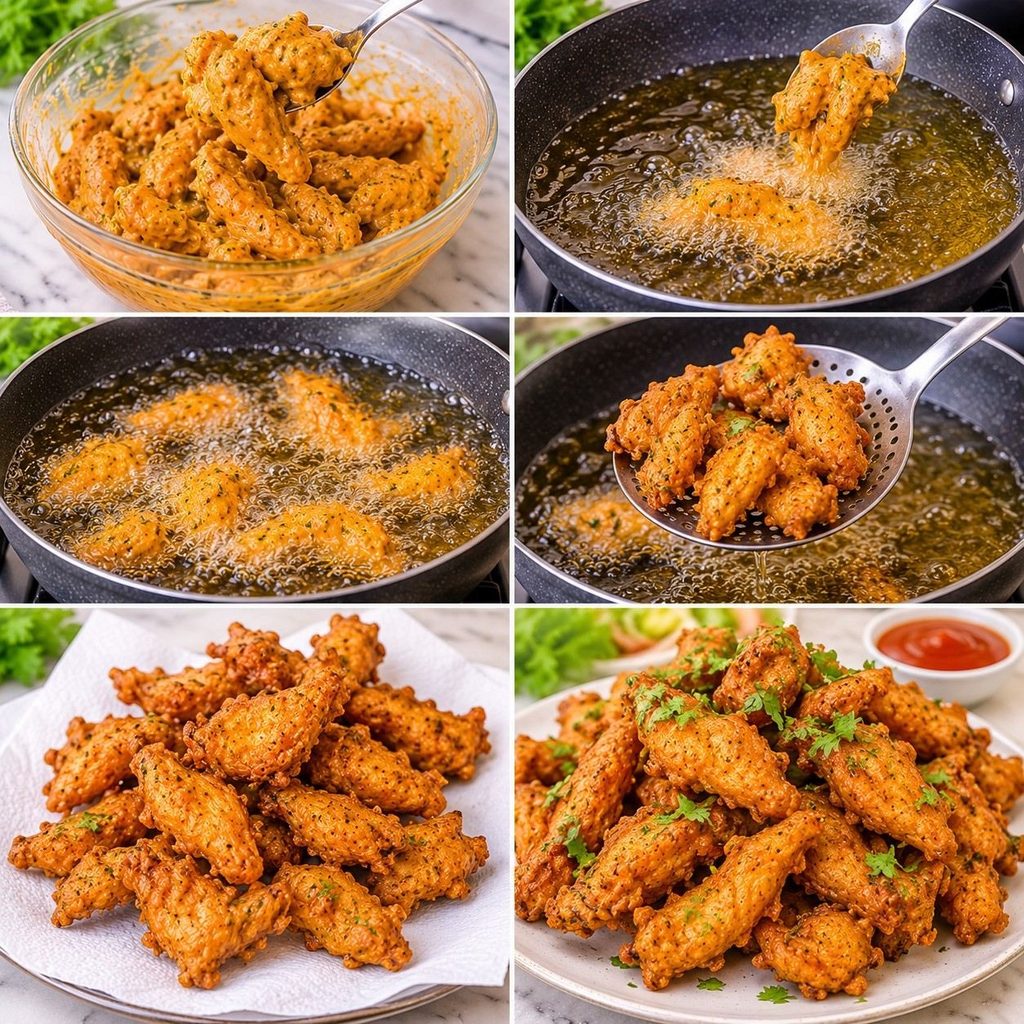
Take a small portion of the chicken mixture and gently bring the pieces together. Carefully lower it into the hot oil using a spoon or tongs.
Fry in small batches for approximately 6 to 8 minutes, turning occasionally so all sides cook evenly. Cooking time depends on the size of the chicken pieces. The coating should become golden brown and crisp.
Check that the thickest chicken pieces reach an internal temperature of 74°C (165°F). Remove the pakoras with a slotted spoon and place them on kitchen paper. Repeat with the remaining mixture.
Sprinkle with fresh coriander and serve while hot.
Tips for Making Crispy Chicken Pakoras Recipe
The right cooking method makes a big difference to the final texture.
- Use rice flour and cornflour along with gram flour for a crisp coating.
- Keep the batter thick instead of adding too much water.
- Fry at around 180°C (350°F) for even browning.
- Because too many pieces can drop the oil’s temperature, try not to pack the pan too full.
- Fry the pakoras soon after adding water to the flour mixture.
- Cut the chicken into evenly sized pieces so they cook at the same rate.
- To get rid of extra oil, drain cooked pakoras on kitchen paper or a wire rack.
Common Mistakes to Avoid
Adding too much water is one of the easiest ways to ruin the coating. A thin batter can slide off the chicken and create a heavy, oily result. Add water slowly and stop when the flour mixture holds together.
Frying at the incorrect temperature is another frequent error. Oil that is too hot can brown the outside before the chicken cooks inside. Oil that is too cool can make the coating greasy. Also, avoid leaving cooked pakoras in a hot oven for too long because the coating can become hard.
Chicken Pakora Recipe Variations
Chicken Breast vs. Chicken Thighs
Both cuts work well. Chicken thighs contain more fat, which helps them stay juicy during frying. Chicken breast is leaner and has a milder taste. Cut either option into similar-sized pieces.
Adjusting the Spice Level
For mild pakoras, reduce the green chilli and chilli powder. For extra heat, add another green chilli or increase the chilli flakes. You can also adjust the curry powder to suit your taste.
Gluten-Free Chicken Pakora Recipe
Gram flour, rice flour, and cornflour are naturally gluten-free. Use certified gluten-free products and check all seasoning labels to avoid unwanted gluten.
Air Fryer Chicken Pakora Recipe
Preheat your air fryer to 190°C (375°F). Arrange small portions of the chicken mixture in a single layer and lightly spray with cooking oil. Cook for about 12 to 16 minutes, turning halfway through. Check that the chicken reaches 74°C (165°F). The texture may be different from deep-fried pakoras, but this method uses less oil.
What to Serve with Chicken Pakora Recipe
Serve chicken pakoras hot with green chutney, mint yogurt sauce, sweet chilli sauce, or mango chutney. A squeeze of fresh lemon also adds a lovely touch.
For a larger Indian meal, pair them with vegetable biryani, homemade chapati, chicken curry, onion bhajis, or cucumber raita. They also make a great addition to an appetizer platter with fresh salad and dipping sauces.
How to Store and Reheat Chicken Pakoras
Refrigerating Leftover Pakoras
Allow the pakoras to cool, then place them in an airtight container. Refrigerate within two hours and use within 3 to 4 days for food safety.
Freezing Chicken Pakoras
Let the cooked pakoras cool completely. Arrange them in a single layer on a tray and freeze until firm. Transfer them to a freezer-safe container or bag. For best quality, use within 2 months.
Reheating Without Losing Crispiness
Reheat refrigerated or thawed pakoras in a preheated oven at 190°C (375°F) for about 8 to 12 minutes. An air fryer also works well at 180°C (350°F) for 4 to 6 minutes. Heat until piping hot throughout. Avoid the microwave because it can make the coating soft.
Frequently Asked Questions
Why Are My Chicken Pakoras Not Crispy?
Too much water, low oil temperature, or overcrowding can make pakoras soggy. Use a thick coating and fry in small batches at around 180°C.
Can I Make Chicken Pakora Recipe Ahead of Time?
You can season and marinate the chicken a day ahead in the refrigerator. For the best texture, mix in the flour and water shortly before frying.
Can I Use Chicken Breast Instead of Thighs?
Yes. Boneless chicken breast is a good option. Cut it into small, even pieces and avoid overcooking because breast meat can dry out.
What Flour Is Best for Chicken Pakora?
Gram flour provides the traditional flavor, while rice flour and cornflour help create a crispy coating. Using all three gives a good balance of taste and texture.
How Do I Know When Chicken Pakoras Are Cooked?
The coating should be golden brown, and the thickest chicken pieces should reach 74°C (165°F) internally. Use a food thermometer for the most reliable result.
Can I Make Chicken Pakora Recipe Without Deep Frying?
Yes. You can use an air fryer with a light coating of oil. The result may be less crunchy than deep-fried pakoras, but it is still delicious.
What Is the Best Sauce to Serve with Chicken Pakora Recipe?
Green chutney, mint yogurt sauce, sweet chilli sauce, and mango chutney all pair nicely with the spices in chicken pakora.
Chicken Pakora Recipe Nutrition Information
The following values are estimates per serving, based on 6 servings. Actual nutrition depends on the chicken cut, amount of oil absorbed, and portion size.
- Calories: Approximately 390 kcal
- Protein: 35 g
- Carbohydrates: 24 g
- Fat: 17 g
- Fiber: 4 g
- Sugar: 3 g
Chicken Pakora Recipe Card
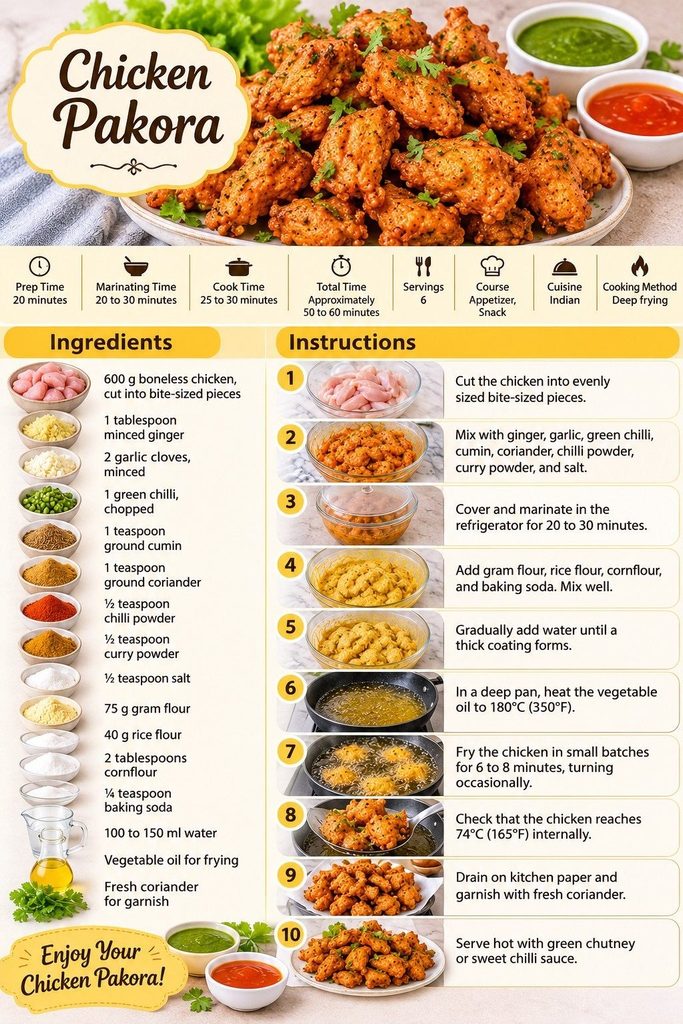
Prep Time: 20 minutes
Marinating Time: 20 to 30 minutes
Cook Time: 25 to 30 minutes
Total Time: Approximately 50 to 60 minutes
Servings: 6
Cooking Method: Deep-frying
Ingredients
- 600 g boneless chicken, cut into bite-sized pieces
- 1 tablespoon minced ginger
- 2 garlic cloves, minced
- 1 green chilli, chopped
- 1 teaspoon ground cumin
- 1 teaspoon ground coriander
- ½ teaspoon chilli powder
- ½ teaspoon curry powder
- ½ teaspoon salt
- 75 g gram flour
- 40 g rice flour
- 2 tablespoons cornflour
- ¼ teaspoon baking soda
- 100 to 150 ml water
- Vegetable oil for frying
- Fresh coriander for garnish
Instructions
- Cut the chicken into evenly sized bite-sized pieces.
- Mix with ginger, garlic, green chilli, cumin, coriander, chilli powder, curry powder, and salt.
- Cover and marinate in the refrigerator for 20 to 30 minutes.
- Add gram flour, rice flour, cornflour, and baking soda. Mix well.
- Gradually add water until a thick coating forms.
- In a deep pan, heat the vegetable oil to 180°C (350°F).
- Fry the chicken in small batches for 6 to 8 minutes, turning occasionally.
- Check that the chicken reaches 74°C (165°F) internally.
- Drain on kitchen paper and garnish with fresh coriander.
- Serve hot with green chutney or sweet chilli sauce.
Final Thoughts
Homemade chicken pakoras are a simple way to bring Indian street-food flavor into your kitchen. The combination of tender chicken, warm spices, and a crispy flour coating makes them perfect for almost any occasion. I recommend serving them fresh from the pan with a bowl of green chutney and a little lemon on the side. Once you try this recipe, these golden bites may become a regular favorite for your family.

Grilled Chicken Salad Recipe
A fresh grilled chicken salad is one of the easiest ways to enjoy a filling meal without spending hours in the kitchen. It combines juicy grilled chicken, crisp lettuce, fresh vegetables, creamy avocado, and salty feta with a sweet, tangy homemade honey-Dijon dressing. Every bite delivers a variety of mouthwatering flavors and textures.
I love this style of salad because it works for lunch, dinner, and meal prep. You can prepare the chicken ahead of time, use vegetables you already have, and make the dressing in just a few minutes. In this recipe, I’ll show you how to grill tender chicken, prepare a simple dressing, choose the best toppings, and keep your salad fresh. This easy meal is perfect for beginners and experienced home cooks alike.
Why You’ll Love This Grilled Chicken Salad
There are plenty of reasons to add this easy grilled chicken salad to your weekly meal plan. It is colorful, satisfying, and simple to change based on what you have in your kitchen.
- Juicy and Flavorful Chicken: Grilled chicken breast adds lean protein and a smoky flavor. A simple seasoning mix helps keep every piece tasty.
- Fresh and Colorful Vegetables: Romaine lettuce, cucumber, cherry tomatoes, and corn bring freshness and a pleasant crunch.
- Creamy Avocado and Feta: Avocado adds a smooth texture, while feta gives the salad a salty and tangy taste.
- Homemade Honey Dijon Dressing: Lemon juice, honey, olive oil, and Dijon mustard create a sweet and tangy dressing that brings everything together.
- Easy to Customize: You can add strawberries, almonds, olives, or other vegetables to make the salad your own.
- Great for Meal Prep: Cook the chicken ahead of time and prepare the vegetables for quick meals during the week.
Ingredients You’ll Need for Grilled Chicken Salad
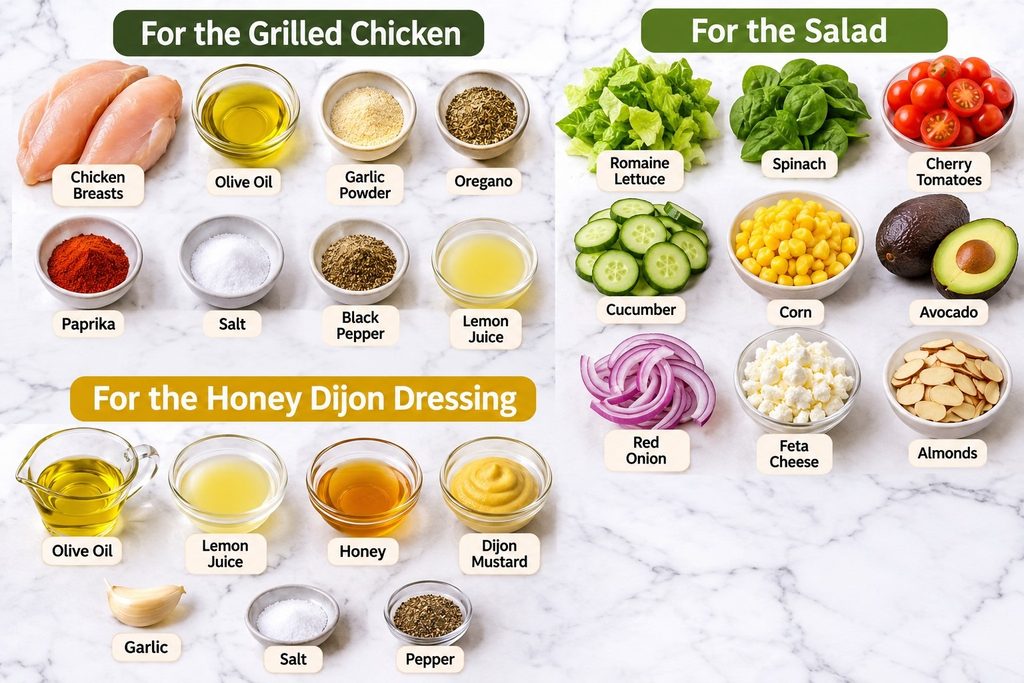
This grilled chicken salad uses simple ingredients that are easy to find in most grocery stores. Fresh ingredients give the best flavor, but several items can also be replaced with convenient alternatives.
For the Grilled Chicken
- 2 medium boneless, skinless chicken breasts (about 1 lb): Chicken breast is a great choice because it cooks quickly and slices easily. Boneless chicken thighs also work.
- 1 tablespoon olive oil: Helps the seasonings coat the chicken and prevents it from sticking to the grill.
- 1 teaspoon garlic powder: Adds a mild garlic flavor.
- 1 teaspoon dried oregano: Gives the chicken a fresh, herby taste.
- ½ teaspoon paprika: Adds color and a gentle smoky flavor.
- ½ teaspoon salt: Brings out the natural flavor of the chicken.
- ¼ teaspoon black pepper: Adds mild warmth.
- 1 tablespoon lemon juice: Helps brighten the seasoning and adds freshness.
For the Salad
- 4 cups chopped romaine lettuce: Provides a crisp and crunchy base.
- 2 cups baby spinach: Adds tender greens and a mild flavor.
- 1 cup cherry tomatoes, halved: Brings sweetness and juicy freshness.
- 1 medium cucumber, chopped: Adds a cool crunch.
- ½ cup sweet corn kernels: Gives the salad a little sweetness.
- 1 ripe avocado, diced: Adds a creamy texture.
- ½ small red onion, thinly sliced: Provides a sharp and fresh flavor.
- ½ cup crumbled feta cheese: Adds a salty, tangy taste.
- ¼ cup sliced almonds: Gives the salad extra crunch.
For the Honey Dijon Dressing
- 3 tablespoons extra-virgin olive oil: Creates a smooth dressing base.
- 2 tablespoons fresh lemon juice: Adds a bright citrus flavor.
- 1 tablespoon honey: Balances the sharpness of the lemon and mustard.
- 1 teaspoon Dijon mustard: Gives the dressing a rich, slightly tangy taste.
- 1 small garlic clove, minced: Adds a fresh garlic flavor.
- ¼ teaspoon salt: Adjusts the seasoning.
- ⅛ teaspoon black pepper: Adds a little warmth.
Equipment You’ll Need for Grilled Chicken Salad
You do not need special kitchen equipment to prepare this easy chicken salad.
- Grill or Grill Pan: For cooking the chicken and creating attractive grill marks.
- Mixing Bowls: For seasoning the chicken and preparing the salad.
- Small Whisk: Helps combine the dressing ingredients.
- Sharp Knife: For slicing chicken and chopping vegetables.
- Cutting Board: Keeps food preparation simple and organized.
- Meat Thermometer: Helps check that the chicken is safely cooked.
- Salad Spinner: Optional, but useful for removing extra water from lettuce.
How to Make Grilled Chicken Salad
This recipe takes about 15 minutes to prepare and 10 to 15 minutes to cook, depending on the thickness of your chicken. Follow these simple steps for a fresh and flavorful salad.
Step 1: Season the Chicken
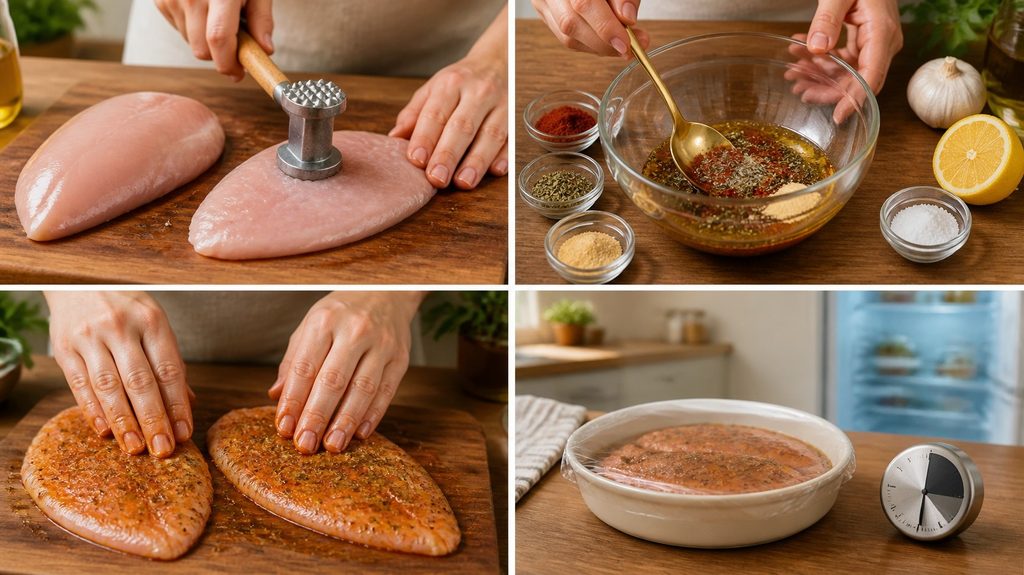
Place the chicken breasts on a cutting board. If one side is much thicker than the other, gently pound the chicken to an even thickness. This helps it cook evenly and prevents the thinner parts from drying out.
In a small bowl, mix olive oil, garlic powder, oregano, paprika, salt, black pepper, and lemon juice. Rub the mixture over both sides of the chicken until evenly coated.
Let the chicken rest in the seasoning for about 15 to 20 minutes while you prepare the other ingredients. If you have more time, cover and refrigerate it for up to 4 hours.
Step 2: Grill the Chicken

Preheat an outdoor grill or grill pan over medium-high heat. Lightly oil the grill grates to prevent sticking.
Place the seasoned chicken on the hot grill. Cook for approximately 5 to 7 minutes on the first side, then turn and cook for another 5 to 7 minutes. Cooking time depends on the thickness of the chicken breasts.
Check the thickest part with an instant-read thermometer. The internal temperature of the chicken should be 165°F, or 74°C. Avoid cutting into it too early because this can release the juices.
Step 3: Rest and Slice the Chicken

After grilling, move the chicken to a spotless cutting board. Before slicing, let it rest for approximately five minutes.
This short resting time helps the juices settle throughout the meat. Slice the chicken into thin strips or bite-sized pieces, depending on how you prefer to serve your salad.
Step 4: Prepare the Vegetables

Wash the romaine lettuce and baby spinach under cool running water. Dry them well using a salad spinner or clean kitchen towel.
Chop the lettuce into bite-sized pieces. Slice the red onion thinly, chop the cucumber, and cut the cherry tomatoes in half.
Dice the avocado just before assembling the salad to help prevent browning. If you are using fresh corn, cook it first and allow it to cool before removing the kernels.
Step 5: Make the Honey Dijon Dressing

Add olive oil, lemon juice, honey, Dijon mustard, minced garlic, salt, and black pepper to a small bowl or jar.
Whisk until the ingredients are well combined, and the dressing looks slightly thickened. If you are using a jar, close the lid and shake well.
Taste the dressing before serving. Add a little more honey if you prefer it sweeter or extra lemon juice if you enjoy a sharper flavor.
Step 6: Assemble the Grilled Chicken Salad
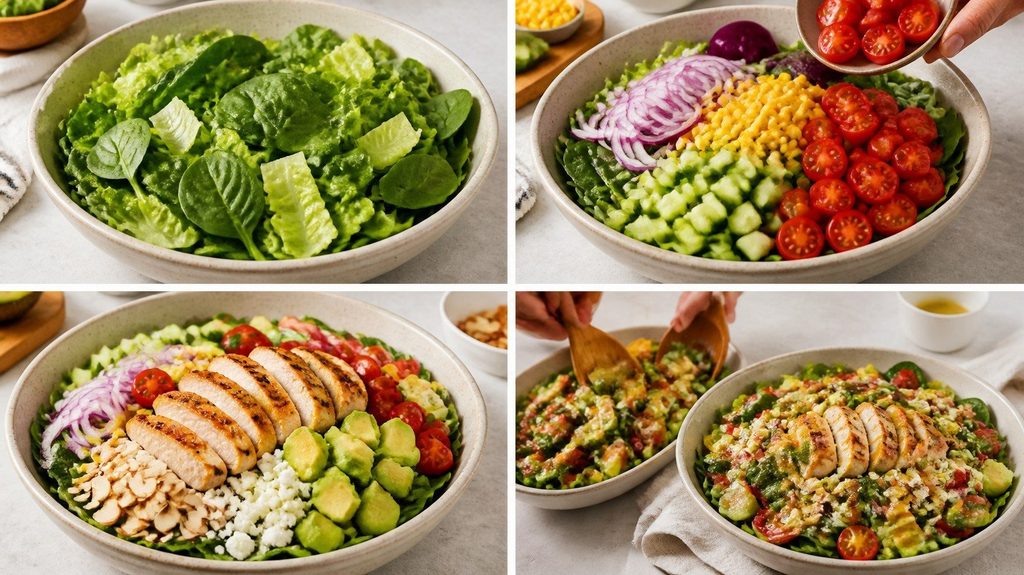
Place the romaine lettuce and baby spinach in a large serving bowl. Add the red onion, corn, cucumber, and cherry tomatoes. Arrange the sliced grilled chicken over the vegetables. Add the sliced almonds, crumbled feta, and chopped avocado.
Drizzle the honey Dijon dressing over the salad a little at a time. Toss gently until everything is lightly coated. Serve immediately while the chicken is fresh and the vegetables are crisp.
Tips for the Best Grilled Chicken Salad
A few simple cooking tips can make a big difference in the final result.
- Do Not Overcook the Chicken: Chicken breast can become dry if left on the grill too long. Use a thermometer and remove it once it reaches 165°F (74°C).
- Dry the Lettuce Properly: Extra water can make the dressing thin and leave the salad soggy. Dry greens give the dressing a better chance to coat each leaf.
- Use Ripe Avocado: Choose an avocado that gives slightly when pressed. It should be soft but not mushy.
- Add Dressing Slowly: Start with a small amount and add more as needed. This keeps the vegetables fresh and crisp.
- Toast the Almonds: Heat them in a dry skillet for about 3 to 5 minutes, stirring often. This brings out their natural flavor.
- Let the Chicken Rest: Give grilled chicken about 5 minutes before slicing to help keep it juicy.
- Use Fresh Lemon Juice: Fresh juice gives the honey Dijon dressing a brighter taste than bottled lemon juice.
Grilled Chicken Salad Variations
One of the best things about this recipe is how easy it is to change. You can use different ingredients to create new flavors without changing the basic cooking method.
1. Mediterranean Grilled Chicken Salad
Add more feta cheese, sliced cucumber, cherry tomatoes, red onion, and Kalamata olives. Make a straightforward red wine vinaigrette with olive oil, vinegar, oregano, and lemon juice in place of the honey Dijon dressing.
2. Strawberry Grilled Chicken Salad
Add the feta, baby spinach, toasted almonds, and freshly cut strawberries. The sweet strawberries pair beautifully with grilled chicken and a tangy honey dressing. Blueberries can also be used when strawberries are not in season.
3. Grilled Chicken Salad with Bacon
Add tomatoes, avocado, sweet corn, cooked and crumbled bacon, and blue cheese. This version has a smoky, savory flavor and makes a filling lunch or dinner.
4. Healthy Grilled Chicken Salad
For a lighter version, use plenty of fresh vegetables, lean grilled chicken, and a smaller amount of cheese and dressing. You can also replace almonds with sunflower seeds or pumpkin seeds.
5. BBQ Grilled Chicken Salad
In the last few minutes of grilling, brush the chicken with a little BBQ sauce. Add black beans, corn, tomatoes, and avocado. A light ranch dressing works well with these smoky flavors.
6. Grilled Chicken Salad with Whole Grains
Add cooked quinoa or farro to make the salad more filling. These grains bring extra texture and work especially well with spinach, avocado, and lemon dressing.
What to Serve with Grilled Chicken Salad
This salad can be served as a complete meal, but a few simple sides make it even better.
- Garlic Bread: Toasted garlic bread is a great choice for soaking up the extra dressing.
- Vegetable Soup: A light vegetable soup makes a comforting combination, especially on cooler days.
- Roasted Potatoes: Crispy roasted potatoes add a warm and satisfying side.
- Fresh Fruit: Watermelon, berries, or sliced peaches complement the fresh vegetables.
- Whole Grain Bread: Serve with a slice of whole grain bread for a simple lunch.
How to Store and Meal Prep Grilled Chicken Salad
Proper storage helps keep the chicken safe and the vegetables fresh. If you plan to prepare this salad ahead of time, it is best to store the ingredients separately.
Refrigerating: Place cooked chicken in an airtight container and refrigerate within 2 hours of cooking.
Storing Vegetables: Keep washed and completely dried lettuce, spinach, cucumber, and tomatoes in separate airtight containers. Store avocado separately and cut it close to serving time.
Storing Dressing: Pour the honey Dijon dressing into a small jar with a tight-fitting lid. Refrigerate it for up to 4 days. Shake well before using because the oil and lemon juice may separate.
Meal Prep: Divide the chicken and vegetables into individual containers. Keep the dressing, feta, almonds, and avocado separate until serving. This helps prevent soggy greens and keeps the toppings fresh.
Reheating: If you prefer warm chicken, heat it gently in a skillet or microwave until steaming hot. You can also serve it cold straight from the refrigerator.
Avoid freezing the assembled salad because lettuce, cucumber, and avocado lose their texture after thawing.
Common Mistakes to Avoid
Even a simple salad can lose its fresh taste if a few basic steps are missed.
- Using Wet Lettuce: Water left on the greens can dilute the dressing. Always dry them before assembling.
- Grilling Cold, Uneven Chicken: Very thick chicken breasts may cook unevenly. Pound them to an even thickness before grilling.
- Skipping the Resting Time: Slicing chicken immediately after grilling can cause more juices to escape.
- Adding Too Much Dressing: Excess dressing makes the vegetables heavy and soggy. Add it gradually.
- Cutting Avocado Too Early: Avocado can turn brown when exposed to air. Dice it shortly before serving.
- Adding Nuts Too Soon: Almonds can lose their crunch when mixed with dressing and moist vegetables. Add them just before serving.
Frequently Asked Questions
1. Is grilled chicken salad healthy?
Grilled chicken salad can be a balanced meal because it combines protein from chicken with vegetables, healthy fats from avocado and olive oil, and fiber from fresh produce. The overall nutrition depends on the ingredients, portion sizes, and amount of dressing used.
2. How long should I grill chicken for a salad?
Boneless chicken breasts usually take about 10 to 14 minutes on a medium-high grill, depending on thickness. Turn them halfway through cooking and check that the thickest part reaches 165°F (74°C).
3. What dressing goes best with grilled chicken salad?
Honey Dijon dressing is a great choice because it combines sweet honey, tangy lemon, olive oil, and mustard. You can also use balsamic vinaigrette, ranch, or a simple lemon garlic dressing.
4. Can I make grilled chicken salad ahead of time?
Yes. You can grill the chicken and prepare the vegetables a day ahead. Store everything separately in airtight containers and add the avocado, almonds, and dressing just before serving.
5. Can I use leftover chicken for this recipe?
Absolutely! Leftover grilled chicken, baked chicken breast, or rotisserie chicken can all work. Slice or dice the cooked chicken and add it to the fresh vegetables.
6. What vegetables go well with grilled chicken salad?
Romaine lettuce, spinach, cucumber, cherry tomatoes, sweet corn, red onion, bell peppers, and carrots are all good choices. You can use your favorite seasonal vegetables.
7. How do I keep grilled chicken salad from getting soggy?
Dry the greens thoroughly, store the dressing separately, and avoid adding wet toppings too early. Assemble the salad just before serving for the best texture.
8. Can I make grilled chicken salad without a grill?
Yes. A stovetop grill pan works well, but you can also cook the chicken in a regular skillet or bake it in the oven. Make sure the thickest part reaches 165°F (74°C).
Nutrition Information

The following values are estimates based on the ingredients and serving sizes. Actual nutrition will vary depending on the chicken size, cheese, almonds, avocado, and dressing portions.
| Nutrient | Approximate Amount |
| Calories | 520 kcal |
| Protein | 42 g |
| Carbohydrates | 19 g |
| Fat | 31 g |
| Saturated Fat | 7 g |
| Fiber | 7 g |
| Sugar | 9 g |
| Sodium | 550 mg |
Grilled Chicken Salad Recipe Card
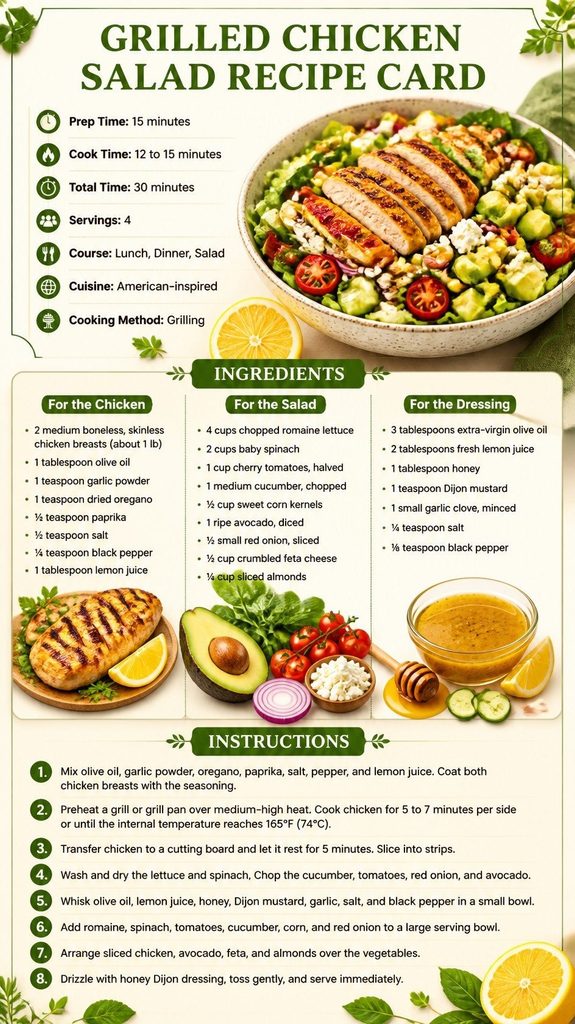
Prep Time: 15 minutes
Cook Time: 12 to 15 minutes
Total Time: 30 minutes
Servings: 4
Course: Lunch, Dinner, Salad
Cuisine: American-inspired
Cooking Method: Grilling
Ingredients
For the Chicken
- 2 medium boneless, skinless chicken breasts (about 1 lb)
- 1 tablespoon olive oil
- 1 teaspoon garlic powder
- 1 teaspoon dried oregano
- ½ teaspoon paprika
- ½ teaspoon salt
- ¼ teaspoon black pepper
- 1 tablespoon lemon juice
For the Salad
- 4 cups chopped romaine lettuce
- 2 cups baby spinach
- 1 cup cherry tomatoes, halved
- 1 medium cucumber, chopped
- ½ cup sweet corn kernels
- 1 ripe avocado, diced
- ½ small red onion, sliced
- ½ cup crumbled feta cheese
- ¼ cup sliced almonds
For the Dressing
- 3 tablespoons extra-virgin olive oil
- 2 tablespoons fresh lemon juice
- 1 tablespoon honey
- 1 teaspoon Dijon mustard
- 1 small garlic clove, minced
- ¼ teaspoon salt
- ⅛ teaspoon black pepper
Instructions
- Mix olive oil, garlic powder, oregano, paprika, salt, pepper, and lemon juice. Coat both chicken breasts with the seasoning.
- Preheat a grill or grill pan over medium-high heat. Cook chicken for 5 to 7 minutes per side or until the internal temperature reaches 165°F (74°C).
- Transfer chicken to a cutting board and let it rest for 5 minutes. Slice into strips.
- Wash and dry the lettuce and spinach. Chop the cucumber, tomatoes, red onion, and avocado.
- Whisk olive oil, lemon juice, honey, Dijon mustard, garlic, salt, and black pepper in a small bowl.
- Add romaine, spinach, tomatoes, cucumber, corn, and red onion to a large serving bowl.
- Arrange sliced chicken, avocado, feta, and almonds over the vegetables.
- Drizzle with honey Dijon dressing, toss gently, and serve immediately.
Final Thoughts
This grilled chicken salad is a simple way to bring fresh ingredients and delicious flavors together in one bowl. Juicy chicken, crunchy greens, creamy avocado, sweet corn, and tangy feta create a satisfying meal that works for almost any day of the week. The homemade honey Dijon dressing adds just the right balance of sweetness and freshness.
I recommend keeping the dressing separate if you are preparing meals ahead of time. That small step helps the vegetables stay crisp and makes lunch much easier during a busy week. Try this easy grilled chicken salad for your next lunch or dinner, and feel free to change the toppings with your favorite seasonal ingredients. Enjoy!

Chicken Schnitzel with Coleslaw: Crispy And Juicy

Easy Chicken Stuffed Bell Peppers Recipe (Cheesy & Delicious)

Easy Chicken Pakora Recipe (Crispy & Juicy)

Healthy Taco Salad Recipe (Easy & Fresh)

Homemade Montreal Chicken Seasoning Recipe

Simple Fried Chicken Recipe : (Crispy and Juicy)

The Best Homemade BBQ Chicken Pizza Recipe 2026

Healthy Chicken Soup Recipe With Vegetables and Tender Chicken

Huli Huli Chicken Recipe: Hawaiian-Style Grilled Chicken

Classic Chicken Salad Recipe – Creamy, Flavorful And Delicious
-
 Chicken Recipes2 months ago
Simple Fried Chicken Recipe : (Crispy and Juicy)
-
 Baked Chicken2 months ago
The Best Homemade BBQ Chicken Pizza Recipe 2026
-
 Soups and Salad2 months ago
Healthy Chicken Soup Recipe With Vegetables and Tender Chicken
-
 Chicken Recipes1 month ago
Huli Huli Chicken Recipe: Hawaiian-Style Grilled Chicken
-
 Soups and Salad2 months ago
Classic Chicken Salad Recipe – Creamy, Flavorful And Delicious
-

 Soups and Salad1 month ago
Homemade Cream of Chicken Soup Recipe 2026
-

 Chicken Recipes2 months ago
Chicken Biryani Recipe: Flavorful and Easy to Make
-
 Cakes and Cupcakes1 month ago
Chocolate Lava Cakes Recipe with Delicious Center