Cakes and Cupcakes
Chocolate Lava Cakes Recipe with Delicious Center


Chocolate Lava Cakes
Chocolate Lava Cakes are the kind of dessert that feels special without requiring complicated baking skills. The outside is soft and rich, while the center stays warm, glossy, and wonderfully gooey. When you cut into one, the melted chocolate flows onto the plate, making every bite feel like a restaurant-style dessert.
The best part is how quickly these individual cakes come together. You only need a handful of everyday ingredients, a few ramekins, and about 20 to 25 minutes. Serve them warm with vanilla ice cream and fresh berries, or keep things simple with a light dusting of powdered sugar.
Why You’ll Love This Recipe
- Quick to make: These cakes can be ready in about 25 minutes.
- Simple ingredients: You do not need a long shopping list or specialty ingredients.
- No mixer required: A whisk and a couple of bowls are enough.
- Rich chocolate flavor: Butter and chocolate create a deep, satisfying taste.
- Perfect molten center: The short baking time keeps the middle soft and gooey.
- Great for entertaining: Individual cakes look impressive when served warm.
- Easy to customize: Add caramel, peanut butter, berries, or your favorite ice cream.
Ingredients
Main Ingredients
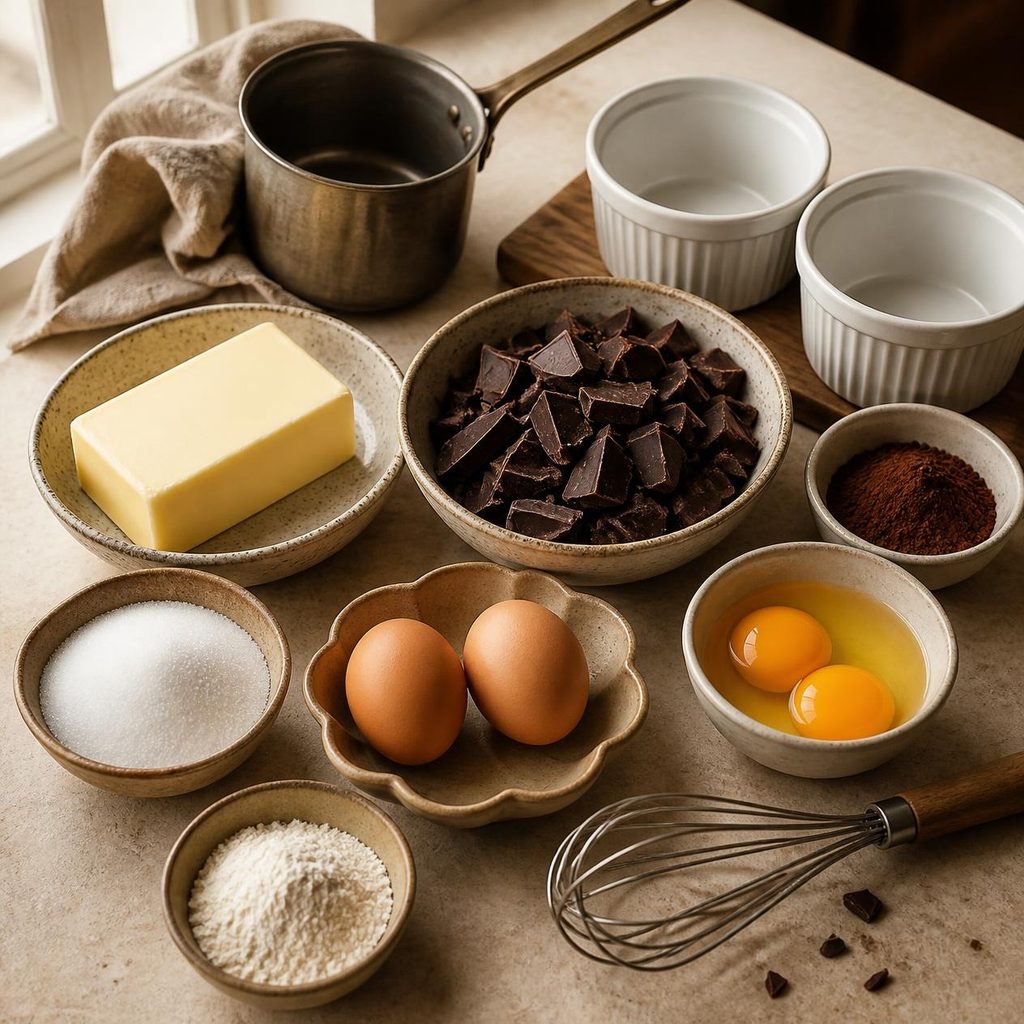
For 4 individual Chocolate Lava Cakes, you will need:
- 1 stick (113g) unsalted butter
- ⅔ cup (113g) semi-sweet or dark chocolate, chopped
- 2 large eggs, preferably at room temperature
- 2 large egg yolks
- ¼ cup (50g) granulated sugar
- 1 tablespoon (8g) all-purpose flour
- Extra granulated sugar or cocoa powder for preparing the ramekins
Ingredient Notes & Substitutions
Chocolate: Semi-sweet chocolate gives the cakes a balanced flavor. Dark chocolate works well if you prefer a deeper, less sweet dessert. Chop the chocolate into small pieces so it melts evenly.
Butter: Unsalted butter is best because it lets you control the amount of salt in the recipe. If you only have salted butter, you can still use it, but avoid adding extra salt.
Eggs and egg yolks: The extra yolks give the cakes a richer texture and help create that soft, custardy center. Room-temperature eggs also combine more smoothly with the melted chocolate.
Flour: Only a small amount is needed. It gives the cake enough structure to hold its shape without turning the center into a fully baked crumb.
Gluten-free option: You can replace the all-purpose flour with a suitable gluten-free flour blend. Since the recipe contains very little flour, the substitution is straightforward.
Ramekin coating: Sugar creates a delicate crust around the outside of the cake. You can also use cocoa powder if you prefer a less noticeable coating.
Equipment Needed
Equipment you need for making the chocolate lava cake recipe:
- 4 small oven-safe ramekins
- Small saucepan
- Medium mixing bowl
- Whisk
- Rubber spatula
- Baking sheet
- Measuring cups and spoons
- Kitchen scale, if available
- Oven mitts or a thick potholder
A kitchen scale is particularly useful when measuring chocolate and flour. Small differences in flour can affect the final texture.
Step-by-Step Instructions
1. Prepare the Ramekins
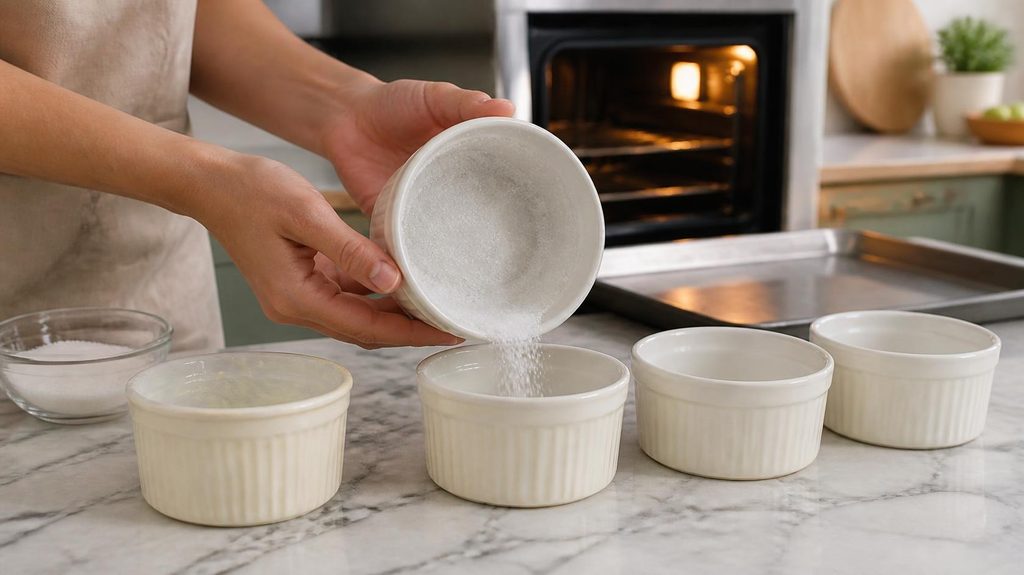
Preheat your oven to 350°F (175°C).
Lightly grease four small ramekins with nonstick spray or butter. Add a spoonful of granulated sugar to one ramekin and rotate it so the sugar coats the bottom and sides. Pour any excess into the next ramekin and repeat.
Place the prepared ramekins on a baking sheet. This makes them easier and safer to move into and out of the oven.
2. Melt the Chocolate and Butter

Fill a small pot with the diced butter and chocolate. Warm the mixture over low heat, stirring gently as the butter melts. Continue until the chocolate is totally melted and smooth.
After taking the saucepan off the burner, allow the mixture to cool somewhat. It should still be fluid but not extremely hot when added to the eggs.
3. Whisk the Eggs, Yolks, and Sugar
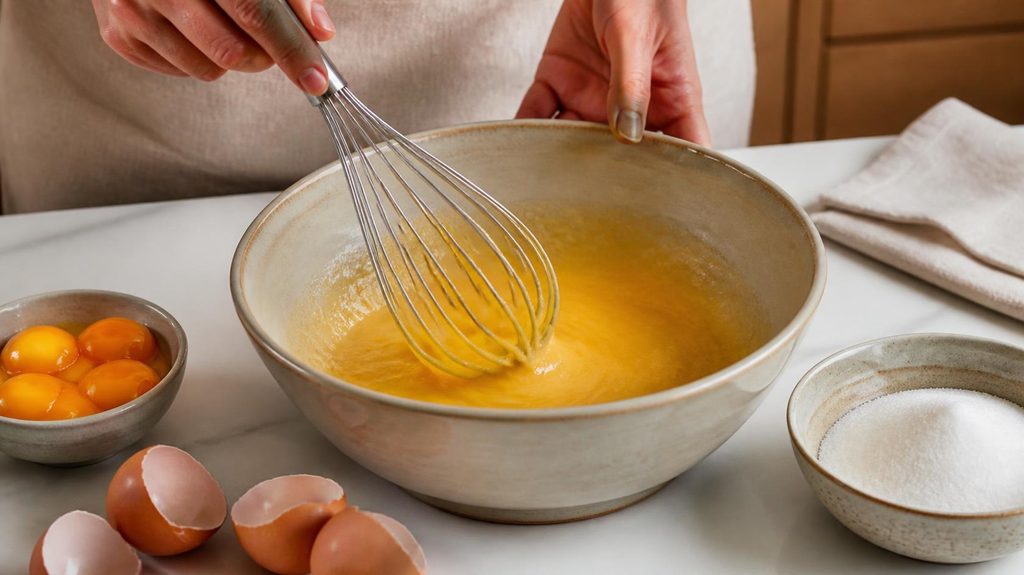
Add the eggs, egg yolks, and granulated sugar to a medium bowl.
Whisk until the mixture becomes slightly thicker and well combined. It does not have to be whipped to a high volume. The goal is simply to blend the eggs and sugar evenly.
4. Combine the Batter

Slowly add the slightly cooled chocolate mixture to the egg mixture while whisking.
Once combined, add the flour and gently mix until no dry streaks remain.
Avoid overmixing once the flour has been incorporated. The batter should be smooth and fairly thick.
5. Fill the Ramekins
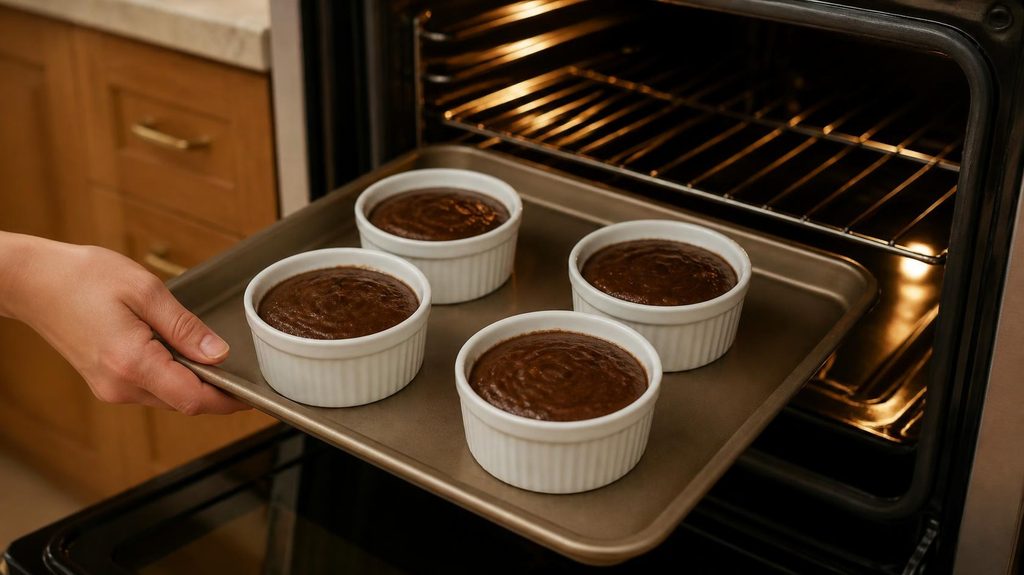
Evenly distribute the batter among the four ramekins that have been prepared. Try to keep the amounts as even as possible so the cakes finish baking at roughly the same time.
Place the ramekins on the baking sheet and carefully transfer them to the preheated oven.
6. Bake Until the Centers Are Jiggly
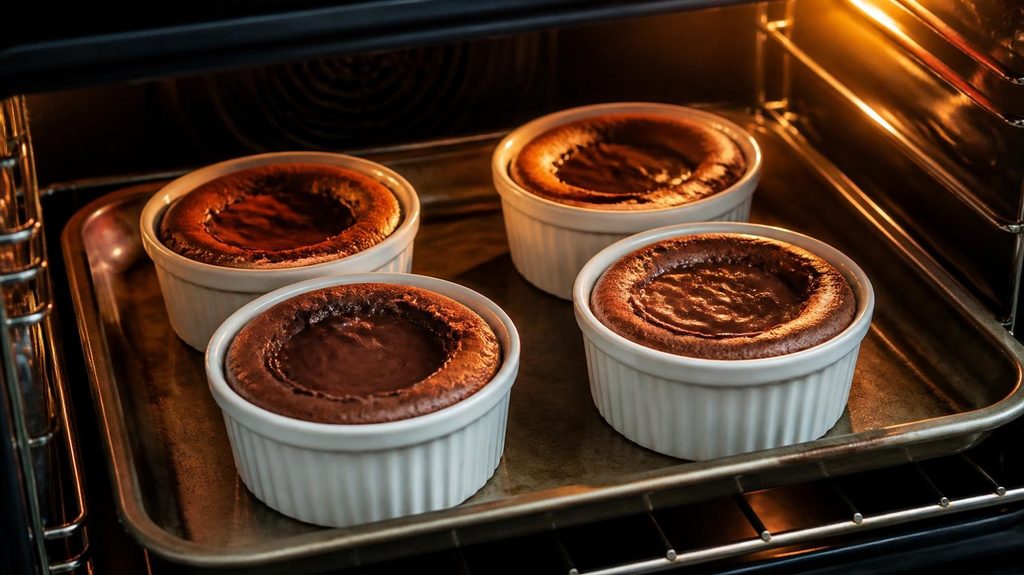
Bake for approximately 11 to 15 minutes.
The exact time can vary depending on your oven, ramekin size, and how molten you want the centers. Look for cakes that have firm-looking edges while the very center still appears soft and slightly jiggly.
Do not wait for the entire surface to look completely firm. That usually means the cakes have been baked too long.
7. Rest and Invert the Cakes

Remove the baking sheet from the oven and let the cakes rest for about 1 minute.
Place a serving plate upside down over a ramekin. Carefully flip the plate and ramekin together, then gently lift the ramekin away.
If the cake does not release immediately, give the ramekin a very gentle shake.
Serve immediately while the center is warm.
Expert Tips
Getting the molten center right is mostly about controlling the baking time.
- Preheat the oven completely. A properly heated oven helps the outside set quickly while the center remains soft.
- Watch the final minutes carefully. Lava cakes can move from perfectly molten to fully baked surprisingly quickly.
- Use room-temperature eggs. They blend more easily with the chocolate mixture.
- Do not overheat the chocolate. Gentle heat is enough to melt the butter and chocolate.
- Let the chocolate cool slightly. Adding very hot chocolate directly to the eggs can affect the mixture.
- Measure flour accurately. Don’t use excess flour;r use accurate measurements.
- Bake all the ramekins together. Keeping the portions similar helps them finish at the same time.
- Use an oven thermometer if needed. Home ovens can sometimes run hotter or cooler than the temperature displayed on the dial.
- Serve immediately. The centers continue to cook from residual heat after the cakes leave the oven.
Recipe Variations
Peanut Butter Chocolate Lava Cakes
Add a small spoonful of creamy peanut butter to the center of each portion before baking. The peanut butter melts into the chocolate for a rich combination.
Salted Caramel Lava Cakes
Add a small amount of thick caramel sauce to the center before baking, then finish the cakes with another drizzle of caramel and a tiny pinch of flaky salt.
Dark Chocolate Lava Cakes
Use high-cocoa dark chocolate for a more intense chocolate flavor. This version is especially good with sweet vanilla ice cream because the contrast keeps the dessert balanced.
Gluten-Free Lava Cakes
Use a gluten-free flour blend instead of regular all-purpose flour. Check your chocolate and other packaged ingredients if you need the entire dessert to be certified gluten-free.
Large Chocolate Lava Cake
You can bake the batter in one larger oven-safe baking dish, but the cooking time will be different. Watch the center carefully rather than relying on the individual-cake timing.
Serving Suggestions
Chocolate Lava Cakes are best served warm, especially when the center is still flowing.
Try pairing them with:
- Vanilla ice cream
- Whipped cream
- Fresh strawberries or raspberries
- Chocolate sauce
- Salted caramel
- Powdered sugar
- Fresh mint
- Chopped toasted nuts
Put the warm cake in the middle of a platter and arrange a tiny scoop of vanilla ice cream next to it for a sophisticated appearance. A few berries and a light dusting of powdered sugar are enough to make it look polished without adding much work.
Storage & Reheating
Chocolate Lava Cakes are best eaten immediately because the molten center is the main attraction.
To make ahead: Fill the prepared ramekins, cover them tightly, and refrigerate. When you are ready to bake, allow the chilled batter to lose some of its refrigerator chill and expect to add extra baking time. Watch the centers rather than following the original time blindly.
For leftovers: A baked lava cake can be refrigerated in an airtight container, but the center will become firmer after chilling.
Reheating: Use the microwave for a very short time. Be careful not to overheat the cake, as the center can become fully set.
For the best texture and presentation, preparing and baking the cakes shortly before serving is recommended.
Common Mistakes to Avoid
- Overbaking the cakes: This is the most common problem. You lose the molten texture if the center is totally solid.
- Using too much flour: Extra flour creates a thicker, more traditional cake texture.
- Adding very hot chocolate to the eggs: Let the melted mixture cool slightly before combining.
- Skipping ramekin preparation: A well-greased and coated ramekin helps the cakes release cleanly.
- Uneven portions: If one ramekin contains significantly more batter, the cakes will not finish at the same time.
- Opening the oven repeatedly: Frequent temperature changes can affect baking.
- Waiting too long to serve: The center continues to thicken as the cake cools.
Frequently Asked Questions
How do I know when Chocolate Lava Cakes are done?
The edges should look set while the center remains soft and slightly jiggly. The middle should not look completely firm.
Can I use milk chocolate?
Yes. Milk chocolate can be used, but it will produce a sweeter and milder cake. Semi-sweet or dark chocolate gives a more balanced chocolate flavor.
Can I make Chocolate Lava Cakes without flour?
Yes. Flour can be omitted for a flour-free version, although the texture will be slightly different and more delicate.
Can I prepare lava cake batter ahead of time?
Yes. You can portion the batter into the ramekins, cover them, and refrigerate them before baking. Chilled batter generally needs additional baking time.
Why did my lava cake not have a molten center?
The most common reason is overbaking. Oven temperature, ramekin size, and batter temperature can all affect the result, so start checking the cakes near the lower end of the recommended baking time.
Can I bake lava cakes in a muffin pan?
Yes. A muffin pan can work when you do not have ramekins. The smaller portions can bake faster, so monitor them closely.
What chocolate is best for lava cakes?
Semi-sweet or dark chocolate works particularly well. Choose a chocolate you enjoy eating because its flavor will be noticeable in the finished dessert.
Can I freeze Chocolate Lava Cakes?
The cakes can be frozen after baking, although the texture of the center may change. For the best molten texture, freshly baked cakes are preferable.
Nutrition Information (Approximate)
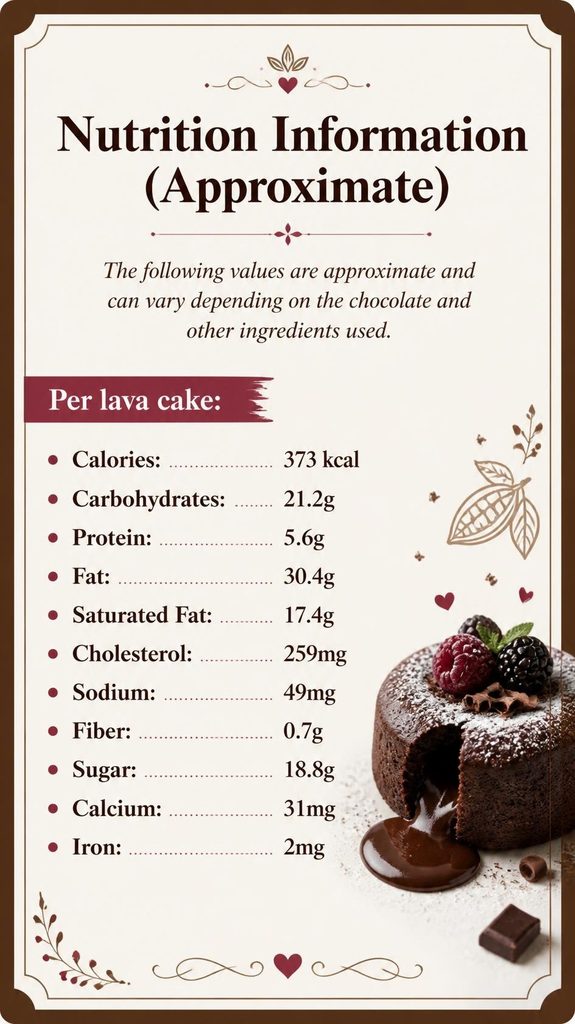
The following values are approximate and can vary depending on the chocolate and other ingredients used.
Per lava cake:
- Calories: 373 kcal
- Carbohydrates: 21.2g
- Protein: 5.6g
- Fat: 30.4g
- Saturated Fat: 17.4g
- Cholesterol: 259mg
- Sodium: 49mg
- Fiber: 0.7g
- Sugar: 18.8g
- Calcium: 31mg
- Iron: 2mg
Adding ice cream, caramel, chocolate sauce, or other toppings will increase the nutritional values.
Recipe Card (Printable Summary)
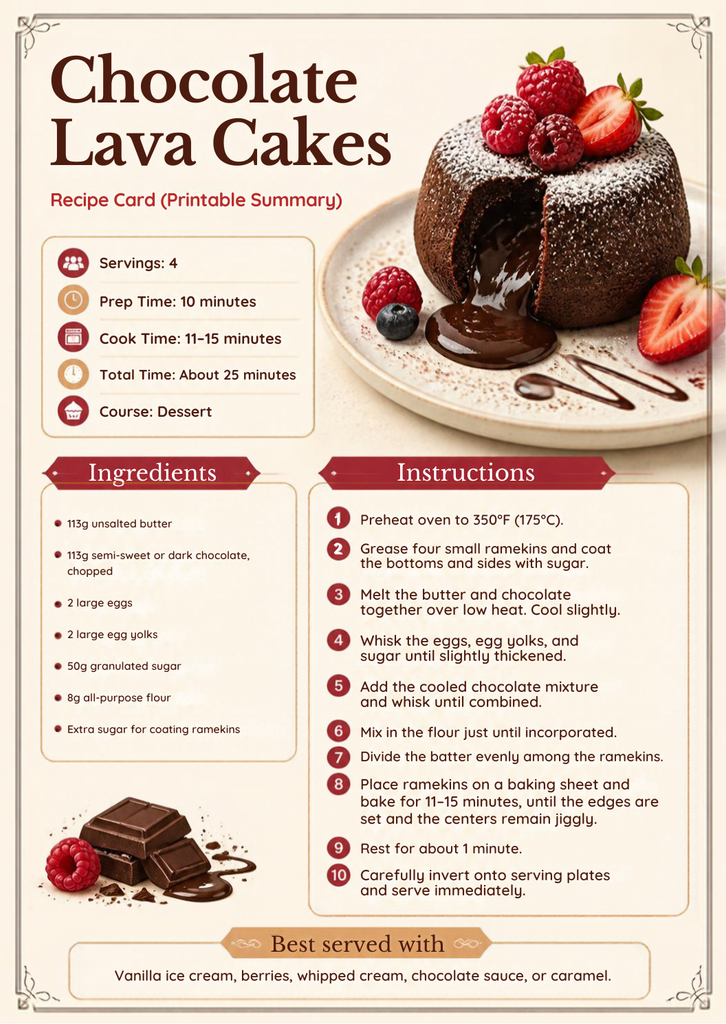
Chocolate Lava Cakes
Servings: 4
Prep Time: 10 minutes
Cook Time: 11–15 minutes
Total Time: About 25 minutes
Course: Dessert
Ingredients
- 113g unsalted butter
- 113g semi-sweet or dark chocolate, chopped
- 2 large eggs
- 2 large egg yolks
- 50g granulated sugar
- 8g all-purpose flour
- Extra sugar for coating ramekins
Instructions
- Preheat oven to 350°F (175°C).
- Grease four small ramekins and coat the bottoms and sides with sugar.
- Melt the butter and chocolate together over low heat. Cool slightly.
- Whisk the eggs, egg yolks, and sugar until slightly thickened.
- Add the cooled chocolate mixture and whisk until combined.
- Mix in the flour just until incorporated.
- Divide the batter evenly among the ramekins.
- Place ramekins on a baking sheet and bake for 11–15 minutes, until the edges are set and the centers remain jiggly.
- Rest for about 1 minute.
- Carefully invert onto serving plates and serve immediately.
Best served with: Vanilla ice cream, berries, whipped cream, chocolate sauce, or caramel.
Conclusion
These Chocolate Lava Cakes are proof that an impressive dessert does not have to be complicated. With a few basic ingredients and careful attention to baking time, you can create soft individual cakes with a warm, molten chocolate center in about 25 minutes.
The key is simple: do not overbake them. Once the edges are set and the center still has a gentle jiggle, take them out and serve them warm. Add a scoop of vanilla ice cream or a handful of fresh berries, and you have an easy dessert that feels far more special than the effort required.


Introduction
There is something timeless about a homemade vanilla cake. It does not need an unusual flavor or complicated decoration to be special. When the crumb is tender, the texture is light, and the vanilla flavor comes through clearly, even a simple slice feels like a treat. This best vanilla cake recipe combines basic baking ingredients with a few dependable techniques to create two soft, golden cake layers that are easy to decorate.
The recipe is suitable for both everyday baking and celebrations. You can keep the finished cake simple with a smooth layer of best vanilla cake buttercream, or dress it up with sprinkles, berries, or piped decorations. Along the way, you will also find useful baking advice for measuring flour, preparing your pans, mixing the batter, and making a smooth Swiss-style buttercream.
Why You’ll Love This Best Vanilla Cake Recipe
This homemade vanilla cake is designed to be approachable while still producing a bakery-style result.
- Soft and tender crumb: Buttermilk helps keep the cake moist and delicate.
- Classic vanilla taste: Pure vanilla extract gives the cake a familiar, fragrant flavor.
- Easy ingredients: Everything can be found in a typical kitchen or grocery store.
- Light texture: Properly creamed butter and sugar help give the layers a pleasant lift.
- Simple to decorate: Vanilla buttercream creates a smooth base for almost any decoration.
- Perfect for celebrations: It works beautifully for birthdays, anniversaries, showers, and family gatherings.
- Good for preparing ahead: The cake layers and frosting can be made before assembly.
- Flexible recipe: The batter can inspire cupcakes, sheet cakes, funfetti versions, and other variations.
Ingredients For Making the Best Vanilla Cake

For the Vanilla Cake
- 2 1/2 cups all-purpose flour
- 2 1/2 teaspoons baking powder
- 1/2 teaspoon salt
- 1 cup unsalted butter, softened
- 1 3/4 cups granulated sugar
- 4 large eggs, at room temperature
- 2 teaspoons pure vanilla extract
- 1 cup buttermilk, at room temperature
For the Vanilla Buttercream
- 4 large egg whites
- 1 1/2 cups granulated sugar
- 1 1/2 cups unsalted butter, softened
- 2 teaspoons pure vanilla extract
- Small pinch of salt, optional
For Decorating
- Sprinkles
- Extra buttercream for piping
- Fresh berries, optional
- Small edible decorations, optional
Equipment Needed for Best Vanilla Cake
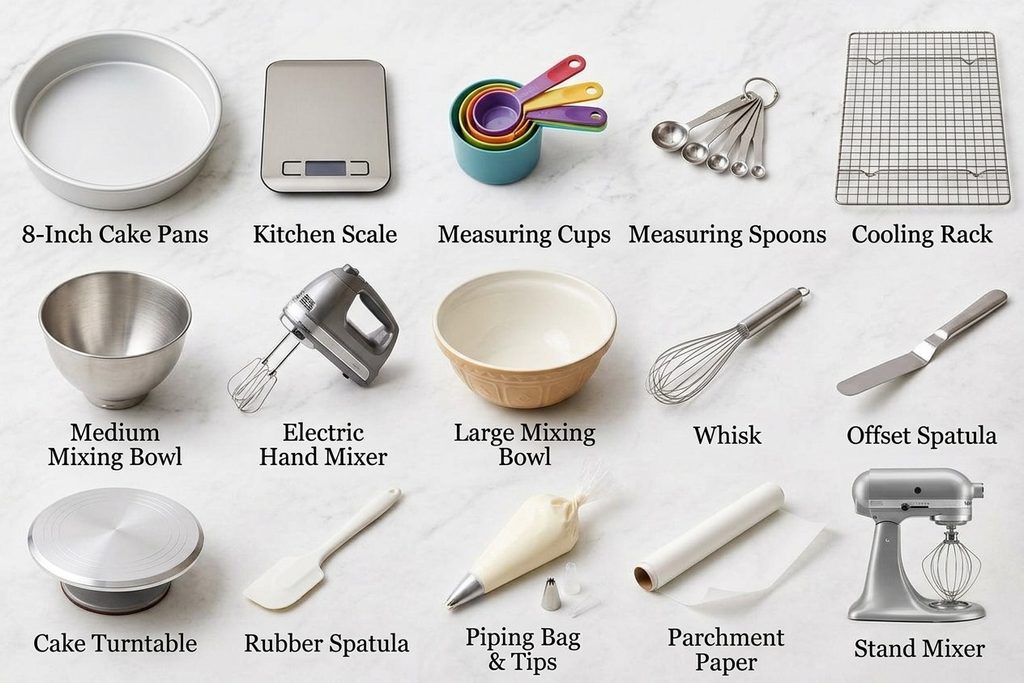
Most home bakers will already have everything needed to make this cake. Prepare:
- Two 8-inch round cake pans
- Large and medium mixing bowls
- Electric hand mixer or stand mixer
- Measuring cups and spoons
- Kitchen scale, optional
- Whisk
- Rubber spatula
- Cooling rack
- Parchment paper
- Cake turntable, optional
- Offset spatula, optional
- Piping bag and piping tip, optional
A stand mixer can make the buttercream easier to prepare, especially during the longer whipping stage. However, a good electric hand mixer can also do the job.
Step-by-Step Instructions For Best Vanilla Cake
1. Get the Cake Pans Ready
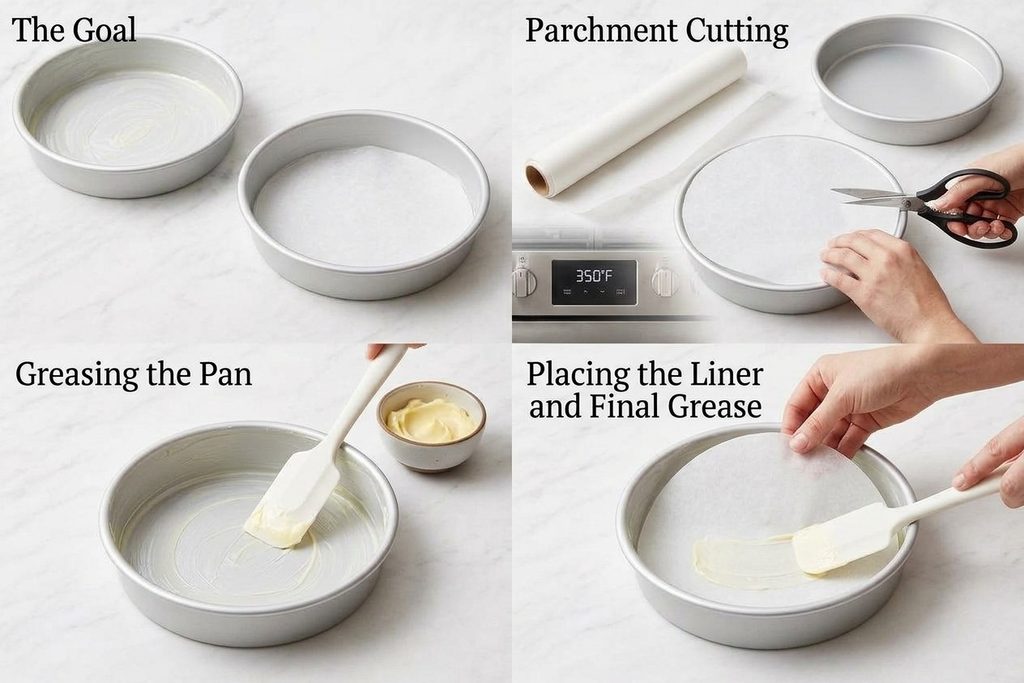
Set the oven to 350°F (175°C) and allow it to preheat fully.
Grease two 8-inch round cake pans. Cut parchment paper to fit the bottoms and place it inside each pan. Lightly grease the parchment as well.
When the cake is done, it may go straight into the oven because the pans were prepared before the batter was mixed.
2. Mix the Dry Ingredients

Mix the flour, baking powder, and salt in a bigger bowl. Stir everything until the ingredients are thoroughly mixed. This helps prevent concentrated pockets of baking powder or salt in the finished cake. Set the bowl aside.
3. Beat the Butter and Sugar
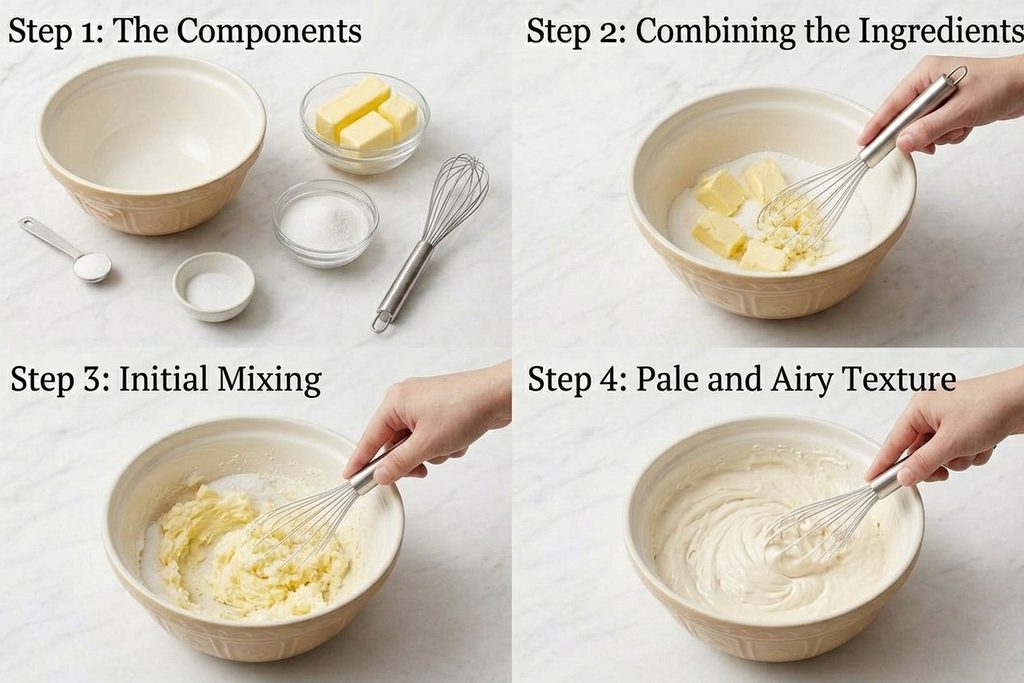
In a large mixing bowl, combine the granulated sugar and softened butter. Beat for approximately 2 to 3 minutes until the mixture becomes pale, creamy, and noticeably airy.
This stage is important because the mixing process helps incorporate air into the butter. Take your time rather than stopping as soon as the ingredients look combined.
4. Incorporate the Eggs and Vanilla
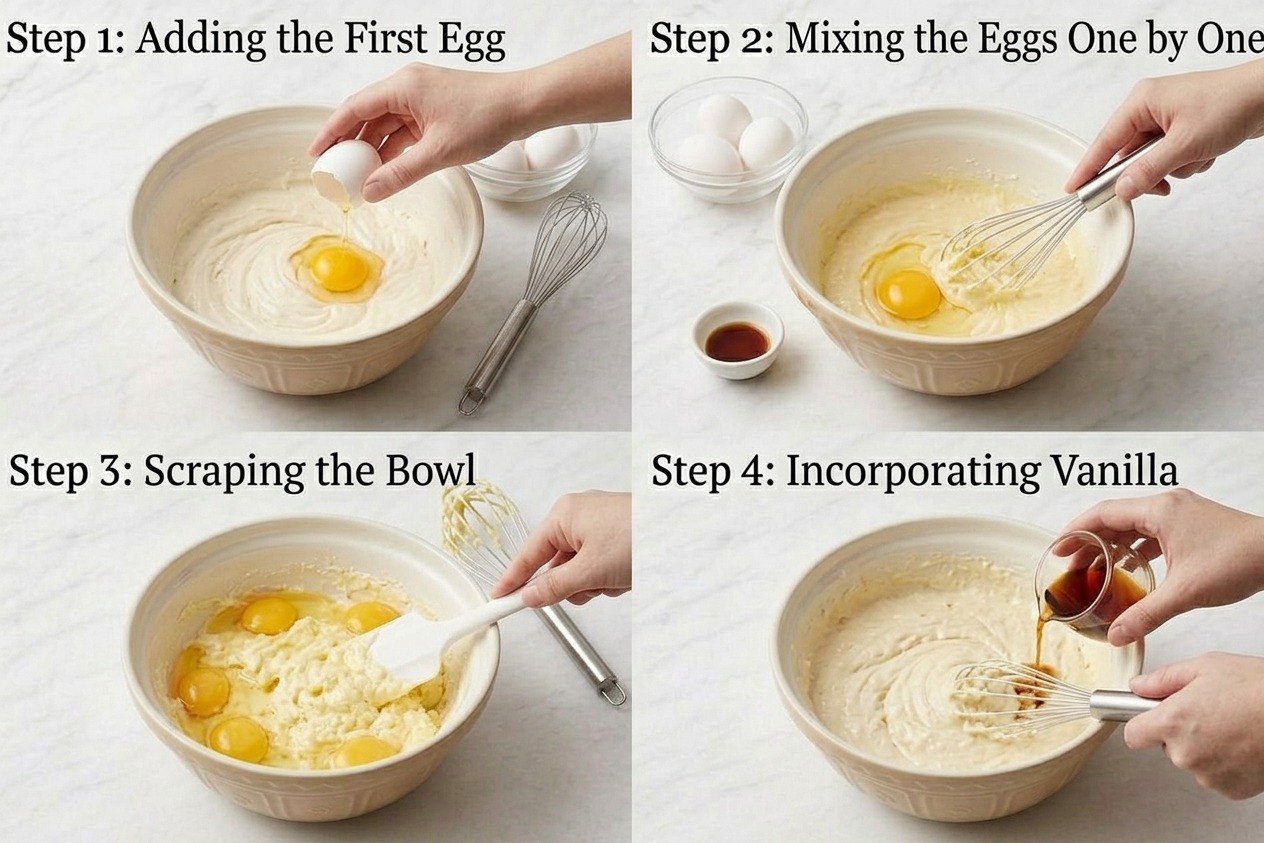
Beat in one egg after adding it to the butter mixture. Repeat with the remaining eggs, adding them individually rather than all at once. Scrape the sides of the bowl whenever needed.
Pour in the vanilla extract and mix briefly.
The batter may appear slightly curdled or uneven at this point. That is not necessarily a problem. As more components are added, the mixture will come together.
5. Combine the Flour Mixture and Buttermilk
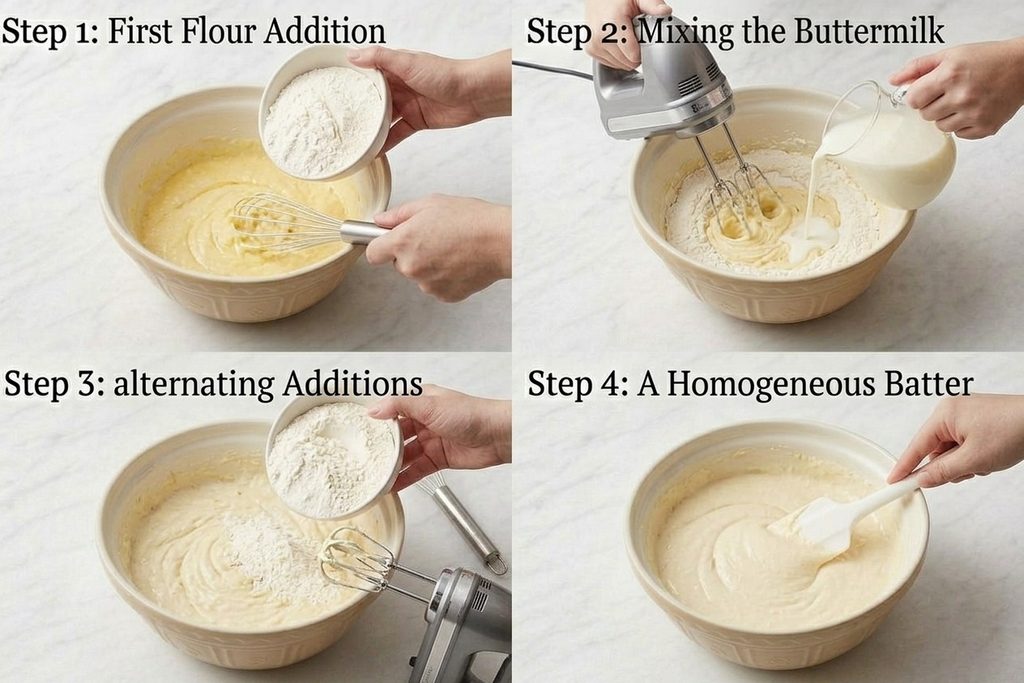
Fill the bowl with about one-third of the flour mixture. On low speed, gradually mix.
Add roughly half of the buttermilk and stir until almost incorporated. Keep switching between the buttermilk and the remaining flour mixture.
Add the last of the dry ingredients to finish. As soon as the batter is homogeneous and there is no longer any loose flour visible, stop mixing. Overworking the batter can make the finished cake heavier.
6. Portion the Batter
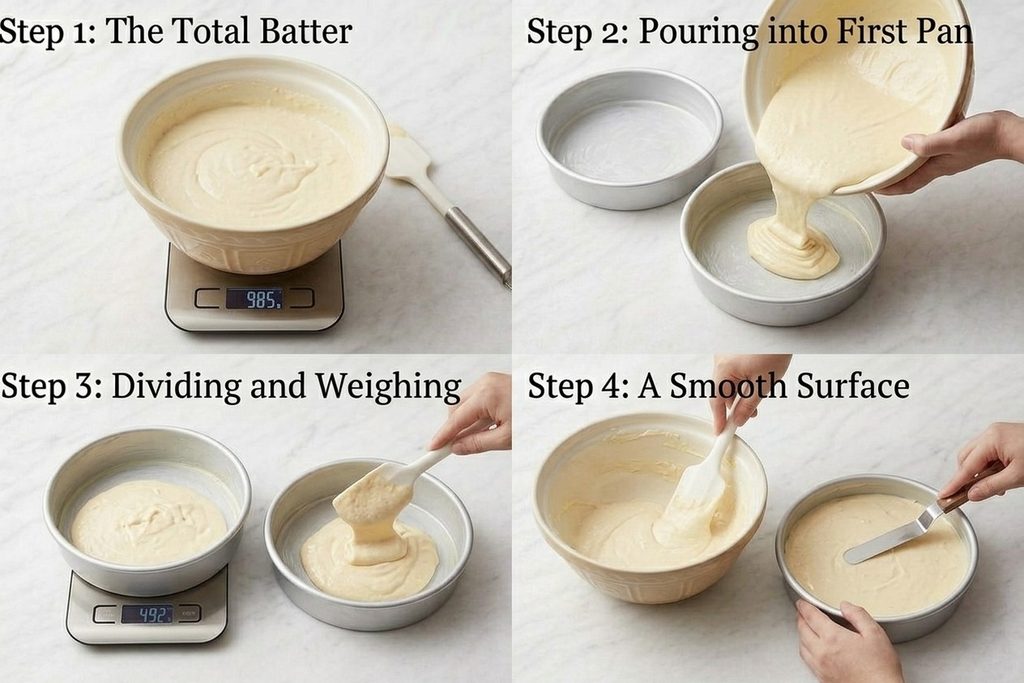
Divide the batter between the two prepared cake pans.
Use a rubber spatula to distribute it evenly and smooth the surface.
For especially even layers, you can weigh the batter and divide the total amount equally between the pans.
7. Bake Until Done
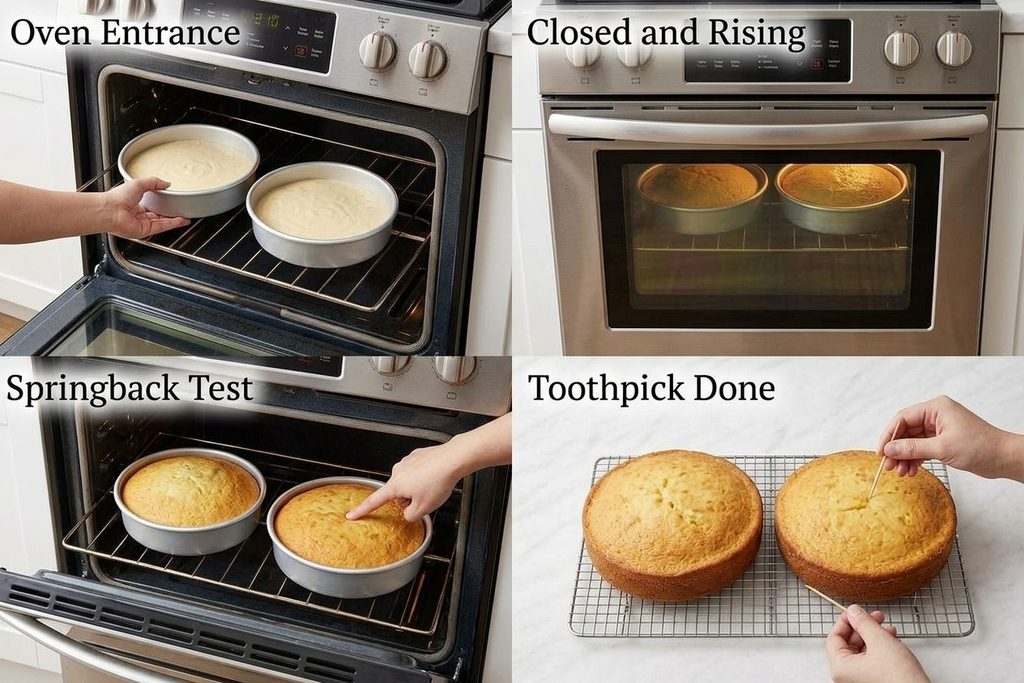
Place both pans in the preheated oven. Bake for approximately 30 to 35 minutes. Check the cakes toward the end of the suggested baking time. They should be lightly golden on top, and the centers should gently spring back when touched.
Put a toothpick in the middle of each cake. It should emerge either clean or with a few damp crumbs on it. Try not to repeatedly open the oven while the cakes are rising. Keeping the oven door closed helps maintain a steady baking temperature.
8. Let the Layers Cool
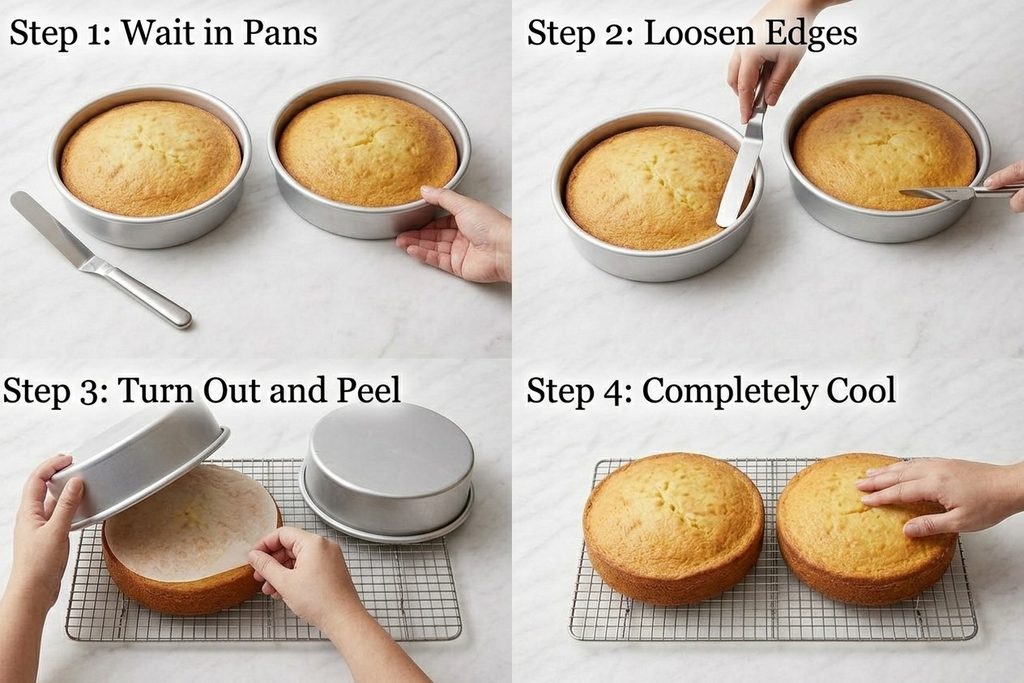
Leave the baked cakes in their pans for about 10 minutes.
If needed, carefully release the edges using a spatula or tiny knife. Turn the cakes onto a cooling rack and peel away the parchment paper. Allow both layers to cool completely before adding frosting.
This step should not be rushed. Buttercream can soften quickly when it comes into contact with warm cake, making the layers harder to stack and decorate.
9. Make the Vanilla Buttercream

In a sanitized, heatproof bowl, combine the egg whites and granulated sugar.
Over a saucepan of water that is just boiling, place the bowl. Whisk the mixture continuously until the sugar dissolves and the mixture reaches approximately 160°F (71°C).
Transfer the mixture to a clean mixing bowl and whip until it becomes thick, glossy, and cool.
Begin adding the softened butter gradually while continuing to mix.
Add the vanilla essence and, if desired, a pinch of salt after the butter has been combined. Beat the buttercream until it is smooth and creamy.
Do not worry if the frosting temporarily looks separated or curdled. Meringue-based buttercream can pass through this stage before becoming smooth. Keep mixing until the texture comes together.
10. Stack and Frost the Cake

On a cake board or serving dish, place one fully cooled layer of cake. Spread a generous, even layer of vanilla buttercream across the top.
Gently press the second piece of cake into place on top of the frosting. Cover the cake’s top and sides with the leftover buttercream. An offset spatula can help create a smooth finish.
For decoration, add colorful sprinkles, piped buttercream, fresh berries, or small edible decorations.
Expert Tips for Making the Best Vanilla Cake
A few simple habits can make this cake more consistent from one bake to the next.
Bring Ingredients to Room Temperature
Buttermilk, eggs, and butter combine more readily at room temperature. This creates a smoother batter and helps the ingredients emulsify properly.
Weigh the Flour When Possible
Flour can become compacted in a measuring cup, which may result in using more than the recipe requires. A kitchen scale provides greater accuracy.
Use the spoon-and-level approach if you do not have a scale.
Pay Attention to the Creaming Stage
The butter and sugar should look lighter and fluffier after pressing. This goes beyond simply mixing ingredients. It has a crucial role in creating the texture of the cake.
Mix Gently After Adding Flour
Once flour enters the batter, avoid unnecessary mixing. Stop once everything is incorporated.
Watch the Baking Time
Every oven behaves slightly differently. Start checking the cake near the lower end of the suggested baking range rather than waiting until the full time has passed.
Let the Cake Cool Fully
A completely cool cake is much easier to frost. If the layers are warm, the buttercream may become soft, and the cake can shift during assembly.
Recipe Variations For Best Vanilla Cake
Vanilla Cupcakes
Use the same batter to make cupcakes. Line a muffin pan with paper liners, divide the batter between the cups, and begin checking them much earlier than the cake layers.
Vanilla Sheet Cake
Instead of dividing the batter between round pans, bake it in an appropriate rectangular pan. This option is especially convenient when you want an easy cake without stacking layers.
Lemon Vanilla Cake
For a brighter flavor, add finely grated lemon zest to the batter. The citrus adds freshness without overpowering the vanilla.
Chocolate Chip Best Vanilla Cake
Fold mini chocolate chips into the batter before transferring it to the pans. Small chips work particularly well because they distribute more evenly.
Berry Vanilla Cake
Add fresh strawberries, raspberries, or blueberries between the cake layers with the buttercream.
Serving Suggestions For Best Vanilla Cake
A slice of best vanilla cake is satisfying by itself, but toppings can make it feel completely different.
Consider serving it with:
- Fresh strawberries
- Raspberries or blueberries
- Homemade berry sauce
- Powdered sugar
- Whipped cream
- Vanilla ice cream
- Chocolate sauce
- Caramel sauce
- Fresh fruit
- Additional vanilla buttercream
For a children’s birthday party, colorful sprinkles and piped frosting are simple choices that look festive. For a more refined presentation, smooth the buttercream and finish the cake with fresh berries or delicate piping.
Storage And Reheating
Room-Temperature Storage
A fully frosted cake can generally remain covered at room temperature for a short period if the room is cool. Keep it protected from sunlight, heat, and humidity.
Refrigerator
For longer storage, cover the cake well and place it in the refrigerator.
Chilling makes buttercream firm, so allow the cake to warm slightly before serving. This improves both the frosting texture and the softness of the cake.
Freezing
For convenient make-ahead baking, freeze the cake layers before frosting them.
The layers can be kept frozen for up to about 3 months for best quality.
The buttercream can also be made ahead. Refrigerate or freeze it in a suitable airtight container. Before using it, allow it to soften and beat it again until smooth and spreadable.
Common Mistakes to Avoid for Best Vanilla Cake
Starting With Cold Butter
Cold butter will not become properly aerated during the creaming stage.
Fix: Allow the butter to soften naturally before mixing.
Adding Too Much Flour
Over-measuring flour can make the cake dry or dense.
Fix: Weigh the flour when possible. Otherwise, use the spoon-and-level method.
Mixing the Batter Too Much
Excessive mixing after adding flour can affect the tenderness of the cake.
Fix: Mix just until the flour disappears.
Filling the Pans Too Much
Overfilled cake pans can cause batter to spill over or bake unevenly.
Fix: Divide the batter evenly between the two pans and avoid filling them excessively.
Decorating Before the Cake Cools
Warm cake can soften the frosting and make the layers difficult to handle.
Fix: Cool the layers completely before assembly.
Leaving Out the Parchment
Cake can stick even when a pan has been greased.
Fix: Use parchment on the bottom of each cake pan for easier removal.
Checking the Oven Too Frequently
Opening the oven repeatedly can allow heat to escape while the cake is still rising.
Fix: Keep the door closed as much as possible and check the cake near the end of the baking period.
Frequently Asked Questions for the Best Vanilla Cake
Can I make this best vanilla cake without buttermilk?
Yes, you can add a few drops of white vinegar and mix it with a cup of milk. Let the mixture stand for around 10 minutes before adding it to the batter.
What causes a best vanilla cake to become dense?
Several factors can contribute to a dense cake, including excess flour, insufficient creaming, overmixing, or old baking powder. Accurate measuring and careful mixing are key to getting a lighter crumb.
Is salted butter okay to use?
Yes. Salted butter can be used if that is what you have available. Keep in mind that it will add some additional salt to the recipe, so the final flavor may vary slightly.
How can I tell when the cake is fully baked?
Check the center with a toothpick. It should come out clean or show only a few moist crumbs. The upper layer should spring back gently when pressed lightly.
Can I prepare the cake layers in advance?
Yes. Once the layers have cooled completely, wrap them securely and store them until you are ready to decorate. They can also be frozen for longer storage.
Can this batter be used for cupcakes?
Yes. The batter works well for cupcakes. Divide it among lined muffin cups and begin testing for doneness much earlier because smaller cakes bake faster.
Can I use another type of frosting?
Definitely. Although vanilla buttercream is a natural match, chocolate frosting, cream cheese frosting, whipped cream, and powdered sugar glaze can all work well.
Nutrition Information For Best Vanilla Cake
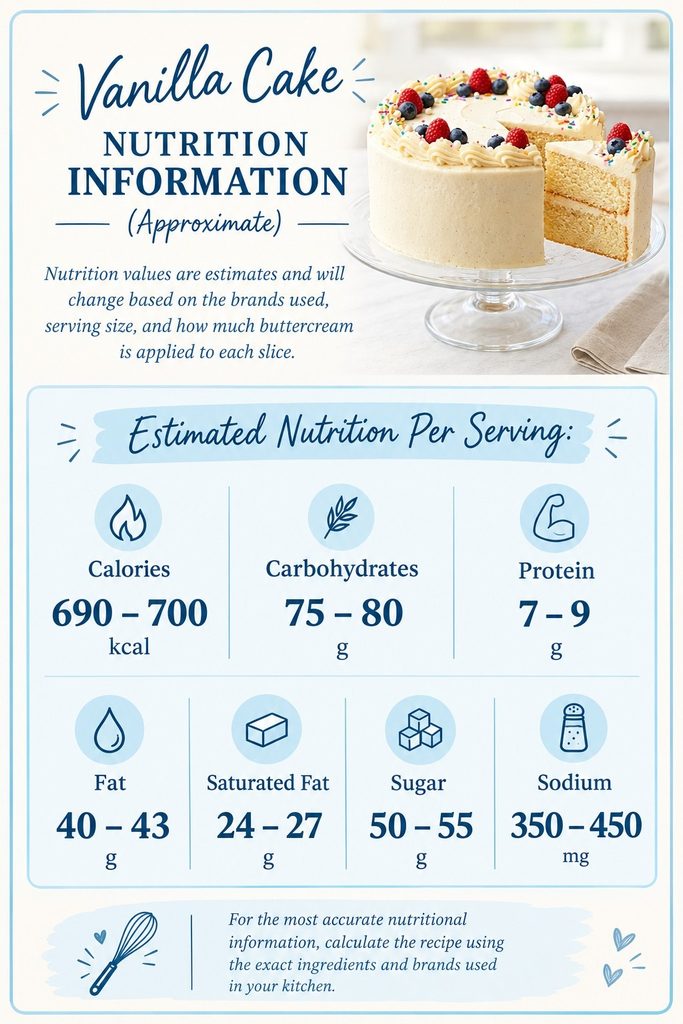
Nutrition values are estimates and will change based on the brands used, serving size, and how much buttercream is applied to each slice.
Estimated nutrition per serving:
- Calories: 690 to 700 kcal
- Carbohydrates: 75 to 80 g
- Protein: 7 to 9 g
- Fat: 40 to 43 g
- Saturated Fat: 24 to 27 g
- Sugar: 50 to 55 g
- Sodium: 350 to 450 mg
For the most accurate nutritional information, calculate the recipe using the exact ingredients and brands used in your kitchen.
Recipe Card (Printable Summary)
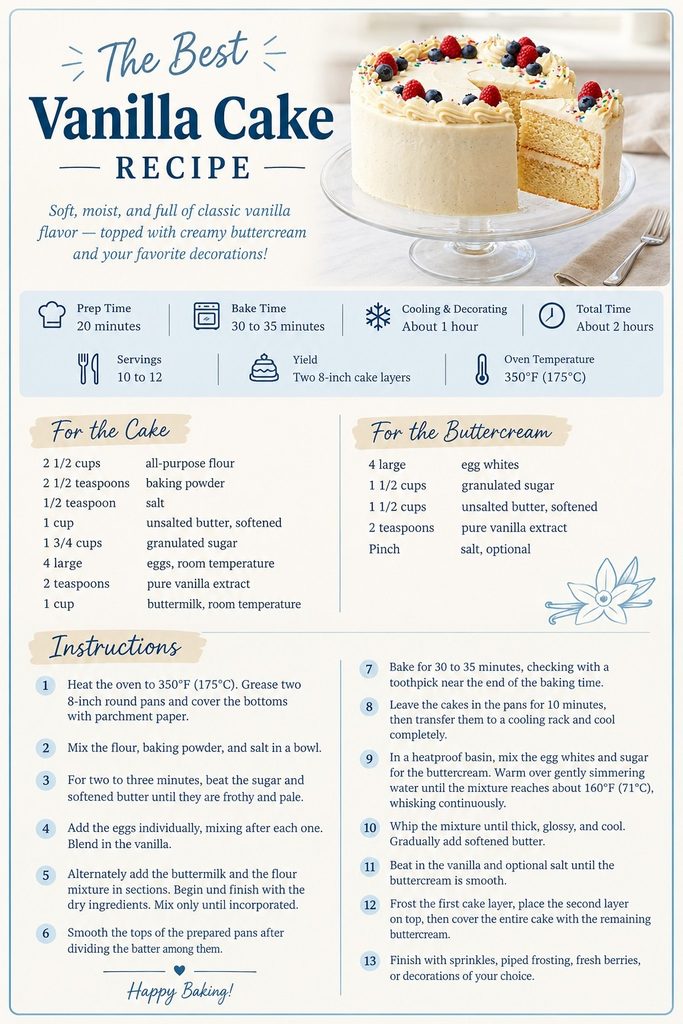
The Best Vanilla Cake Recipe
Prep Time: 20 minutes
Bake Time: 30 to 35 minutes
Cooling & Decorating: About 1 hour
Total Time: About 2 hours
Servings: 10 to 12
Yield: Two 8-inch cake layers
Oven Temperature: 350°F (175°C)
Ingredients
For the Cake:
- 2 1/2 cups all-purpose flour
- 2 1/2 teaspoons baking powder
- 1/2 teaspoon salt
- 1 cup unsalted butter, softened
- 1 3/4 cups granulated sugar
- 4 large eggs, room temperature
- 2 teaspoons pure vanilla extract
- 1 cup buttermilk, room temperature
For the Buttercream:
- 4 large egg whites
- 1 1/2 cups granulated sugar
- 1 1/2 cups unsalted butter, softened
- 2 teaspoons pure vanilla extract
- Pinch of salt, optional
Instructions
- Heat the oven to 350°F (175°C). Grease two 8-inch round pans and cover the bottoms with parchment paper.
- Mix the flour, baking powder, and salt in a bowl.
- For two to three minutes, beat the sugar and softened butter until they are frothy and pale.
- Add the eggs individually, mixing after each one. Blend in the vanilla.
- Alternately add the buttermilk and the flour mixture in sections. Begin and finish with the dry ingredients. Mix only until incorporated.
- Smooth the tops of the prepared pans after dividing the batter among them.
- Bake for 30 to 35 minutes, checking with a toothpick near the end of the baking time.
- Leave the cakes in the pans for 10 minutes, then transfer them to a cooling rack and cool completely.
- In a heatproof basin, mix the egg whites and sugar for the buttercream. Warm over gently simmering water until the mixture reaches about 160°F (71°C), whisking continuously.
- Whip the mixture until thick, glossy, and cool. Gradually add softened butter.
- Beat in the vanilla and optional salt until the buttercream is smooth.
- Frost the first cake layer, place the second layer on top, then cover the entire cake with the remaining buttercream.
- Finish with sprinkles, piped frosting, fresh berries, or decorations of your choice.
Conclusion for Best Vanilla Cake
A dependable best vanilla cake recipe does not have to be complicated. With ordinary ingredients and attention to a few key techniques, you can create a cake that is soft, flavorful, and suitable for almost any occasion. Creaming the butter and sugar properly, measuring flour accurately, using room-temperature ingredients, and avoiding unnecessary mixing all help produce a better result.
The finished cake has a delicate vanilla crumb and a creamy buttercream topping that can be kept simple or decorated for a special event. Whether you are making a birthday cake, preparing dessert for guests, or simply want a homemade treat with a classic flavor, this recipe gives you plenty of room to make it your own.

Introduction
Chocolate desserts are hard to resist, especially when they are rich, creamy, and easy to make at home. Whether you want a quick treat after dinner or a dessert for a special gathering, simple chocolate dessert recipes can turn everyday ingredients into something delicious.
This easy chocolate dessert combines a smooth, rich chocolate mixture with a soft and creamy texture. It uses common ingredients such as chocolate, cocoa powder, cream, butter, and sugar. You can serve it on its own or dress it up with berries, whipped cream, nuts, or chocolate shavings.
Why You’ll Love This Recipe
There are plenty of reasons to keep this chocolate dessert recipe in your collection:
- Easy to make: The preparation uses simple techniques and basic kitchen equipment.
- Rich chocolate flavor: Chocolate and cocoa powder create a deeper flavor.
- Simple ingredients: Most ingredients are easy to find.
- Customizable: Add nuts, berries, caramel, or whipped cream.
- Great for guests: Individual servings can make this simple dessert look elegant.
- Make-ahead friendly: It can be prepared in advance and chilled until ready to serve.
Ingredients For Chocolate Dessert
This recipe makes approximately 6 servings.
Main Ingredients
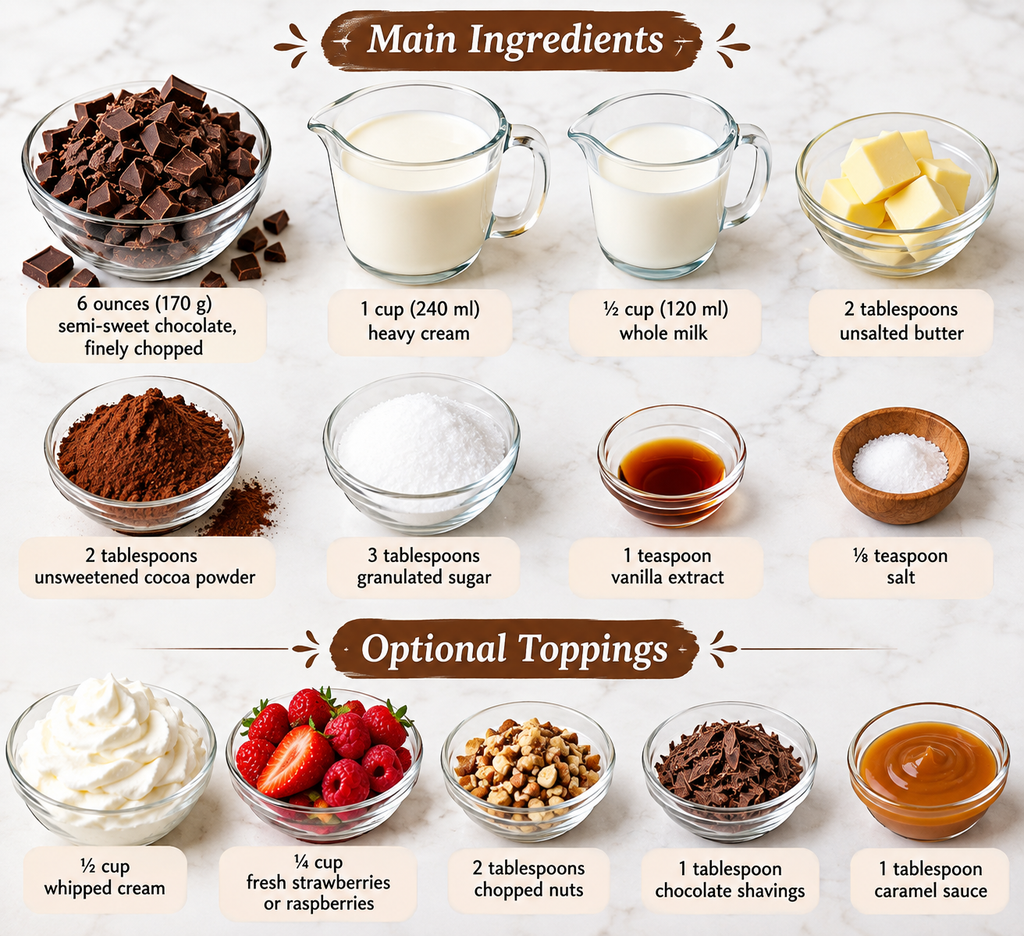
- 6 ounces (170 g) semi-sweet chocolate, finely chopped
- 1 cup (240 ml) heavy cream
- ½ cup (120 ml) whole milk
- 2 tablespoons unsalted butter
- 2 tablespoons unsweetened cocoa powder
- 3 tablespoons granulated sugar
- 1 teaspoon vanilla extract
- ⅛ teaspoon salt
Optional Toppings
- ½ cup whipped cream
- ¼ cup fresh strawberries or raspberries
- 2 tablespoons chopped nuts
- 1 tablespoon chocolate shavings
- 1 tablespoon caramel sauce
Use good-quality chocolate for the best flavor. Semi-sweet chocolate provides a nice balance, but dark chocolate can be used if you prefer a more intense taste.
Equipment Needed For Chocolate Dessert
You only need a few basic tools:
- Medium saucepan
- Heatproof mixing bowl
- Whisk
- Rubber spatula
- Measuring cups and spoons
- Six small serving glasses or dessert cups
- Refrigerator
Step-by-Step Instructions For Chocolate Dessert
1. Prepare the Chocolate
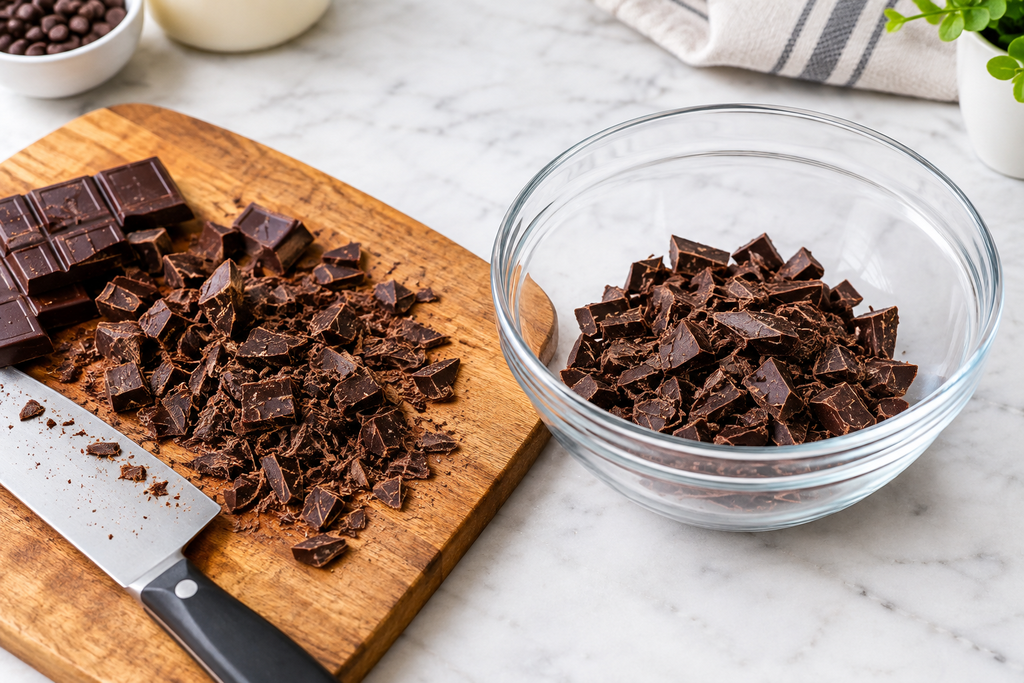
Chop the chocolate finely and put it in a bowl that can withstand heat. Smaller pieces melt more evenly and quickly.
Set the bowl aside while you prepare the warm cream mixture.
2. Heat the Cream and Milk
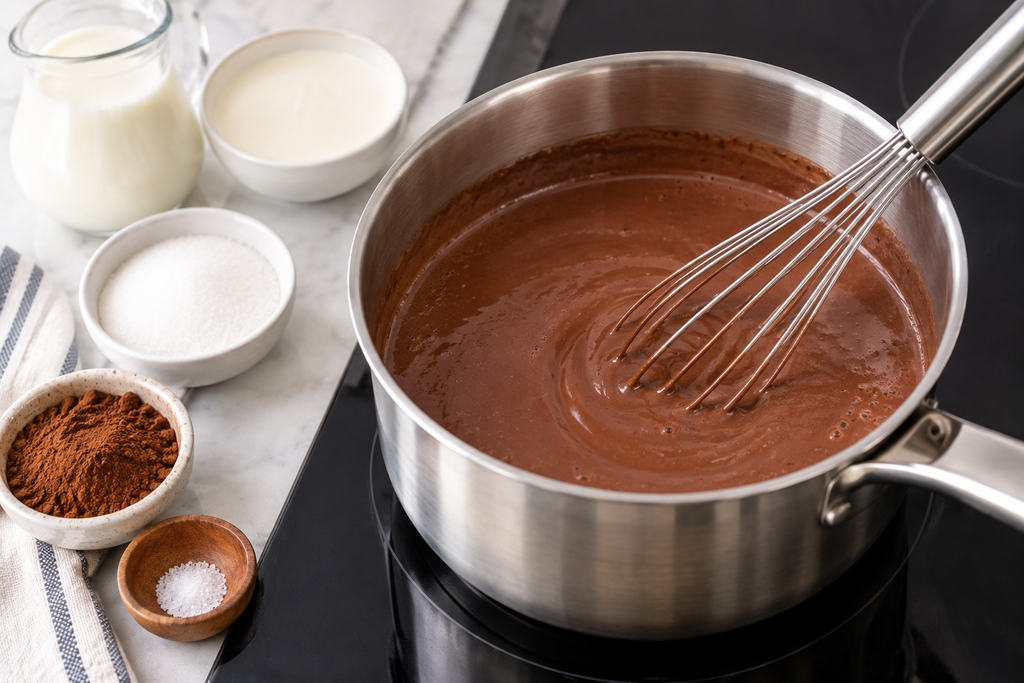
Add the heavy cream, milk, sugar, cocoa powder, and salt to a medium saucepan.
Warm the mixture over medium-low heat, whisking frequently. Do not let it come to a full boil. Heat it until the sugar dissolves and the mixture is hot and smooth.
3. Melt the Chocolate
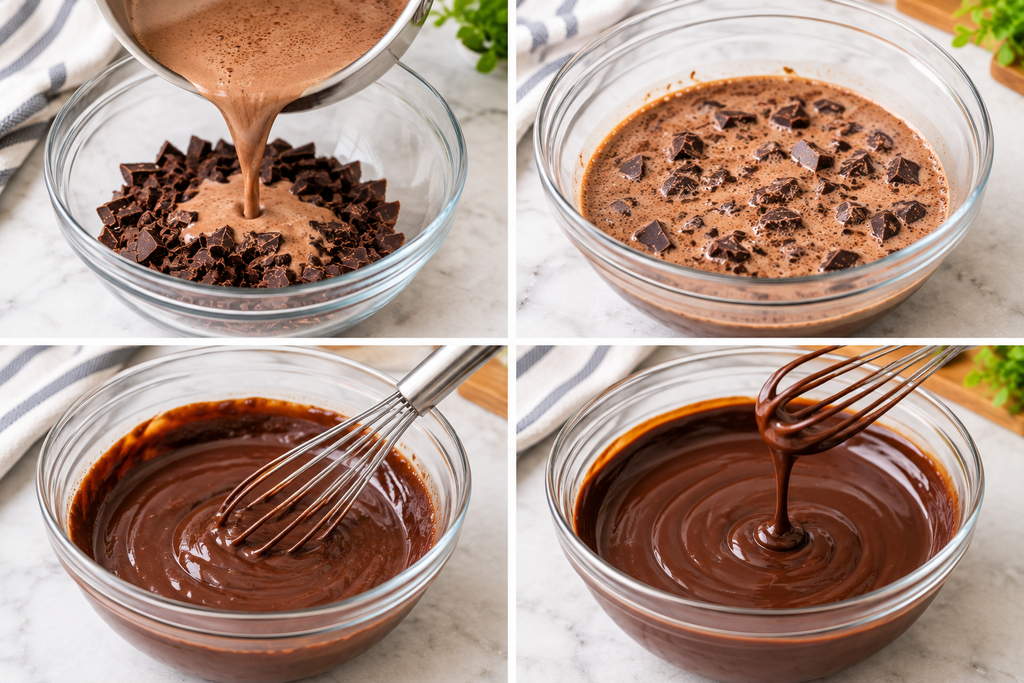
Now put all the melting chocolate into the chopped chocolate. Let it sit for about 2 minutes.
Whisk gently until the chocolate has completely melted and the mixture becomes smooth and glossy.
4. Add Butter and Vanilla
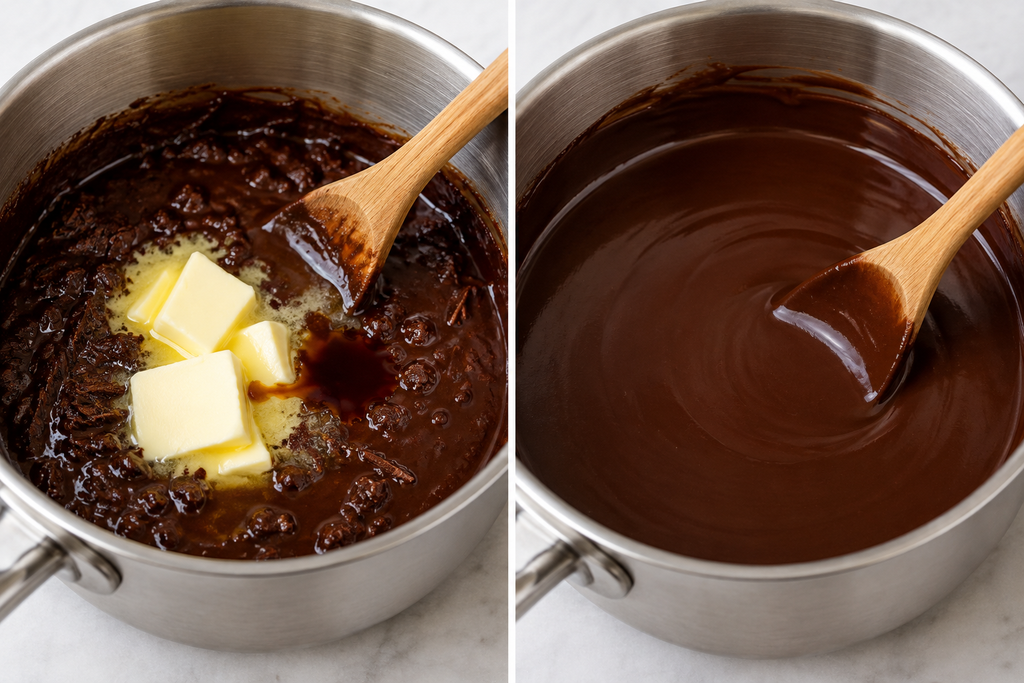
Add the butter and vanilla extract. Stir until the butter melts completely and blends into the chocolate mixture.
The finished mixture should look smooth without visible pieces of chocolate or butter.
5. Portion the Dessert
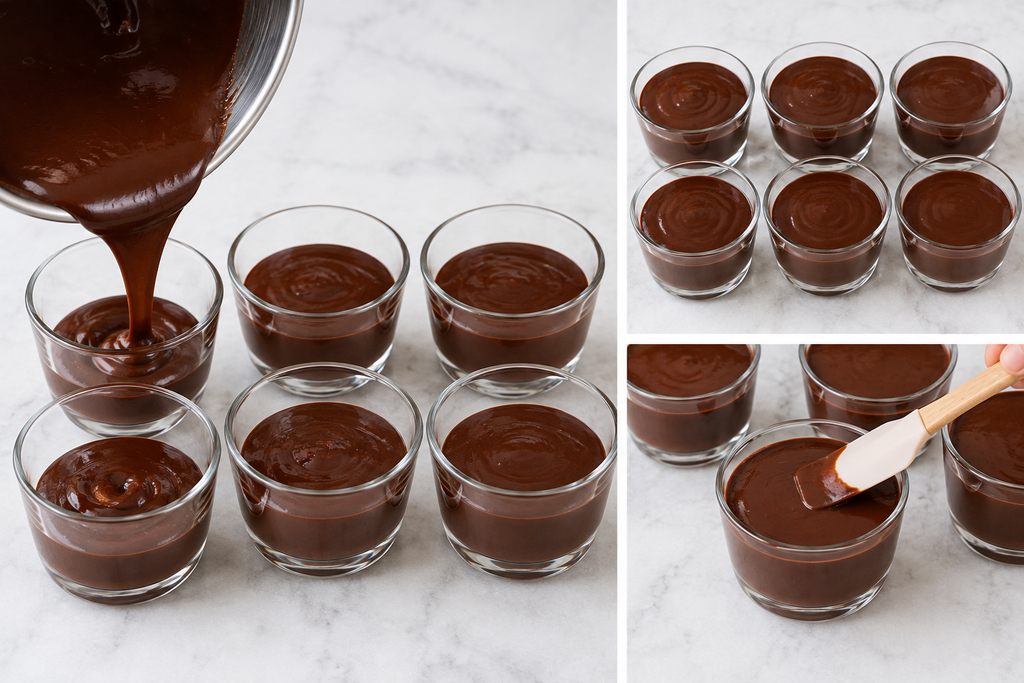
Divide the chocolate mixture evenly between six small serving glasses or dessert cups.
Use a spoon or spatula to smooth the tops if needed.
6. Chill
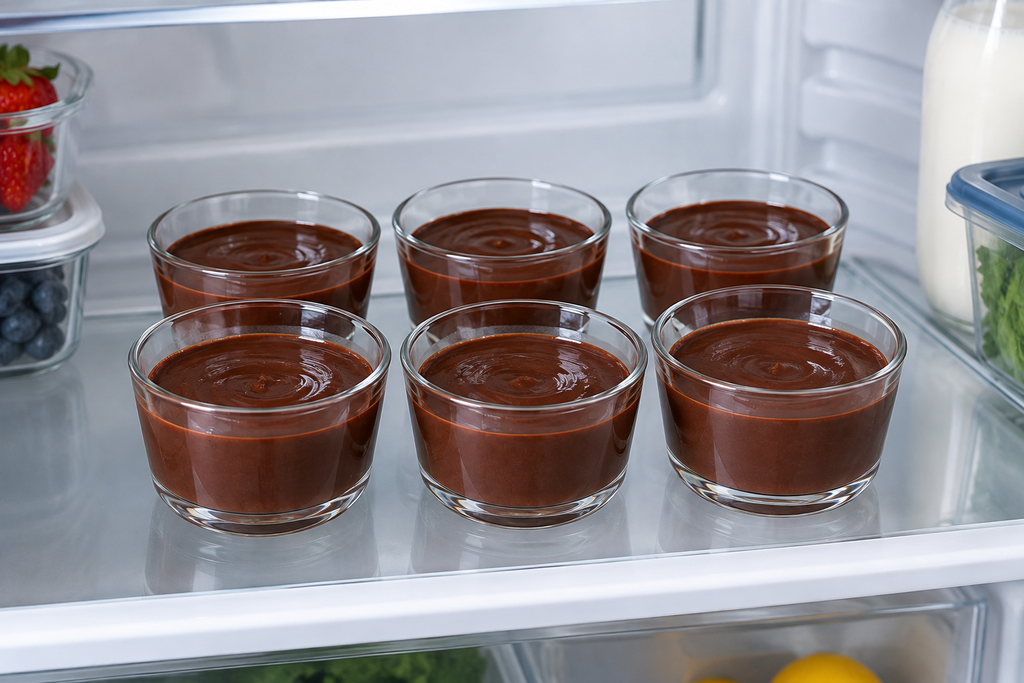
Place the desserts in the refrigerator for at least 1–2 hours, or until they have set to your preferred consistency.
For a firmer texture, chill them for several hours.
7. Add Toppings and Serve
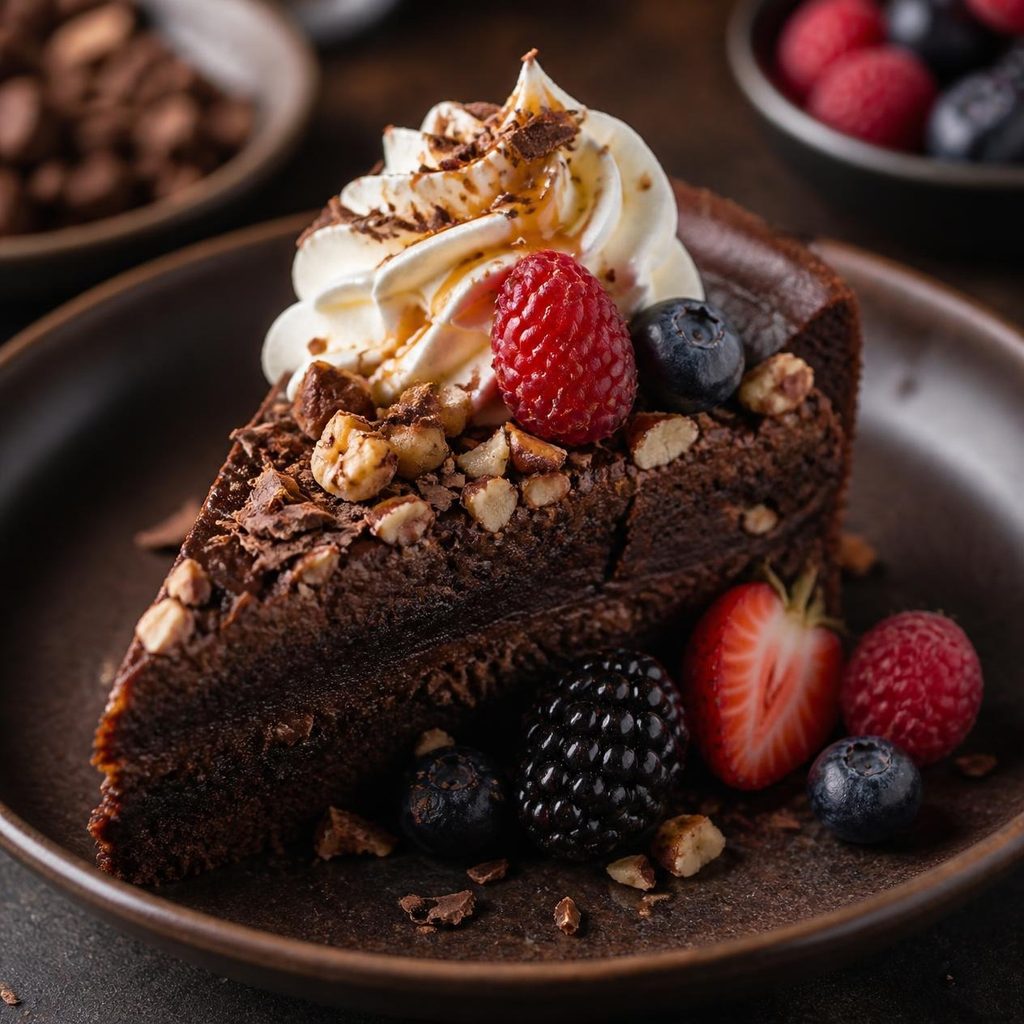
Just before serving, add whipped cream, fresh berries, chopped nuts, chocolate shavings, or a small drizzle of caramel sauce.
Keep the toppings simple so they do not overpower the chocolate flavor.
Expert Tips For Chocolate Dessert
- Use finely chopped chocolate so it melts evenly.
- Keep the cream mixture below a boil. Excessive heat can affect the texture.
- Whisk gently after adding the chocolate to create a smooth mixture.
- Use room-temperature butter so it blends more easily.
- Do not skip chilling. The dessert needs enough time to develop its final texture.
- Taste before adding extra sugar. Different chocolate brands have different sweetness levels.
- For a stronger chocolate flavor, use dark chocolate with 60–70% cocoa.
Recipe Variations
Dark Chocolate Dessert
Replace the semi-sweet chocolate with 6 ounces of dark chocolate for a deeper, less sweet flavor.
Chocolate Berry Dessert
Add fresh raspberries or strawberries before serving. Their natural tartness balances the richness of chocolate.
Chocolate Nut Dessert
Sprinkle 2–3 tablespoons of toasted chopped almonds, walnuts, or hazelnuts over each serving.
Mocha Chocolate Dessert
Add 1 teaspoon instant espresso powder to the warm cream mixture. Coffee enhances the chocolate flavor without making the dessert taste strongly like coffee.
Peanut Butter Chocolate Dessert
Swirl 2 tablespoons smooth peanut butter into the chocolate mixture before portioning it into serving glasses.
Serving Suggestions
Serve this dessert chilled with a simple topping. Whipped cream and fresh berries are classic choices, but you can also add:
- Chocolate curls
- Toasted nuts
- Caramel sauce
- Fresh strawberries
- Raspberries
- Vanilla ice cream
- A light dusting of cocoa powder
For parties, use small glass cups and prepare individual portions ahead of time.
Storage & Reheating
Cover the dessert cups and refrigerate for up to 3 days.
Because this is a chilled chocolate dessert, reheating is not recommended. Keep it refrigerated until about 5–10 minutes before serving so the texture softens slightly.
If using fresh fruit or whipped cream, add them shortly before serving for the best appearance and texture.
Common Mistakes to Avoid
- Boiling the cream: Keep the heat moderate to prevent the mixture from becoming unpleasantly thick or affecting the chocolate.
- Using large chocolate pieces: They may not melt evenly.
- Skipping the resting time: Give the chocolate mixture a couple of minutes to soften before whisking.
- Serving too soon: Chilling is important for the final consistency.
- Adding too many toppings: Excess toppings can overwhelm the main chocolate flavor.
- Using very sweet chocolate with extra sugar: Taste and adjust the sweetness when appropriate.
Frequently Asked Questions
What chocolate is best for chocolate dessert recipes?
Semi-sweet chocolate is a versatile choice because it provides a balanced sweetness. Dark chocolate works well if you prefer a richer and less sweet dessert.
Can I make this dessert without cocoa powder?
Yes. You can omit the cocoa powder, although the chocolate flavor will be slightly different. Using good-quality chocolate will still give you a rich result.
Can I make this chocolate dessert ahead of time?
Yes. Prepare it up to 3 days in advance and store it covered in the fridge. Add fresh toppings just before serving.
How do I make the dessert more chocolatey?
Use dark chocolate with a higher cocoa percentage or add an extra tablespoon of cocoa powder. The flavor of the chocolate can also be improved by a tiny bit of espresso powder.
Can I use milk chocolate?
Yes, but milk chocolate is sweeter than semi-sweet or dark chocolate. If using it, you may want to reduce the added sugar.
Nutrition Information (Approximate)
The following estimate is based on 6 servings without optional toppings:
- Calories: 390 kcal
- Carbohydrates: 30 g
- Protein: 5 g
- Fat: 29 g
- Saturated Fat: 17 g
- Sugar: 23 g
- Fiber: 3 g
- Sodium: 70 mg
Actual nutrition will vary depending on the chocolate, cream, milk, and toppings used.
Recipe Card (Printable Summary)
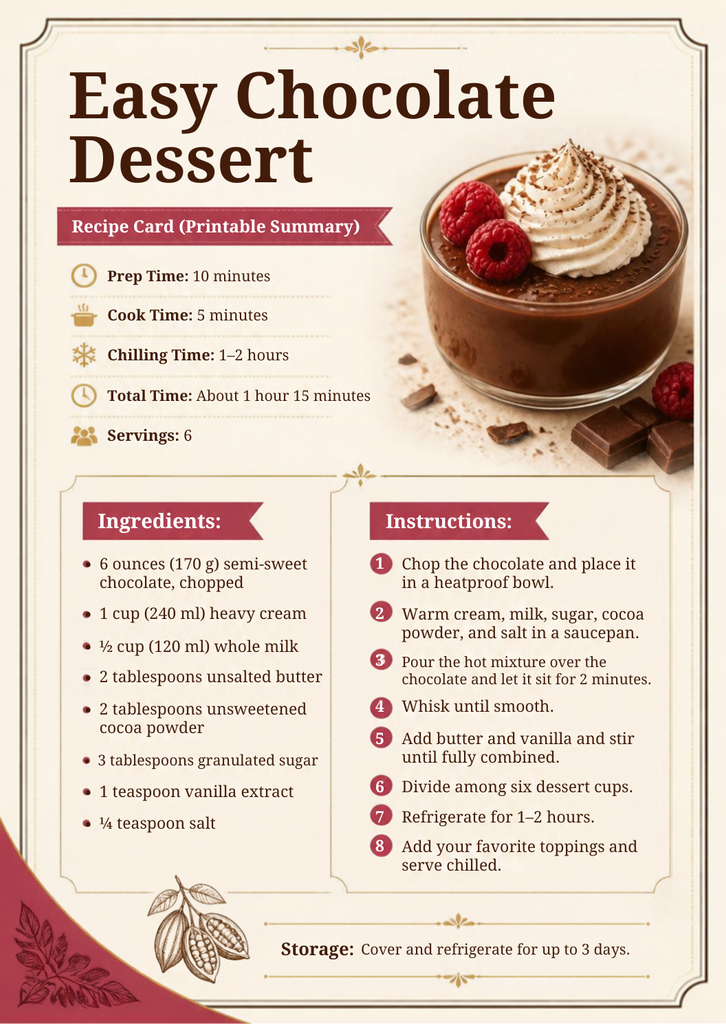
Chocolate Dessert Recipe
Prep Time: 10 minutes
Cook Time: 5 minutes
Chilling Time: 1–2 hours
Total Time: About 1 hour 15 minutes
Servings: 6
Ingredients:
- 6 ounces (170 g) semi-sweet chocolate, chopped
- 1 cup (240 ml) heavy cream
- ½ cup (120 ml) whole milk
- 2 tablespoons unsalted butter
- 2 tablespoons unsweetened cocoa powder
- 3 tablespoons granulated sugar
- 1 teaspoon vanilla extract
- ⅛ teaspoon salt
Instructions:
- Chop the chocolate and place it in a heatproof bowl.
- Warm the cream, milk, sugar, cocoa powder, and salt in a saucepan.
- After adding the heated mixture to the chocolate, let it sit for 2 minutes.
- Whisk until smooth.
- Add butter and vanilla and stir until fully combined.
- Divide among six dessert cups.
- Refrigerate for 1–2 hours.
- Add your favorite toppings and serve chilled.
Conclusion
These chocolate dessert recipes are a great starting point when you want something rich, creamy, and easy to prepare. You do not need to spend hours in the kitchen to make a dessert that seems great with just a few ingredients.
Keep the basic recipe simple, then experiment with dark chocolate, berries, nuts, peanut butter, or coffee to create your own favorite version. Whether you are serving it after a family dinner or preparing it for guests, this chocolate dessert is an easy sweet treat worth making.

Creamy Shrimp Pasta Recipe (Easy 30-Minute Dinner)

Baked Ziti Recipe: Easy, Cheesy Italian-American Dinner

Huli Huli Chicken Recipe: Easy Hawaiian Grilled Chicken

Easy Diet Meal: A Healthy, High-Protein Chicken and Vegetable Bowl

Apple Smoothie Recipe: Easy, Creamy And Healthy

The Best Homemade BBQ Chicken Pizza Recipe 2026

Simple Fried Chicken Recipe: Crispy, Juicy, and Easy

Healthy Chicken Soup Recipe With Vegetables and Tender Chicken

Classic Chicken Salad Recipe – Creamy, Flavorful And Delicious

Chicken Biryani Recipe: Flavorful and Easy to Make
-
 Baked Chicken1 month ago
The Best Homemade BBQ Chicken Pizza Recipe 2026
-
 Chicken Recipes1 month ago
Simple Fried Chicken Recipe: Crispy, Juicy, and Easy
-
 Soups and Salad1 month ago
Healthy Chicken Soup Recipe With Vegetables and Tender Chicken
-
 Soups and Salad1 month ago
Classic Chicken Salad Recipe – Creamy, Flavorful And Delicious
-
 Chicken Recipes1 month ago
Chicken Biryani Recipe: Flavorful and Easy to Make
-

 Soups and Salad3 weeks ago
Homemade Cream of Chicken Soup Recipe 2026
-
 Chicken Recipes1 month ago
Air Fryer Chicken Wings with Crispy, Juicy, and Delicious
-
 Milkshakes4 weeks ago
Salted Caramel Milkshake Creamy And Easy Recipe