
Chicken Recipes
Creamy Shrimp Pasta Recipe in 30 minutes


Introduction to Creamy Shrimp Pasta
Creamy Shrimp Pasta is a comforting, restaurant-style meal that combines tender shrimp, perfectly cooked pasta, and a rich garlic Parmesan sauce. Every forkful brings together savory seafood, creamy goodness, and a hint of black pepper for a satisfying dinner. Best of all, you can make this delicious meal at home with simple ingredients in about 30 minutes.
Whether you love classic shrimp Alfredo, flavorful shrimp scampi pasta, or a comforting bowl of shrimp fettuccine, this recipe gives you a great starting point. The sauce clings beautifully to the noodles without needing complicated techniques. Serve it for a quick family dinner, a cozy weekend meal, or an easy date-night dish. With a few simple tips, you can make creamy shrimp pasta that tastes special without spending hours in the kitchen.
Why You’ll Love This Creamy Shrimp Pasta Recipe
- Ready in 30 minutes: Prepare the sauce while the pasta cooks to save time.
- Rich and creamy: Heavy cream, garlic, and Parmesan create a smooth, flavorful sauce.
- Tender, juicy shrimp: A short cooking time helps prevent rubbery seafood.
- Easy to customize: Add spinach, broccoli, Cajun seasoning, or lemon for a different flavor.
- Perfect for pasta lovers: It offers the comfort of shrimp fettuccine Alfredo with a homemade touch.
- Simple ingredients: Most items are easy to find at a regular grocery store.
Ingredients for Creamy Shrimp Pasta

This recipe makes four servings.
| Ingredient | Quantity |
| Fettuccine or linguine | 12 oz (340 g) |
| Large raw shrimp, peeled and deveined | 1 lb (450 g) |
| Olive oil | 1 tbsp |
| Unsalted butter | 2 tbsp |
| Garlic, minced | 4 cloves |
| Small onion, finely chopped | 1 |
| Heavy cream | 1 cup (240 ml) |
| Freshly grated Parmesan cheese | ¾ cup (75 g) |
| Chicken or seafood broth | ¼ cup (60 ml) |
| Paprika | ½ tsp |
| Salt | To taste |
| Black pepper | ½ tsp, or to taste |
| Fresh lemon juice | 1–2 tsp |
| Fresh parsley, chopped | 2 tbsp |
| Reserved pasta water | Up to ½ cup (120 ml) |
Ingredient Notes and Substitutions
- Shrimp: Fresh or frozen shrimp both work. If using frozen shrimp, thaw completely and pat dry before cooking.
- Pasta: Fettuccine is ideal for a creamy sauce, but spaghetti, linguine, or penne are suitable alternatives.
- Heavy cream: This provides a rich texture. Half-and-half can work, although the sauce may be thinner.
- Parmesan: Freshly grated cheese usually melts more smoothly than pre-shredded varieties.
- Broth and lemon: Broth adds savory depth, while lemon juice balances the richness of the cream.
Equipment Needed for Creamy Shrimp Pasta
- Large pot for boiling pasta
- Large skillet or frying pan
- Colander
- Tongs or a wooden spoon
- Measuring cups and spoons
- Knife and cutting board
- Cheese grater
Step-by-Step Instructions for Creamy Shrimp Pasta
Step 1: Cook the Pasta
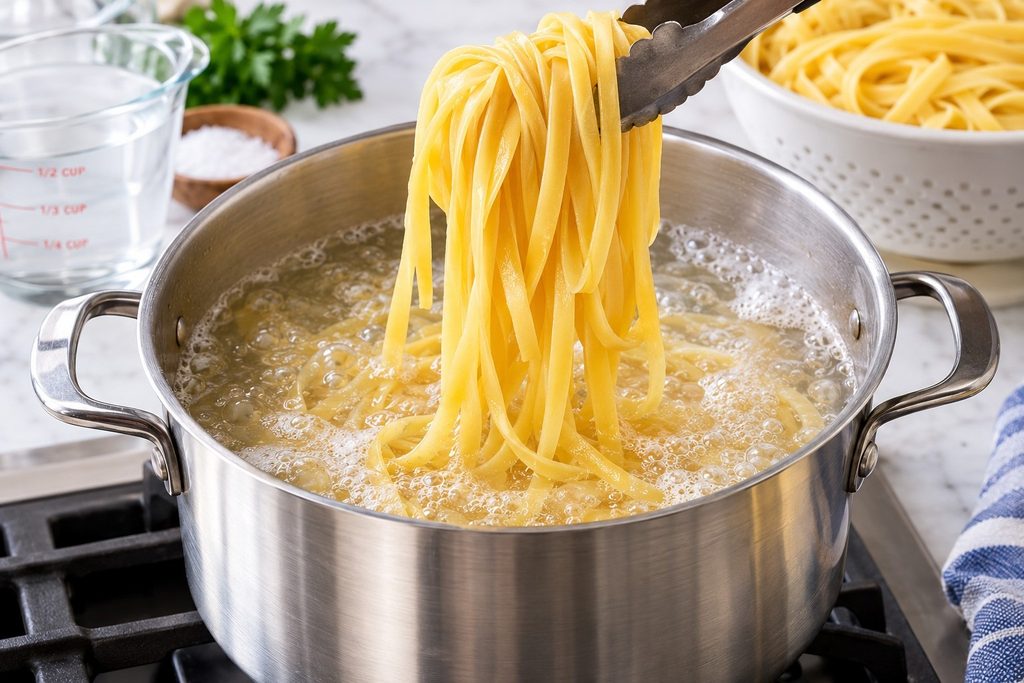
Heat a big pot of salted water till it boils. Add the fettuccine and cook according to the package directions until al dente. Set aside roughly half a cup of pasta water before draining. Drain the pasta without rinsing it, then set it aside.
Step 2: Season and Cook the Shrimp
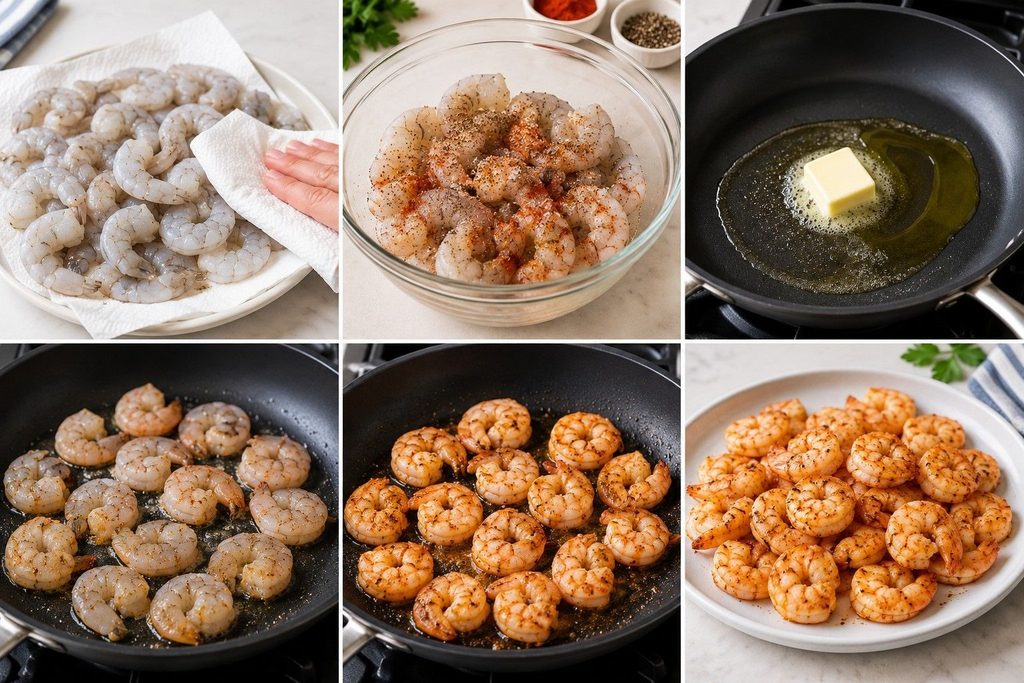
Pat the shrimp dry with paper towels. Add a little salt, black pepper, and paprika for seasoning. In a big skillet, place one tablespoon of butter and olive oil over medium-high heat.
Arrange the shrimp in a single layer and cook for approximately 1–2 minutes per side, depending on their size. Remove them once they turn pink and opaque and reach an internal temperature of 145°F (63°C). Set aside while you prepare the sauce.
Step 3: Sauté the Garlic and Onion
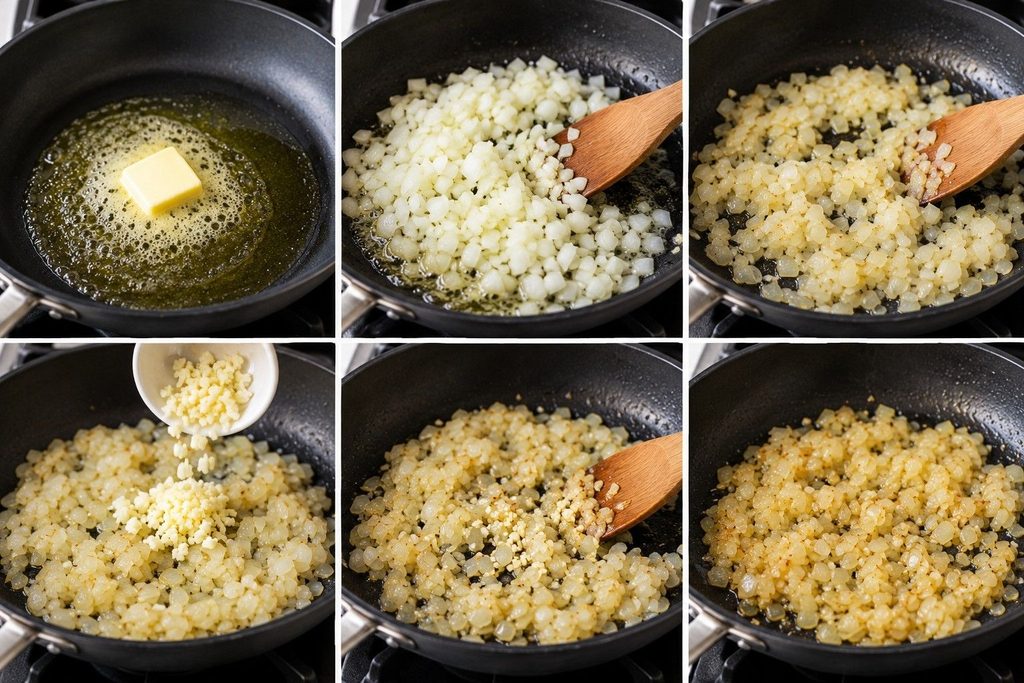
Add the remaining butter to the same skillet and lower the heat to medium. Cook the chopped onion for two to three minutes, or until it becomes tender. Add the minced garlic and heat for an additional 30 seconds, or until fragrant.
Garlic can become bitter if it is browned too much.
Step 4: Make the Creamy Parmesan Sauce
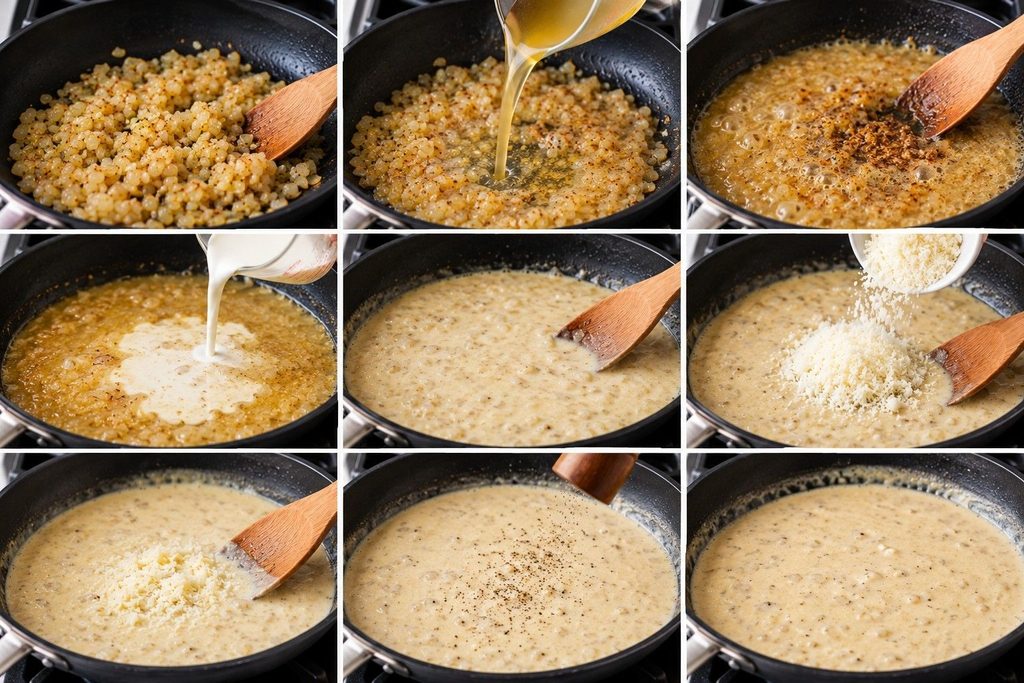
Pour in the broth and scrape up the flavorful browned bits from the bottom of the skillet. Add the heavy cream once it has briefly simmered.
Allow the sauce to gently simmer for 2–3 minutes. Reduce the heat and add the grated Parmesan cheese little by little until it melts. Season with salt and black pepper to taste.
Step 5: Combine the Pasta and Shrimp
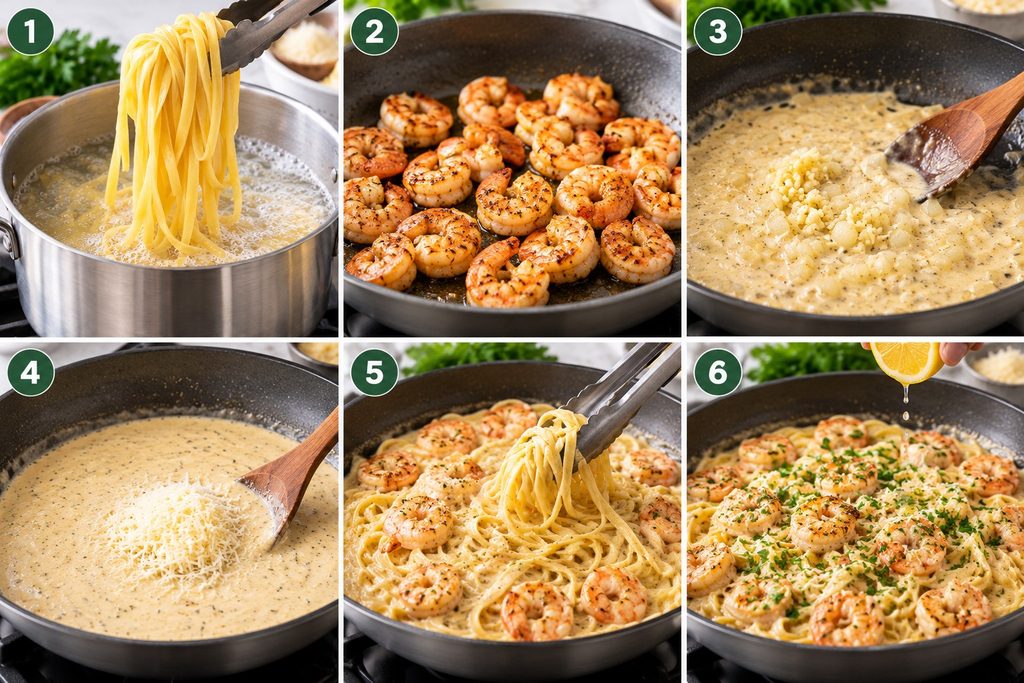
Toss the drained pasta in the sauce in the skillet. Return the cooked shrimp to the pan and gently mix.
If the sauce seems too thick, add reserved pasta water a tablespoon at a time until it reaches your preferred consistency. Stir in the lemon juice and chopped parsley.
Step 6: Serve and Enjoy
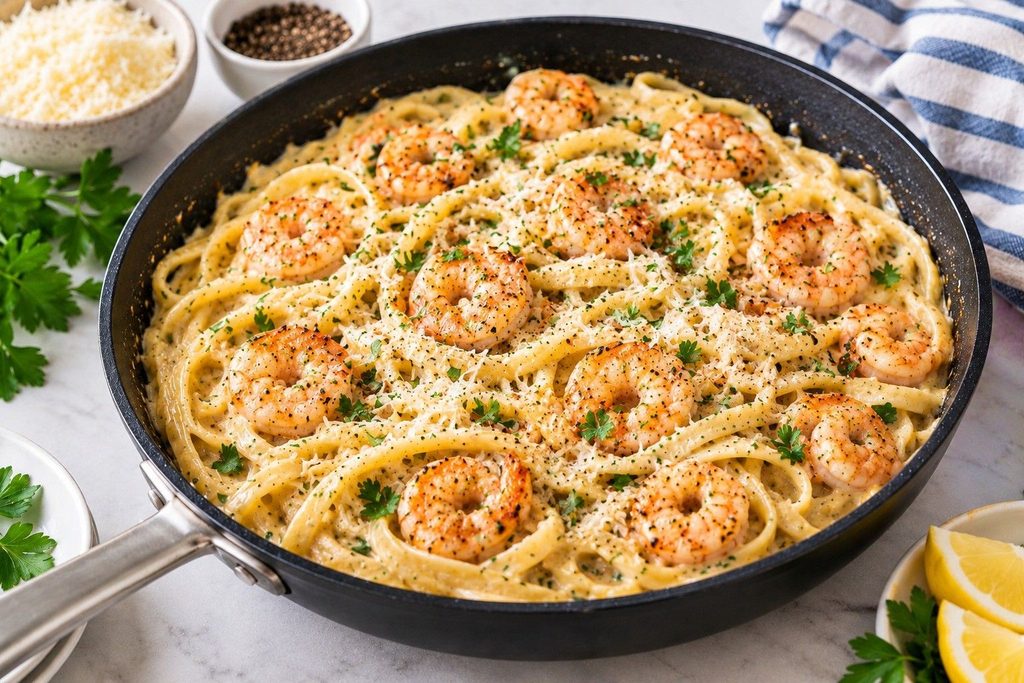
Remove the skillet from the heat. Add a little black pepper, fresh parsley, and additional Parmesan cheese. Serve immediately while the sauce is creamy and the shrimp are tender.
Expert Tips for the Best Creamy Shrimp Pasta
- Do not overcook the shrimp. Shrimp cook quickly and can become tough if left in the pan too long.
- Grate Parmesan fresh. It helps create a smoother sauce with a better cheese flavor.
- Keep the heat low after adding cheese. A hard boil can make the sauce grainy or separated.
- Save pasta water. Its starch helps the sauce cling to the noodles and makes it easier to adjust thickness.
- Balance the richness. A small squeeze of lemon brightens the cream sauce without making it too sour.
- Serve immediately. Cream-based pasta tastes best when freshly prepared.
Creamy Shrimp Pasta Recipe Variations
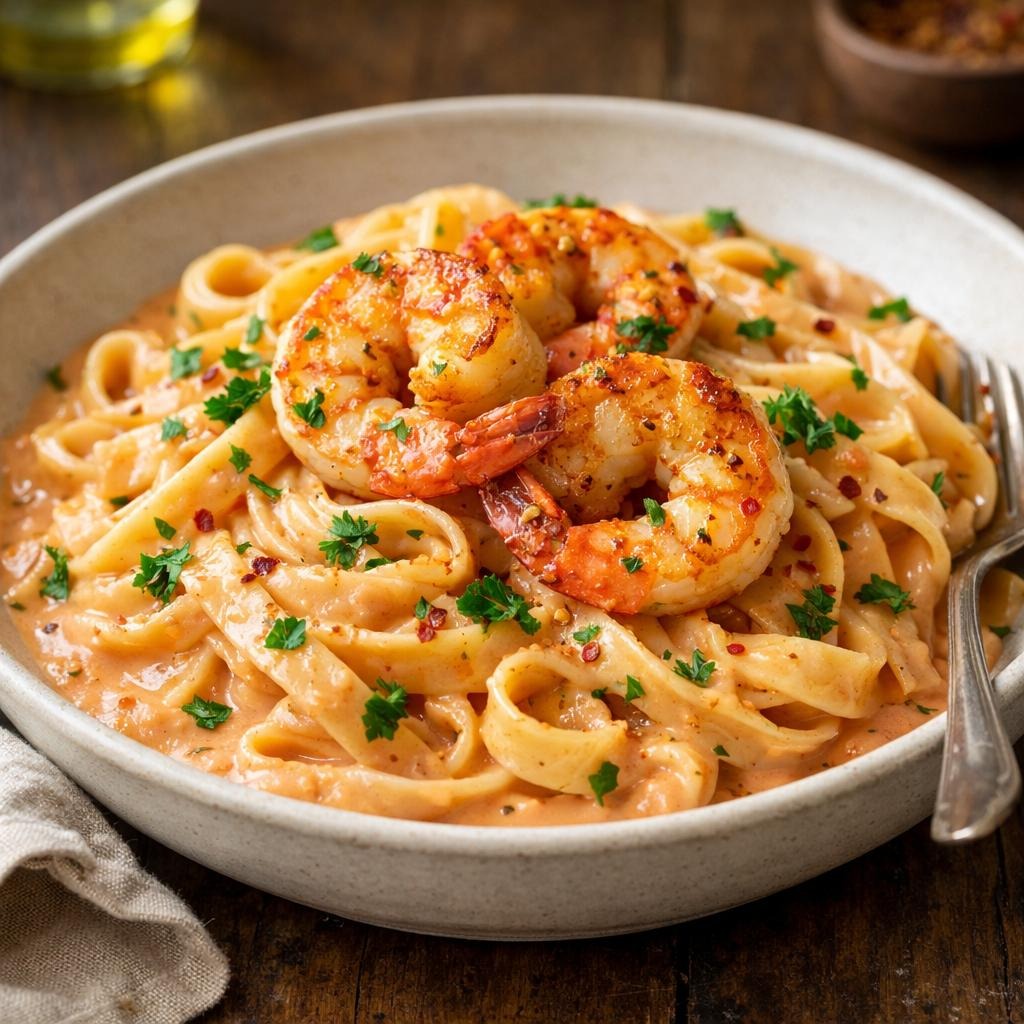
1. Cajun Shrimp Pasta
Add 1 to 2 teaspoons of Cajun seasoning when preparing the shrimp. This creates a spicy, smoky version with bold flavor.

2. Shrimp Fettuccine Alfredo
For a classic shrimp Alfredo pasta, use fettuccine and increase the Parmesan slightly. You can omit the onion and broth for a simpler Alfredo-style sauce.
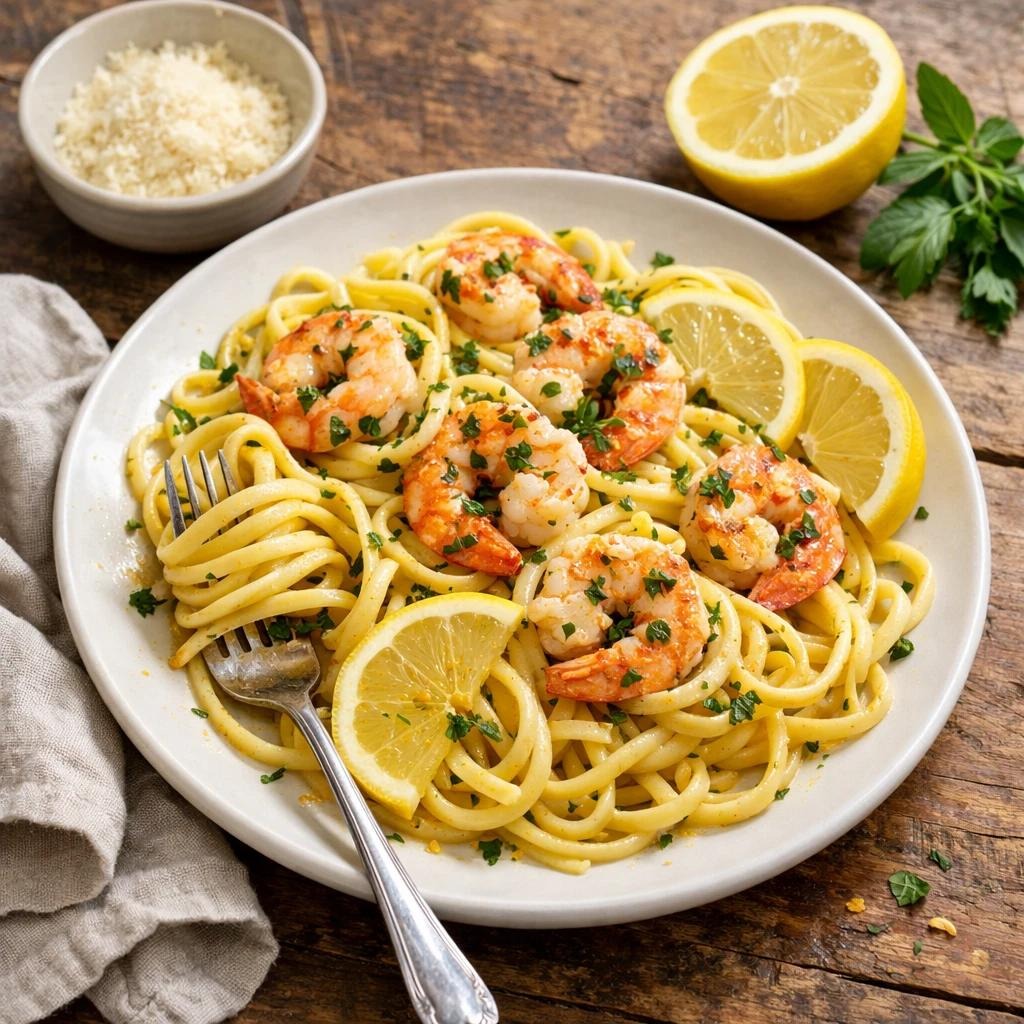
3. Lemon Garlic Shrimp Pasta
Add extra lemon zest, fresh lemon juice, and garlic. This lighter-tasting option balances the richness of the cream.

4. Shrimp and Broccoli Pasta
Stir steamed broccoli into the finished pasta for added color, texture, and vegetables.
You can also explore shrimp scampi pasta for a garlic and butter-based dish, shrimp carbonara for an egg-and-cheese sauce, or garlic prawn pasta for a seafood dinner inspired by Italian flavors. For a spicy tomato option, try arrabbiata shrimp instead.
Serving Suggestions for Creamy Shrimp Pasta
Serve this hot pasta with straightforward sides that go well with its flavorful sauce.
- Garlic bread: Perfect for soaking up extra Parmesan cream sauce.
- Green salad: A crisp contrast is created by a fresh salad dressed with lemon.
- Roasted broccoli: A savory vegetable side that pairs naturally with shrimp.
- Green salad: A crisp contrast is created by a fresh salad dressed with lemon.
- Roasted cherry tomatoes: Bring sweetness and acidity to the plate.
For a restaurant-inspired dinner, serve the pasta in warm bowls with extra Parmesan and chopped parsley.
Storage and Reheating
Refrigeration: Allow leftovers to cool, then store them in an airtight container in the refrigerator for up to two days.
Reheating: Gently reheat the pasta with a little milk, cream, or broth in a skillet over low heat. Until well hot, stir often. Another option is to use a microwave for brief periods of time, stirring in between.
Freezing: Freezing is not recommended because the cream sauce may separate and the shrimp can lose their tender texture.
For the best results, cook only as much as you expect to eat and enjoy the pasta freshly made.
Common Mistakes to Avoid
- If the shrimp are overcooked, take them out as soon as they are thoroughly cooked.
- Using high heat for the sauce: Gentle heat helps keep the cream and cheese smooth.
- Skipping the pasta water: It can help bring a thick sauce back to the right consistency.
- Adding all the cheese at once: Stir it in gradually over low heat.
- Making the sauce too thick: Add a little broth or pasta water until it coats the noodles easily.
- Adding too much salt early: Parmesan is naturally salty, so taste the sauce before adding more.
Frequently Asked Questions About Creamy Shrimp Pasta
1. Can I use frozen shrimp for creamy shrimp pasta?
Yes. You can thaw frozen shrimp in the refrigerator or in a sealed bag submerged in cold water overnight. Drain and pat dry before seasoning and cooking.
2. What pasta is best for shrimp Alfredo?
Fettuccine is a classic choice because its wide noodles hold creamy sauce well. Linguine, spaghetti, and penne are also excellent options.
3. Can I make creamy shrimp pasta without heavy cream?
Yes. Half-and-half can create a lighter sauce, although it may be thinner. To help thicken the sauce, you can also use milk and a tiny bit of flour.
4. How do I keep the Alfredo sauce from separating?
Keep the heat low after adding Parmesan, avoid boiling the finished sauce, and stir gently. Add a little reserved pasta water if needed.
5. Is creamy shrimp pasta the same as shrimp scampi pasta?
No. Creamy shrimp pasta typically uses a cream and Parmesan sauce. Traditional shrimp scampi pasta usually features garlic, butter, olive oil, lemon, and sometimes white wine, without a heavy cream base.
Nutrition Information (Approximate)

Assuming four servings from the recipe, the following estimates are per serving.
| Nutrient | Approximate Amount |
| Calories | 650 kcal |
| Protein | 38 g |
| Carbohydrates | 57 g |
| Fat | 29 g |
| Saturated Fat | 16 g |
| Fiber | 3 g |
| Sodium | 650 mg |
Actual nutrition will vary depending on the pasta brand, shrimp size, Parmesan, broth, and amount of salt used.
Recipe Card: Creamy Shrimp Pasta

- PREP TIME
- 10 minutes
- COOK TIME
- 20 minutes
- SERVINGS
4
Ingredients
- 12 oz fettuccine
- 1 lb peeled and deveined shrimp
- 1 tbsp olive oil
- 2 tbsp butter
- 4 garlic cloves, minced
- 1 small onion, chopped
- 1 cup heavy cream
- ¾ cup grated Parmesan
- ¼ cup broth
- ½ tsp paprika
- Salt and black pepper to taste
- 1 to 2 tsp lemon juice
- 2 tbsp fresh parsley
- Up to ½ cup reserved pasta water
Instructions
- Cook fettuccine until al dente. Reserve pasta water and drain.
- Season shrimp with paprika, salt, and pepper. Sauté in olive oil until pink and opaque. Set aside.
- Melt butter in the skillet. Cook onion until soft, then add garlic.
- Add broth and heavy cream. Simmer gently, then stir in Parmesan.
- Toss the pasta and shrimp in the sauce. Adjust consistency with pasta water.
- Finish with lemon juice and parsley. Serve with extra Parmesan.
Copy Recipe
Conclusion
This Creamy Shrimp Pasta is an easy, satisfying dinner that combines juicy shrimp, tender noodles, and a rich garlic Parmesan sauce. With a few everyday ingredients and about 30 minutes, you can prepare a meal that feels special without complicated cooking.
For optimal flavor, keep the heat low, do not overcook the shrimp, and garnish with fresh parsley and lemon. Whether you prefer classic shrimp Alfredo, spicy Cajun shrimp pasta, or a bright lemon garlic variation, this recipe is easy to adapt to your taste. Serve it fresh with garlic bread or a crisp salad for a delicious homemade dinner.

A Baked Ziti Recipe is a wonderful choice when you want a warm, filling dinner without the extra work of making lasagna. Tender pasta, rich tomato sauce, seasoned meat, and layers of melted cheese come together in one baking dish. Every serving is hearty, comforting, and full of flavor.
This homemade version combines a savory meat sauce with creamy ricotta, mozzarella, and Parmesan. You can prepare it with ground beef, Italian sausage, or a mixture of both. It is easy enough for a busy weeknight and satisfying enough for a family gathering. Best of all, you can assemble it ahead of time and bake it when you are ready to eat.
Why You’ll Love This Baked Ziti Recipe
- Easy to prepare: Cook the pasta and sauce, assemble the ingredients, and let the oven finish the job.
- Rich meat sauce: Tomatoes, garlic, onion, and Italian seasonings create a flavorful base.
- Cheesy and creamy: Ricotta adds softness, while mozzarella melts into a golden topping.
- Flexible ingredients: Use ziti, penne, or rigatoni depending on what you have available.
- Great for meal prep: Prepare it ahead, refrigerate it, or freeze portions for another day.
- Family-friendly: Adjust the spices and choose your preferred meat to suit different tastes.
Ingredients for Homemade Baked Ziti Recipe
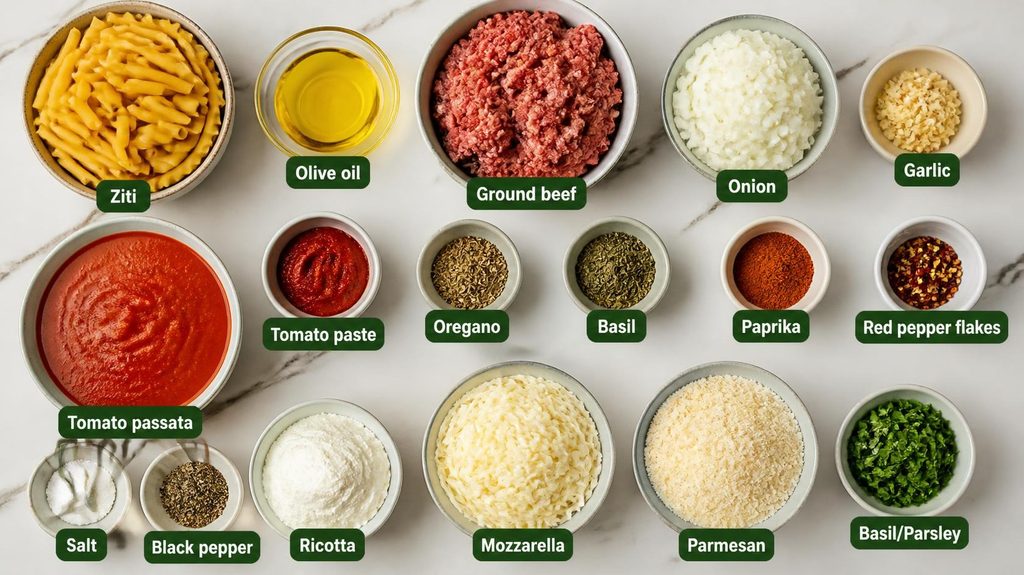
This recipe makes approximately six servings.
| Ingredient | Quantity |
| Ziti pasta or penne | 12 oz (340 g) |
| Olive oil | 1 tbsp |
| Ground beef | 1 lb (450 g) |
| Onion, finely chopped | 1 medium |
| Garlic, minced | 3 cloves |
| Tomato passata or crushed tomatoes | 24 oz (680 g) |
| Tomato paste | 2 tbsp |
| Dried oregano | 1 tsp |
| Dried basil | 1 tsp |
| Paprika | 1 tsp |
| Red pepper flakes | ¼ tsp, optional |
| Salt | ¾ tsp, or to taste |
| Black pepper | ½ tsp |
| Ricotta cheese | 1 cup (250 g) |
| Shredded mozzarella cheese | 2 cups (200 g) |
| Grated Parmesan cheese | ½ cup (45 g) |
| Fresh basil or parsley | 2 tbsp, optional |
Ingredient Notes
- Pasta: Ziti is traditional, but penne and rigatoni are excellent alternatives. Their shape makes them easy to coat with sauce.
- Ground beef: Choose lean ground beef for a balanced sauce. Drain excess fat after browning if needed.
- Tomato sauce: Passata gives the sauce a smooth texture. If using crushed tomatoes, simmer the sauce until it thickens.
- Cheese: Whole-milk ricotta creates a creamy center. Low-moisture mozzarella melts well without releasing too much water.
- Seasonings: Basil, oregano, and paprika add flavor. Adjust the red pepper flakes to control the heat.
Equipment Needed for Baked Ziti Recipe
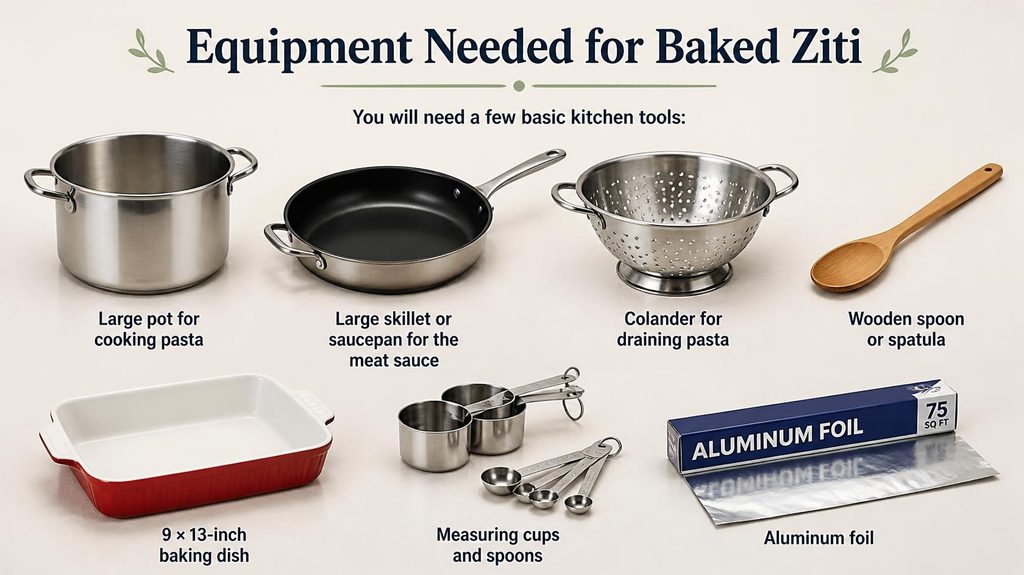
You will need a few basic kitchen tools:
- Large pot for cooking pasta
- Large skillet or saucepan for the meat sauce
- Colander for draining pasta
- Wooden spoon or spatula
- 9 × 13-inch baking dish
- Measuring cups and spoons
- Aluminum foil
Step-by-Step Instructions for Baked Ziti Recipe
Step 1: Cook the Pasta
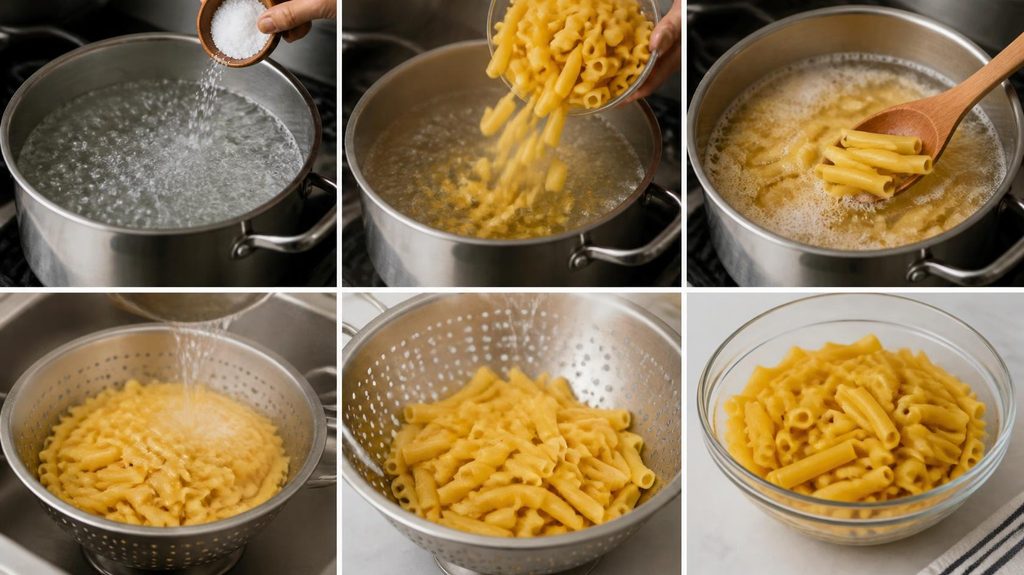
Heat a big pot of salted water till it boils. Add the ziti and cook it for about two minutes less than the package instructions recommend. The pasta should be slightly firm because it will continue cooking in the oven.
Drain well and set aside. Avoid overcooking the pasta, as soft noodles can become mushy after baking.
Step 2: Prepare the Meat Sauce
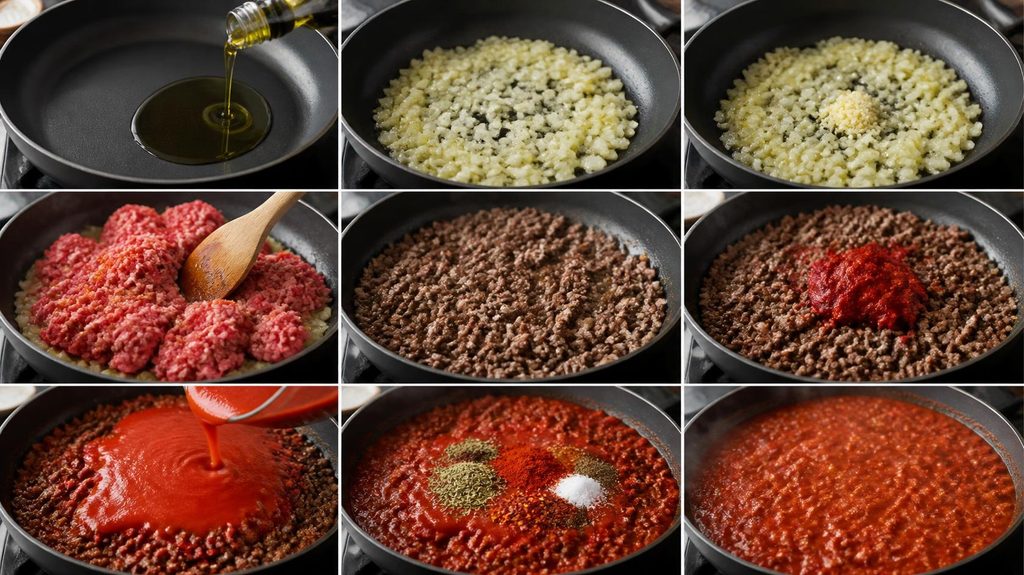
Set a large skillet over medium heat, then pour in the olive oil. Add the chopped onion and cook for three to four minutes until softened. Stir in the garlic and cook for another 30 seconds.
Add the ground beef and break it into small pieces with a wooden spoon. Cook until browned and no pink remains. Drain excess fat if necessary.
Stir in the tomato paste, passata, oregano, basil, paprika, salt, black pepper, and optional red pepper flakes. Bring the sauce to a gentle simmer and cook for 15–20 minutes, stirring occasionally, until thick and flavorful.
Step 3: Combine the Pasta and Sauce
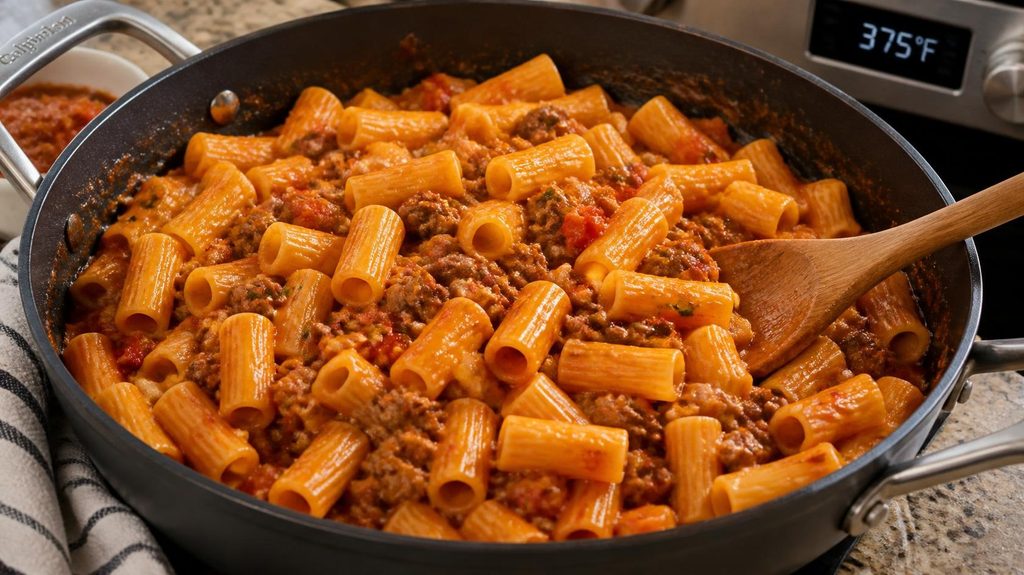
Preheat your oven to 375°F (190°C).
Add the drained pasta to the skillet if it is large enough, or combine it in a mixing bowl. Stir until the beef sauce coats the pasta evenly. Reserve a little sauce for the top if desired.
Step 4: Add the Cheese
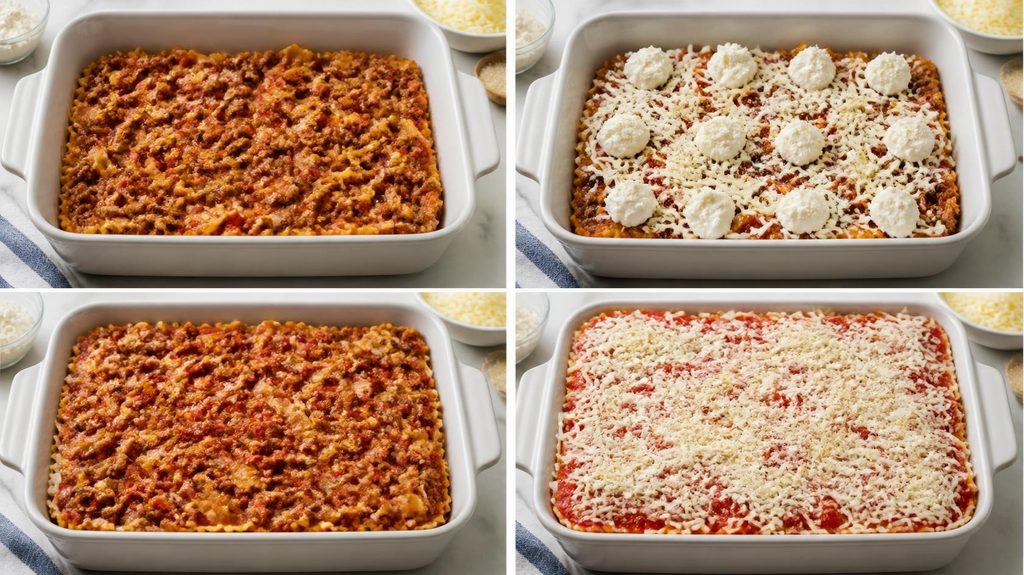
Fill the baking dish with half of the pasta mixture. Spoon small portions of ricotta over the pasta and sprinkle with some mozzarella and Parmesan.
Add the remaining pasta, followed by the reserved sauce. Finish with the remaining mozzarella and Parmesan to create a cheesy topping.
Step 5: Bake Until Golden
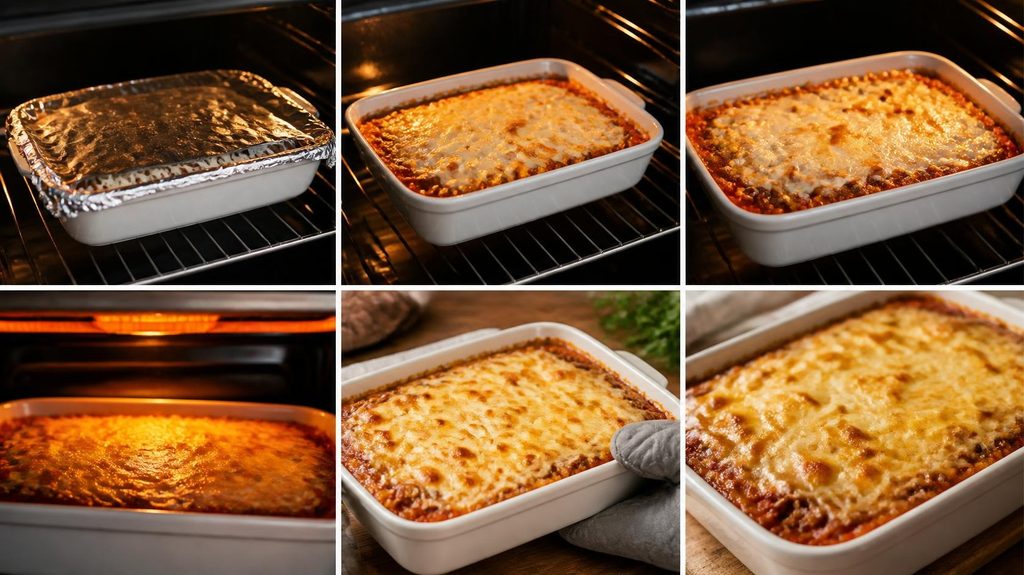
After loosely covering the dish with aluminum foil, bake it for twenty minutes. Remove the foil and bake for another 10–15 minutes, until the cheese has melted and the edges are bubbling.
For a more golden top, broil briefly at the end, watching carefully to prevent burning.
Step 6: Rest and Serve
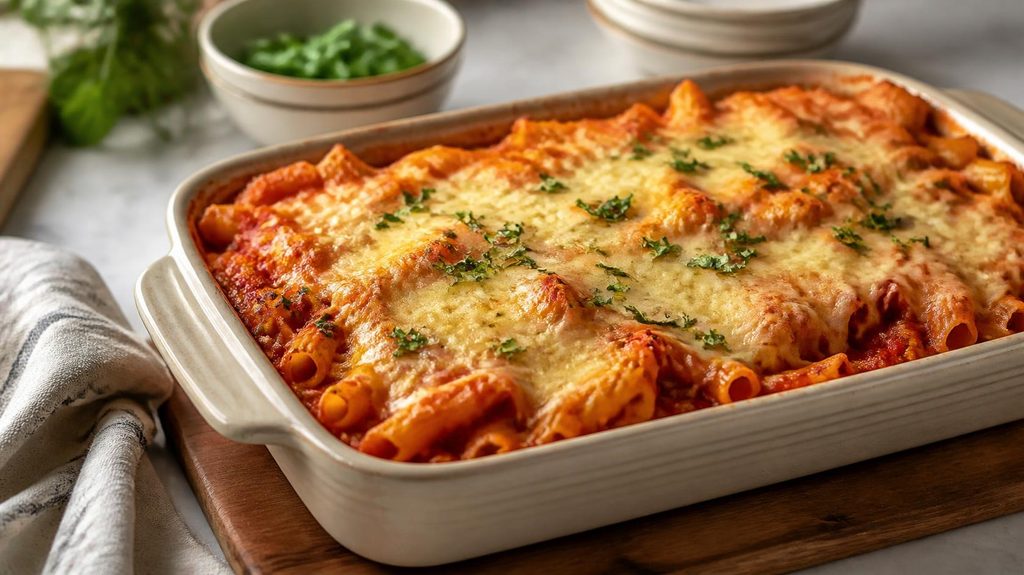
After removing the baked ziti from the oven, let it rest for 5 to 10 minutes before serving. This helps the cheese and sauce settle, making it easier to cut and serve without falling apart. Sprinkle with fresh basil or parsley, then serve while warm.
Expert Tips for Cheesy Baked Ziti Recipe
- Cook the pasta until just firm: Slightly undercooked pasta holds its shape during baking.
- Make a thick sauce: A watery sauce can leave the casserole loose. Simmer it until it coats the back of a spoon.
- Season the sauce properly: Taste before assembling and adjust the salt, pepper, and herbs.
- Use enough sauce: Pasta absorbs liquid as it bakes, so make sure every piece is coated.
- Grate cheese fresh when possible: Freshly grated Parmesan melts smoothly and adds a savory finish.
- Let it rest: A short resting period makes the casserole easier to serve without losing its structure.
Recipe Variations for Baked Ziti Recipe
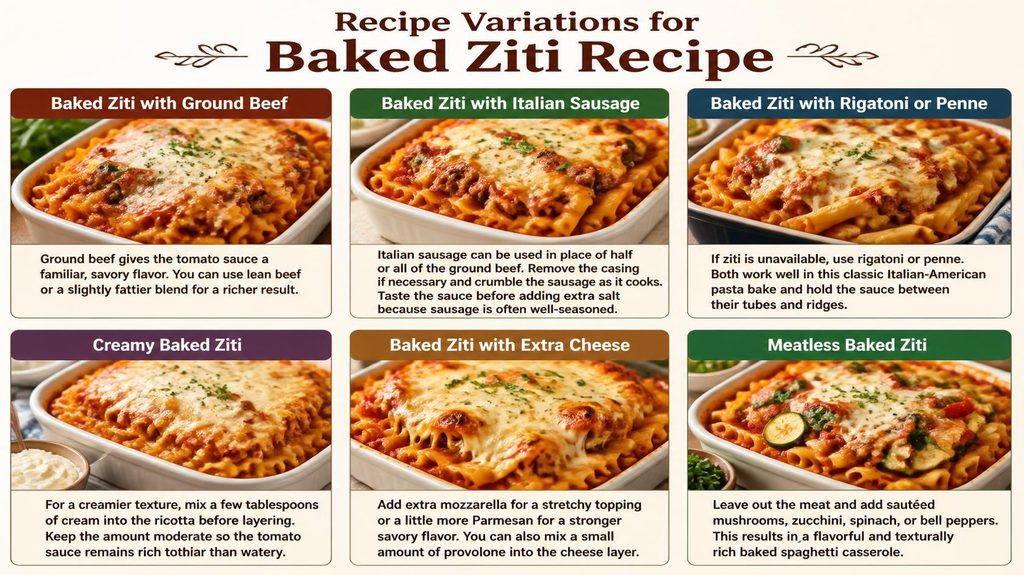
Baked Ziti with Ground Beef
Ground beef gives the tomato sauce a familiar, savory flavor. You can use lean beef or a slightly fattier blend for a richer result.
Baked Ziti with Italian Sausage
Italian sausage can be used in place of half or all of the ground beef. Remove the casing if necessary and crumble the sausage as it cooks. Taste the sauce before adding extra salt because sausage is often well-seasoned.
Baked Ziti with Rigatoni or Penne
If ziti is unavailable, use rigatoni or penne. Both work well in this classic Italian-American pasta bake and hold the sauce between their tubes and ridges.
Creamy Baked Ziti
For a creamier texture, mix a few tablespoons of cream into the ricotta before layering. Keep the amount moderate so the tomato sauce remains rich rather than watery.
Baked Ziti with Extra Cheese
Add extra mozzarella for a stretchy topping or a little more Parmesan for a stronger savory flavor. You can also mix a small amount of provolone into the cheese layer.
Meatless Baked Ziti
Leave out the meat and add sautéed mushrooms, zucchini, spinach, or bell peppers. This results in a flavorful and texturally rich baked spaghetti casserole.
Serving Suggestions for Baked Ziti Recipe
Since this dish is rich and filling, serve it with simple sides that bring freshness to the meal.
- Garlic bread or toasted baguette
- Green salad with a light vinaigrette
- Cherry tomato salad with fresh basil
- Steamed broccoli or green beans
- Roasted zucchini or bell peppers
For a complete family dinner, pair a generous portion of baked ziti with a green salad and warm garlic bread.
Storage and Reheating Baked Ziti Recipe
Refrigeration: Place leftovers in an airtight container after letting them cool. Use within three to four days after refrigerating for two hours.
Freezing: Store individual portions in freezer-safe containers for up to three months for best quality. Label them with the date.
Oven reheating: Place a portion in an oven-safe dish, cover with foil, and heat at 350°F (175°C) until steaming hot throughout. Add a spoonful of water or tomato sauce if it seems dry.
Microwave reheating: Cover loosely and heat in short intervals, stirring where possible, until hot throughout.
Make-ahead option: Assemble the casserole, cover, and refrigerate before baking. Allow extra baking time if it goes into the oven cold, and check that the center is thoroughly heated.
Common Mistakes to Avoid For Baked Ziti Recipe
- Overcooking the pasta: This can make the finished dish too soft.
- Using watery tomato sauce: Reduce the sauce before assembling the casserole.
- Adding too little seasoning: Pasta and cheese need a well-seasoned sauce to taste their best.
- Using too much wet cheese: Excess moisture can affect the casserole’s texture. Drain very wet ricotta if necessary.
- The cheese may brown before the middle heats through if it is baked uncovered the entire time. Cover first, then uncover to finish.
- Cutting immediately: Let the casserole rest so the sauce settles and portions hold together better.
Frequently Asked Questions About Baked Ziti Recipe
1. What is baked ziti?
A baked ziti recipe is an Italian-American pasta casserole made with tube-shaped pasta, tomato sauce, and cheese. Many versions include ground meat, ricotta, mozzarella, and Parmesan.
2. Can I make a baked ziti recipe without ricotta?
Yes. You can omit ricotta or replace it with small dollops of cottage cheese or a mild cream cheese mixture. The food will still be excellent despite a little alteration in texture.
3. Can I use penne instead of ziti?
Absolutely. Penne is a convenient substitute, and rigatoni also works well. Cook the pasta until slightly firm before baking.
4. Why is my baked ziti recipe dry?
The pasta may have absorbed too much liquid, or the sauce may have been too thick before baking. Coat the pasta generously with sauce and cover the dish during the first part of baking.
5. Can I prepare baked ziti recipe ahead of time?
Yes. Before baking, assemble the dish, cover it, and place it in the refrigerator. Bake it when needed, allowing extra time for a chilled casserole to heat through.
Nutrition Information for Baked Ziti Recipe
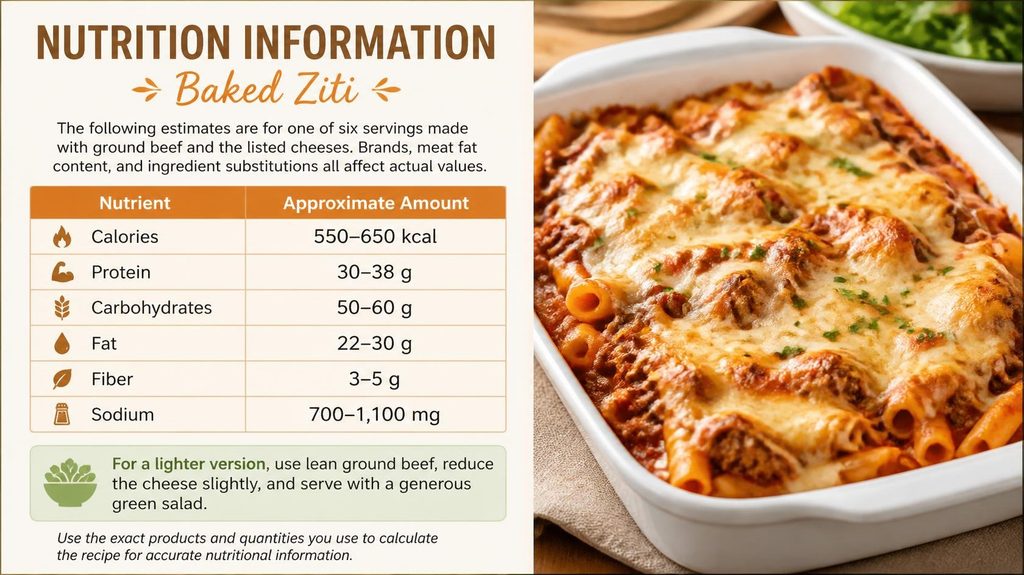
The following estimates are for one of six servings made with ground beef and the listed cheeses. Brands, meat fat content, and ingredient substitutions all affect actual values.
| Nutrient | Approximate Amount |
| Calories | 550–650 kcal |
| Protein | 30–38 g |
| Carbohydrates | 50–60 g |
| Fat | 22–30 g |
| Fiber | 3–5 g |
| Sodium | 700–1,100 mg |
For a lighter version, use lean ground beef, reduce the cheese slightly, and serve with a generous green salad. Use the exact products and quantities you use to calculate the recipe for accurate nutritional information.
Recipe Card: Easy Baked Ziti Recipe
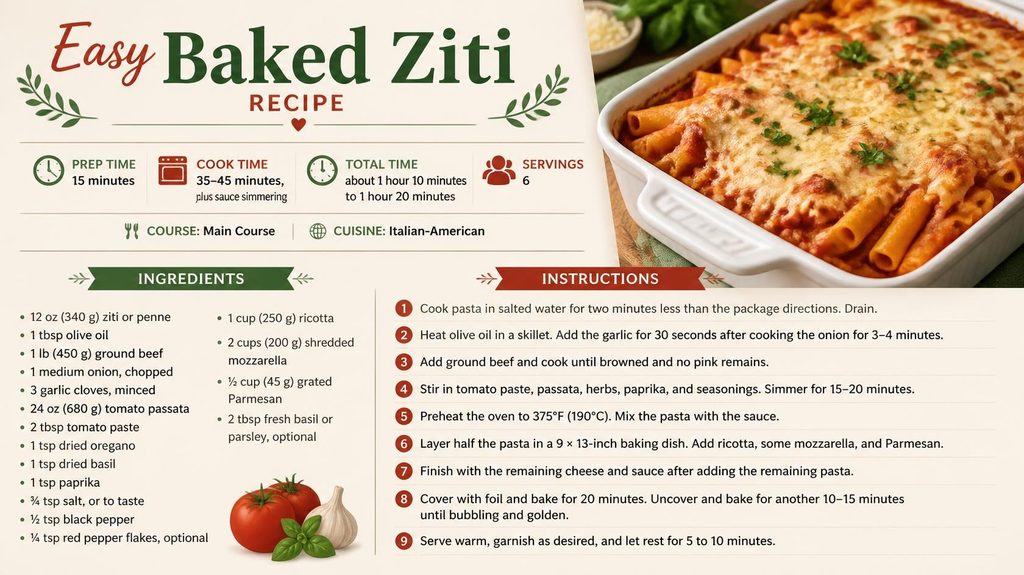
Prep Time: 15 minutes
Cook Time: 35–45 minutes, plus sauce simmering
Total time: about 1 hour 10 minutes to 1 hour 20 minutes.
Servings: 6
Course: Main Course
Cuisine: Italian-American
Ingredients
- 12 oz (340 g) ziti or penne
- 1 tbsp olive oil
- 1 lb (450 g) ground beef
- 1 medium onion, chopped
- 3 garlic cloves, minced
- 24 oz (680 g) tomato passata
- 2 tbsp tomato paste
- 1 tsp dried oregano
- 1 tsp dried basil
- 1 tsp paprika
- ¾ tsp salt, or to taste
- ½ tsp black pepper
- ¼ tsp red pepper flakes, optional
- 1 cup (250 g) ricotta
- 2 cups (200 g) shredded mozzarella
- ½ cup (45 g) grated Parmesan
- 2 tbsp fresh basil or parsley, optional
Instructions
- Cook pasta in salted water for two minutes less than the package directions. Drain.
- Heat olive oil in a skillet. Add the garlic for 30 seconds after cooking the onion for 3–4 minutes.
- Add ground beef and cook until browned and no pink remains.
- Stir in tomato paste, passata, herbs, paprika, and seasonings. Simmer for 15–20 minutes.
- Preheat the oven to 375°F (190°C). Mix the pasta with the sauce.
- Layer half the pasta in a 9 × 13-inch baking dish. Add ricotta, some mozzarella, and Parmesan.
- Finish with the remaining cheese and sauce after adding the remaining pasta.
- Cover with foil and bake for 20 minutes. Uncover and bake for another 10–15 minutes until bubbling and golden.
- Serve warm, garnish as desired, and let rest for 5 to 10 minutes.
Conclusion
This Baked Ziti Recipe brings together tender pasta, a rich homemade meat sauce, creamy ricotta, and a golden layer of melted cheese. It is simple to customize with ground beef, Italian sausage, penne, or rigatoni, making it a useful recipe for different tastes and occasions.
Prepare it for a relaxed family dinner, make it ahead for a busy evening, or freeze portions for future meals. With a well-seasoned tomato sauce and properly cooked pasta, this homemade baked ziti recipe can become a comforting favorite in your regular dinner rotation.
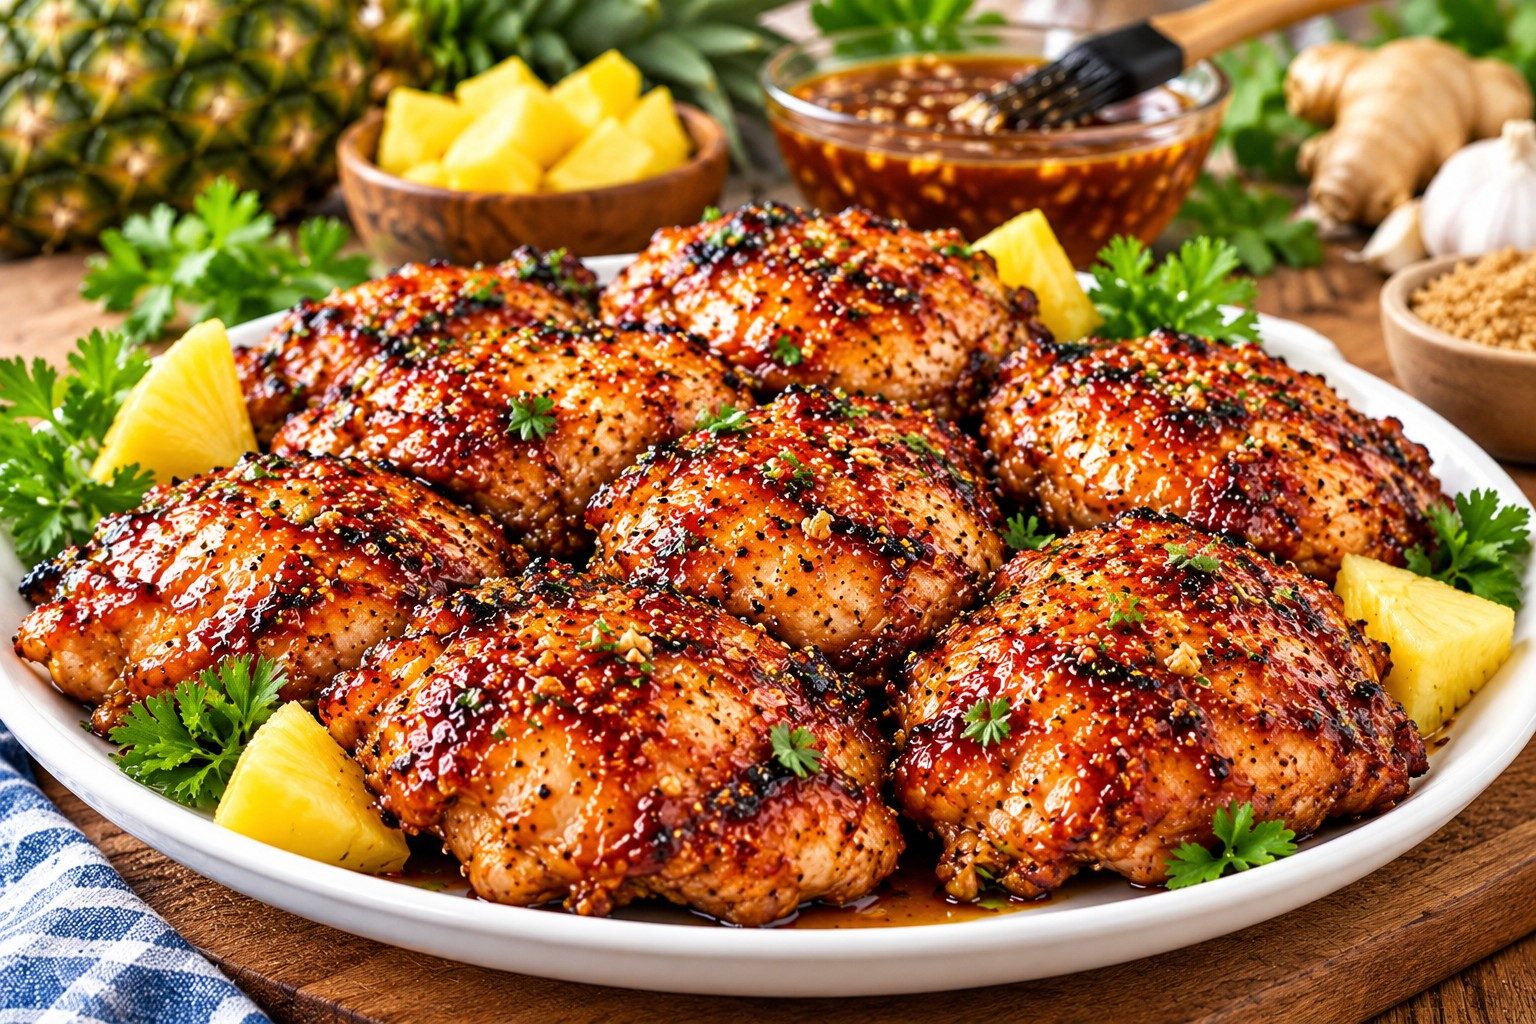
Introduction: Easy Huli Huli Chicken Recipe
This Easy Huli Huli Chicken recipe brings sweet, savory, and slightly spicy Hawaiian-inspired flavors to your dinner table. The chicken is coated in a homemade marinade made with pineapple juice, soy sauce, brown sugar, garlic, and fresh ginger. As it cooks, the marinade develops into a rich, sticky glaze that makes every bite delicious.
You can prepare this dish on an outdoor grill, a stovetop grill pan, or in the oven. Whether you are planning a summer barbecue or an easy family dinner, this recipe offers plenty of flavor without complicated cooking steps. With a little preparation and a few everyday ingredients, you can make tender, juicy chicken that pairs beautifully with rice and fresh vegetables.
Why You’ll Love This Huli Huli Chicken Recipe
- Sweet and savory flavor: Pineapple juice and brown sugar balance the salty, rich taste of soy sauce.
- Simple ingredients: Most ingredients are easy to find at your local grocery store.
- Flexible cooking methods: Make grilled chicken or try an oven-baked version.
- Great for meal prep: Marinate the chicken ahead of time for a convenient dinner.
- Easy to customize: Adjust the spice level, sweetness, and chicken cuts to suit your taste.
Ingredients for Huli Huli Chicken Recipe
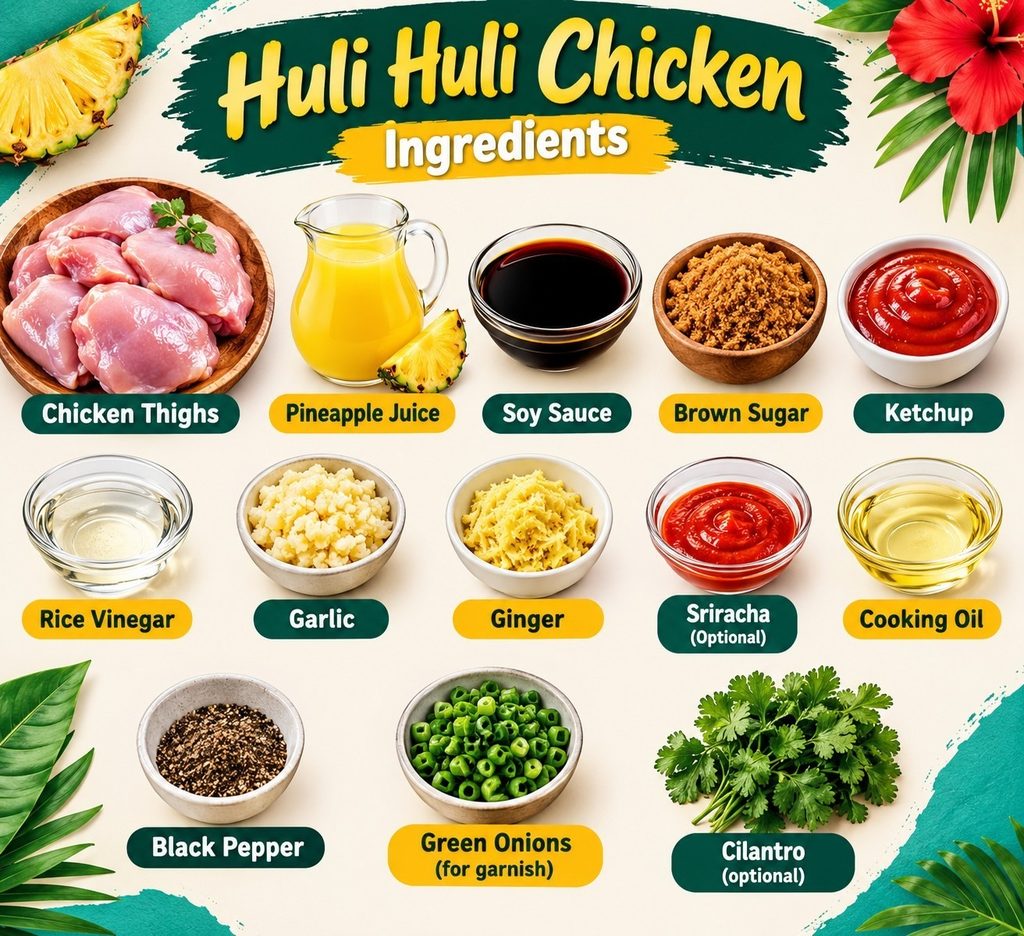
This recipe serves four people and uses boneless, skinless chicken thighs for a juicy result.
- 2 pounds (900 g) boneless, skinless chicken thighs
- 1 cup pineapple juice
- ¼ cup reduced-sodium soy sauce
- ¼ cup brown sugar, packed
- ¼ cup ketchup
- 2 tablespoons rice vinegar or white vinegar
- 3 garlic cloves, minced
- 1 tablespoon freshly grated ginger
- 1 tablespoon sriracha, optional
- 1 tablespoon neutral cooking oil, for grilling
- Black pepper, to taste
- 2 tablespoons chopped green onions, for garnish
- Fresh cilantro, optional
Ingredients for Homemade Huli Huli Chicken Marinade
The Homemade Huli Huli Chicken marinade combines fruit juice, salty soy sauce, sweet brown sugar, and aromatic seasonings. Pineapple juice adds a tropical taste, while ginger and garlic provide warmth and depth.
Use reduced-sodium soy sauce if you prefer better control over the saltiness. For a milder marinade, leave out the sriracha.
Equipment Needed for Huli Huli Chicken
- Mixing bowl
- Measuring cups and spoons
- Whisk
- Shallow dish or food-safe zip-top bag
- Grill or grill pan
- Tongs
- Instant-read meat thermometer
Step-by-Step Instructions: How to Make Huli Huli Chicken
Step 1: Prepare the Marinade
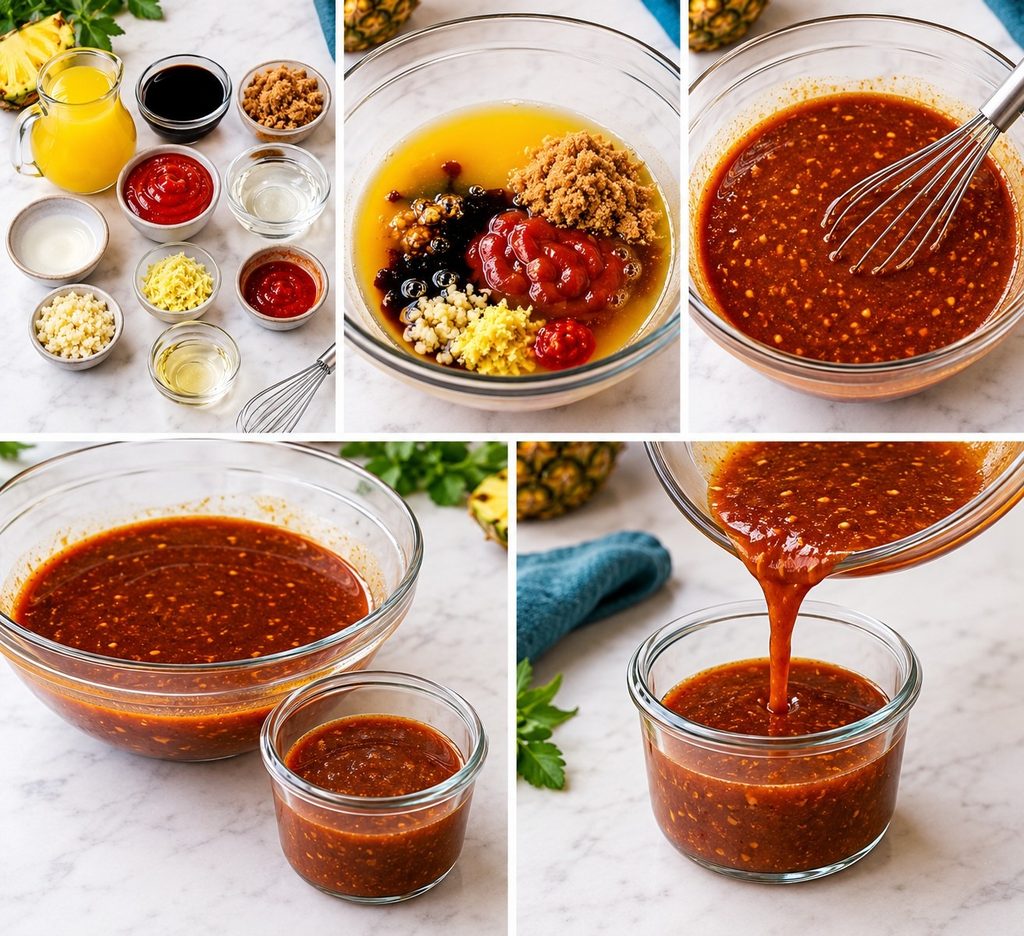
In a bowl, whisk together the pineapple juice, soy sauce, brown sugar, ketchup, vinegar, garlic, ginger, and optional sriracha. Stir until the sugar begins to dissolve.
Reserve a small portion of the marinade in a separate container before adding the raw chicken. Refrigerate it for later basting.
Step 2: Marinate the Chicken
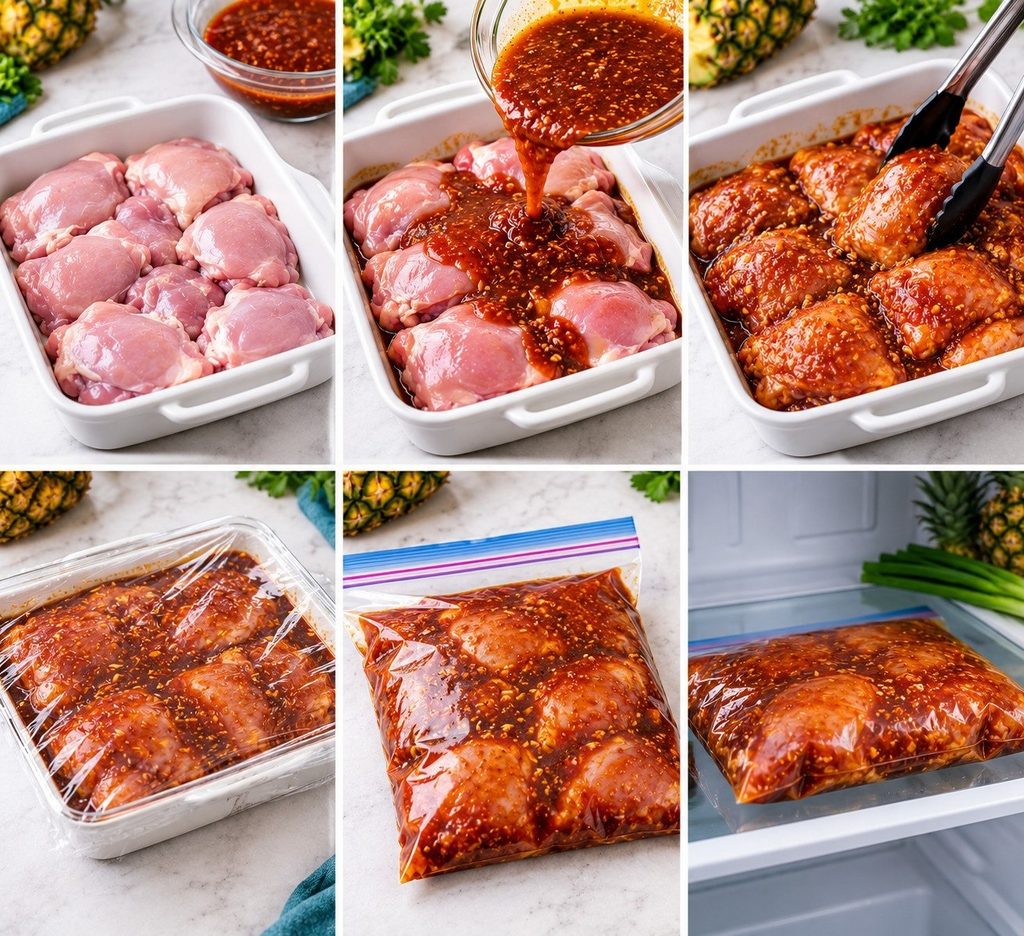
Place the chicken thighs in a shallow dish or food-safe bag. After adding the remaining marinade, flip the chicken pieces to ensure they are equally coated.
Cover and refrigerate for at least 30 minutes. Give it two to four hours to marinate for a richer taste. Avoid leaving the chicken in this acidic marinade for too long, as the texture can become soft.
Step 3: Preheat the Grill
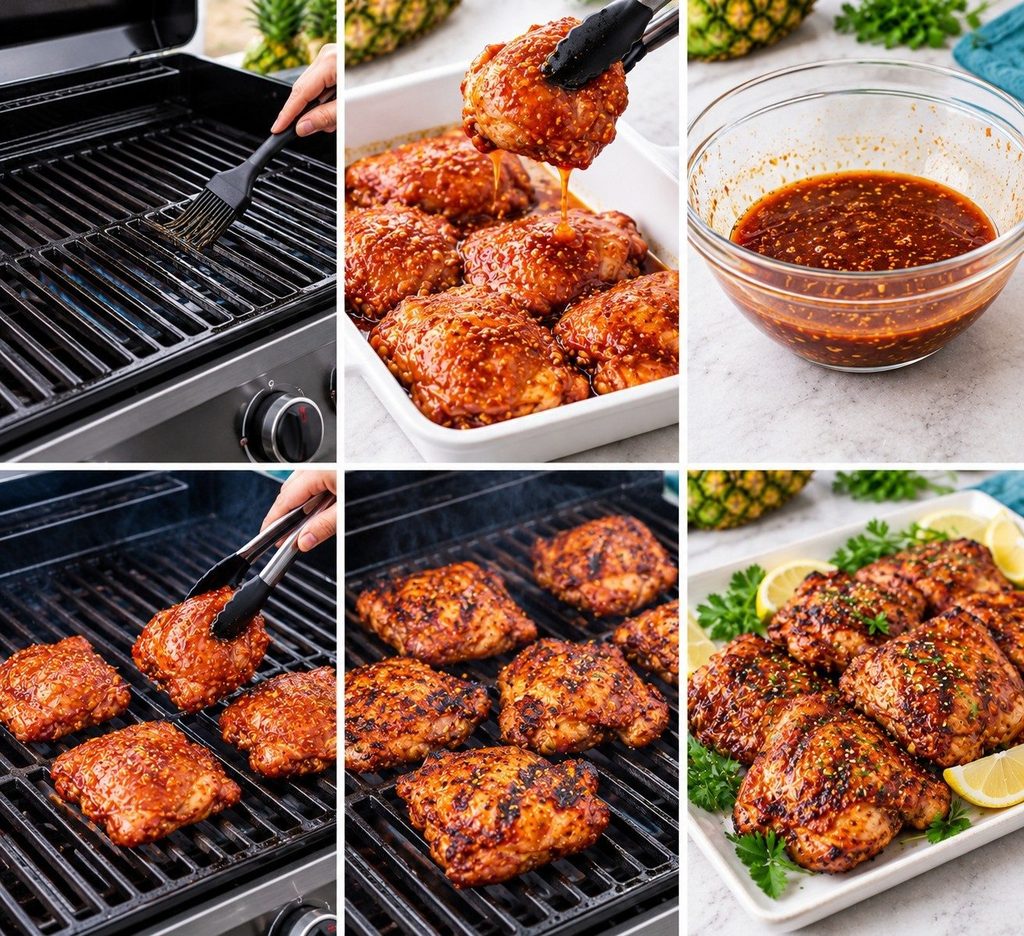
Heat an outdoor grill or grill pan to medium-high heat. Lightly oil the cooking surface to help prevent sticking.
Remove the chicken from the marinade and let the excess drip off. Discard the marinade that touched raw chicken.
Step 4: Cook Huli Huli Chicken Recipe on the Grill
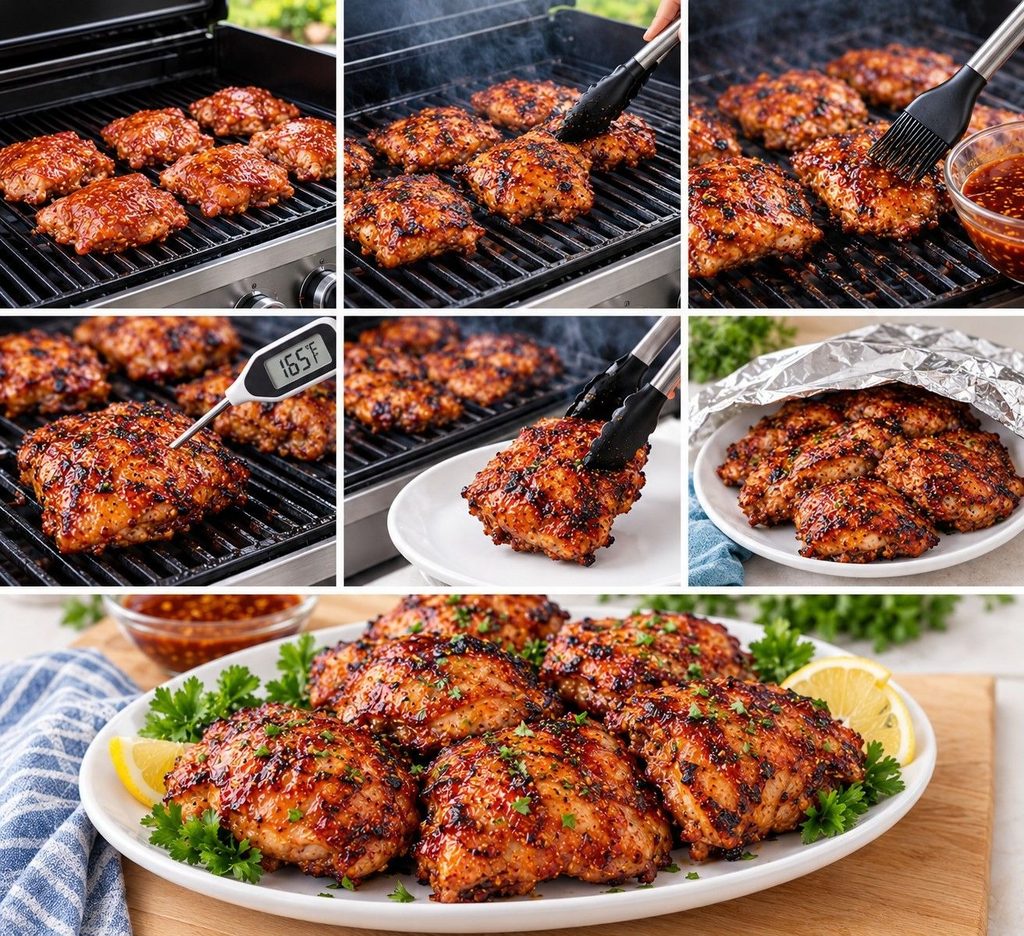
Place the chicken on the hot grill. Cook for approximately 5 to 7 minutes per side, depending on thickness.
Apply the marinade that was set aside to the chicken during the last few minutes. Watch carefully because the brown sugar can burn over high heat.
The chicken is ready when the thickest part reaches an internal temperature of 165°F (74°C). Transfer it to a clean plate and rest for 5 minutes before serving.
Step 5: Make Oven-Baked Huli Huli Chicken Recipe
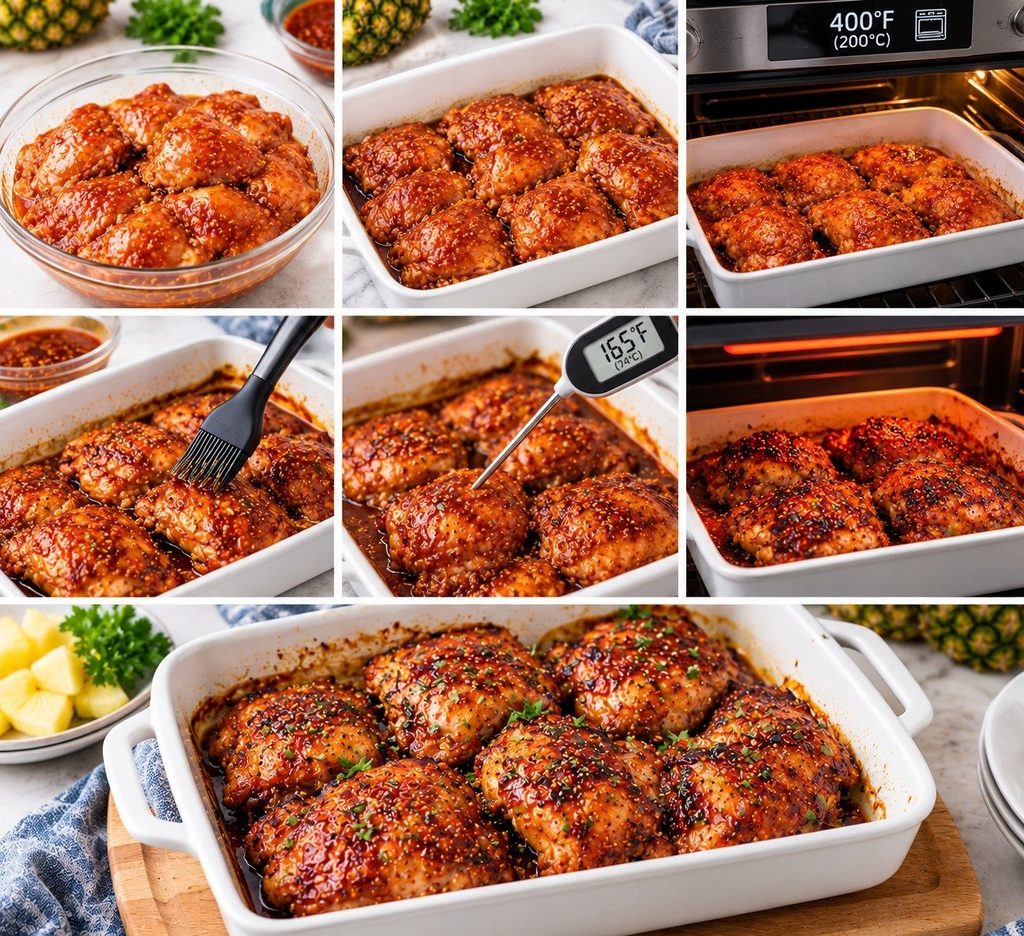
For Oven-Baked Huli Huli Chicken, preheat the oven to 400°F (200°C). Arrange the marinated chicken in a lightly greased baking dish and bake for approximately 20 to 30 minutes, depending on the thickness of the pieces.
In the last five to ten minutes, brush with the reserved marinade. Check the internal temperature with a meat thermometer, ensuring it reaches 165°F (74°C). For extra color, briefly broil the chicken while watching closely to prevent burning.
Expert Tips for the Best Huli Huli Chicken Recipe
- Choose the right chicken: Thighs are forgiving and remain juicy, making them ideal for grilling.
- Balance the flavors: Taste the unused marinade before adding the chicken and adjust the sweetness or spice if needed.
- Reserve fresh sauce: Never use raw-chicken marinade as a finishing glaze unless it has been brought to a full boil.
- Avoid excessive heat: Brown sugar caramelizes quickly, so moderate heat helps prevent a burnt exterior.
- Use a thermometer: Check the thickest part of each piece for reliable doneness.
Recipe Variations for Huli Huli Chicken recipe
Huli Huli Chicken Thighs Recipe
Chicken thighs work especially well because their higher fat content helps keep the meat moist. Bone-in thighs can also be used, but they generally need a longer cooking time.
Grilled Chicken with Pineapple Juice
For a stronger tropical flavor, serve the chicken with grilled pineapple rings. You can also replace part of the marinade’s pineapple juice with a little orange juice for a citrus twist.
Huli Huli Chicken with Brown Sugar and Soy Sauce
The combination of brown sugar and soy sauce creates the classic sweet-salty balance. Use dark brown sugar for a deeper molasses flavor or light brown sugar for a milder sweetness.
Spicy Hawaiian Chicken
For further spice, add a sprinkle of red pepper flakes or additional Sriracha. Reduce the amount if you prefer a family-friendly, mild version.
Serving Suggestions for Sweet and Savory Grilled Chicken
This Sweet and savory grilled chicken tastes excellent with simple side dishes that complement its bold glaze.
Try serving it with:
- Steamed white or brown rice
- Coconut rice
- Grilled pineapple and bell peppers
- Hawaiian-style macaroni salad
- Fresh cabbage slaw
- Roasted broccoli or green beans
For a complete meal, slice the chicken and serve it over rice with vegetables and a spoonful of freshly prepared sauce.
Common Mistakes to Avoid with Huli Huli Chicken recipe
- Skipping the marinade: Even a short marinating period helps the chicken absorb flavor.
- Overheating: Before the chicken cooks through, the sweet glaze may be burned by high heat.
- Overcooking the meat: Use a thermometer instead of relying only on cooking time.
- Reusing contaminated marinade: Keep the reserved sauce separate from the beginning.
- Cutting the chicken immediately: Resting for 5 minutes helps the juices settle before slicing.
Frequently Asked Questions About Huli Huli Chicken Recipe
1. What is Huli Huli Chicken?
Huli Huli Chicken is a Hawaiian-style chicken dish with a sweet, savory marinade and a grilled, glazed finish. The word “huli” means “turn” in Hawaiian, referring to turning the chicken while it cooks.
2. What makes the best Huli Huli sauce recipe?
The Best Huli Huli sauce recipe balances pineapple juice, soy sauce, brown sugar, garlic, ginger, and an acid like vinegar. Ketchup adds body, while optional sriracha provides heat.
3. Can I make Huli Huli Chicken recipe without a grill?
Yes. Bake it at 400°F (200°C) until the thickest part reaches 165°F (74°C). You can briefly broil it at the end for a more caramelized finish.
4. How long should I marinate Huli Huli Chicken?
Marinate for at least 30 minutes, although 2 to 4 hours usually provides more flavor. Keep the chicken refrigerated throughout marinating.
5. How do I store leftover Huli Huli Chicken?
Cool leftovers can be kept in the fridge for up to three or four days in an airtight container. Reheat until the center reaches 165°F (74°C). You can also freeze cooked chicken for longer storage.
Nutrition Information For Huli Huli Chicken Recipe
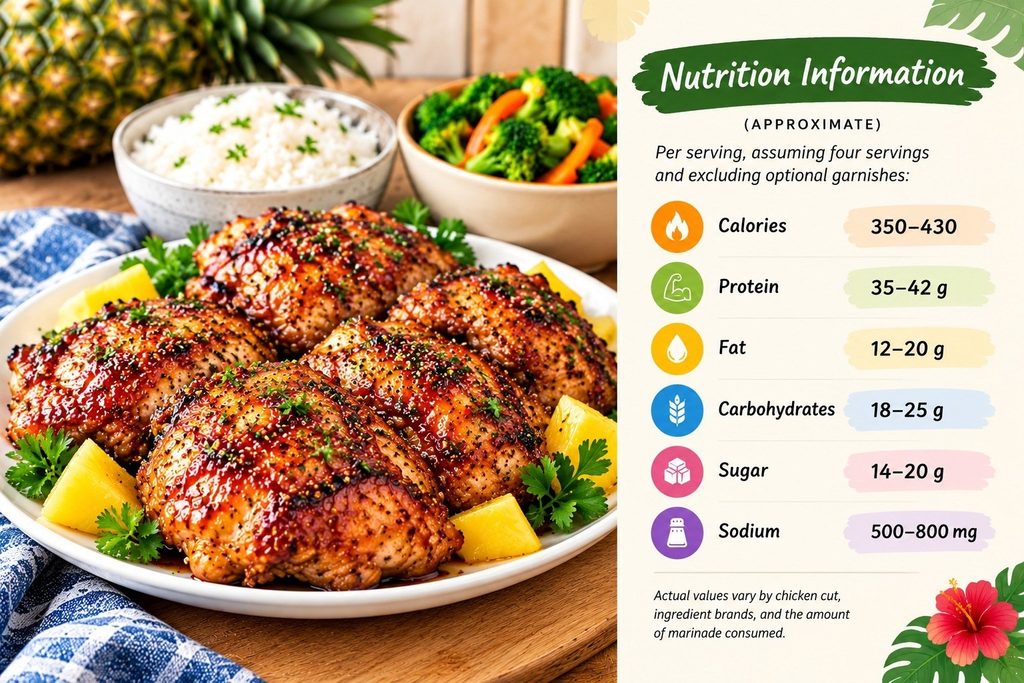
Per serving, assuming four servings and excluding optional garnishes:
- Calories: 350–430
- Protein: 35–42 g
- Fat: 12–20 g
- Carbohydrates: 18–25 g
- Sugar: 14–20 g
- Sodium: 500–800 mg
Actual values vary by chicken cut, ingredient brands, and the amount of marinade consumed.
Recipe Card: Printable Huli Huli Chicken Recipe
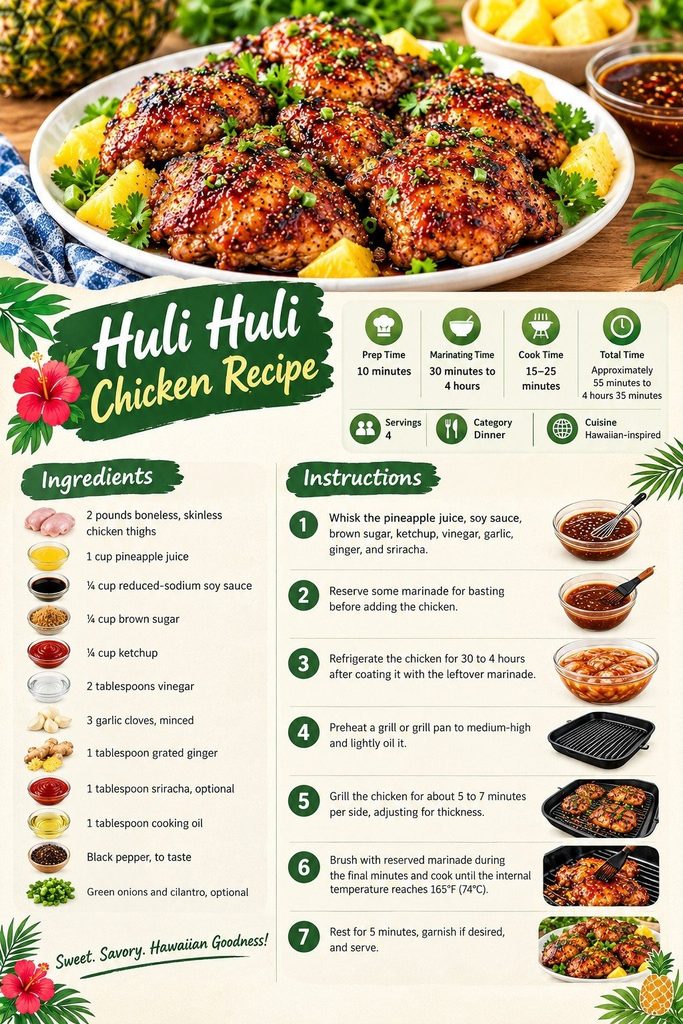
Prep Time: 10 minutes
Marinating Time: 30 minutes to 4 hours
Cook Time: 15–25 minutes
Total Time: Approximately 55 minutes to 4 hours 35 minutes
Servings: 4
Category: Dinner
Cuisine: Hawaiian-inspired
Ingredients
- 2 pounds boneless, skinless chicken thighs
- 1 cup pineapple juice
- ¼ cup reduced-sodium soy sauce
- ¼ cup brown sugar
- ¼ cup ketchup
- 2 tablespoons vinegar
- 3 garlic cloves, minced
- 1 tablespoon grated ginger
- 1 tablespoon sriracha, optional
- 1 tablespoon cooking oil
- Black pepper, to taste
- Green onions and cilantro, optional
Instructions
- Whisk the pineapple juice, soy sauce, brown sugar, ketchup, vinegar, garlic, ginger, and sriracha.
- Reserve some marinade for basting before adding the chicken.
- Refrigerate the chicken for 30 to 4 hours after coating it with the leftover marinade.
- Preheat a grill or grill pan to medium-high and lightly oil it.
- Grill the chicken for about 5 to 7 minutes per side, adjusting for thickness.
- Brush with reserved marinade during the final minutes and cook until the internal temperature reaches 165°F (74°C).
- Rest for 5 minutes, garnish if desired, and serve.
Conclusion: Easy Huli Huli Chicken Recipe
This Easy Huli Huli Chicken recipe is a delicious way to bring Hawaiian-inspired flavors into your kitchen. Its homemade marinade combines pineapple juice, brown sugar, soy sauce, garlic, and ginger for a sweet, savory glaze that complements juicy chicken thighs.
Whether you choose the Huli Huli Chicken recipe on the grill or an oven-baked method, the key is to control the heat, baste safely, and cook the chicken to the correct temperature. Serve it with rice and vegetables for a satisfying meal that is easy enough for a weeknight and special enough for a weekend gathering.
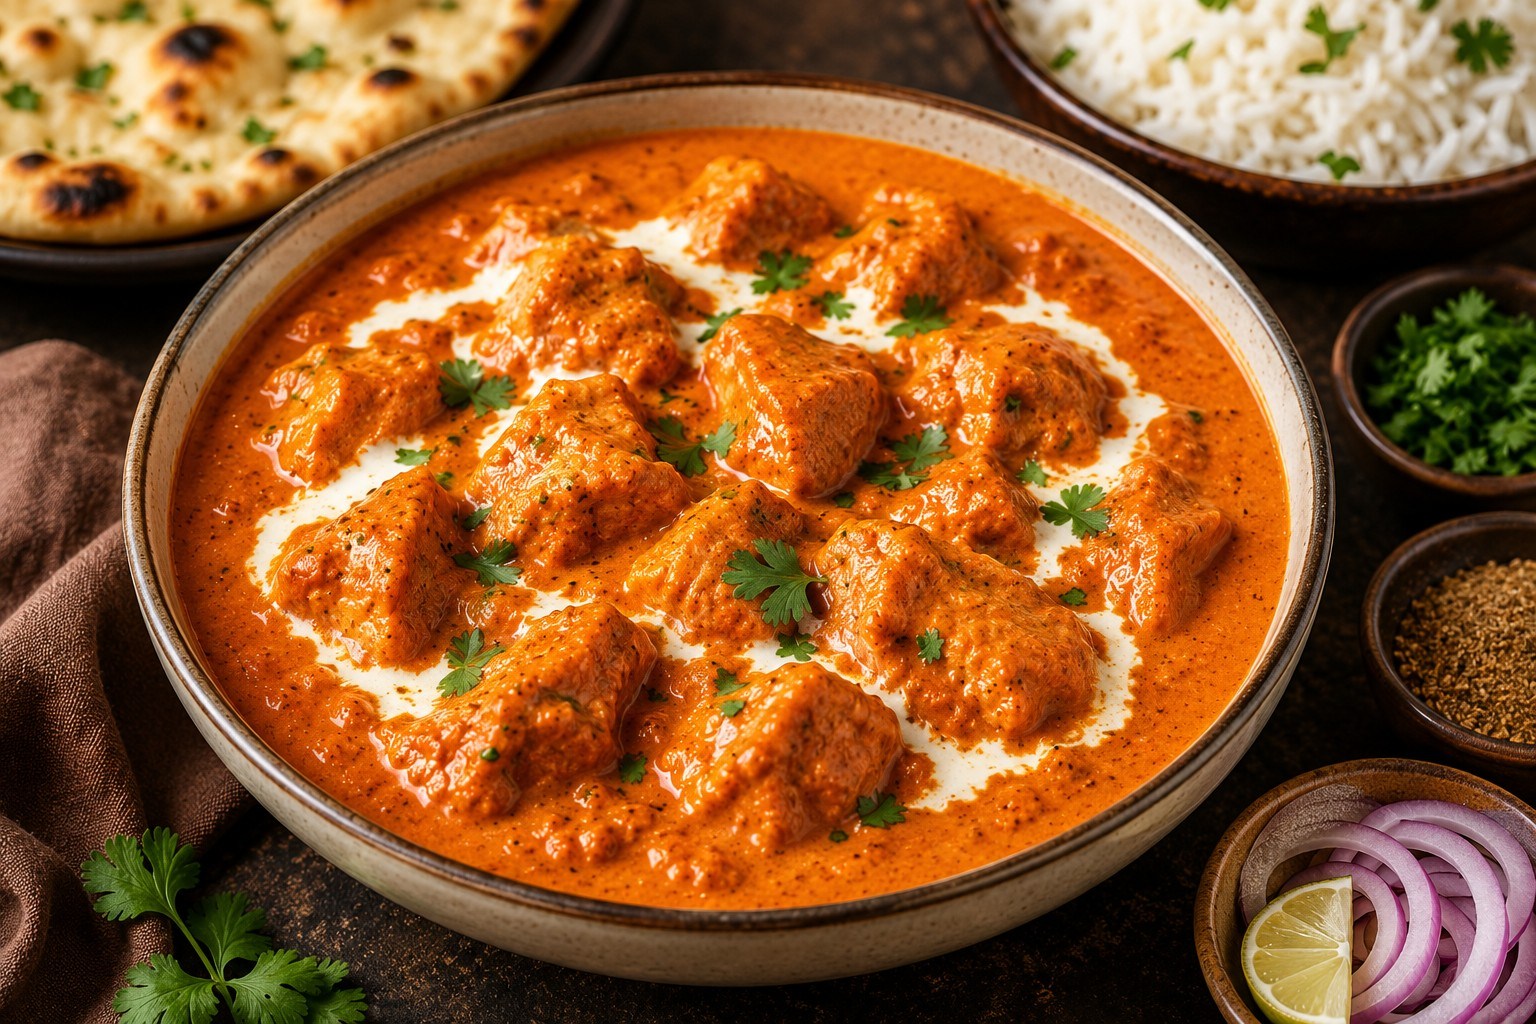
Butter Chicken Recipe
This Butter Chicken recipe is everything you want in a homemade Indian curry. The chicken is coated in a mixture of yogurt, garlic, ginger, and warm spices and left to sit until it becomes tender. It is then cooked in a rich sauce made from tomatoes and butter, finished with cream. The result is rich, flavorful, and surprisingly easy to make at home.
Whether you’re making a Butter Chicken recipe for the first time or looking for a better recipe than your usual takeout, this version delivers restaurant-quality flavor with simple, easy-to-find ingredients. Serve it with fluffy basmati rice or warm naan, and you’ll have a comforting meal everyone will love.
Why You’ll Love This Butter Chicken Recipe
Here’s why you’ll love it:
● Rich, creamy, and perfectly balanced sauce
● Tender, juicy marinated chicken
● Easy-to-find ingredients
● Mild enough for the whole family
● Better than most restaurant takeout
● Ready with simple cooking techniques
● Great for meal prep and freezing
● Perfect with rice, naan, or roti
Once prepared, you will see what makes this classic Indian curry a hit in any part of the world.
Ingredient Notes
The beauty of Butter Chicken is that each ingredient plays an important role. Together, they create the rich flavor and silky texture that make this dish unforgettable.
Chicken
Boneless skinless chicken thighs are the best choice because they stay juicy during cooking and absorb the marinade beautifully.
Greek Yogurt
Full-fat plain Greek yogurt creates the perfect marinade. It gently tenderizes the chicken while helping the spices stick to every piece.
Avoid flavored or sweetened yogurt.
Fresh Garlic and Ginger
Fresh ingredients make a huge difference. Garlic and ginger create the deep aromatic flavor that bottled pastes simply can’t match.
Finely grate both so they blend smoothly into the marinade and sauce.
Tomato Paste or Tomatoes
A rich tomato base gives Butter Chicken its signature color and flavor.
Tomato paste creates a thicker, more concentrated sauce, while crushed tomatoes produce a slightly lighter consistency.
Either option works well when cooked properly.
Butter
Real butter gives the curry its signature richness.
Unsalted butter allows better control over seasoning, but salted butter works if you adjust the salt later.
Heavy Cream
Heavy cream creates the silky finish that makes Butter Chicken famous.
For a lighter version, you can reduce the amount slightly or replace part of it with plain Greek yogurt after the sauce has cooled slightly.
Garam Masala
Garam masala is the warmth and complexity without making the curry spicy.
Every brand tastes slightly different, so always taste the finished sauce before serving.
Kashmiri Chili Powder
Kashmiri chili powder gives Butter Chicken its beautiful orange-red color while adding only mild heat.
Turmeric
Add a small amount of Turmeric to enhance the golden color.
Only a small amount is needed.
Ground Cumin and Coriander
These classic Indian spices provide warmth and depth while balancing the richness of the butter and cream.
Kasoori Methi (Dried Fenugreek Leaves)
Kasoori methi is optional but highly recommended.
Best Chicken for Butter Chicken
The type of chicken you choose has a big impact on the final dish.
Chicken Thighs
Boneless, skinless chicken thighs are the best option because they remain juicy, tender, and flavorful even after simmering in the sauce.
Chicken Breasts
Chicken breasts work well if you prefer a leaner meal. Cut them into uniform-sized bites and do not overcook. They should reach an internal temperature of 165°F (74°C) before serving.
How to Marinate Chicken for Maximum Flavor
Marinating is one of the most important steps in making authentic Butter Chicken.
The yogurt gently tenderizes the chicken while the spices soak into the meat, creating flavor in every bite.
For the marinade, combine:
● Plain Greek yogurt
● Lemon juice
● Fresh grated garlic
● Fresh grated ginger
● Garam masala
● Ground cumin
● Ground coriander
● Turmeric
● Kashmiri chili powder
● Salt
Mix until smooth, then coat every piece of chicken evenly.
Cover and refrigerate.
Marinating times:
● 30 minutes: Good
● 2 to 4 hours: Better
● Overnight: Best
Avoid marinating for more than 24 hours, as the yogurt can begin to change the chicken’s texture.
The longer marinating time allows the spices to fully penetrate the meat, resulting in chicken that’s incredibly juicy and flavorful after cooking.
How to Make Butter Chicken: Butter Chicken Recipe
Making Butter Chicken at home is much easier than most people think. The recipe comes together in three simple stages: marinate the chicken, prepare the creamy tomato sauce, and combine everything until perfectly cooked.
Take your time with each step, and you’ll be rewarded with a rich, restaurant-quality curry.
Step 1: Marinate the Chicken
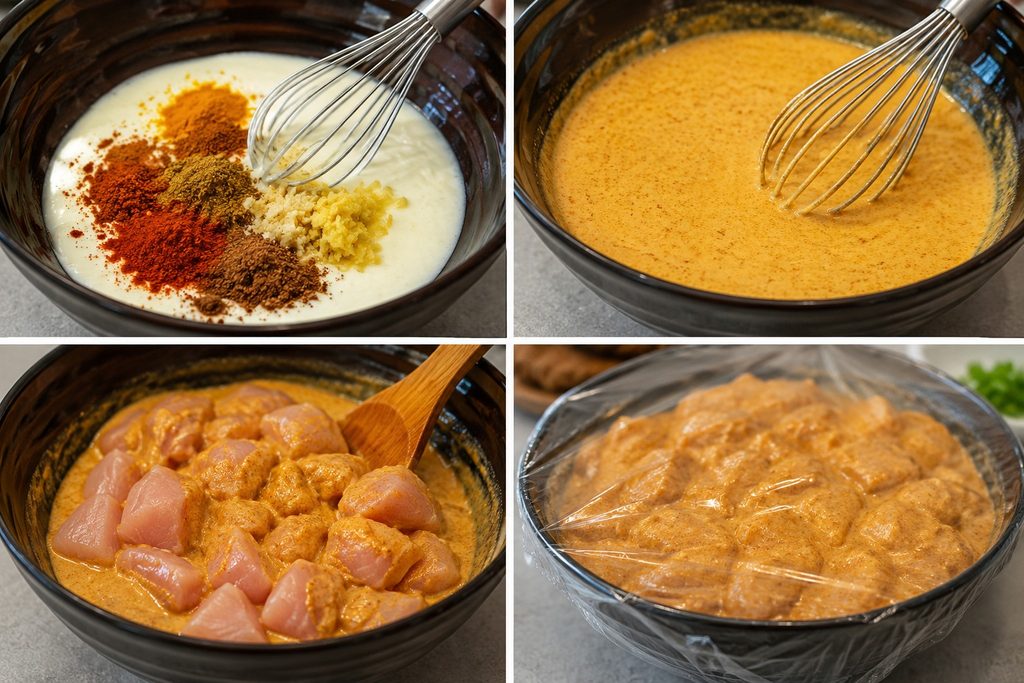
In a large bowl, whisk together the Greek yogurt, lemon juice, garlic, ginger, garam masala, cumin, coriander, turmeric, Kashmiri chili powder, and salt until smooth.
Add the chicken pieces and stir-fry until they are well incorporated.
Cover and refrigerate the chicken for 2 hours. If possible, let it marinate overnight for the deepest flavor and the most tender chicken.
Step 2: Cook the Chicken

Remove the chicken from the refrigerator about 15 minutes before cooking.
Cook the chicken using your preferred method:
● Grill over medium-high heat until lightly charred.
● Roast in a 400°F (200°C) oven.
● Cook in a hot skillet until lightly browned.
● Broil for the final 2 to 4 minutes to create smoky edges.
The chicken doesn’t need to be fully cooked at this stage because it will finish cooking in the sauce.
Step 3: Prepare the Butter Chicken Sauce
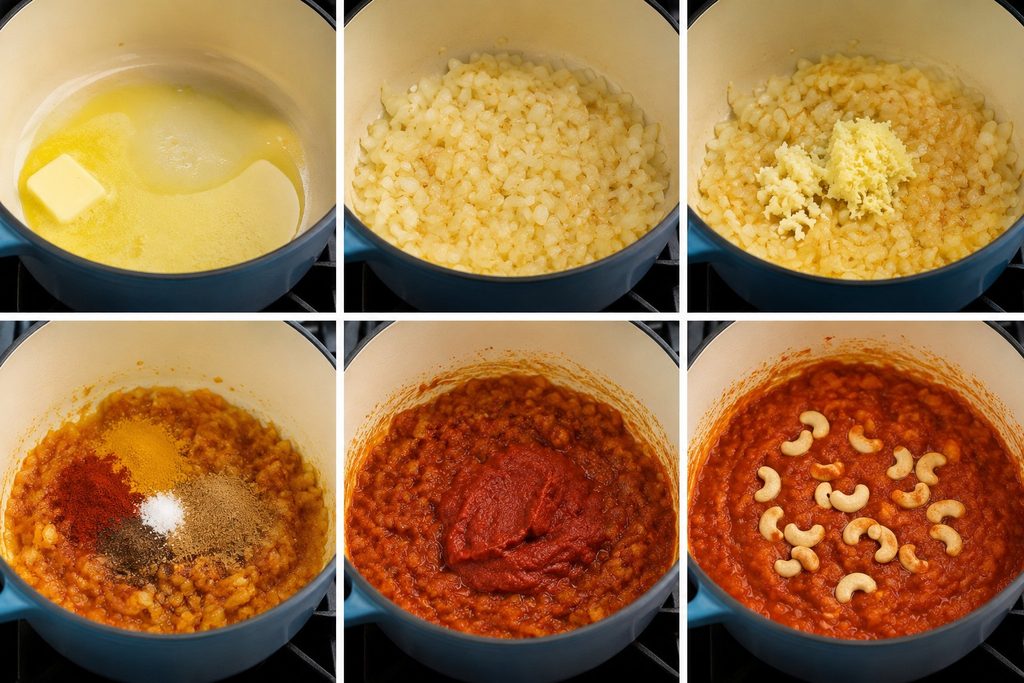
Heat the butter and a little oil in a large skillet or Dutch oven over medium heat.
Cook the onions until they soften and turn light golden. Stir in the garlic and ginger, then cook for another minute until fragrant.
Add all the spices and stir for a few seconds until fragrant. Stir continuously for about 30 seconds to toast the spices without burning them.
Add the tomato paste or crushed tomatoes and cook for 5 to 8 minutes, or until the tomatoes lose their fresh flavor and start to color.
If you’re using cashews, add them now and let them simmer with the tomatoes.
Step 4: Blend the Sauce

The tomato mixture should be carefully transferred to a blender and blended until smooth. If you have an immersion blender, blend the sauce directly in the pot.
This step creates the silky texture that makes Butter Chicken taste as if it came from a restaurant.
Step 5: Finish the Curry
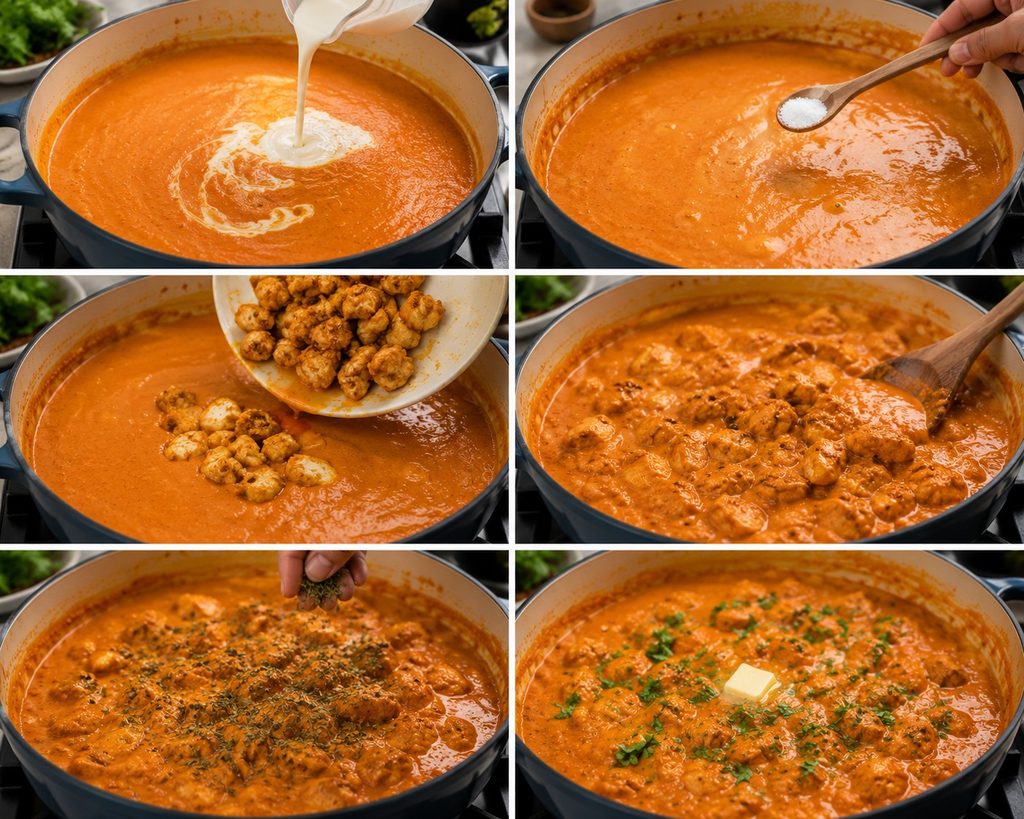
Return the blended sauce to the pan. Add the heavy cream and adjust the salt to your taste. Add the cooked chicken along with any juices released during cooking.
Reduce the heat to low and simmer gently for 8 to 10 minutes until the chicken is fully cooked and the flavors come together. Finish with crushed Kasoori methi, chopped fresh cilantro, and a small knob of butter if desired. Serve immediately while hot.
Expert Tips for the Best Butter Chicken Recipe
A few simple techniques can make the difference between good Butter Chicken and truly exceptional Butter Chicken.
Marinate Overnight
The longer the chicken sits in the yogurt marinade, the more flavorful and tender it becomes. Overnight marinating gives the best results.
Don’t Skip the Char
Traditional Butter Chicken gets its smoky flavor from a tandoor oven.
At home, grilling the chicken or placing it under a broiler for a few minutes creates similar caramelized edges that add incredible depth to the curry.
Cook the Tomatoes Properly
Raw tomatoes taste acidic.
Allow the tomato paste or crushed tomatoes to cook until the color deepens. This develops sweetness and creates a richer sauce.
Blend Until Completely Smooth
Blend the sauce for 1 to 2 minutes.
A silky sauce coats the chicken much better than a chunky one and gives the curry its signature restaurant-quality texture.
Simmer Gently After Adding Cream
Once the cream is added, avoid boiling the curry.
A gentle simmer keeps the sauce smooth and prevents the dairy from separating.
Taste Before Serving
Every brand of garam masala and chili powder tastes slightly different.
Before serving, taste the curry and adjust the seasoning with salt, a little sugar if needed, or an extra squeeze of lemon juice for balance.
Common Mistakes to Avoid
If a few crucial details are missed, even a straightforward dish might go awry.
Skipping the Marinade
The marinade isn’t just for flavor. It also helps tenderize the chicken, making every bite juicy.
Overcooking the Chicken
Chicken continues to cook as it simmers in the sauce.
Cooking it too long can make it dry and chewy.
Burning the Spices
Ground spices cook very quickly.
Once added to the pan, stir constantly and cook only until fragrant.
Using Too Much Cream
Butter Chicken should be creamy but still taste like tomatoes and spices.
Using too much cream can hide the other flavors.
Not Blending the Sauce
Skipping this step leaves the curry with a coarse texture rather than the smooth consistency Butter Chicken is known for.
Boiling the Cream
Keep the heat low after adding cream.
Boiling the sauce too quickly can cause it to split.
Recipe Variations
One of the best things about the Butter Chicken recipe is how easy it is to customize.

Spicy Butter Chicken
Add extra Kashmiri chili powder, cayenne pepper, or finely chopped green chilies for more heat.
Mild Butter Chicken
Reduce the chili powder and leave out the fresh chilies for a kid-friendly version.
Dairy-Free Butter Chicken
Replace the yogurt with unsweetened coconut yogurt.
Use coconut cream instead of heavy cream and dairy-free butter or oil in place of regular butter.
Healthier Butter Chicken Recipe
Use chicken breast instead of thighs.
Reduce the butter slightly and substitute part of the heavy cream with plain Greek yogurt.
Vegetarian Butter Chicken
Replace the chicken with:
● Paneer
● Tofu
● Chickpeas
● Roasted cauliflower
● Mixed vegetables
The creamy tomato sauce pairs beautifully with all of these options.
What to Serve with Butter Chicken Recipe
Butter Chicken is filling enough to enjoy on its own, but the right side dishes make it even more satisfying.
Some of the best serving options include:
● Steamed basmati rice
● Jeera rice (cumin rice)
● Garlic naan
● Plain naan
● Roti
● Paratha
● Kachumber salad
● Cucumber raita
● Papadums
Serve the curry with a fresh salad or cooling yogurt to balance the richness.
Storage Instructions
One of the best things about this Butter Chicken recipe is that it tastes even better the next day. As the curry rests, the spices continue to blend, creating an even richer, deeper flavor.
How to Store Butter Chicken Recipe
Allow the Butter Chicken to cool completely before storing it.
Store it in the refrigerator for up to four days after transferring it to an airtight container. For the best flavor and texture, avoid leaving the curry at room temperature for longer than 2 hours.
Can You Freeze Butter Chicken?
Yes! Butter Chicken freezes beautifully, making it a perfect meal-prep recipe.
To freeze:
- Let the curry cool completely.
- Divide it into individual portions.
- Place the portions in freezer bags or freezer-safe containers.
- Label each container with the date.
Store in the freezer for up to 3 months.
If possible, freeze the curry without the garnish and add fresh cilantro after reheating for the best flavor.
How to Reheat Butter Chicken
Reheating Butter Chicken is simple, and the flavors often become even better after a day or two.
Stovetop Method
This is the best way to reheat Butter Chicken.
● In a saucepan over medium-low heat, add the curry.
● Stir occasionally until heated through.
● If the sauce has thickened, add a splash of water, chicken broth, or heavy cream to loosen it.
Avoid boiling the curry after adding dairy, as this can cause the sauce to separate.
Microwave Method
For a quick meal:
● Place the Butter Chicken in a microwave-safe bowl.
● Cover loosely.
● Heat in 1-minute intervals, stirring between each interval until hot.
This helps the curry heat evenly without drying out.
Frequently Asked Questions
Is Butter Chicken spicy?
No. Traditional Butter Chicken is a mild curry with warm, aromatic spices rather than intense heat.
Most of its vibrant color comes from Kashmiri chili powder, which adds color more than spice.
If you like a hotter curry, simply add extra green chilies or a pinch of cayenne pepper.
Can I use chicken breast instead of chicken thighs?
Yes.
Chicken breasts are leaner and cook more quickly, while chicken thighs stay juicier and more tender.
When using chicken breasts, take care not to overcook them because this will cause them to dry out more quickly.
How long should I marinate the chicken?
For the best results:
● 30 minutes: Good
● 2 to 4 hours: Better
● Overnight: Best
Longer marinating allows the yogurt and spices to tenderize the chicken and build deeper flavor.
What is Kashmiri chili powder?
Kashmiri chili powder is a mild Indian chili powder known for its bright red color and gentle heat.
If you can’t find it, mix:
● ¾ teaspoon sweet paprika
● ¼ teaspoon cayenne pepper
This creates a similar color and flavor.
Do I need Kasoori methi?
No, but it adds the classic restaurant-style aroma that many people associate with Butter Chicken.
If it’s available, I highly recommend using it.
If not, the recipe will still taste delicious without it.
Can I prepare Butter Chicken in advance?
Absolutely.
The chicken can be marinated the day before, and the sauce can be prepared early.
When you’re ready to serve, simply combine the cooked chicken with the sauce and heat everything together.
This makes Butter Chicken an excellent recipe for entertaining or meal prep.
How can I fix thin Butter Chicken recipe sauce?
A thin sauce usually means there is too much liquid or it hasn’t simmered long enough.
To thicken the sauce:
● Simmer uncovered for a few extra minutes.
● Stir occasionally.
● Add a little more tomato paste if needed.
The sauce should naturally become thick and creamy without adding flour or cornstarch.
Can I make Butter Chicken Recipe without a blender?
Yes.
Blend the sauce, if possible, for the smoothest texture, but if you don’t have a blender:
● Finely chop the onions and tomatoes.
● Cook them until very soft.
● Mash them well with a potato masher.
The sauce won’t be quite as silky, but it will still taste wonderful.
What is the difference between Butter Chicken Recipe and Chicken Tikka Masala?
Although they look similar, they are different dishes.
Butter Chicken has a smooth tomato, butter, and cream sauce with a rich, mild flavor.
Chicken Tikka Masala usually contains onions in the sauce, making it thicker and slightly more robust in flavor.
What should I serve with Butter Chicken?
Butter Chicken pairs perfectly with:
● Steamed basmati rice
● Jeera rice
● Garlic naan
● Plain naan
● Roti
● Paratha
● Cucumber raita
● Kachumber salad
● Papadums
These sides soak up the rich, creamy sauce and complete the meal.
Recipe Card (Printable Summary)
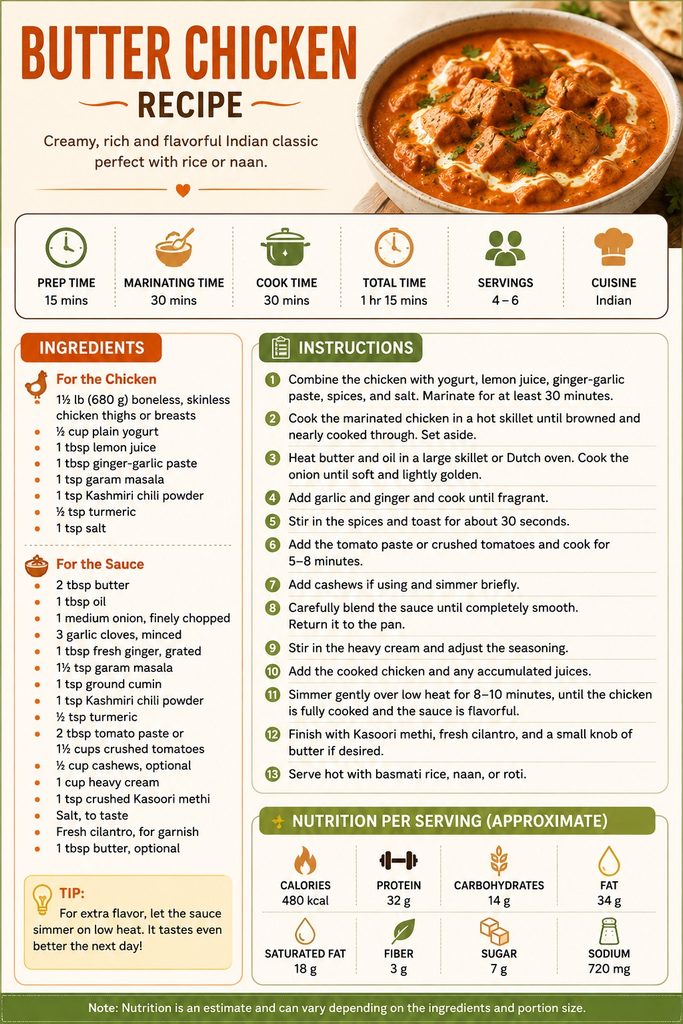
Butter Chicken Recipe
Prep Time: 15 minutes
Marinating Time: 30 minutes
Cook Time: 30 minutes
Total Time: About 1 hour 15 minutes
Servings: 4–6
Cuisine: Indian
Ingredients
For the Chicken:
- 1½ lb (680 g) boneless, skinless chicken thighs or breasts
- ½ cup plain yogurt
- 1 tablespoon lemon juice
- 1 tablespoon ginger-garlic paste
- 1 teaspoon garam masala
- 1 teaspoon Kashmiri chili powder
- ½ teaspoon turmeric
- 1 teaspoon salt
For the Sauce:
- 2 tablespoons butter
- 1 tablespoon oil
- 1 medium onion, finely chopped
- 3 garlic cloves, minced
- 1 tablespoon fresh ginger, grated
- 1½ teaspoons garam masala
- 1 teaspoon ground cumin
- 1 teaspoon Kashmiri chili powder
- ½ teaspoon turmeric
- 2 tablespoons tomato paste or 1½ cups crushed tomatoes
- ½ cup cashews, optional
- 1 cup heavy cream
- 1 teaspoon crushed Kasoori methi
- Salt, to taste
- Fresh cilantro, for garnish
- 1 tablespoon butter, optional
Nutrition Information (Approximate)
The exact nutrition values will vary depending on the amount of butter, cream, yogurt, chicken, and oil used. For a standard serving of Butter Chicken Recipe with about 1 cup of curry, the approximate nutrition is:
Calories: 480 kcal
Protein: 32 g
Carbohydrates: 14 g
Fat: 34 g
Saturated Fat: 18 g
Fiber: 3 g
Sugar: 7 g
Sodium: 720 mg
Note: These values are estimates and do not include rice, naan, or other side dishes. Using chicken breast, less butter, and Greek yogurt instead of some of the cream can significantly reduce the calories and fat.
Instructions
- Combine the chicken with yogurt, lemon juice, ginger-garlic paste, spices, and salt. Marinate for at least 30 minutes.
- Cook the marinated chicken in a hot skillet until browned and nearly cooked through. Set aside.
- Heat butter and oil in a large skillet or Dutch oven. Cook the onion until soft and lightly golden.
- Add garlic and ginger and cook until fragrant.
- Stir in the spices and toast for about 30 seconds.
- Add the tomato paste or crushed tomatoes and cook for 5–8 minutes.
- Add cashews if using and simmer briefly.
- Carefully blend the sauce until completely smooth. Return it to the pan.
- Stir in the heavy cream and adjust the seasoning.
- Add the cooked chicken and any accumulated juices.
- Simmer gently over low heat for 8–10 minutes, until the chicken is fully cooked and the sauce is flavorful.
- Finish with Kasoori methi, fresh cilantro, and a small knob of butter if desired.
- Serve hot with basmati rice, naan, or roti.
Conclusion
This Butter Chicken recipe brings together everything people love about this classic Indian dish. Tender marinated chicken, a rich tomato-based sauce, warm spices, butter, and cream combine to create a meal that’s comforting, flavorful, and surprisingly easy to make at home.
With a simple marinade, fresh ingredients, and a few easy cooking techniques, you can enjoy restaurant-quality Butter Chicken in your own kitchen. This recipe is sure to impress, whether you’re whipping it up for a family gathering, preparing meals for the week ahead, or hosting friends.
Serve it with fluffy basmati rice, warm naan, or your favorite Indian bread, and don’t forget to garnish with fresh cilantro and a sprinkle of Kasoori methi for that authentic finishing touch.
I hope this homemade Butter Chicken becomes one of your favorite comfort food recipes. Once you taste the rich, creamy sauce and perfectly tender chicken, you’ll understand why this dish has remained a favorite around the world for generations. Happy cooking!

Healthy Lunch Ideas: Easy, Fresh, and Filling Meals

Creamy Shrimp Pasta Recipe in 30 minutes

Baked Ziti Recipe: Easy, Cheesy Italian-American Dinner

Huli Huli Chicken Recipe: Easy Hawaiian Grilled Chicken

Easy Diet Meal: A Healthy, High-Protein Chicken and Vegetable Bowl

Simple Fried Chicken Recipe: Crispy, Juicy, and Easy

The Best Homemade BBQ Chicken Pizza Recipe 2026

Healthy Chicken Soup Recipe With Vegetables and Tender Chicken

Classic Chicken Salad Recipe – Creamy, Flavorful And Delicious

Chicken Biryani Recipe: Flavorful and Easy to Make
-
 Chicken Recipes1 month ago
Simple Fried Chicken Recipe: Crispy, Juicy, and Easy
-
 Baked Chicken1 month ago
The Best Homemade BBQ Chicken Pizza Recipe 2026
-
 Soups and Salad1 month ago
Healthy Chicken Soup Recipe With Vegetables and Tender Chicken
-
 Soups and Salad1 month ago
Classic Chicken Salad Recipe – Creamy, Flavorful And Delicious
-
 Chicken Recipes1 month ago
Chicken Biryani Recipe: Flavorful and Easy to Make
-

 Soups and Salad3 weeks ago
Homemade Cream of Chicken Soup Recipe 2026
-
 Chicken Recipes1 month ago
Air Fryer Chicken Wings with Crispy, Juicy, and Delicious
-
 Milkshakes4 weeks ago
Salted Caramel Milkshake Creamy And Easy Recipe