
Chicken Recipes
Air Fryer Chicken Wings with Crispy, Juicy, and Delicious

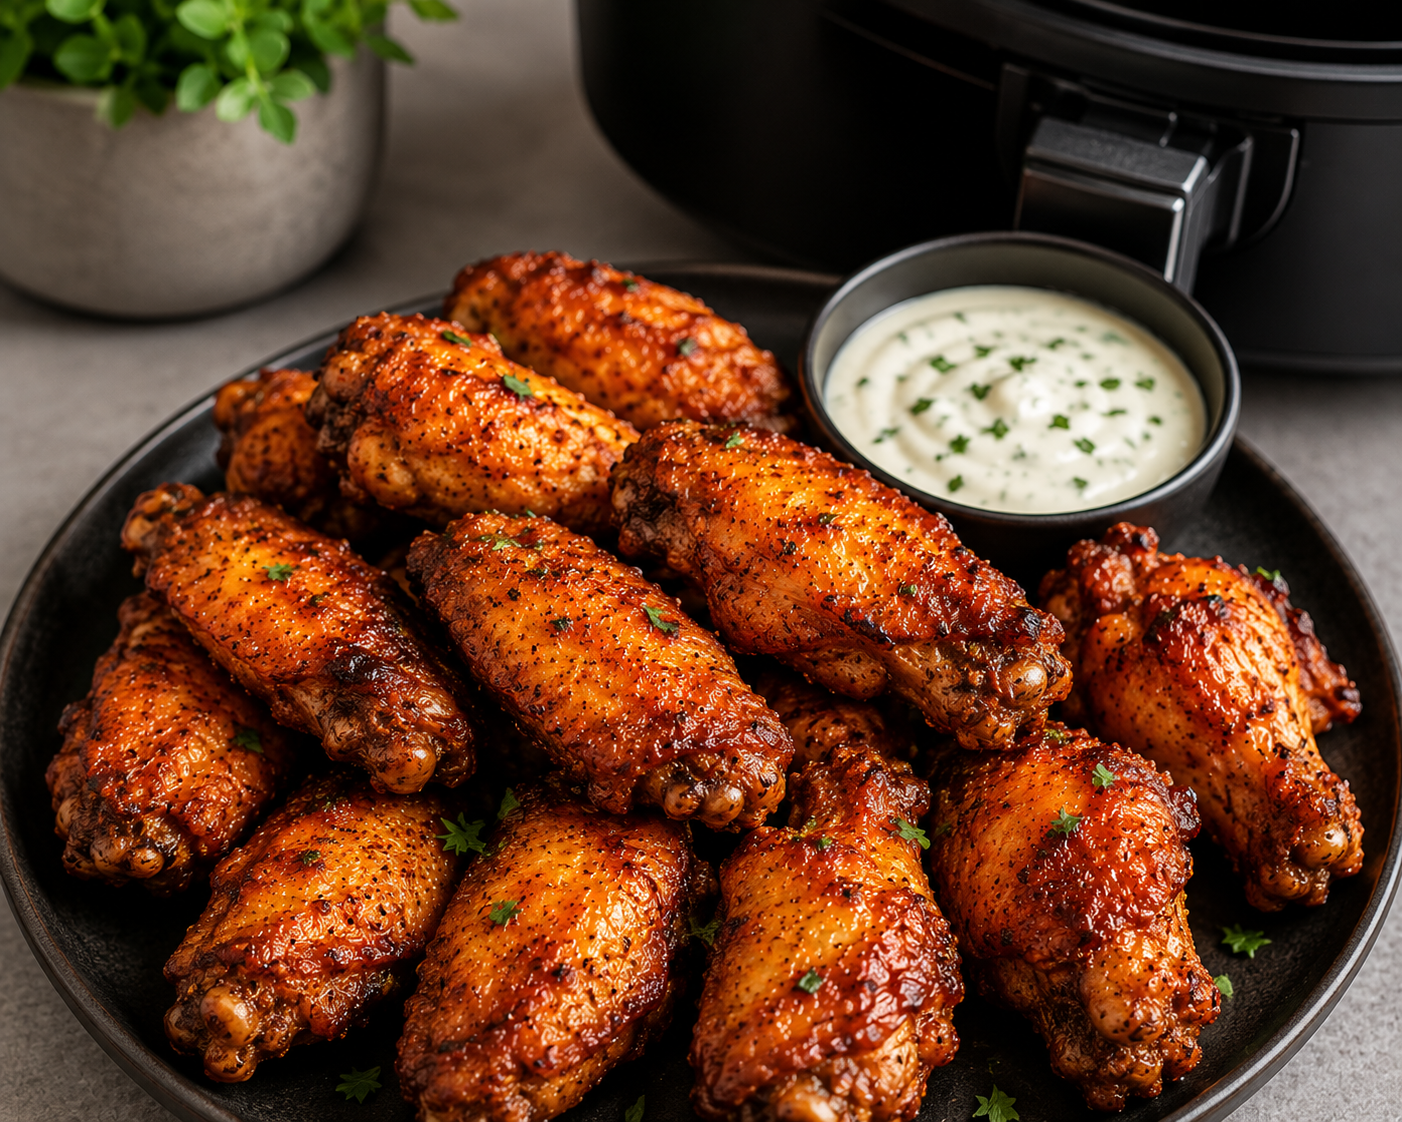
Air Fryer Chicken Wings
There’s something incredibly satisfying about biting into perfectly crispy Air Fryer Chicken Wings. The skin crackles with every bite, while the meat inside stays tender and juicy. Traditionally, achieving that restaurant-style texture meant deep-frying, which often leaves a greasy mess and requires a lot of oil. Thankfully, the air fryer has completely changed the game, making it possible to enjoy crispy chicken wings at home with far less effort.
This air fryer chicken wings recipe is delicious and delivers everything you want in a great wing. The seasoning is simple yet flavorful, the cooking method creates beautifully crisp skin, and there’s no need to marinate the chicken beforehand. Whether you’re making appetizers for game day, preparing a quick family dinner, or serving snacks for a gathering, these wings are reliable, easy, and packed with flavor. Even better, they’re versatile enough to enjoy plain, tossed in Buffalo sauce, or coated with your favorite wing glaze.
Why You’ll Love Air Fryer Chicken Wings
If you’re looking for an easy chicken wing recipe that delivers restaurant-quality results, this one won’t disappoint. The air fryer cooks the wings evenly by circulating hot air around each piece, creating crispy skin without deep-frying. A simple blend of everyday spices adds plenty of flavor, and the cooking process takes less than 30 minutes from start to finish. Since the wings can be served plain or paired with nearly any sauce, they’re perfect for everything from casual weeknight dinners to parties, game days, and family gatherings.
Ingredients for Air Fryer Chicken Wings
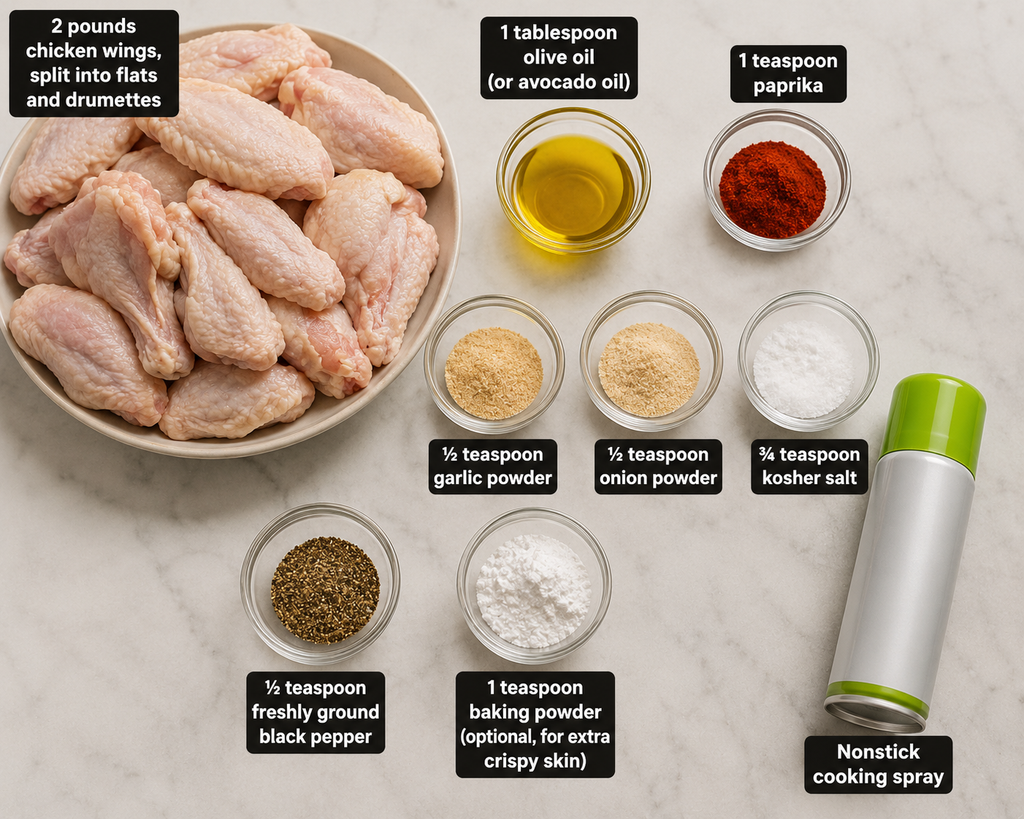
You’ll only need a handful of simple ingredients.
- 2 pounds of chicken wings, which are split into two parts — the flat portions and the drumettes.
- 1 tablespoon olive oil (or avocado oil)
- 1 teaspoon paprika
- ½ teaspoon garlic powder
- ½ teaspoon onion powder
- ¾ teaspoon kosher salt
- ½ teaspoon freshly ground black pepper
- 1 teaspoon baking powder (optional, for extra crispy skin)
- Nonstick cooking spray
Optional Sauces
- Buffalo sauce
- Garlic Parmesan sauce
- Honey BBQ sauce
- Sweet chili sauce
- Teriyaki sauce
- Lemon pepper butter
- Hot honey glaze
For Serving
- Ranch dressing
- Blue cheese dressing
- Celery sticks
- Carrot sticks
- Lemon wedges
Ingredient Notes & Substitutions
Chicken wings that have already been split into flats and drumettes cook more evenly, but whole wings work just as well if you separate them at the joints before cooking. Olive oil helps the seasoning stick to the wings and encourages browning, although avocado oil is an excellent substitute because of its high smoke point.
Paprika provides mild flavor and color, while smoked paprika adds a deeper smoky taste if you prefer bolder wings. Garlic powder and onion powder create a balanced savory seasoning without overpowering the chicken.
For extra crispy skin, a small amount of baking powder can be mixed into the seasoning. Make sure you use baking powder, not baking soda, as baking soda will leave an unpleasant taste.
Kosher salt is recommended because it seasons more evenly, but fine sea salt can also be used. If you’re using garlic salt instead of garlic powder, reduce the amount of additional salt to prevent overly salty wings.
Once cooked, these wings pair well with almost any sauce, making them easy to customize for different tastes.
Equipment Needed for Air Fryer Chicken Wings
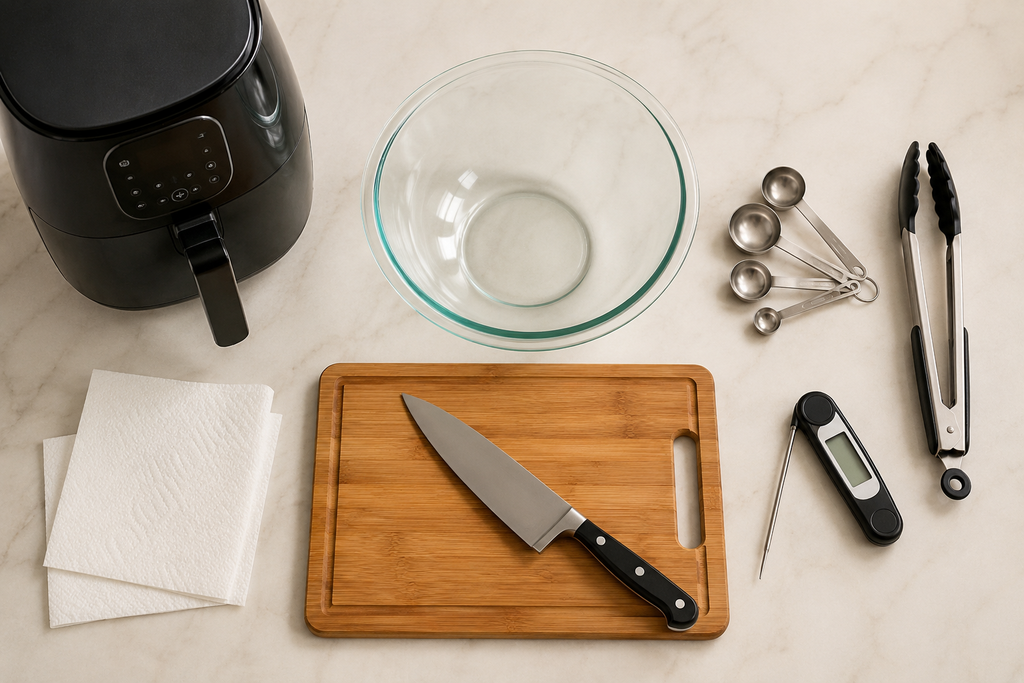
You don’t need any special kitchen tools beyond the basics.
- Air fryer
- Large mixing bowl
- Measuring spoons
- Tongs
- Paper towels
- Sharp knife (if separating whole wings)
- Instant-read meat thermometer (recommended for perfect doneness)
A meat thermometer isn’t absolutely required, but it’s the easiest way to ensure the wings are safely cooked while remaining juicy. The chicken should reach an internal temperature of 165°F (74°C), although many cooks prefer wings cooked to 175°F to 185°F (79°C to 85°C) for even more tender meat and crispier skin.
Step-by-Step Instructions
Air frying to make crispy chicken wings is easier than you might think. The key is preparing the wings properly and allowing the hot air to circulate freely around each piece. Follow these steps for consistently delicious results.
1. Preheat the Air Fryer
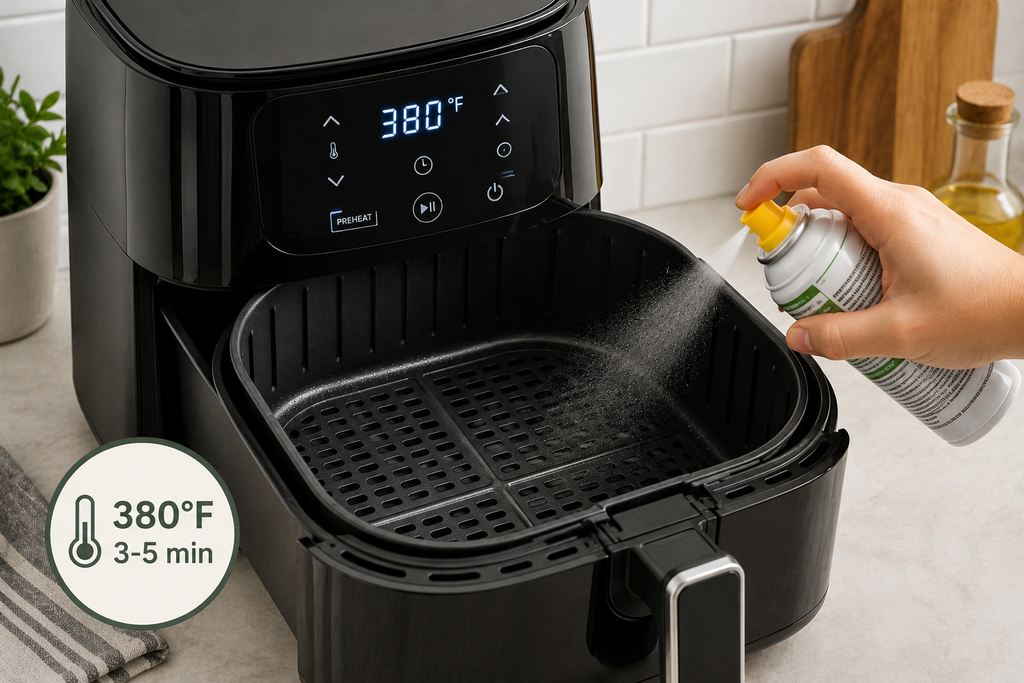
Preheat your air fryer to 380°F (193°C) for 3 to 5 minutes if your model recommends preheating. While some air fryers heat up quickly without preheating, starting with a hot basket helps the wings begin crisping immediately.
Lightly coat the air fryer basket with nonstick cooking spray to prevent sticking and make cleanup easier.
2. Pat the Wings Completely Dry
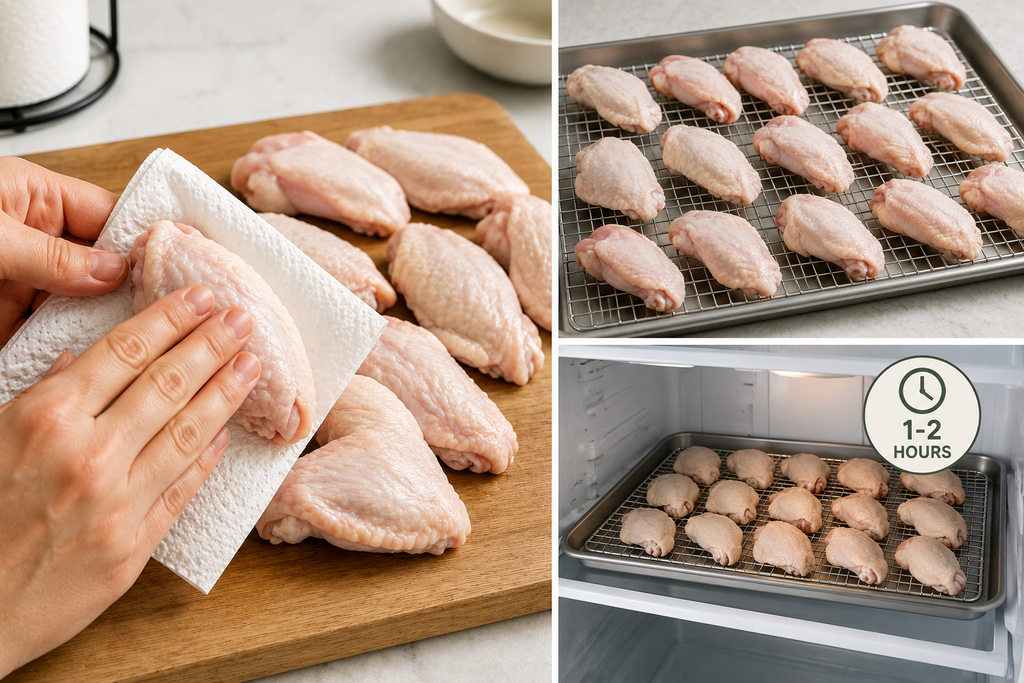
This is the most important step for crispy skin.
Remove the chicken wings from the package and thoroughly pat every piece dry using paper towels. Moisture is the enemy of crispiness. The drier the skin, the better it browns and crisps during cooking.
If you have extra time, place the uncovered wings on a wire rack in the refrigerator for 1 to 2 hours. This dries the skin even further and produces even crispier results.
3. Season the Wings
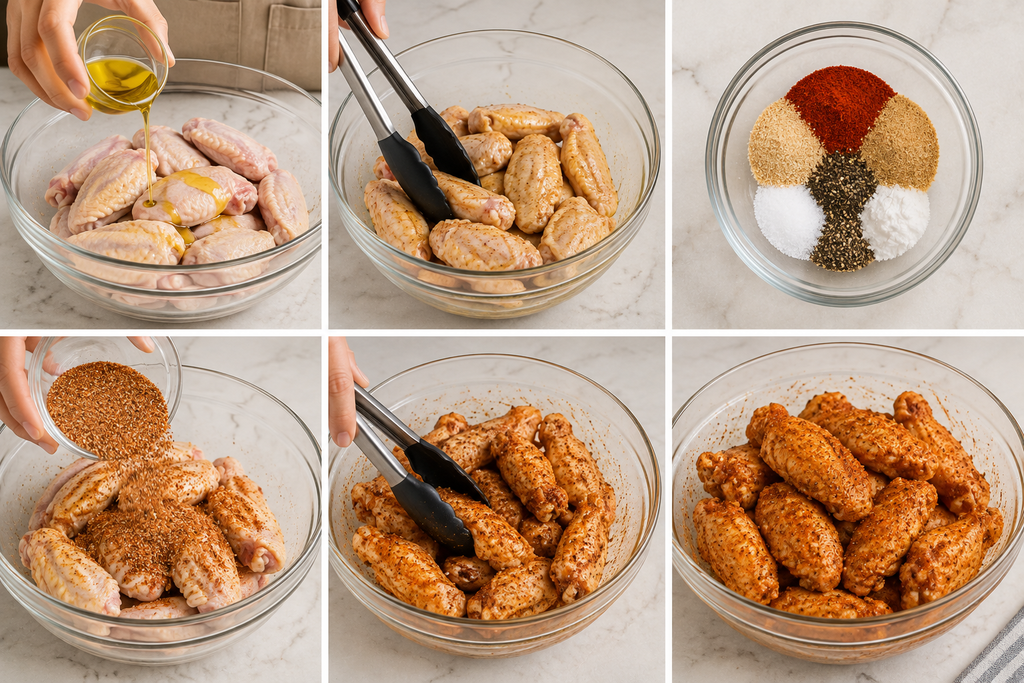
Place the wings in a large mixing bowl.
Drizzle with olive oil and toss until every wing has a light coating.
In a small bowl, combine:
- Paprika
- Garlic powder
- Onion powder
- Salt
- Black pepper
- Baking powder (if using)
Sprinkle the seasoning mixture over the wings and toss well until every piece is evenly coated.
4. Arrange the Wings
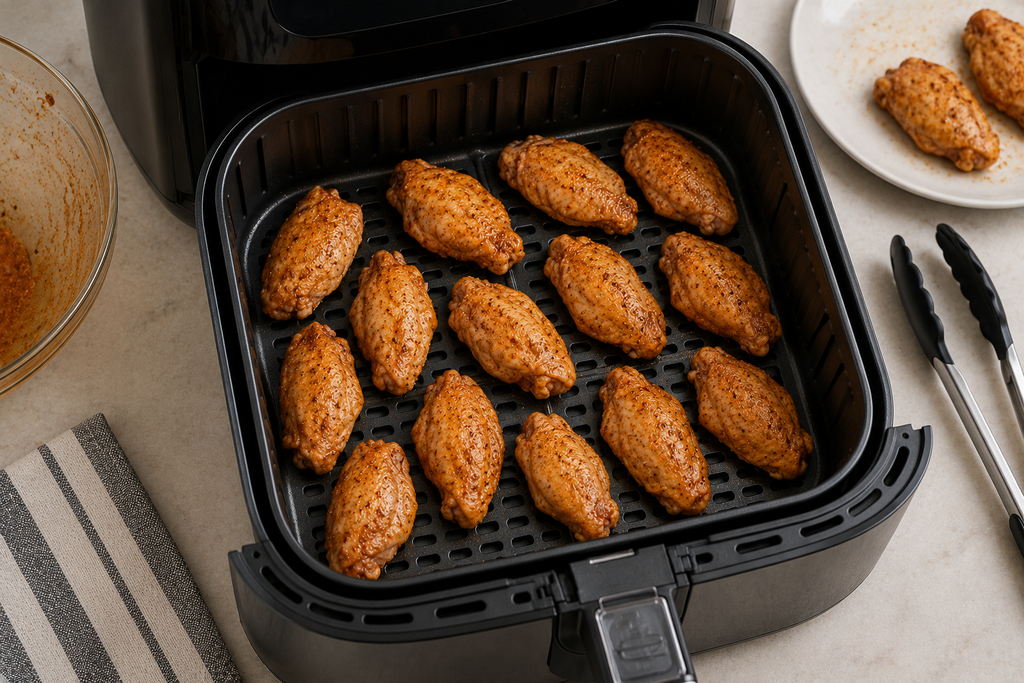
Place all the wings in a single layer inside the air fryer basket, making sure they are not overlapping.
Leave a little space between each wing so hot air can circulate every piece. Avoid stacking or overcrowding the basket. If you’re cooking a large batch, work in batches rather than squeezing everything into one load.
5. Cook Using the Two-Step Temperature Method
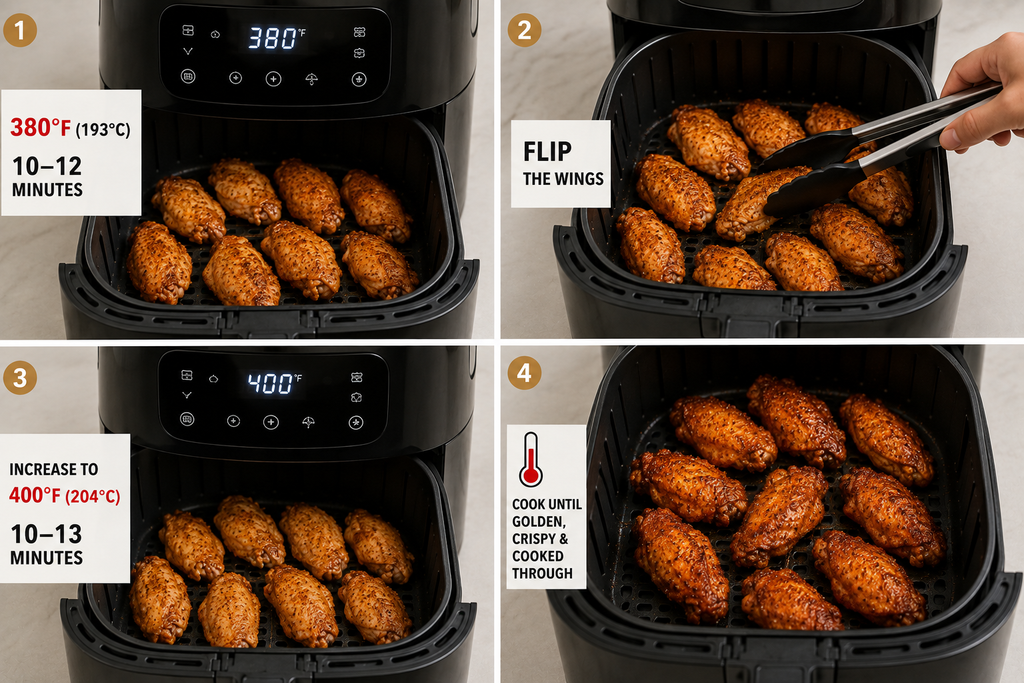
Cook the wings at 380°F (193°C) for 10 to 12 minutes.
Open the basket and flip each wing using tongs, or shake the basket if your air fryer allows.
Increase the temperature to 400°F (204°C) and continue cooking for another 10 to 13 minutes, depending on the size of the wings.
This two-step cooking method starts by slowly cooking the meat, then uses high heat to make the skin crisp and tasty without making the chicken dry.
6. Check for Doneness of Air Fryer Chicken Wings
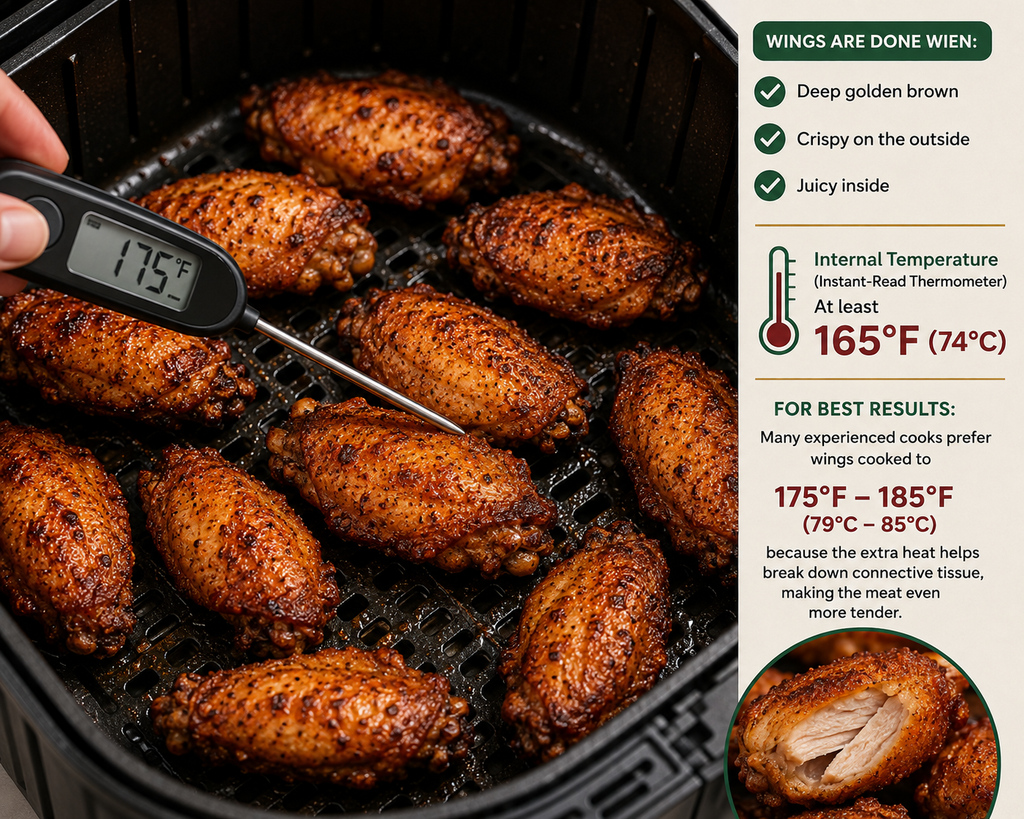
The wings should be:
- Deep golden brown
- Crispy on the outside
- Juicy inside
An instant-read thermometer inserted into the thickest part should register at least 165°F (74°C).
Many experienced cooks prefer wings cooked to 175°F to 185°F (79°C to 85°C) because the extra heat helps break down connective tissue, making the meat even more tender.
7. Add Sauce (Optional)
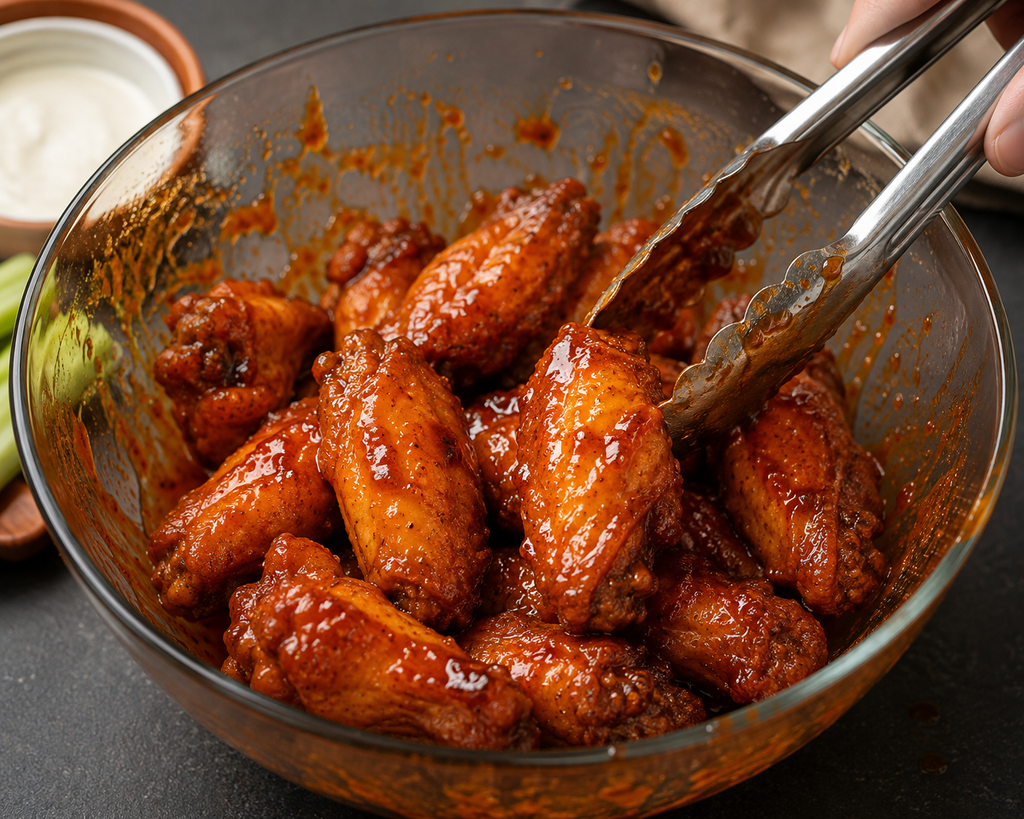
If serving Buffalo, BBQ, honey garlic, garlic Parmesan, or another sauce, wait until the wings are fully cooked.
Transfer the hot wings to a large bowl, pour the sauce over them, and gently toss until evenly coated.
If you love extra-crispy wings, serve the sauce on the side instead.
Expert Tips for Making Air Fryer Chicken Wings
A few simple techniques can take your wings from good to outstanding.
- Dry the wings thoroughly before seasoning.
- Use split wings for faster, more even cooking.
- Leave space between each wing in the basket.
- Cook in batches instead of overcrowding.
- Flip the wings halfway through cooking.
- Use the two-temperature cooking method for the crispiest skin.
- Add sauce only after the wings are fully cooked.
- Check the internal temperature with a meat thermometer instead of relying only on cooking time.
- Serve immediately for the best texture.
Recipe Variations of Air Fryer Chicken Wings
This recipe works as a base for countless flavor combinations.
- Classic Buffalo Wings: Toss with Buffalo sauce and melted butter.
- Garlic Parmesan Wings: Coat with melted butter, garlic, and grated Parmesan cheese.
- Lemon Pepper Wings: Finish with melted butter and lemon pepper seasoning.
- Honey BBQ Wings: Toss with your favorite barbecue sauce mixed with honey.
- For the Sweet Chili Wings, you will need to coat each wing generously with sweet chili sauce to give them a sweet and spicy taste.
- Hot Honey Wings: Drizzle with hot honey for a balance of heat and sweetness.
- Cajun Wings: Replace the seasoning blend with Cajun seasoning for a spicy Southern twist.
Serving Suggestions
Air fryer chicken wings are delicious on their own, but the right sides turn them into a complete meal or party spread.

Serve them with:
- Ranch dressing
- Blue cheese dressing
- Celery sticks
- Carrot sticks
- French fries
- Potato wedges
- Onion rings
- Coleslaw
- Caesar salad
- Macaroni salad
- Corn on the cob
- Garlic bread
- Loaded nachos
- Spinach artichoke dip
- Jalapeño poppers
For game days or parties, arrange the wings on a large platter with several dipping sauces so everyone can choose their favorite flavor.
Storage & Reheating
Allow leftover wings to cool completely before storing.
Place them in an airtight container and refrigerate for up to 4 days.
For longer storage, freeze cooked wings for up to 3 months. Thaw overnight in the refrigerator before reheating.
To reheat:
- Air Fryer: 360°F to 375°F for 4 to 6 minutes.
- Oven: 375°F for 10 to 15 minutes.
- Microwave: Heat until warm, although the skin won’t stay as crispy.
The air fryer remains the best option for restoring the crispy exterior.
Common Mistakes to Avoid
These small mistakes can prevent your wings from becoming perfectly crispy.
- Skipping the step of drying the wings.
- Overcrowding the air fryer basket.
- Cooking everything at one temperature instead of increasing the heat near the end.
- Adding sauce before cooking.
- Forgetting to flip the wings halfway through.
- Using baking soda instead of baking powder.
- Removing the wings before they are fully cooked.
Frequently Asked Questions
Can I cook frozen chicken wings in the air fryer?
Yes, you can cook frozen chicken wings directly in the air fryer without needing to thaw them first. Add about 8 to 10 extra minutes to the cooking time and separate the wings once they begin to thaw. For the crispiest results, thawed wings are still the best option because they dry more easily before cooking.
Do I need to preheat the air fryer?
It depends on your air fryer model. Many newer models heat up quickly, but preheating for 3 to 5 minutes helps the wings start crisping immediately and can improve browning. If your manufacturer recommends preheating, it’s worth taking the extra few minutes.
Why aren’t my air fryer chicken wings crispy?
The most common reasons are excess moisture, overcrowding the basket, or adding sauce too early. Always pat the wings dry, arrange them in a single layer with space between each piece, and wait until after cooking to toss them in sauce.
Should I flip the wings while cooking?
Yes. Flipping the wings halfway through cooking helps both sides brown evenly and ensures the skin becomes crispy all over.
Can I make these wings without baking powder?
Absolutely. The wings will still be delicious and crispy thanks to the circulating hot air in the air fryer. Baking powder simply helps dry the skin a little more, creating an even crispier finish.
What’s the best internal temperature for chicken wings?
Chicken is safe to eat once it reaches 165°F (74°C). However, wings often taste even better when cooked to 175°F to 185°F (79°C to 85°C) because the connective tissue breaks down, making the meat more tender while the skin becomes crispier.
Can I use whole chicken wings?
Yes. If using whole wings, separate them into drumettes, flats, and wing tips before cooking. The drumettes and flats cook more evenly, while the wing tips are best saved for making homemade chicken stock.
What sauces go best with air fryer chicken wings?
Buffalo sauce is the classic choice, but these wings are equally delicious with garlic Parmesan, honey BBQ, sweet chili, teriyaki, hot honey, lemon pepper butter, or simply served with ranch or blue cheese dressing.
Nutrition Information (Approximate)

The nutrition values below are estimates for one serving of plain seasoned wings and may vary depending on the ingredients, portion size, and any sauces added.
| Nutrient | Amount Per Serving |
| Calories | 240 kcal |
| Protein | 17 g |
| Carbohydrates | 1 g |
| Total Fat | 18 g |
| Saturated Fat | 5 g |
| Unsaturated Fat | 11 g |
| Cholesterol | 71 mg |
| Sodium | 500 mg |
| Potassium | 160 mg |
| Fiber | 0 g |
| Sugar | 0 g |
Note: Adding Buffalo sauce, barbecue sauce, ranch dressing, or blue cheese dressing will increase the calories, fat, sodium, and carbohydrate content.
Recipe Card
Air Fryer Chicken Wings
Prep Time: 10 minutes
Cook Time: 20–25 minutes
Total Time: 30–35 minutes
Servings: 4
Ingredients
- 2 pounds chicken wings, split into flats and drumettes
- 1 tablespoon olive oil or avocado oil
- 1 teaspoon paprika
- ½ teaspoon garlic powder
- ½ teaspoon onion powder
- ¾ teaspoon kosher salt
- ½ teaspoon freshly ground black pepper
- 1 teaspoon baking powder, optional
- Nonstick cooking spray
Optional Sauces
- Buffalo sauce
- Garlic Parmesan sauce
- Honey BBQ sauce
- Sweet chili sauce
- Teriyaki sauce
- Lemon pepper butter
- Hot honey glaze
Instructions
- Preheat: Preheat the air fryer to 380°F (193°C) for 3–5 minutes, if recommended by your model. Lightly spray the basket.
- Dry the wings: Pat the chicken wings completely dry with paper towels.
- Season: Toss the wings with olive oil. Mix the paprika, garlic powder, onion powder, salt, pepper, and optional baking powder. Coat the wings evenly.
- Arrange: Place the wings in a single layer without overlapping. Cook in batches if needed.
- Cook: Air fry at 380°F for 10–12 minutes. Flip the wings, increase the temperature to 400°F (204°C), and cook for another 10–13 minutes.
- Check doneness: Make sure the thickest part reaches at least 165°F (74°C).
- Sauce: If desired, toss the hot cooked wings with Buffalo, BBQ, garlic Parmesan, or your favorite sauce.
Conclusion
These air fryer chicken wings prove that you don’t need a deep fryer to enjoy crispy, flavorful wings at home. With simple pantry ingredients, a straightforward cooking method, and the right techniques, you can achieve golden, crunchy skin while keeping the meat juicy and tender. Whether you enjoy them plain, coated in classic Buffalo sauce, or tossed in your favorite glaze, this recipe is easy enough for busy weeknights and impressive enough for parties, game days, and family gatherings. Once you try homemade air fryer chicken wings, they’re sure to become a regular favorite in your kitchen.
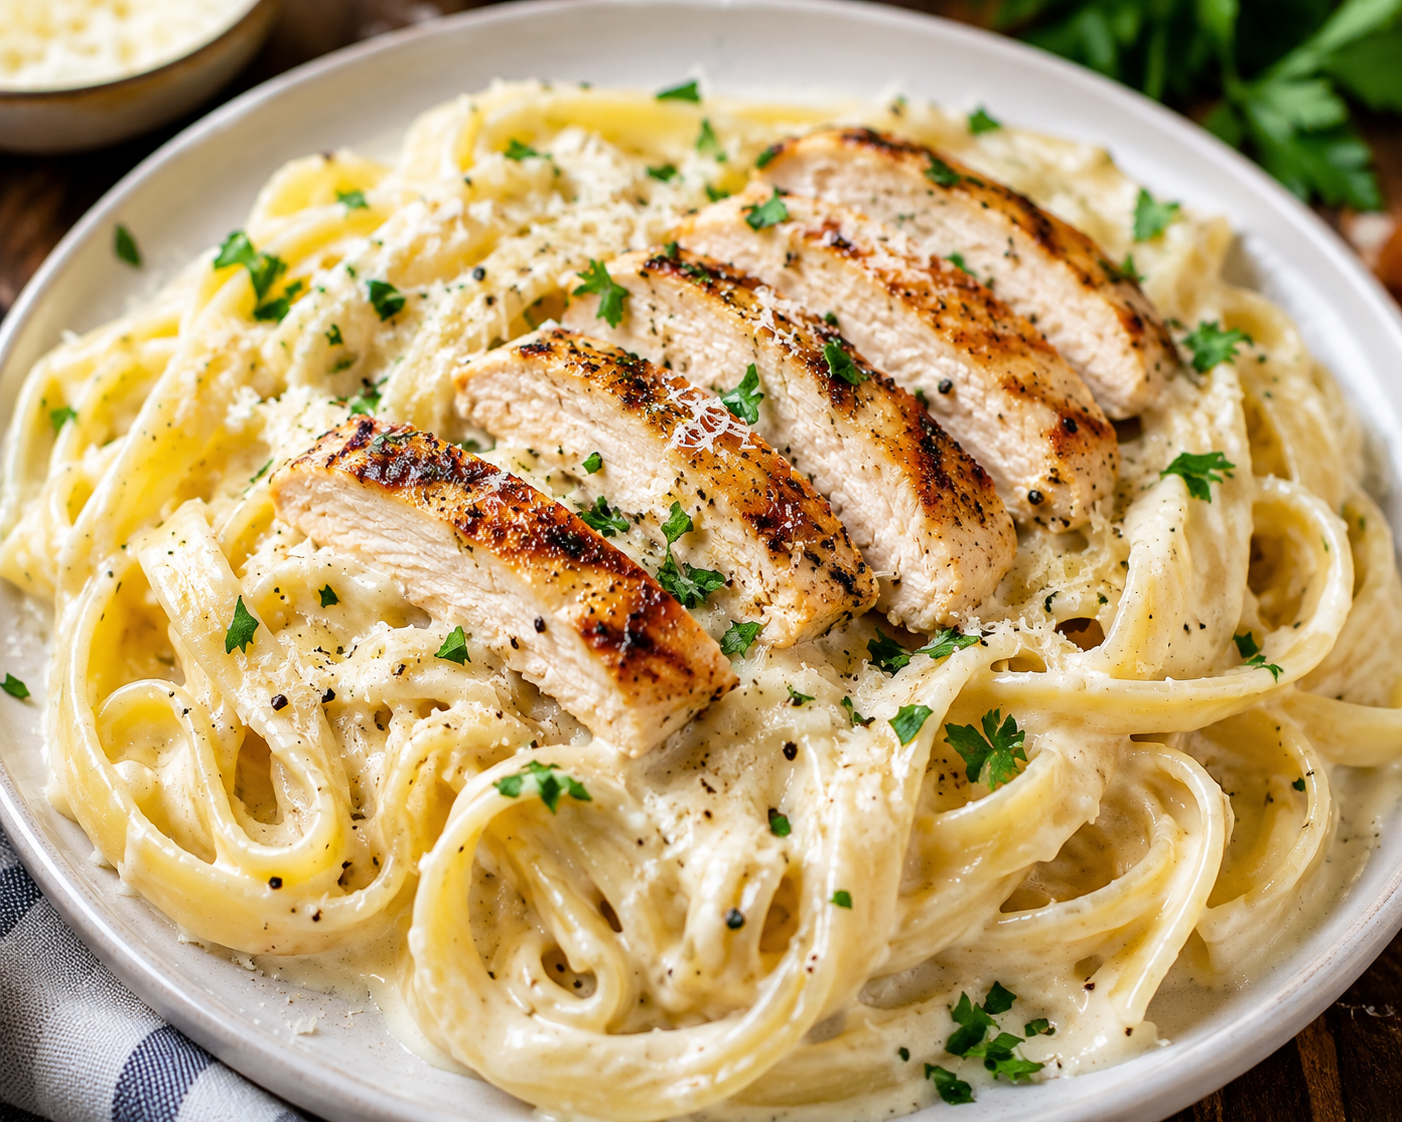
Chicken Alfredo Pasta Recipe
Few comfort foods can compete with a warm bowl of homemade Chicken Alfredo Pasta. Tender slices of seasoned chicken, silky homemade Alfredo sauce, and perfectly cooked fettuccine come together to create a rich, satisfying, and surprisingly easy meal. Whether you’re cooking for your family, planning a cozy date night, or simply treating yourself after a long day, this classic pasta dish never disappoints.
Many people think Alfredo sauce is difficult to make at home, but that’s far from the truth. With a handful of simple ingredients like butter, garlic, heavy cream, and Parmesan cheese, you can prepare a restaurant-quality sauce in less than 15 minutes. The best part is that you control every ingredient, so the flavor is fresher, creamier, and more balanced than most store-bought sauces.
I’ve tested several methods for making Chicken Alfredo Pasta, including traditional and one-pot versions. While both have their place, I always come back to this classic approach because it delivers the perfect balance of juicy chicken, creamy sauce, and tender pasta every single time. A few simple techniques—like searing the chicken until golden, using freshly grated Parmesan, and reserving a little pasta water—make a huge difference in the final dish.
Whether you’re making Chicken Alfredo for the first time or looking to improve your favorite recipe, this guide walks you through every step with practical tips, easy substitutions, and expert advice so you can enjoy a creamy, flavorful pasta dinner with confidence.
Why You’ll Love This Recipe
Once you make this homemade Chicken Alfredo, it will quickly become one of your favorite comfort food recipes.
- Rich, creamy homemade Alfredo sauce made from scratch.
- Juicy, perfectly seasoned chicken breasts with a golden crust.
- Ready in about 40 minutes from start to finish.
- Uses simple ingredients that are easy to find.
- Perfect for weeknight dinners or special occasions.
- Much fresher and more flavorful than jarred Alfredo sauce.
- Easy to customize with vegetables, herbs, or different proteins.
- Family-friendly and loved by both kids and adults.
- Great for meal prep and leftovers.
- Beginner-friendly with simple cooking techniques.
Ingredients You’ll Need for Making Chicken Alfredo Pasta
This recipe uses everyday ingredients that work together to create a rich and creamy pasta dish with restaurant-quality flavor.
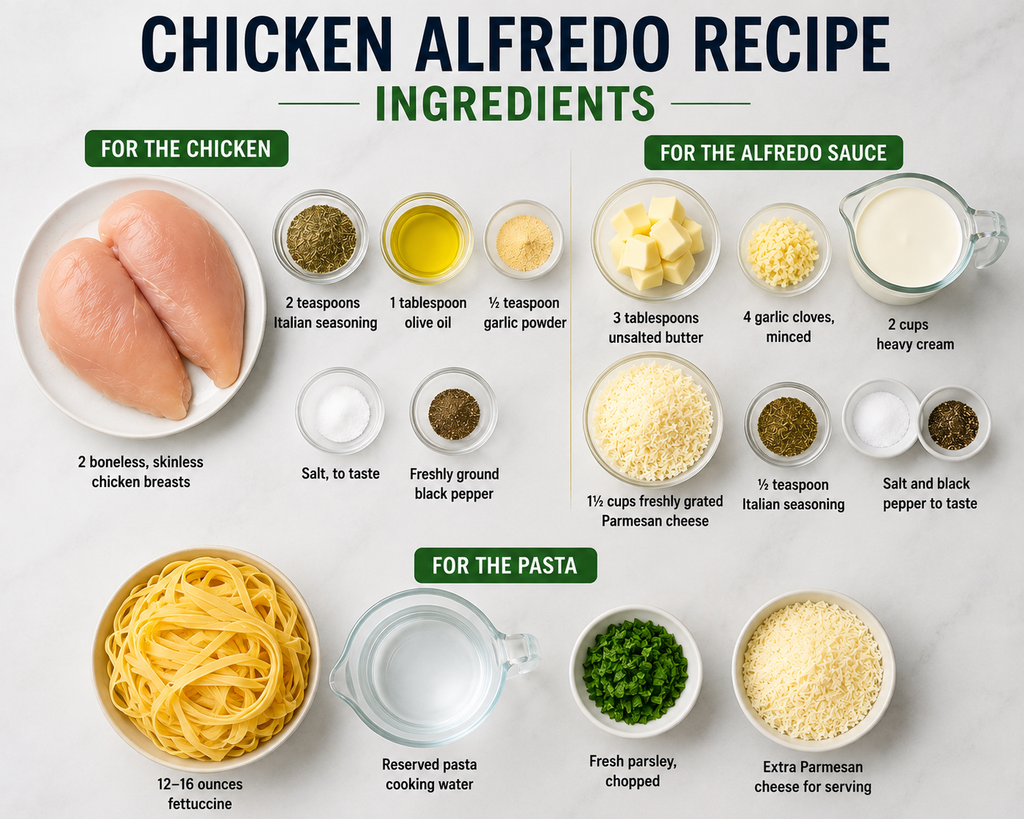
For the Chicken
- 2 boneless, skinless chicken breasts
- 2 teaspoons Italian seasoning
- 1 tablespoon olive oil
- ½ teaspoon garlic powder
- Salt, to taste
- Freshly ground black pepper
For the Alfredo Sauce
- 3 tablespoons unsalted butter
- 4 garlic cloves, minced
- 2 cups heavy cream
- 1½ cups freshly grated Parmesan cheese
- ½ teaspoon Italian seasoning
- Salt and black pepper to taste
For the Pasta
- 12–16 ounces fettuccine
- Reserved pasta cooking water
- Fresh parsley, chopped
- Extra Parmesan cheese for serving
Although fettuccine is the traditional pasta for Alfredo, linguine, spaghetti, tagliatelle, or even penne also work well.
Ingredient Notes & Substitutions
One of the reasons this Chicken Alfredo recipe is so popular is its flexibility. If you’re missing an ingredient, several easy substitutions still produce delicious results.
Chicken Options
Boneless, skinless chicken breasts cook quickly and stay tender when not overcooked. However, you can also use:
- Boneless chicken thighs for a juicier texture
- Rotisserie chicken for a quick shortcut
- Grilled chicken leftovers
- Turkey breast
If using cooked chicken, simply slice it and stir it into the finished sauce before serving.
Parmesan Cheese
Fresh Parmesan delivers the smoothest Alfredo sauce.
If fresh Parmesan isn’t available, you can use:
- Grana Padano
- Pecorino Romano (for a saltier flavor)
- Good-quality pre-grated Parmesan
Avoid powdered shelf-stable Parmesan whenever possible because it doesn’t melt as smoothly.
Heavy Cream Alternatives
Heavy cream is highly recommended because it creates the rich texture Alfredo is known for.
If necessary, you can substitute:
- Whipping cream
- Half-and-half (lighter sauce)
- Full-fat cooking cream
Keep in mind that lighter dairy products may require additional Parmesan or a slightly longer simmer to thicken properly.
Pasta Choices
Traditional Alfredo is served with fettuccine, but nearly any pasta shape works.
Popular choices include:
- Linguine
- Tagliatelle
- Spaghetti
- Penne
- Rigatoni
- Farfalle
- Rotini
Short pasta shapes hold plenty of creamy sauce in every bite.
Add More Flavor
You can customize your Chicken Alfredo with ingredients like:
- Fresh spinach
- Steamed broccoli
- Mushrooms
- Sun-dried tomatoes
- Roasted garlic
- Crispy bacon
- Red pepper flakes
- Fresh basil
- Fresh thyme
These additions add texture, color, and extra flavor without changing the heart of the recipe.
Equipment Needed for Chicken Alfredo Pasta
You don’t need any fancy kitchen tools to make this Chicken Alfredo recipe. A few basic pieces of cookware are enough to produce creamy, restaurant-quality results.
- Large pot for boiling pasta
- Large skillet or sauté pan
- Sharp chef’s knife
- Cutting board
- Tongs
- Cheese grater
A large skillet with high sides works best because it provides enough room to toss the pasta with the sauce without making a mess.
Step-by-Step Instructions
Making homemade Chicken Alfredo is easier than you might think. Follow these simple steps for creamy pasta and perfectly cooked chicken every time.
Step 1: Cook the Pasta
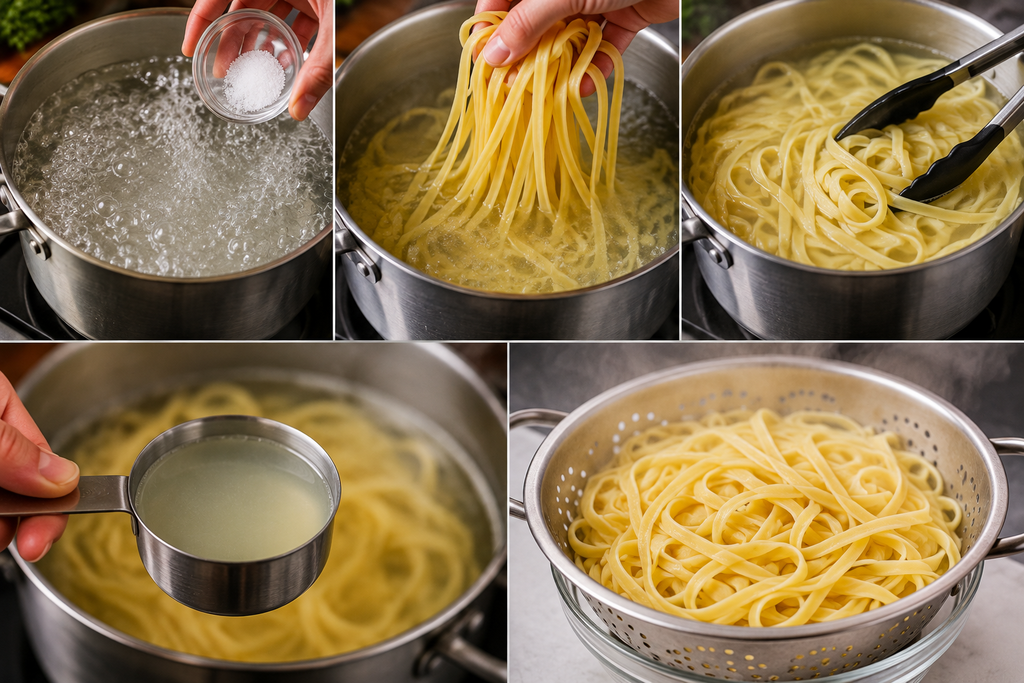
Bring a large pot of generously salted water to a rolling boil. Add the fettuccine and cook until al dente according to the package directions. Before straining, reserve about half a cup of the pasta water.
This starchy water helps loosen the sauce later if needed. Drain the pasta and set it aside.
Tip: Slightly undercooked pasta finishes cooking in the sauce and absorbs even more flavor.
Step 2: Prepare the Chicken

Pat the chicken breasts dry with paper towels.
Season both sides generously with:
- Italian seasoning
- Garlic powder
- Salt
- Black pepper
Drying the chicken first helps it develop a beautiful golden crust instead of steaming in the pan.
Step 3: Sear the Chicken
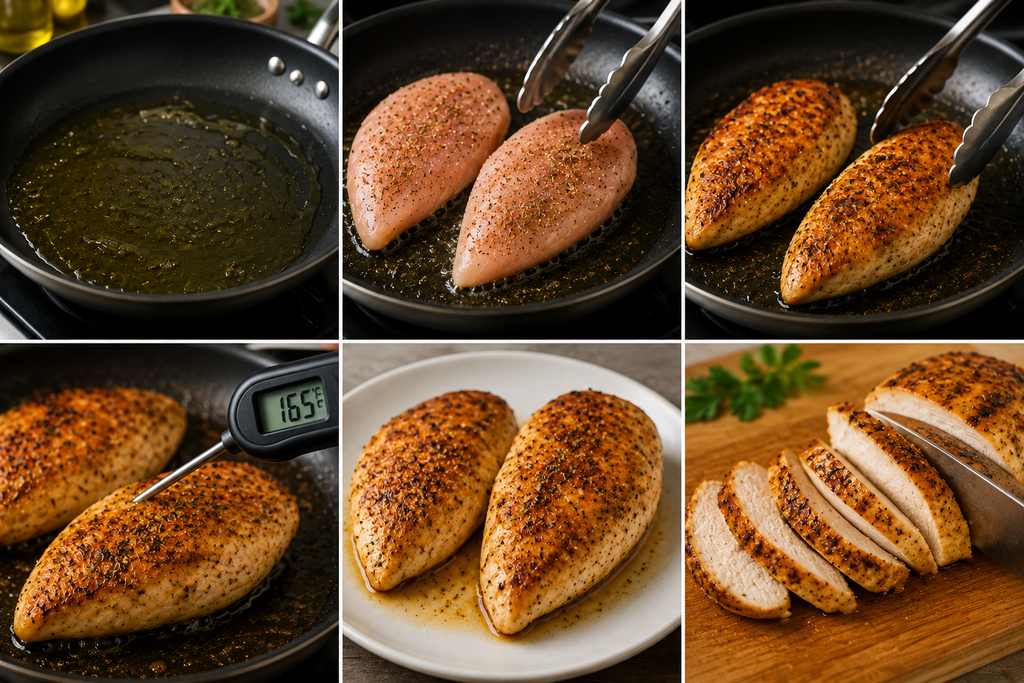
Add the olive oil to the pan and heat it over medium heat. Once the oil is shimmering, add the chicken. Cook for about 5–7 minutes per side, depending on thickness, until:
- Golden brown outside
- Internal temperature reaches 165°F (74°C). Transfer the chicken to a plate and let it rest for five minutes before slicing. Resting allows the juices to redistribute, keeping every bite tender and juicy.
Step 4: Build the Alfredo Sauce

Reduce the heat to medium-low. In the same skillet, melt the butter. Add garlic and cook it for 30–60 seconds until its smell all around. Do not brown the garlic, as its taste is bitter.
Pour in the heavy cream and gently stir while scraping up the flavorful browned bits from the bottom of the pan.
Step 5: Add the Parmesan

Gradually stir the freshly grated Parmesan into the warm cream. Stir the cheese until it melts and completely mixes into the sauce. Season with:
Salt
Black pepper
A pinch of Italian seasoning, if desired
The sauce should be smooth, creamy, and thick enough to coat the back of a spoon. If it becomes too thick, add a splash of reserved pasta water until it reaches your preferred consistency.
Step 6: Combine Everything
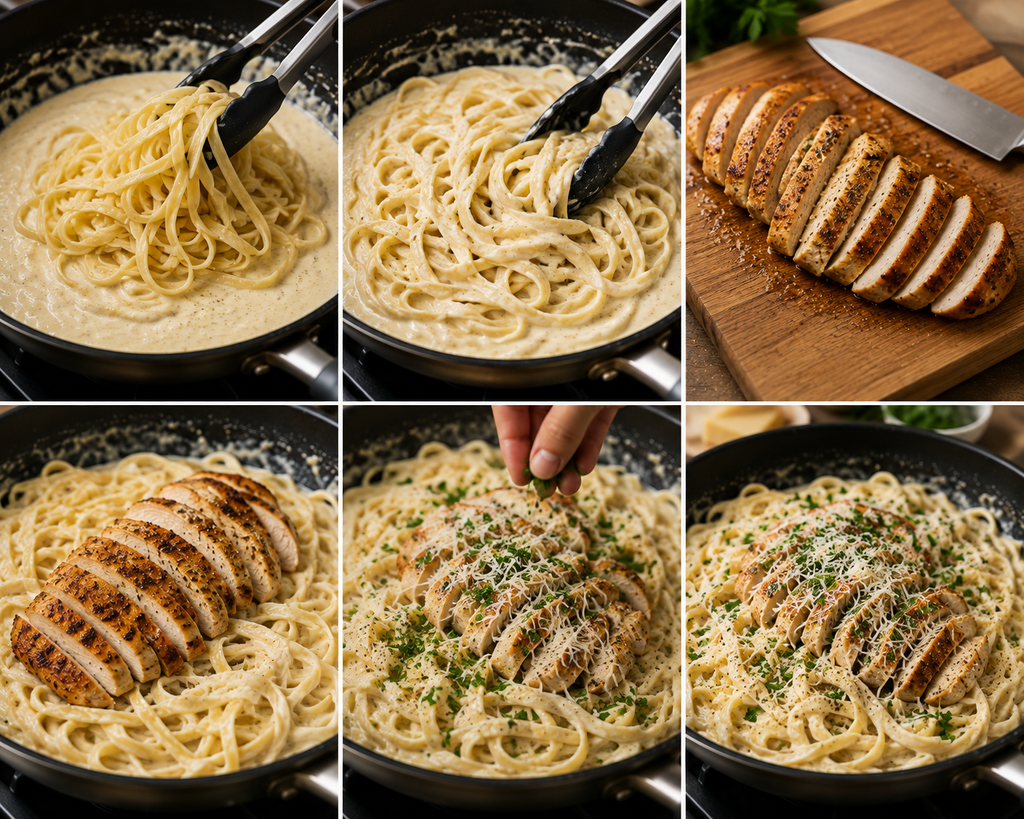
Add the cooked fettuccine to the skillet. Using tongs, carefully mix the pasta so that each piece is evenly covered in the rich Alfredo sauce. Slice the rested chicken into thin strips and arrange it over the pasta or toss it into the sauce.
Sprinkle with:
- Fresh parsley
- Extra Parmesan cheese
- Freshly cracked black pepper
Serve pasta when the sauce is hot, creamy, and silky.
The secret to unforgettable Chicken Alfredo isn’t complicated—it’s simply using quality ingredients, cooking the chicken carefully, and finishing the pasta in a freshly made Alfredo sauce. With these steps, you’ll have a rich, comforting dinner that tastes every bit as good as your favorite Italian restaurant.
Expert Tips for the Best Chicken Alfredo Pasta
A few small techniques can make the difference between good Chicken Alfredo and one that’s truly restaurant-worthy. These tips will help you achieve juicy chicken, perfectly cooked pasta, and a smooth, creamy Alfredo sauce every time.
Use Freshly Grated Parmesan
Fresh Parmesan melts much more smoothly than pre-shredded cheese. Packaged shredded cheeses often contain anti-caking agents that can make the sauce grainy.
Don’t Overcook the Chicken
Chicken breasts can become dry if cooked for too long. Use an instant-read thermometer and remove the chicken from the pan once it reaches 165°F (74°C). Let it rest for about five minutes before slicing to keep the juices inside.
Salt the Pasta Water Well
The pasta takes in some of the water as it cooks. Properly salted water adds flavor from the inside out and enhances the overall taste of the dish.
Reserve the Pasta Water
Before you drain the pasta, keep about half a cup of the starchy water it was cooked in. Adding a few tablespoons to the Alfredo sauce helps create a silky texture and makes the sauce cling beautifully to the pasta.
Simmer—Don’t Boil—the Cream
Heavy cream should be heated gently. A rapid boil can cause the sauce to separate and affect its smooth texture.
Add the Cheese Gradually
Mix the Parmesan into the warm cream little by little. This allows it to melt evenly and prevents clumps.
Serve Immediately
Chicken Alfredo is at its creamiest right after it’s made. The sauce naturally thickens as it cools, so enjoy it while it’s hot.
Common Mistakes to Avoid When Making Chicken Alfredo Pasta
Even a simple pasta recipe can go wrong if a few key steps are overlooked. Here’s how to avoid the most common problems.
Adding Cold Parmesan
Very cold cheese cools the sauce quickly and may not melt evenly. Before adding Parmesan, cool the sauce at room temperature.
Cooking the Pasta Too Long
Pasta has the best texture and continues to absorb sauce after it’s mixed. Overcooked pasta can become soft and mushy.
Not Seasoning Properly
Cream and pasta naturally mellow flavors. Taste the finished dish before serving and adjust the salt and black pepper if needed.
Recipe Variations
Chicken Alfredo is a delicious variation to try.
One Pot Chicken Alfredo Pasta
Cook the pasta directly in milk and chicken broth before adding the heavy cream and Parmesan near the end. This method saves time and reduces cleanup while still producing a creamy sauce.
Broccoli Chicken Alfredo Pasta
Add steamed broccoli during the final few minutes of cooking. The broccoli adds color, nutrition, and a fresh contrast to the rich sauce.
Mushroom Chicken Alfredo Pasta
Sauté sliced mushrooms in the skillet before adding the garlic. Their earthy flavor pairs beautifully with the creamy Alfredo sauce.
Cajun Chicken Alfredo Pasta
Season the chicken with Cajun seasoning instead of Italian herbs for a spicy twist. Finish with a pinch of smoked paprika or red pepper flakes.
Spinach Chicken Alfredo Pasta
Before adding the pasta, stir the spinach into the hot sauce. It wilts quickly and adds freshness without overpowering the dish.
Storage & Reheating
Chicken Alfredo is best enjoyed fresh, but leftovers can still be delicious when stored and reheated properly.
How to Store
Allow the pasta to cool completely before transferring it to an airtight container.
Store it up to 3 days in the refrigerator.
Can You Freeze Chicken Alfredo Pasta?
Freezing isn’t ideal because cream-based sauces can separate after thawing. If you do freeze it, store it in a freezer-safe container for up to 2 months and thaw overnight in the refrigerator before reheating.
How to Reheat
The best way to reheat Chicken Alfredo is on the stovetop.
- Add the pasta to the pan and heat over medium flame.
- Add a splash of milk, heavy cream, or chicken broth.
- For smoothie texture, stir the sauce.
For microwave reheating:
- Heat in 30-second intervals.
- Stir after each interval.
- Add a little milk if the sauce becomes too thick.
Avoid overheating, as it can cause the sauce to separate.
Serving Suggestions
Chicken Alfredo is rich and satisfying on its own, but pairing it with the right side dishes creates a complete restaurant-style meal.
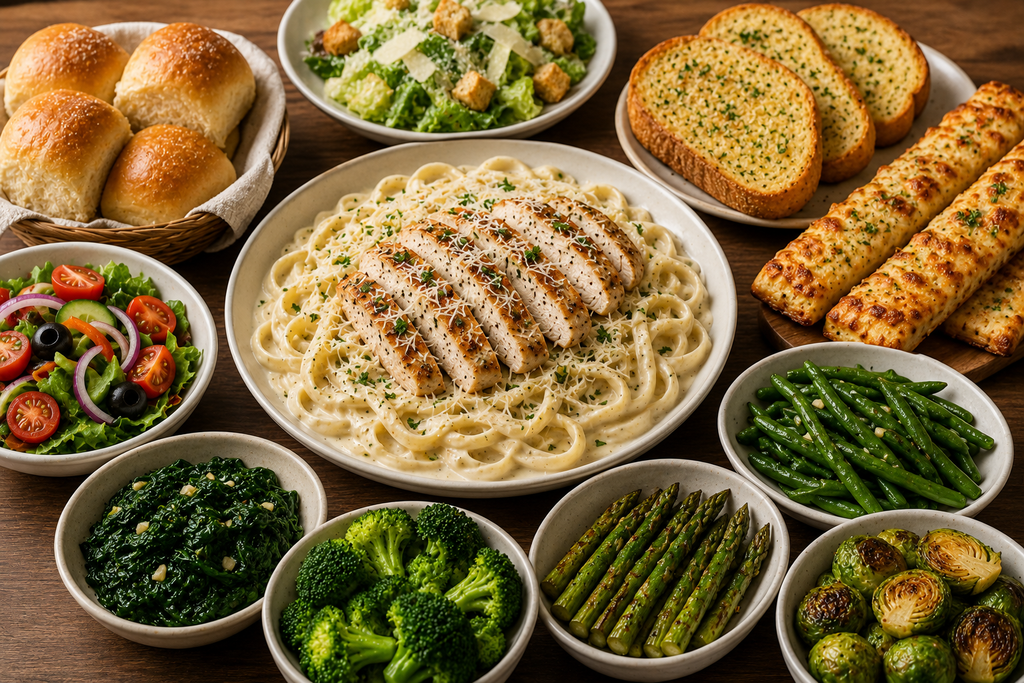
Bread
- Garlic bread
- Cheesy breadsticks
- Homemade dinner rolls
- Toasted Italian bread
Salads
- Caesar salad
- Italian garden salad
- Arugula salad with lemon vinaigrette
- Mixed greens with balsamic dressing
Vegetables
- Steamed broccoli
- Roasted asparagus
- Green beans
- Sautéed spinach
- Roasted Brussels sprouts
Frequently Asked Questions
Can I use chicken thighs instead of chicken breasts?
Yes. Boneless, skinless chicken thighs are slightly juicier and work just as well. Adjust the cooking time depending on their thickness.
Can I make Chicken Alfredo without heavy cream?
Yes, but its look and taste without creaminess are not good.
What is the best pasta for Chicken Alfredo?
Fettuccine is the traditional choice because its wide, flat noodles hold the creamy sauce well. Linguine, tagliatelle, spaghetti, penne, and rigatoni are also excellent options.
Why is my Alfredo sauce grainy?
Grainy sauce is usually caused by overheating the cheese or using pre-shredded Parmesan. Keep the heat low and use freshly grated cheese whenever possible.
How do I make the sauce thicker?
Let it simmer for a few extra minutes, or stir in a little more freshly grated Parmesan until it reaches your preferred consistency.
How do I thin Alfredo sauce?
Add a splash of reserved pasta water, warm milk, or chicken broth while stirring until the sauce becomes smooth again.
Can I prepare Chicken Alfredo Pasta ahead of time?
Make fresh Alfredo sauce, but cook the chicken ahead of time. Cream-based sauces have the best texture immediately after cooking.
How do I keep Alfredo sauce creamy after reheating?
Reheat slowly over low heat while stirring in a splash of milk, cream, or chicken broth. Gentle heat helps restore the sauce’s smooth, creamy consistency without causing it to separate.
Nutrition Information (Approximate)
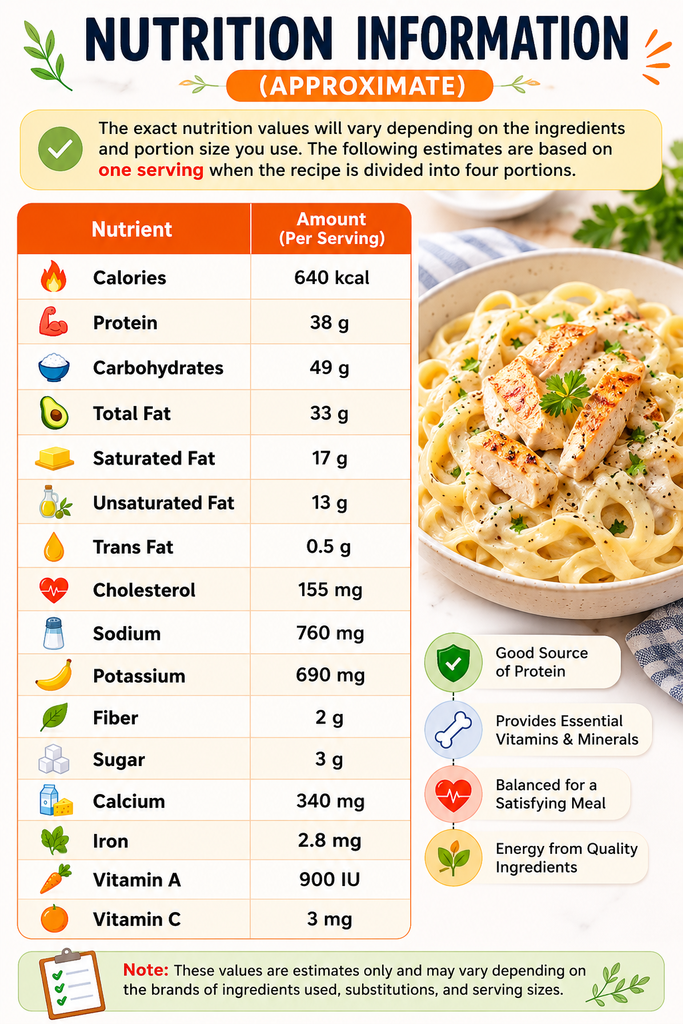
The exact nutrition values will vary depending on the ingredients and portion size you use. The following estimates are based on one serving when the recipe is divided into four portions.
| Nutrient | Amount (Per Serving) |
| Calories | 640 kcal |
| Protein | 38 g |
| Carbohydrates | 49 g |
| Total Fat | 33 g |
| Saturated Fat | 17 g |
| Unsaturated Fat | 13 g |
| Trans Fat | 0.5 g |
| Cholesterol | 155 mg |
| Sodium | 760 mg |
| Potassium | 690 mg |
| Fiber | 2 g |
| Sugar | 3 g |
| Calcium | 340 mg |
| Iron | 2.8 mg |
| Vitamin A | 900 IU |
| Vitamin C | 3 mg |
Note: These values are estimates only and may vary depending on the brands of ingredients used, substitutions, and serving sizes.
Chicken Alfredo Pasta Recipe (Recipe Card)
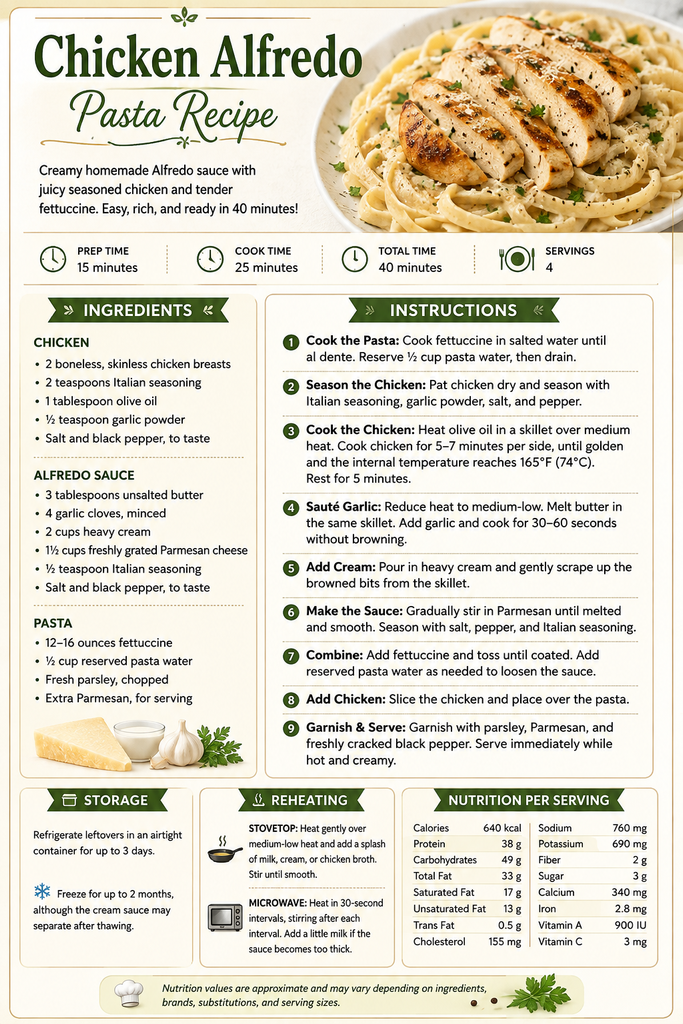
Prep Time: 15 minutes
Cook Time: 25 minutes
Total Time: 40 minutes
Servings: 4
Ingredients
Chicken
- 2 boneless, skinless chicken breasts
- 2 teaspoons Italian seasoning
- 1 tablespoon olive oil
- ½ teaspoon garlic powder
- Salt and black pepper, to taste
Alfredo Sauce
- 3 tablespoons unsalted butter
- 4 garlic cloves, minced
- 2 cups heavy cream
- 1½ cups freshly grated Parmesan cheese
- ½ teaspoon Italian seasoning
- Salt and black pepper, to taste
Pasta
- 12–16 ounces fettuccine
- ½ cup reserved pasta water
- Fresh parsley, chopped
- Extra Parmesan, for serving
Instructions
- Cook fettuccine in salted water until al dente. Reserve ½ cup pasta water, then drain.
- Pat chicken dry and season with Italian seasoning, garlic powder, salt, and pepper.
- Heat olive oil in a skillet over medium heat. Cook chicken for 5–7 minutes per side, until golden and the internal temperature reaches 165°F (74°C). Rest for 5 minutes.
- Reduce heat to medium-low. Melt butter in the same skillet. Add garlic and cook for 30–60 seconds without browning.
- Pour in heavy cream and gently scrape up the browned bits from the skillet.
- Gradually stir in Parmesan until melted and smooth. Season with salt, pepper, and Italian seasoning.
- Add fettuccine and toss until coated. Add reserved pasta water as needed to loosen the sauce.
- Slice the chicken and place over the pasta. Garnish with parsley, Parmesan, and freshly cracked black pepper.
- Serve immediately while hot and creamy.
Conclusion
This Chicken Alfredo Recipe is an easy way to enjoy a rich, creamy pasta dinner at home. Juicy seasoned chicken, tender fettuccine, and a smooth homemade Alfredo sauce made with butter, garlic, heavy cream, and Parmesan cheese come together in about 40 minutes for a comforting, restaurant-quality meal.
Simple ingredients and a few key techniques—like using freshly grated Parmesan, cooking the chicken until just done, and gently simmering the sauce—make all the difference. Whether you serve it for a busy weeknight dinner or a special occasion, this creamy Chicken Alfredo is sure to become a family favorite.
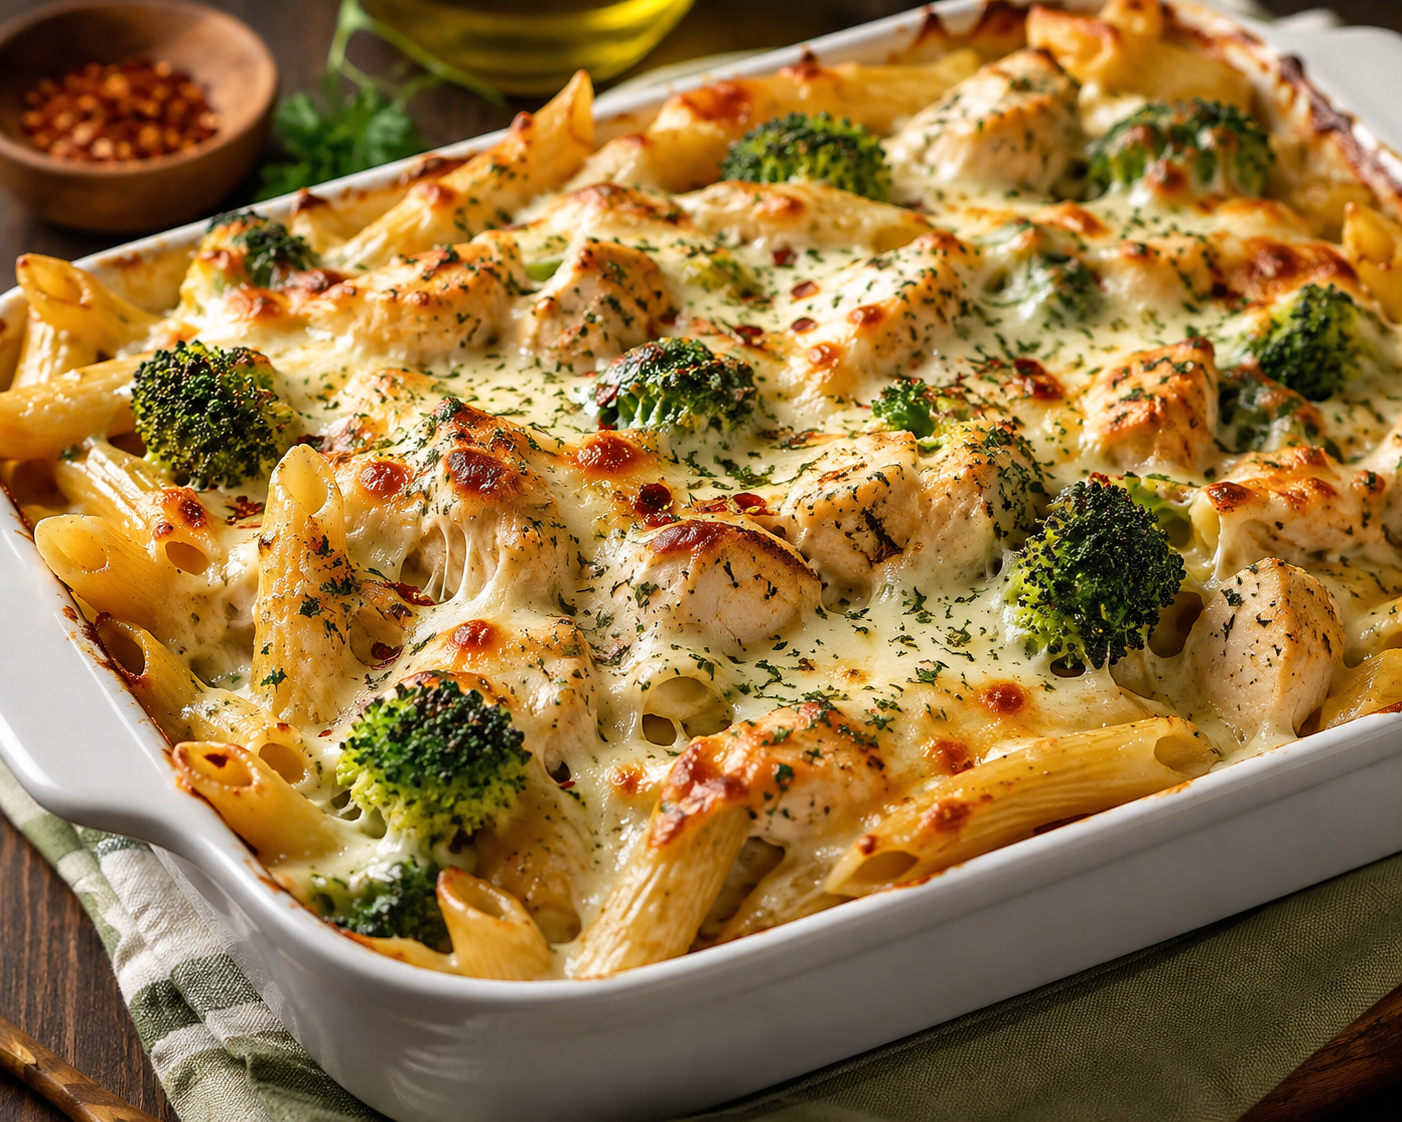
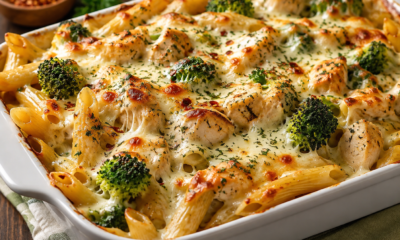
When you need a comforting dinner without spending the whole evening in the kitchen, this Chicken Broccoli Pasta Bake is exactly the kind of recipe to keep handy. It combines tender chicken, pasta, fresh broccoli, and a creamy cheese sauce in one satisfying casserole. The finished dish has a golden, cheesy top, a creamy center, and enough vegetables to make it feel like a complete meal.
What makes this version especially useful is the balance between convenience and homemade flavor. You do not need a complicated sauce or a long list of ingredients. The chicken and broccoli add protein and vegetables, while the pasta makes the casserole hearty enough for a family dinner. Whether you are feeding a busy family on a weeknight or preparing food ahead for another day, this pasta bake is simple, flexible, and wonderfully comforting.
Why You’ll Love This Chicken Broccoli Pasta Bake
There are plenty of reasons this chicken broccoli pasta bake deserves a place in your regular dinner rotation.
- It is a complete meal: Chicken, broccoli, pasta, and cheese come together in one dish.
- Comforting without being complicated: The creamy sauce gives you the cozy texture you want from a pasta bake without requiring restaurant-style techniques.
- Family-friendly: The mild flavors are easy to enjoy, and you can adjust the seasonings to suit your household.
- Great for busy evenings: Several components can be prepared ahead of time.
- A useful leftover meal: It reheats well from the refrigerator and makes a convenient lunch the next day.
- Easy to customize: You can change the cheese, vegetables, herbs, or even the type of chicken.
- A smart way to add vegetables: Broccoli works naturally with creamy sauces and cheese, so it does not feel like an afterthought.
- Freezer-friendly with a little planning: An assembled casserole can be saved for a future meal.
I especially like recipes like this because they do not require perfection. If your broccoli florets are slightly different sizes or you use a different melting cheese, dinner can still turn out delicious.
Ingredients For Chicken Broccoli Pasta Bake
Main Ingredients
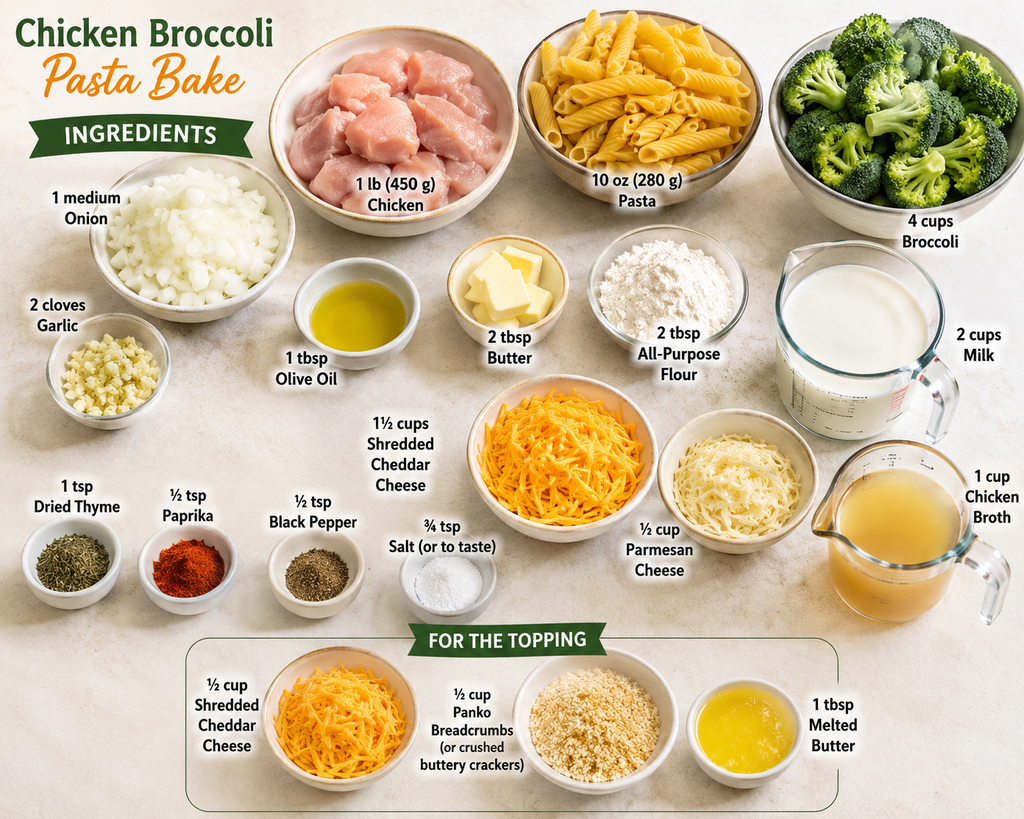
For about 6 servings, you will need:
- 1 pound (450 g) boneless, skinless chicken breasts or thighs
- 10 ounces (280 g) short pasta, such as rotini, fusilli, or penne
- 4 cups small broccoli florets
- 1 medium yellow onion, finely diced
- 2 garlic cloves, minced
- 2 tablespoons butter
- 2 tablespoons all-purpose flour
- 2 cups milk
- 1 cup chicken broth
- 1½ cups shredded sharp cheddar cheese
- ½ cup shredded Parmesan cheese
- 1 teaspoon dried thyme
- ½ teaspoon paprika
- ½ teaspoon black pepper
- ¾ teaspoon salt, or to taste
- 1 tablespoon olive oil
For the topping:
- ½ cup shredded cheddar cheese
- ½ cup panko breadcrumbs or crushed buttery crackers
- 1 tablespoon melted butter
Ingredient Notes & Substitutions
Chicken: Chicken breast keeps the casserole relatively lean, while boneless chicken thighs provide a little more richness and stay juicy. Rotisserie chicken is also an excellent shortcut. If using cooked chicken, shred or chop it and add it to the sauce rather than cooking it from raw.
Pasta: Short shapes are ideal because they hold onto the creamy sauce. Rotini, fusilli, shells, penne, and macaroni can all work. Cook the pasta just until al dente because it will continue cooking in the oven.
Broccoli: Fresh broccoli gives the best texture. Cut large florets into smaller, bite-sized pieces so they cook evenly. Frozen broccoli is also convenient. Thaw it first and remove excess water before adding it.
Milk: Whole milk creates the richest sauce, but 2% milk can be used for a lighter result. Very low-fat milk may produce a thinner sauce.
Cheese: Sharp cheddar gives the casserole a noticeable cheesy flavor. Monterey Jack, Colby, Gruyère, or a cheddar blend can be substituted. Parmesan adds savory depth, but you can reduce it or leave it out if needed.
Breadcrumbs: Panko gives the topping a light, crisp texture. Crushed crackers create a more buttery finish, while regular breadcrumbs are a simple pantry option.
Seasonings: Thyme and paprika add gentle flavor without overwhelming the chicken and broccoli. You can also use Italian seasoning, garlic powder, onion powder, or a small pinch of red pepper flakes.
Equipment Needed For Chicken Broccoli Pasta Bake
You do not need specialized kitchen equipment for this recipe.
- Large pot for cooking pasta
- Large saucepan or deep skillet
- 9 × 13-inch baking dish
- Colander
- Cutting board
- Chef’s knife
- Wooden spoon or silicone spatula
- Whisk
- Measuring cups and spoons
- Cheese grater
- Aluminum foil, if needed
A kitchen thermometer is also useful when cooking chicken. The thickest part of the chicken should reach 165°F (74°C) for food safety.
Step-by-Step Instructions
1. Prepare the Oven and Baking Dish
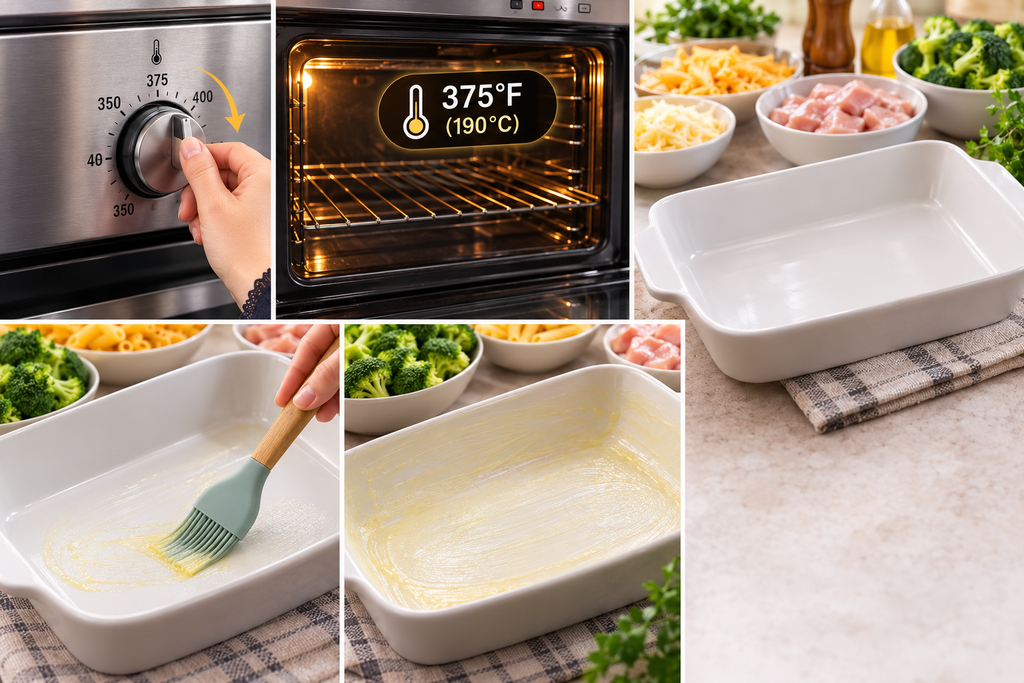
Preheat your oven to 375°F (190°C). Lightly grease a 9 × 13-inch baking dish with butter or cooking spray.
Getting the oven fully heated before assembling the casserole helps the dish cook evenly.
2. Cook the Pasta
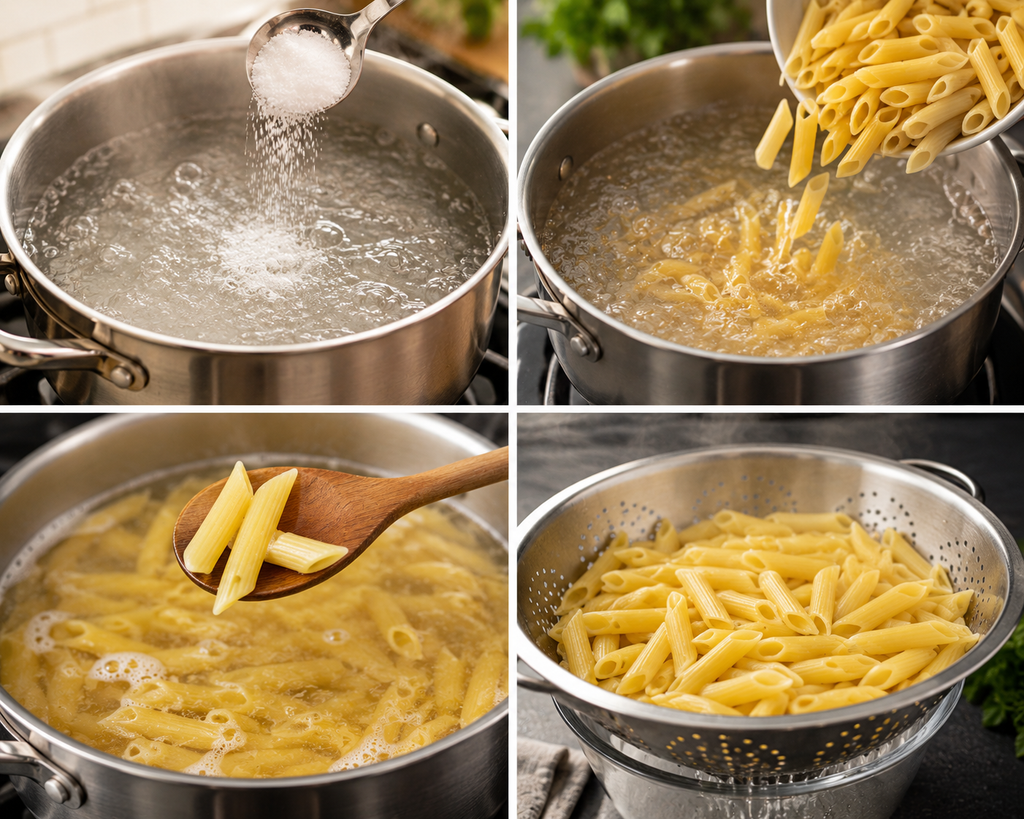
Bring a large pot of salted water to a boil. Add the pasta and cook according to the package directions, but stop when it is just al dente.
Do not cook it until completely soft. Pasta continues to absorb moisture while the casserole bakes, and starting with overcooked pasta can leave you with a soft, mushy bake.
Drain the pasta well and set it aside.
3. Blanch the Broccoli
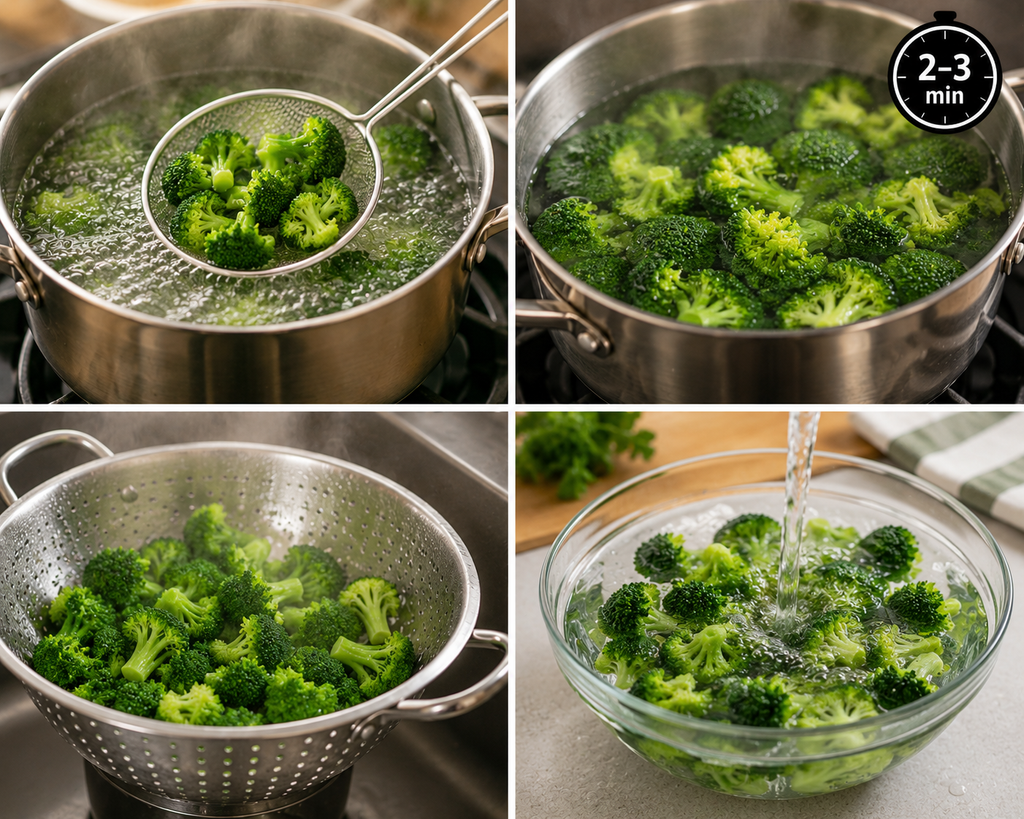
Bring the water back to a boil or use a separate pot of boiling water. Add the broccoli florets and cook for about 2 to 3 minutes.
The broccoli should become bright green and slightly tender while still retaining some bite.
Drain immediately and rinse briefly with cold water. This stops the cooking process and helps prevent the broccoli from becoming mushy in the oven.
If using thawed frozen broccoli, you can skip this step. Simply drain and pat the broccoli dry.
4. Cook the Chicken

Cut the chicken into small, evenly sized pieces. Season with salt, pepper, thyme, and paprika.
Heat the olive oil in a large skillet over medium-high heat. Add the chicken in a single layer and cook until lightly browned and cooked through, turning occasionally.
Depending on the size of the pieces, this should take approximately 6 to 8 minutes.
Check the thickest pieces with a food thermometer. The chicken should reach 165°F (74°C).
Transfer the cooked chicken to a plate.
5. Cook the Onion and Garlic
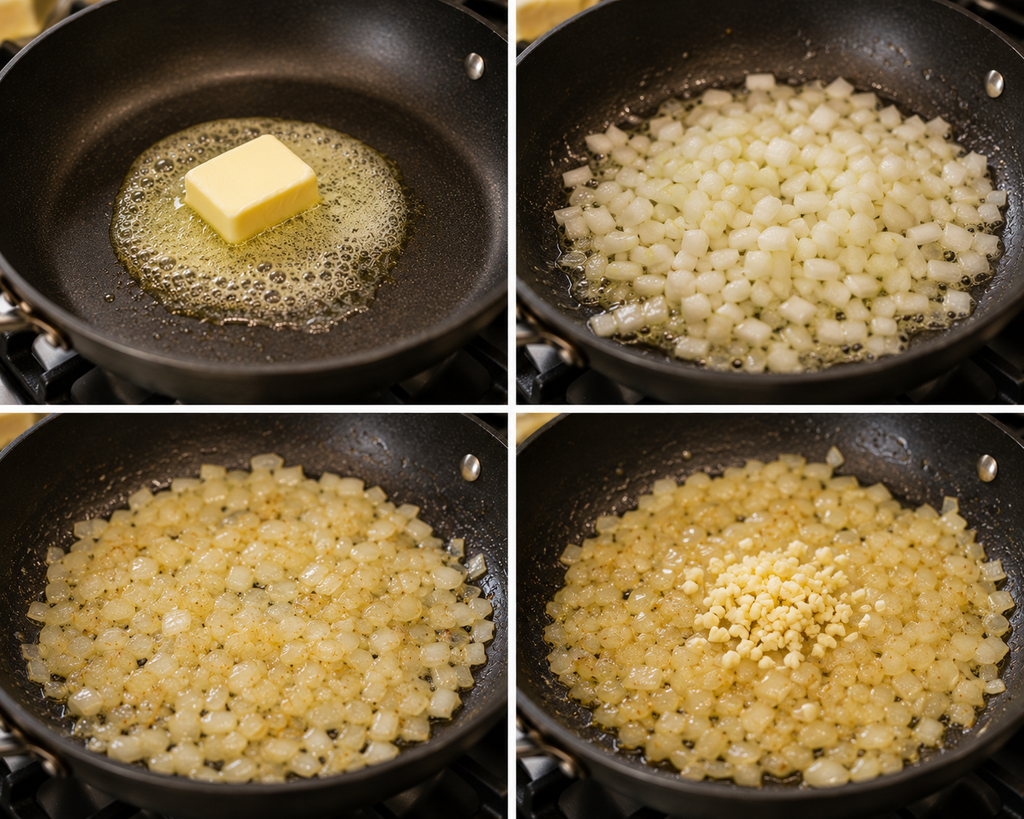
Reduce the heat to medium and add the butter to the same skillet. Add the chopped onion and heat, stirring occasionally, until softened, about 3 to 4 minutes. Add the garlic and cook for another 30 seconds.
You want the garlic fragrant but not browned.
6. Make the Creamy Sauce

Sprinkle the flour over the onion and garlic mixture. Stir continuously for about 1 minute.
Gradually whisk in the milk, followed by the chicken broth. Adding the liquids slowly helps prevent lumps.
Continue cooking and whisking for several minutes until the mixture thickens enough to lightly coat the back of a spoon.
Stir in the Parmesan and about 1 cup of shredded cheddar. Add the remaining seasoning and taste for salt and pepper.
The sauce should be creamy and flavorful before it goes into the oven. If it seems extremely thick, add a small splash of milk or broth.
7. Combine the Filling
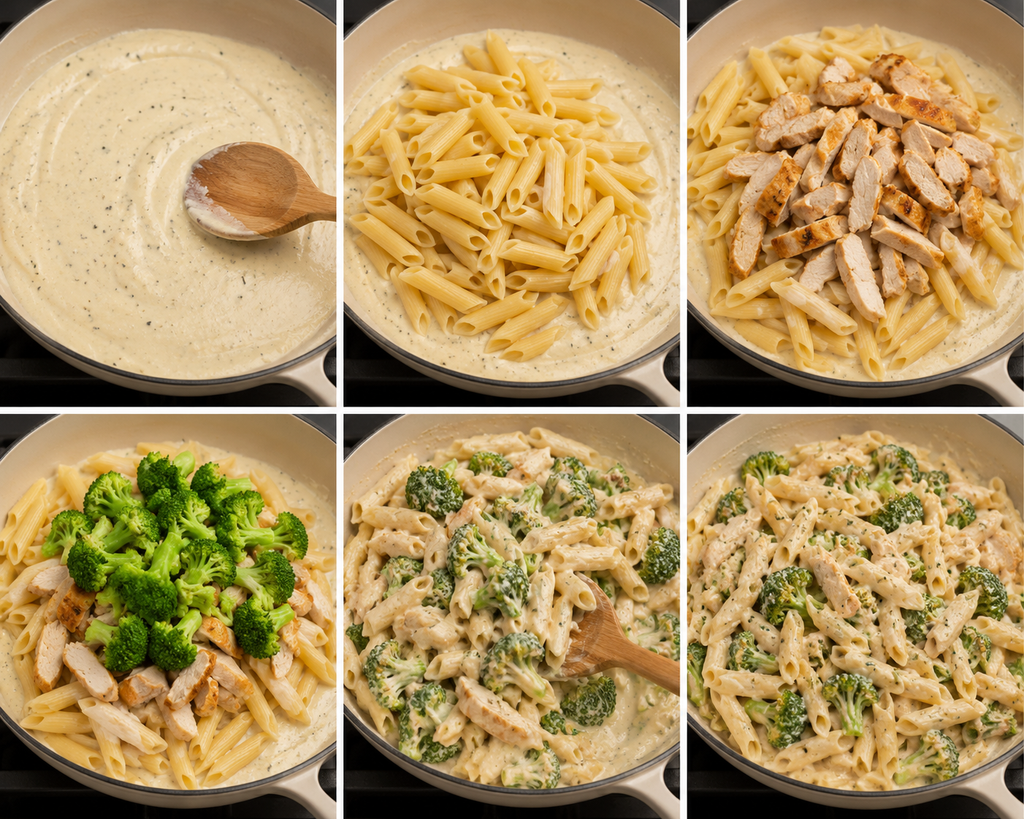
Add the cooked pasta, chicken, and broccoli to the sauce.
Gently fold everything together until the ingredients are evenly coated. Take care not to stir too aggressively because you want the broccoli to remain intact.
Taste the mixture at this stage. This is your easiest opportunity to adjust the seasoning.
8. Assemble the Casserole

Spread the mixture evenly in the baking dish that has been prepared. Sprinkle the remaining cheddar over the surface.
For a crunchy topping, combine the panko breadcrumbs or crushed crackers with melted butter. Sprinkle the mixture evenly over the cheese.
9. Bake Until Golden and Bubbly
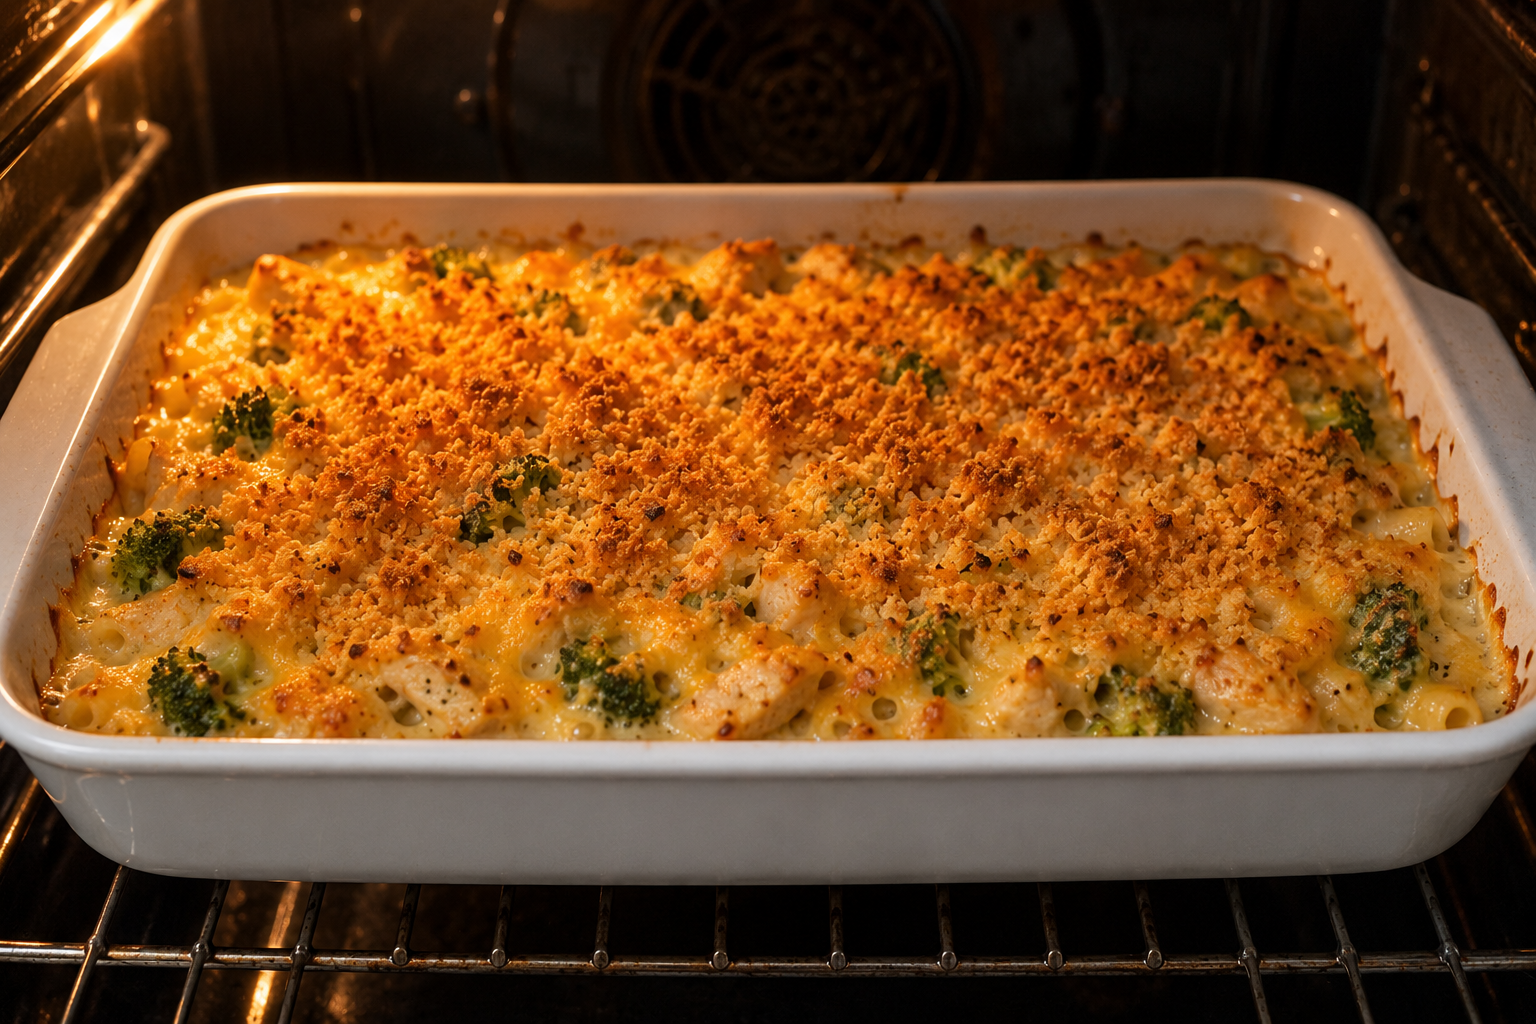
Place the casserole in the preheated oven and bake uncovered for about 20 to 25 minutes. The edges should be bubbling, the cheese should be melted, and the topping should be lightly golden.
If you want a darker, crispier top, place the casserole under the broiler for 1 to 2 minutes at the end. Watch it closely because breadcrumbs and cheese can brown quickly.
10. Rest Before Serving
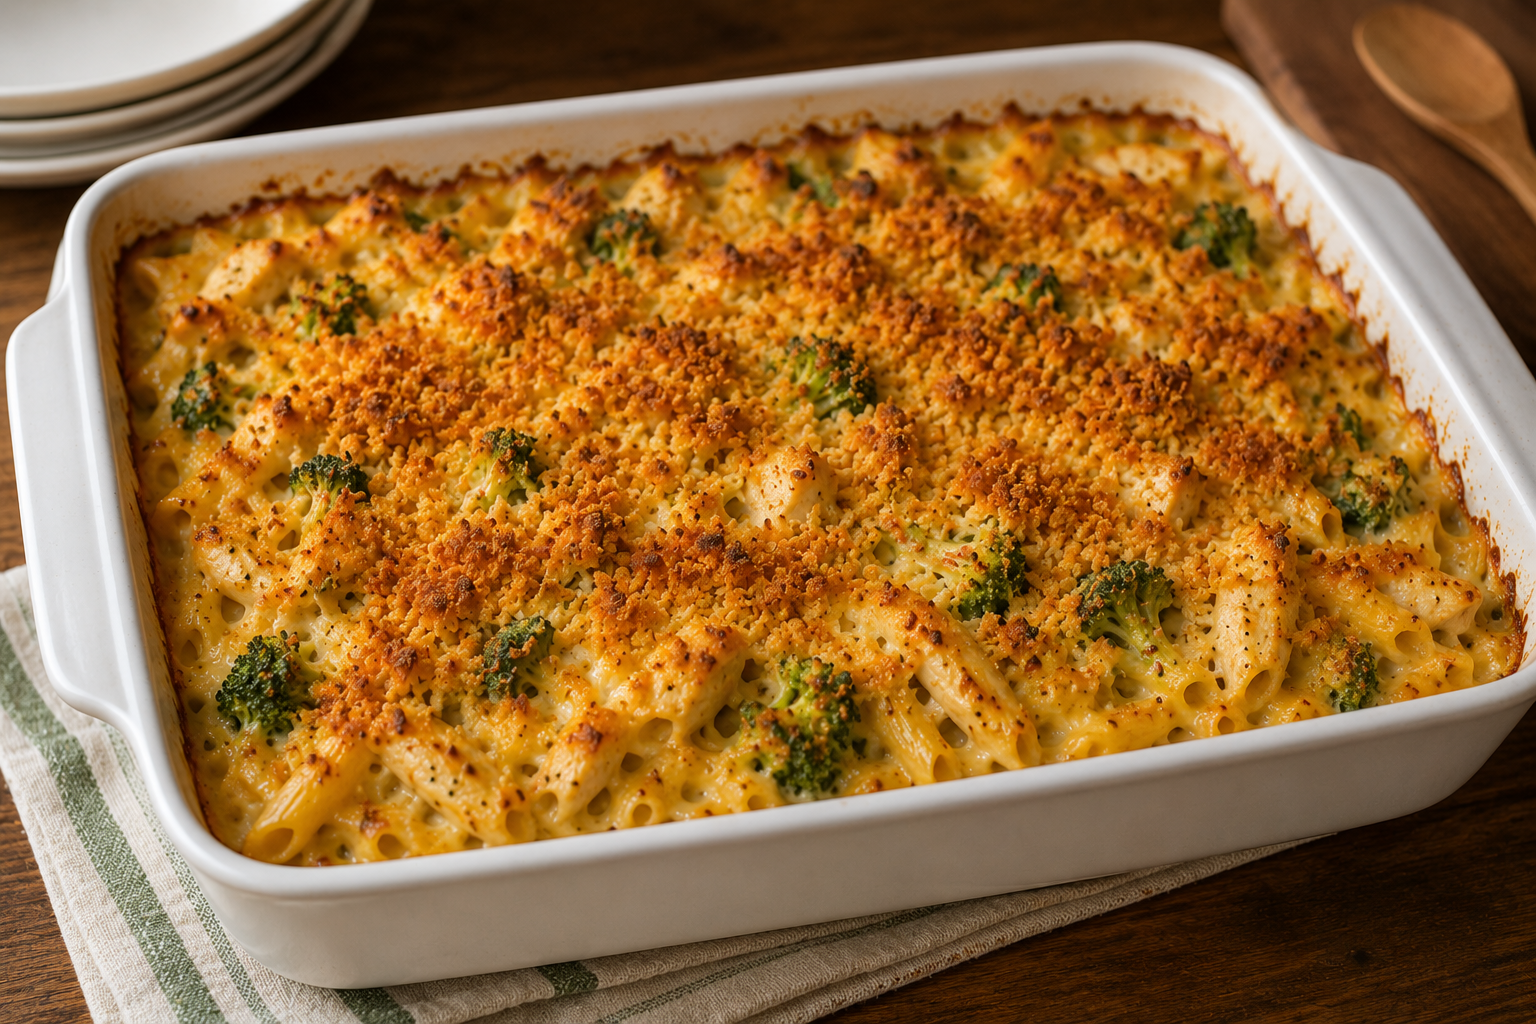
Before serving, take the dish out of the oven and give it 5 to 10 minutes to rest. This short resting period allows the sauce to settle and makes the casserole easier to portion.
Expert Tips
Cut the Chicken Into Even Pieces
Uniform chicken pieces cook at roughly the same rate. Very large chunks may take longer to cook, while tiny pieces can become dry before the casserole is assembled.
Do Not Overcook the Pasta
This is one of the most important details in any pasta bake. Cook the pasta only until al dente. It will soften further when surrounded by the hot sauce in the oven.
Keep the Broccoli Crisp-Tender
Broccoli should not be completely soft before baking. A brief blanch gives it a head start while preserving enough texture to withstand the second round of cooking.
Shred Cheese From a Block
Freshly shredded cheese generally melts more smoothly than wide pre-shredded varieties. Pre-shredded cheese can contain ingredients that affect how smoothly it melts.
Do Not Make the Sauce Too Thick
The sauce should be creamy and pourable rather than stiff. Pasta absorbs liquid as it bakes, so a sauce that seems perfect in the pan can become too thick after baking.
Season Each Component
A common mistake is relying entirely on the cheese for flavor. Season the chicken, sauce, pasta water, and final mixture appropriately. Layered seasoning gives the casserole much better depth.
Let It Rest
It is tempting to serve the casserole immediately, but giving it a few minutes to settle helps the sauce cling to the pasta instead of running across the plate.
Recipe Variations For Chicken Broccoli Pasta Bake
Chicken Broccoli Alfredo Pasta Bake
For an Alfredo-inspired version, replace part of the milk and broth with a little heavy cream and increase the Parmesan. Add a small amount of garlic for a richer flavor.
Chicken Broccoli and Mushroom Bake
Sauté sliced mushrooms with the onion before making the sauce. Mushrooms add a savory flavor that works especially well with chicken and cheese.
Spicy Chicken Broccoli Pasta Bake
To the sauce, add ¼ to ½ teaspoon of red pepper flakes. You can also use a spicy cheddar or add a few dashes of hot sauce.
Rotisserie Chicken Broccoli Pasta Bake
This is one of the easiest shortcuts. Use about 3 to 4 cups of shredded rotisserie chicken instead of cooking raw chicken. Add it directly when combining the pasta, broccoli, and sauce.
Chicken Broccoli Pasta Bake With Mixed Vegetables
Add peas, diced carrots, spinach, or sweet corn. Keep in mind that vegetables with high water content should be drained well so they do not thin the sauce.
Lighter Chicken Broccoli Pasta Bake
For a lighter version, use skinless chicken breast, reduced-fat milk, a moderate amount of cheese, and extra broccoli. You can also replace some of the pasta with additional vegetables.
Gluten-Free Version
Use your favorite gluten-free short pasta and replace all-purpose flour with a suitable gluten-free thickener. Check that the broth and other packaged ingredients are certified gluten-free if cross-contact is a concern.
Serving Suggestions
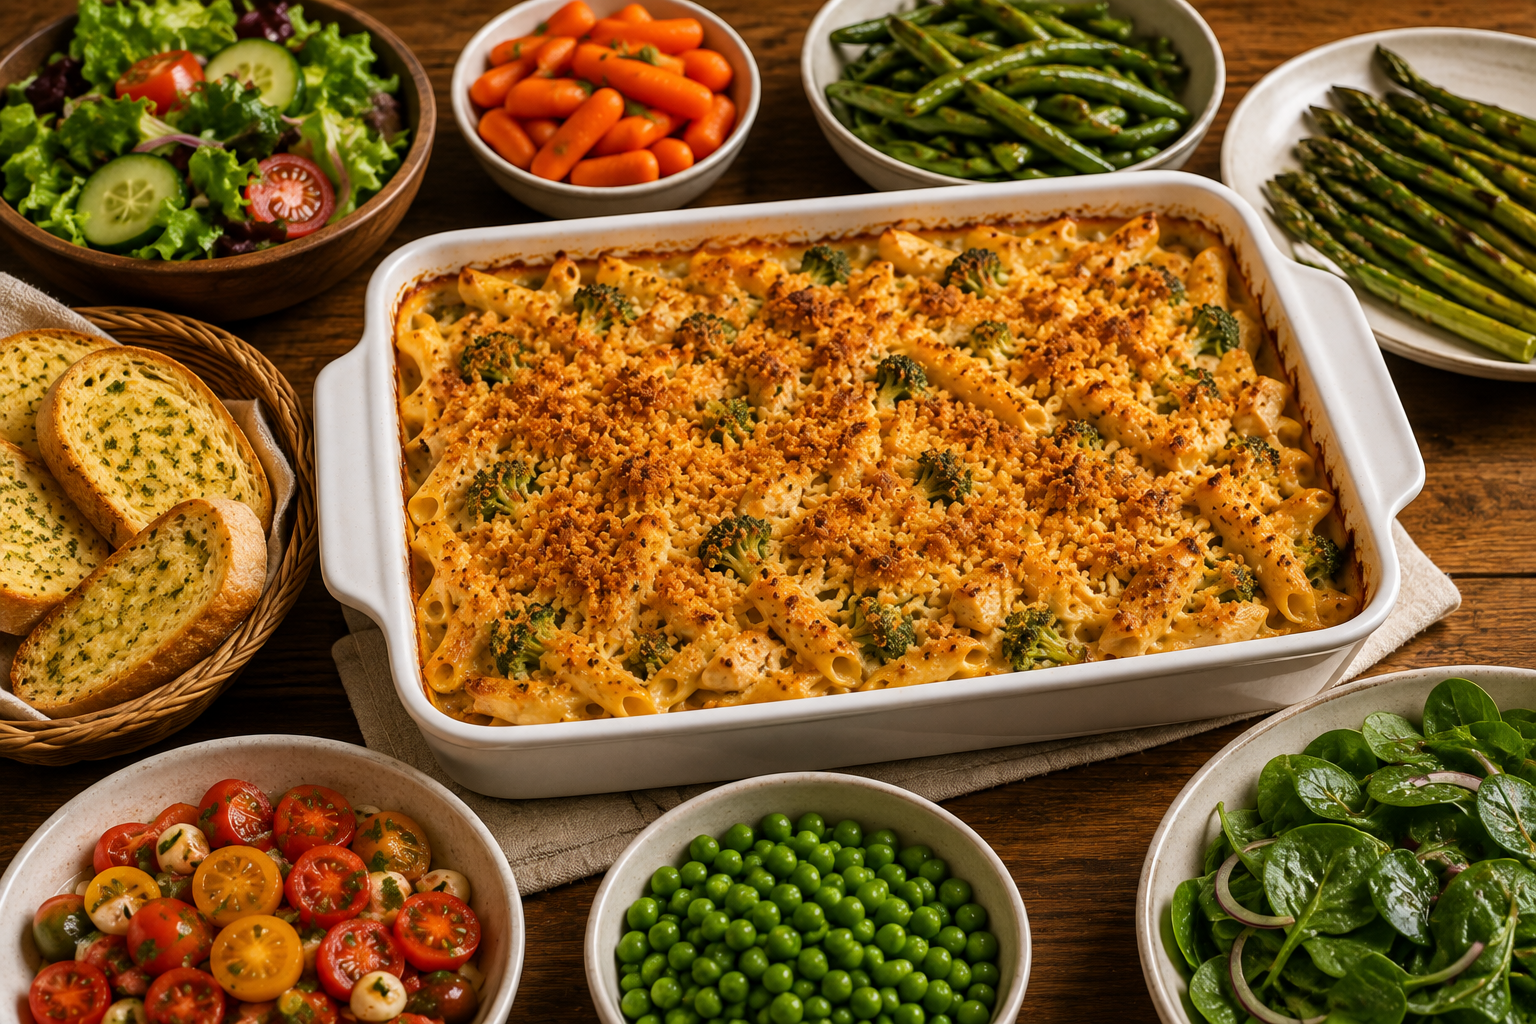
This casserole is filling enough to serve on its own, but a simple side can make the meal feel more complete.
Good choices include:
- Simple green salad
- Steamed carrots
- Roasted green beans
- Roasted asparagus
- Garlic bread
- Fresh tomato salad
- Steamed peas
- Lightly dressed spinach salad
Because the casserole already contains pasta and a creamy sauce, I prefer sides that are fresh or vegetable-forward rather than another heavy dish.
For a family dinner, serve the casserole hot with a crisp green salad and a simple vegetable. For leftovers, reheat individual portions and add a fresh salad to balance the meal.
Storage & Reheating
Refrigerator Storage
Allow leftover casserole to cool slightly before transferring it to an airtight container or covering the baking dish.
Use it within 3 to 4 days after storing it in the refrigerator.
For the best texture, store larger portions rather than repeatedly reheating the entire casserole.
Reheating Individual Portions
Put a portion on a plate that is safe to use in the microwave and cover it loosely. Heat until steaming hot throughout, stirring or rotating if necessary.
If the pasta looks dry, add a tablespoon or two of milk before reheating. This helps loosen the sauce.
Reheating in the Oven
For a larger portion, cover the casserole with foil and reheat at about 350°F (175°C) until hot throughout.
Remove the foil during the final few minutes if you want the cheese and topping to crisp again.
Freezing
This casserole can be frozen, although creamy sauces may change slightly in texture after thawing.
For best results, cool the assembled casserole completely before freezing. Wrap it tightly and label it with the date.
Thaw it in the refrigerator overnight before reheating. Add a small amount of milk if the sauce appears dry, then heat until the center is thoroughly hot.
If you are intentionally preparing this as a freezer meal, consider leaving the breadcrumb topping off until the casserole is ready to bake. Add fresh crumbs just before baking for a better crunch.
Common Mistakes to Avoid
Overcooking the Pasta
Soft pasta becomes even softer in the oven. Always start with firm pasta and al dente.
Using Large Broccoli Florets
Huge florets can remain tough in the center while the smaller pieces become overcooked. Keep the pieces relatively uniform.
Adding Wet Frozen Vegetables
Excess water can thin the sauce. Thaw frozen broccoli and squeeze or pat away excess moisture before using it.
Making a Very Thick Sauce
Remember that pasta absorbs liquid. A sauce that is extremely thick before baking may produce a dry casserole.
Using Undercooked Chicken
Chicken should be fully cooked before it is combined with the rest of the ingredients. Use a thermometer when possible rather than relying only on color.
Adding Too Much Cheese
More cheese does not automatically mean a better casserole. Excess cheese can make the dish greasy and overpower the flavor of the chicken and broccoli.
Skipping the Resting Time
Serving immediately can result in a loose sauce and messy portions. Even five minutes of resting makes a noticeable difference.
Frequently Asked Questions
Can I use rotisserie chicken for chicken broccoli pasta bake?
Yes. Rotisserie chicken is one of the easiest ways to shorten the preparation time. Remove the skin and bones, then shred or chop about 3 to 4 cups of meat. Since the chicken is already cooked, simply fold it into the sauce with the pasta and broccoli.
Can I use frozen broccoli?
Yes. Frozen broccoli is a convenient substitute for fresh broccoli. Thaw it first and drain it thoroughly. Patting it dry is important because excess water can make the sauce thinner.
What pasta works best for this casserole?
Short pasta shapes are generally best. Rotini, fusilli, shells, penne, and macaroni all work well because they hold the creamy sauce. Avoid cooking the pasta completely before baking.
Why is my chicken broccoli pasta bake dry?
A dry pasta bake usually results from too little sauce, overcooked pasta, excessive baking, or leaving the casserole uncovered for too long.
Make sure the sauce is fairly loose before baking and avoid cooking the pasta beyond al dente.
Can I freeze chicken broccoli pasta bake?
Yes. Freeze the casserole in an airtight, freezer-safe dish. Thaw it in the refrigerator before reheating for the most even result. The sauce may not have the same texture as when freshly made, but it can still be a convenient and satisfying freezer meal.
What cheese melts best in a chicken broccoli pasta bake?
Cheddar is an excellent choice because it provides flavor and melts well. Monterey Jack, Colby, Gruyère, or a mix of cheeses also works. Freshly grated cheese usually produces the smoothest result.
Nutrition Information (Approximate)
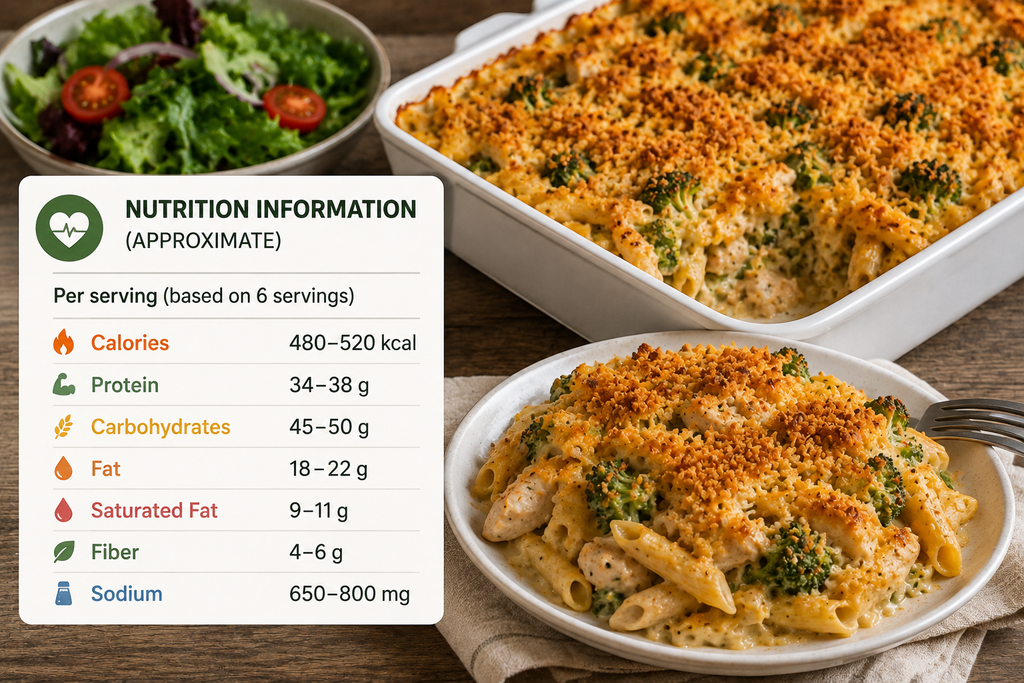
Nutrition will vary depending on the chicken cut, pasta, milk, cheese, and exact portion size used.
Approximate nutrition per serving, assuming 6 servings:
- Calories: 480–520 kcal
- Protein: 34–38 g
- Carbohydrates: 45–50 g
- Fat: 18–22 g
- Saturated Fat: 9–11 g
- Fiber: 4–6 g
- Sodium: 650–800 mg
These figures are estimates rather than laboratory-tested values. If you need precise nutrition information for dietary or medical reasons, calculate it using the exact brands and quantities you use.
Recipe Card (Printable Summary)
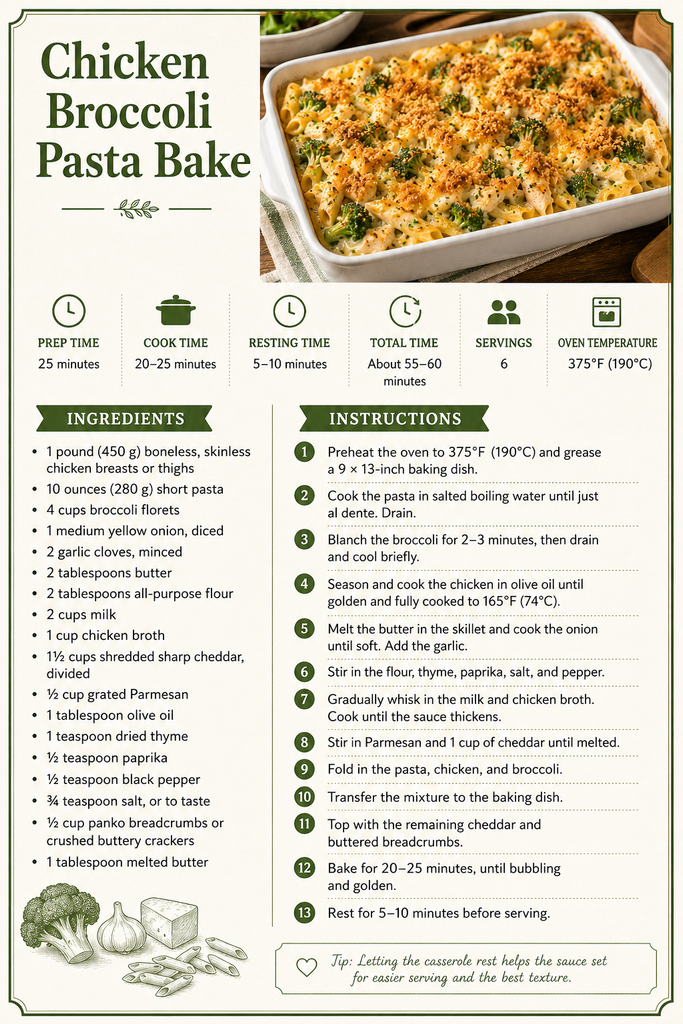
Chicken Broccoli Pasta Bake
Prep Time: 25 minutes
Cook Time: 20–25 minutes
Resting Time: 5–10 minutes
Total Time: About 55–60 minutes
Servings: 6
Oven Temperature: 375°F (190°C)
Ingredients
- 1 pound (450 g) boneless, skinless chicken breasts or thighs
- 10 ounces (280 g) short pasta
- 4 cups broccoli florets
- 1 medium yellow onion, diced
- 2 garlic cloves, minced
- 2 tablespoons butter
- 2 tablespoons all-purpose flour
- 2 cups milk
- 1 cup chicken broth
- 1½ cups shredded sharp cheddar, divided
- ½ cup grated Parmesan
- 1 tablespoon olive oil
- 1 teaspoon dried thyme
- ½ teaspoon paprika
- ½ teaspoon black pepper
- ¾ teaspoon salt, or to taste
- ½ cup panko breadcrumbs or crushed buttery crackers
- 1 tablespoon melted butter
Instructions
- Preheat the oven to 375°F (190°C) and grease a 9 × 13-inch baking dish.
- Cook the pasta in salted boiling water until just al dente. Drain.
- Blanch the broccoli for 2–3 minutes, then drain and cool briefly.
- Season and cook the chicken in olive oil until golden and fully cooked to 165°F (74°C).
- Melt the butter in the skillet and cook the onion until soft. Add the garlic.
- Stir in the flour, thyme, paprika, salt, and pepper.
- Gradually whisk in the milk and chicken broth. Cook until the sauce thickens.
- Stir in Parmesan and 1 cup of cheddar until melted.
- Fold in the pasta, chicken, and broccoli.
- Transfer the mixture to the baking dish.
- Top with the remaining cheddar and buttered breadcrumbs.
- Bake for 20–25 minutes, until bubbling and golden.
- Rest for 5–10 minutes before serving.
Conclusion
A good Chicken Broccoli Pasta Bake should be comforting, creamy, filling, and practical enough to make on an ordinary weeknight. This version checks all four boxes without requiring complicated cooking techniques. Tender chicken, crisp-tender broccoli, al dente pasta, and a homemade cheese sauce come together under a golden, crunchy topping for a dinner that feels special without being difficult.
The recipe is also easy to adapt. Use rotisserie chicken when time is short, swap the vegetables based on what you have, change the cheese for a different flavor, or prepare the casserole ahead for a busy day. Once you understand the basic method, it becomes less of a fixed recipe and more of a reliable dinner formula.
For the best results, focus on three things: do not overcook the pasta, keep the broccoli slightly crisp, and make sure the sauce is loose enough before baking. Follow those simple details, and you will have a creamy, satisfying casserole with plenty of flavor and texture. It is the kind of family dinner that is just as welcome on a busy Tuesday as it is around a relaxed weekend table.
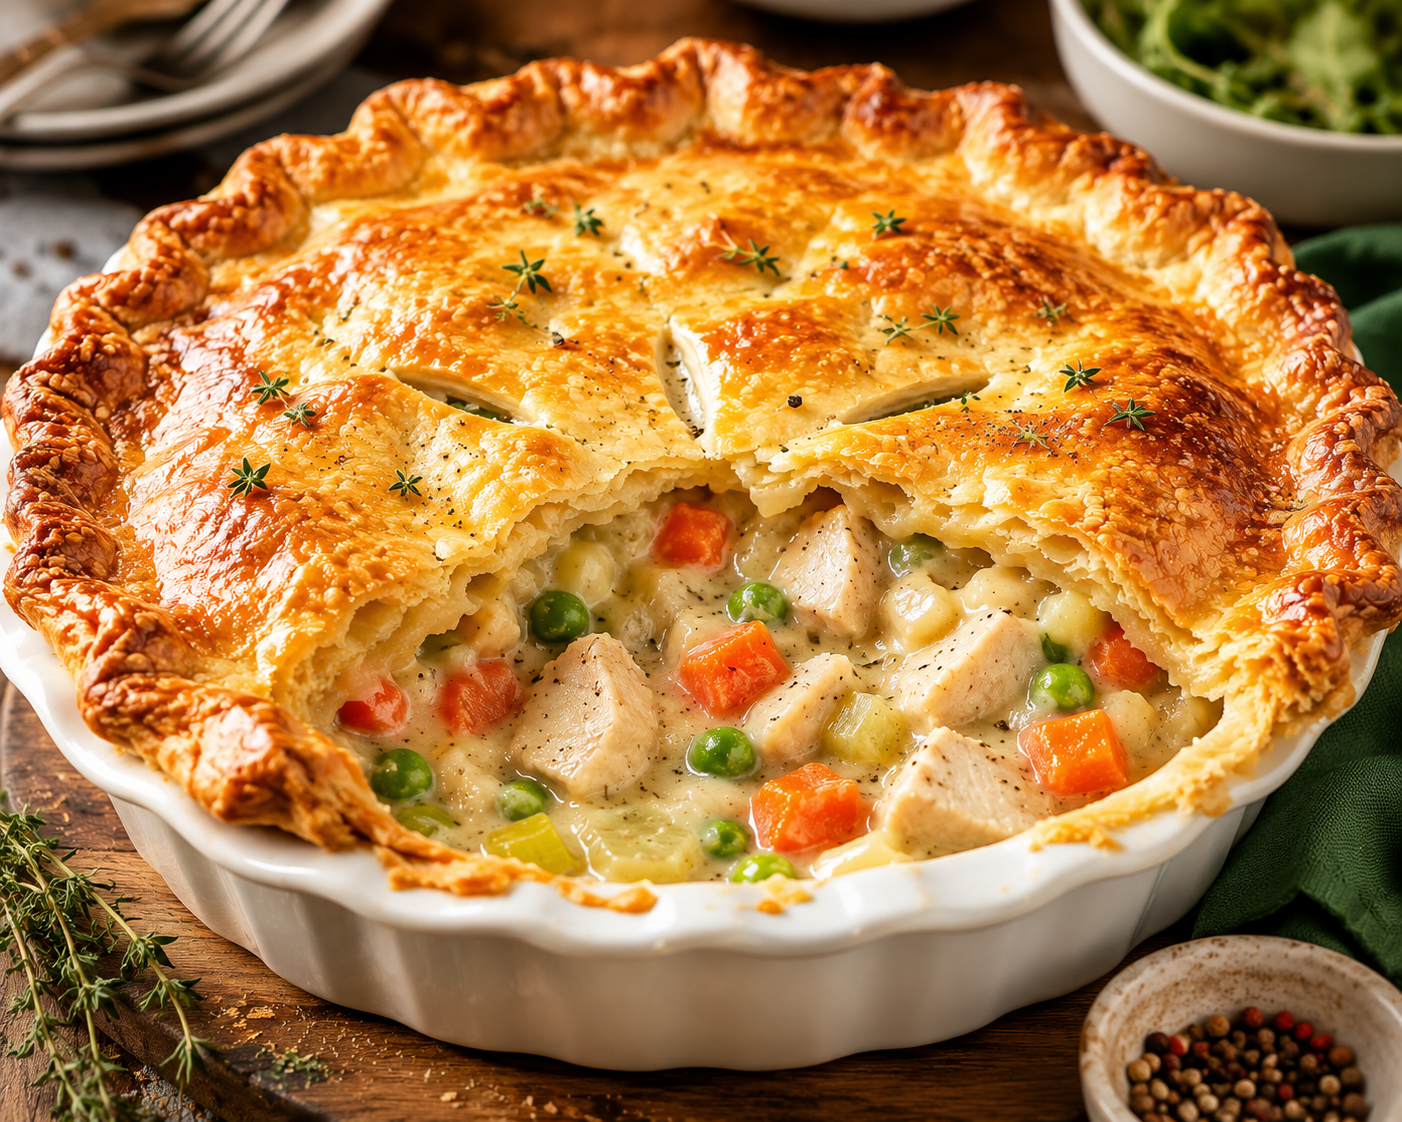
There are few meals as comforting as a homemade easy chicken pot pie recipe. A golden, flaky crust gives way to tender chicken, colorful vegetables, and a creamy, savory filling that feels warm and satisfying from the very first bite. It is the kind of dinner that brings everyone to the table without much convincing. Whether you make one large pie for the family or individual pot pies for easy serving, this classic dish always feels special.
What I love most about this homemade easy chicken pot pie recipe is how practical it can be. You can cook the chicken from scratch, use leftover roasted chicken, or save time with rotisserie chicken. Fresh or frozen vegetables both work well, and you can use homemade pastry or a good-quality refrigerated crust when you’re short on time. The key is getting the filling thick and flavorful before it meets the crust. Follow a few simple techniques, and you’ll have a creamy, hearty chicken pot pie with a beautifully golden top.
Why You’ll Love This Easy Chicken Pot Pie Recipe
This recipe combines the best parts of classic chicken pot pie while keeping the process approachable.
- Comforting and filling: Chicken, vegetables, creamy sauce, and pastry create a complete meal in one dish.
- Full of flavor: Aromatic vegetables, herbs, chicken broth, and a creamy sauce give the filling plenty of savory depth.
- Flexible: Use chicken breast, chicken thighs, or leftover cooked chicken.
- Fresh or frozen vegetables work: You don’t need to spend extra time chopping every vegetable.
- Make-ahead friendly: The filling can be prepared ahead of time and refrigerated until you’re ready to assemble the pie.
- Freezer-friendly: An assembled pot pie can be frozen for a convenient future dinner.
- Family-friendly: The mild, creamy flavors make this an easy meal for both adults and children.
- Perfect for leftovers: The flavors often become even more developed after resting overnight.
Ingredients
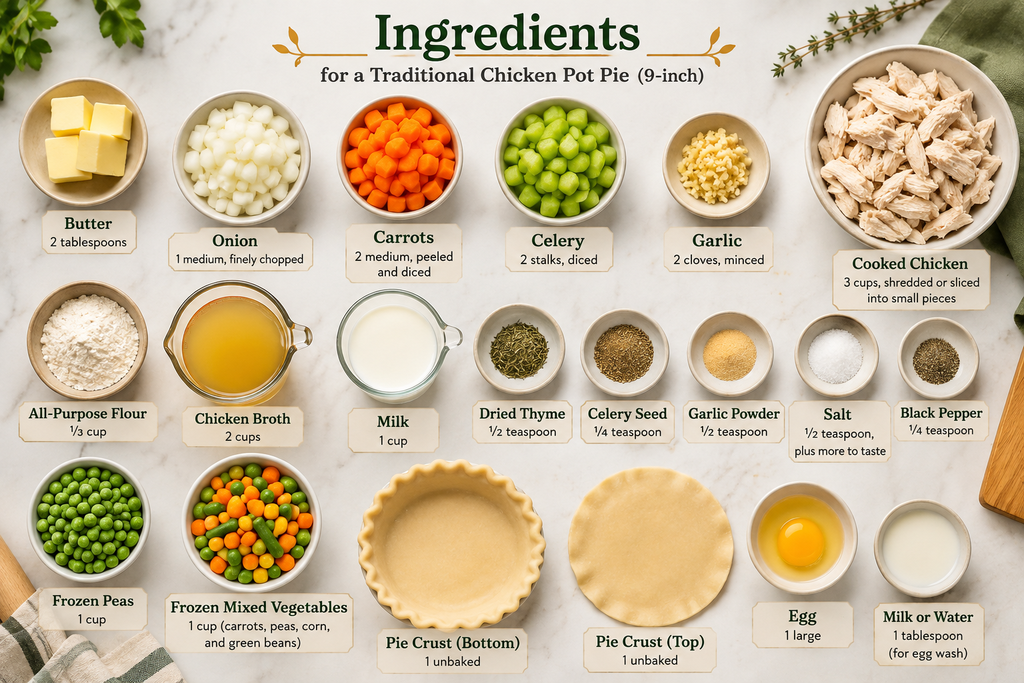
For a traditional 9-inch chicken pot pie, you’ll need:
- 2 tablespoons butter
- 1 medium onion, finely chopped
- 2 medium carrots, peeled and diced
- 2 celery stalks, diced
- 2 cloves garlic, minced
- Three cups of cooked chicken, either shredded or sliced into small pieces
- 1/3 cup all-purpose flour
- 2 cups chicken broth
- 1 cup milk
- 1/2 teaspoon dried thyme
- 1/4 teaspoon celery seed
- 1/2 teaspoon garlic powder
- 1/2 teaspoon salt, plus more to taste
- 1/4 teaspoon freshly ground black pepper
- 1 cup frozen peas
- 1 cup frozen mixed vegetables, such as carrots, peas, corn, and green beans
- 1 unbaked pie crust for the bottom
- 1 unbaked pie crust for the top
- 1 large egg
- 1 tablespoon of water or milk to wash the eggs
Ingredient Notes & Substitutions
Chicken: Cooked chicken breast is easy to shred and has a mild flavor. If slightly overdone, chicken thighs are more forgiving and have more juice.
Chicken broth: Use low-sodium broth when possible. This gives you better control over the salt level, especially if you add bouillon or seasoned chicken.
Milk: Whole milk gives the filling a richer texture, but 2% milk works well too.
Flour: All-purpose flour thickens the sauce. Cook it with the butter and vegetables before adding the liquid to avoid a raw flour taste.
Vegetables: Carrots, peas, celery, corn, and green beans are classic choices.
Herbs: Thyme is especially good with chicken. A tiny bit of fresh sage, rosemary, or parsley can also be used.
Pie crust: Homemade crust gives excellent flavor and texture, but refrigerated pie crust works when you want a faster dinner.
Parmesan: A small amount of finely grated Parmesan can be stirred into the filling for extra savory depth. It should enhance the sauce rather than make it taste strongly cheesy.
Equipment Needed for Easy Chicken Pot Pie
You don’t need specialized equipment for this recipe. Gather:
- 9-inch pie dish
- Large saucepan or skillet
- Medium mixing bowl
- Wooden spoon or spatula
- Whisk
- Rolling pin, if using homemade pastry
- Sharp knife
- Cutting board
- Measuring cups and spoons
- Pastry brush
- Baking sheet
- Instant-read thermometer, if cooking the chicken from raw
A rimmed baking sheet is particularly useful because it catches any bubbling filling that escapes during baking.
Step-by-Step Instructions
1. Prepare the Chicken
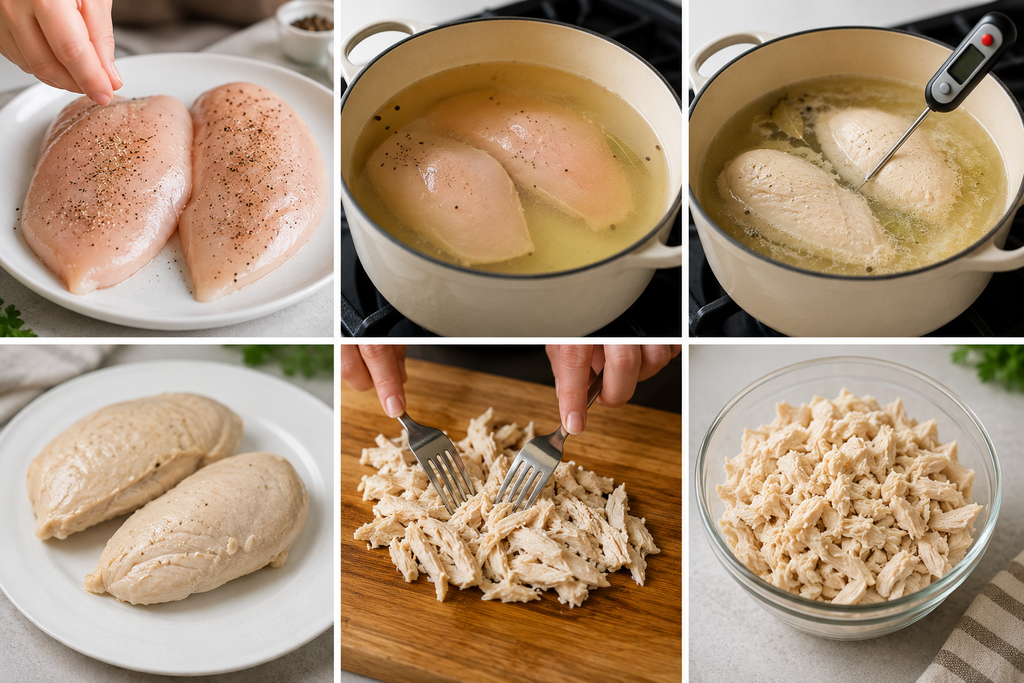
If you’re starting with raw chicken, season it lightly with salt and pepper. Put it in a pot and cover it with enough water or chicken broth. Bring the liquid to a gentle simmer and cook until the thickest part of the chicken reaches 165°F.
Avoid aggressively boiling the chicken because gentle cooking helps keep it tender. Transfer the chicken to a plate and let it cool enough to handle. Shred or chop it into bite-size pieces.
If you’re using already-cooked chicken, simply shred or dice it and move on to the filling.
2. Cook the Vegetables for Easy Chicken Pot Pie
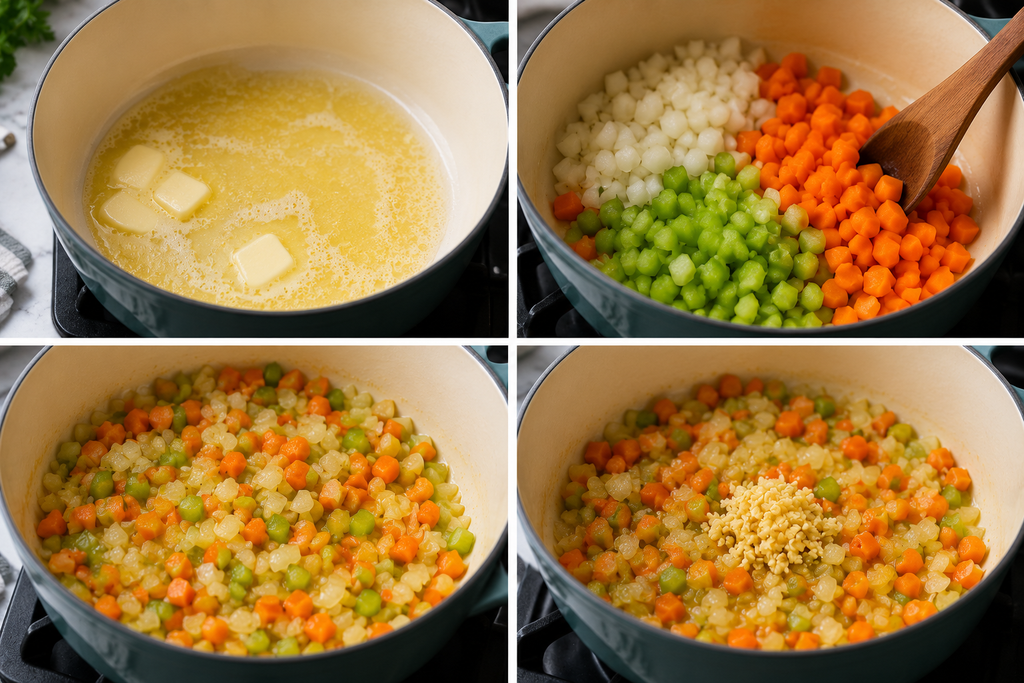
Melt the butter in a large saucepan over medium heat.
Add the onion, carrots, and celery. Cook for about 4 to 5 minutes, stirring occasionally, until the onion softens and the vegetables begin to become tender.
Cook the garlic for up to 30 seconds. You want the garlic to become fragrant without letting it burn.
3. Build the Creamy Sauce for Easy Chicken Pot Pie
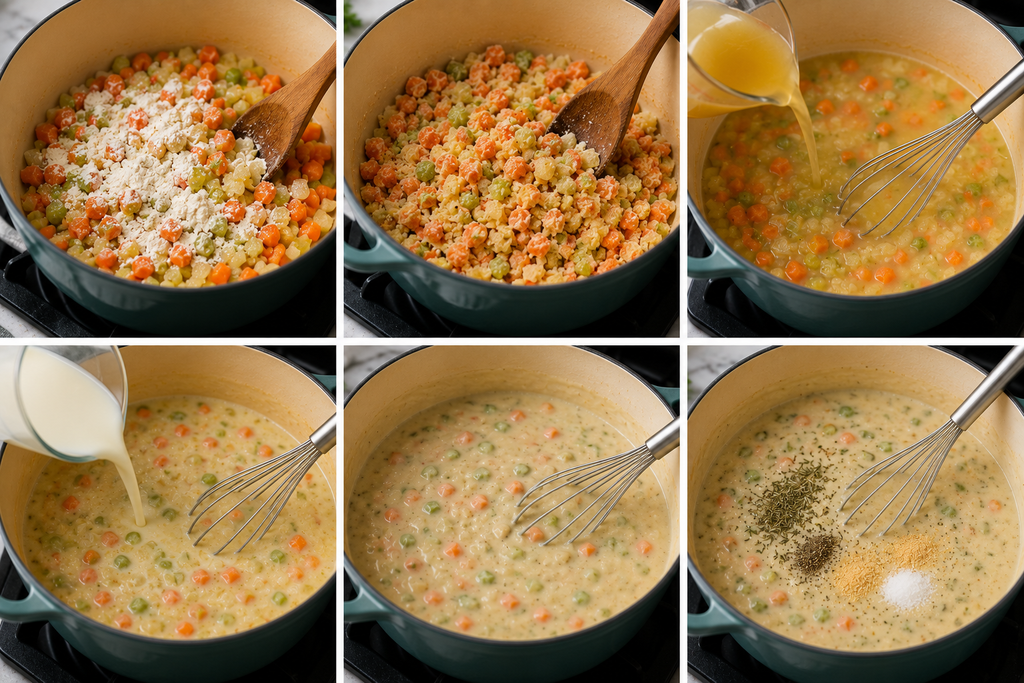
Sprinkle the flour over the vegetables and stir well so it coats everything. Cook for about 1 minute. This short step helps cook out the raw flour flavor and prepares it to thicken the liquid.
Pour in the chicken broth gradually, swirling or whisking constantly. Add the milk gradually as well. As the mixture reaches a mild simmer, continue stirring.
Within a few minutes, the sauce should become noticeably thicker. Add the thyme, celery seed, garlic powder, salt, and black pepper.
4. Add the Chicken and Vegetables for Easy Chicken Pot Pie

Stir the cooked chicken into the creamy sauce.
Add the frozen vegetables. You don’t need to thaw them first.
Allow the mixture to simmer gently for several minutes, stirring occasionally, until everything is hot and the sauce reaches a thick, spoonable consistency.
Taste the filling before assembling the pie. Add more salt, pepper, thyme, or chicken broth as needed.
The filling should be creamy and thick rather than watery.
5. Cool the Filling
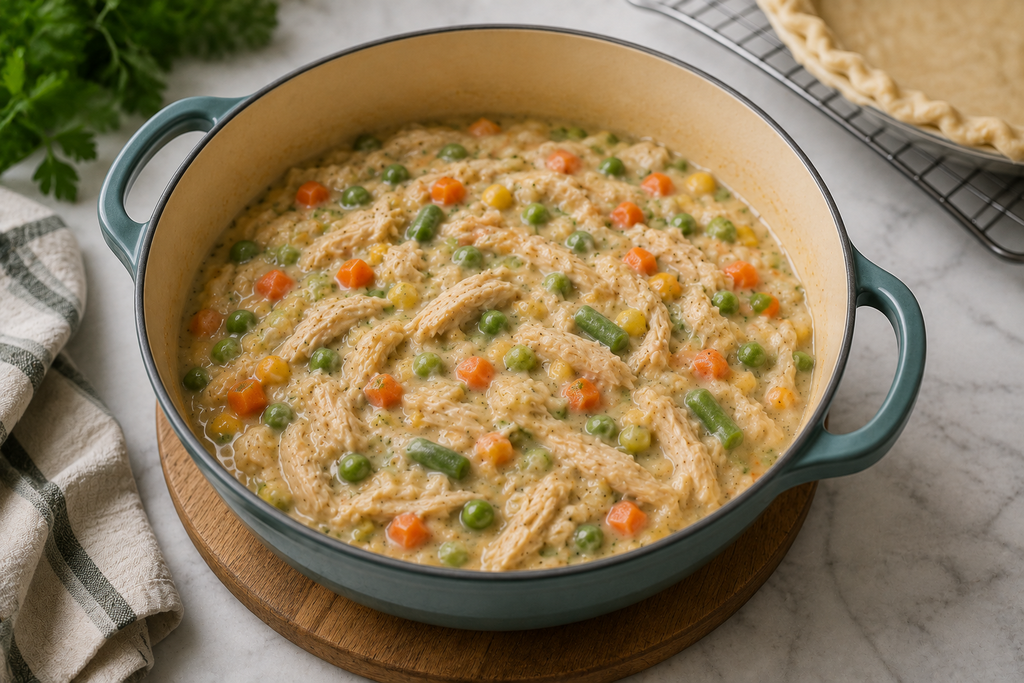
After removing from the stove, let it cool.
This step is easy to overlook, but it makes a big difference. Pouring piping-hot filling directly into pastry can soften or melt the fat in the crust before baking, which may lead to a less flaky result.
You don’t need the filling to be refrigerator-cold. It simply needs to cool enough that it is no longer steaming hot.
6. Prepare the Pie Crust for Easy Chicken Pot Pie
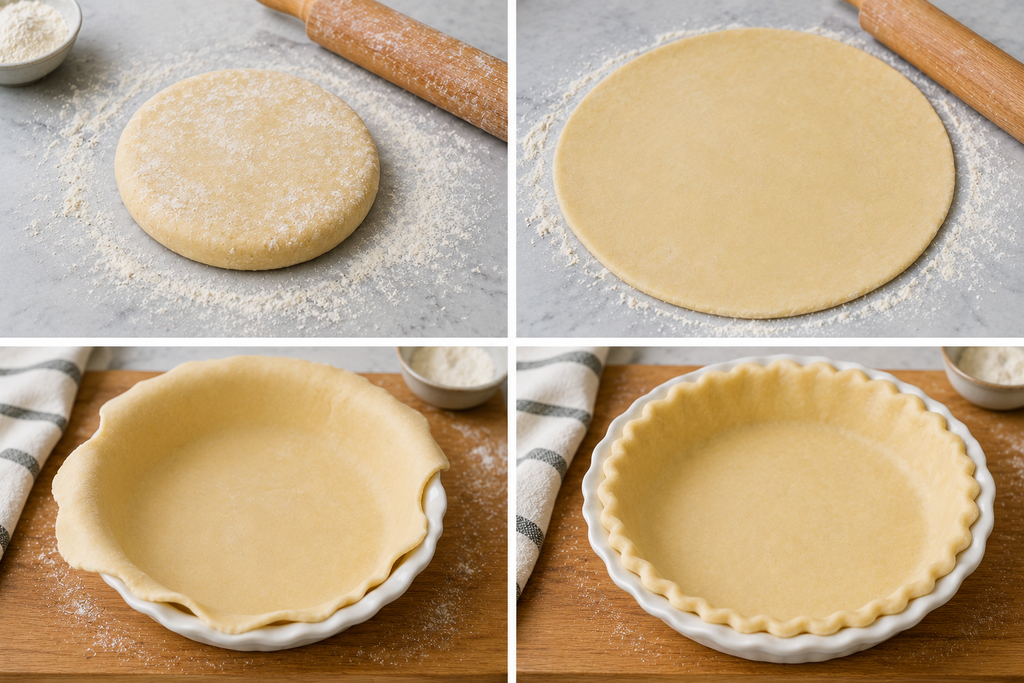
Preheat your oven to 425°F. Lightly flour your work surface and roll out the bottom crust until it is large enough to fit comfortably inside a 9-inch pie dish.
Transfer the pastry to the dish and gently press it into the bottom and sides. Avoid stretching the dough because stretched pastry can shrink during baking.
7. Assemble the Chicken Pot Pie
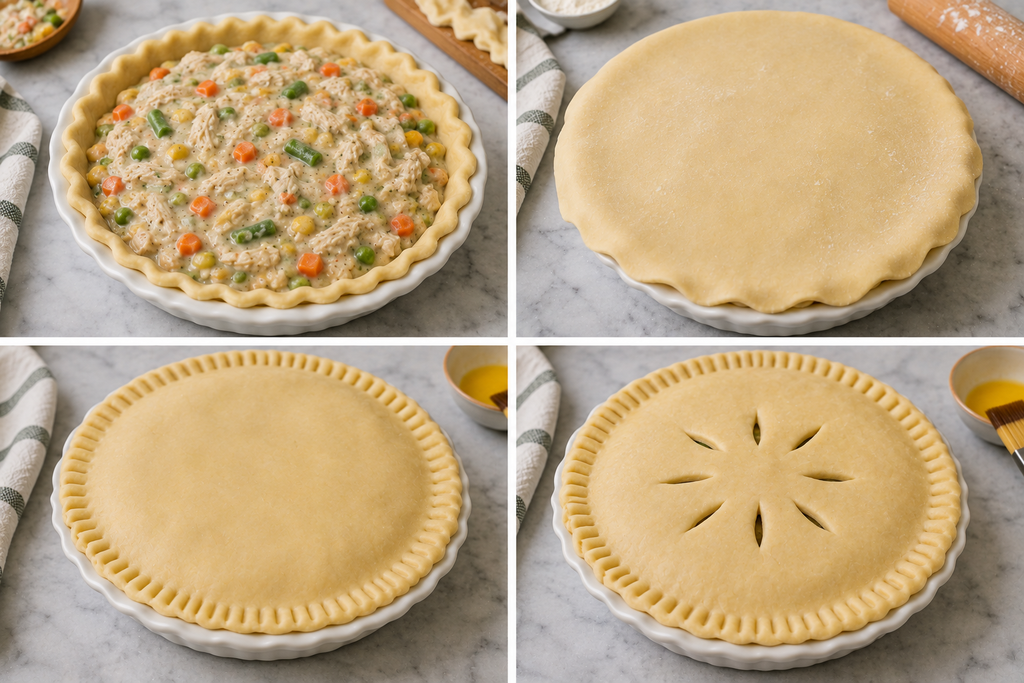
Spoon the cooled filling into the prepared bottom crust. Roll out the second crust and carefully place it over the filling. The top and bottom crusts should be pressed together. Trim any excess pastry if necessary, then crimp the edges with your fingers or a fork.
Cut several small vents in the top crust. Steam can escape via these holes while the pie bakes.
8. Add the Egg Wash for Easy Chicken Pot Pie
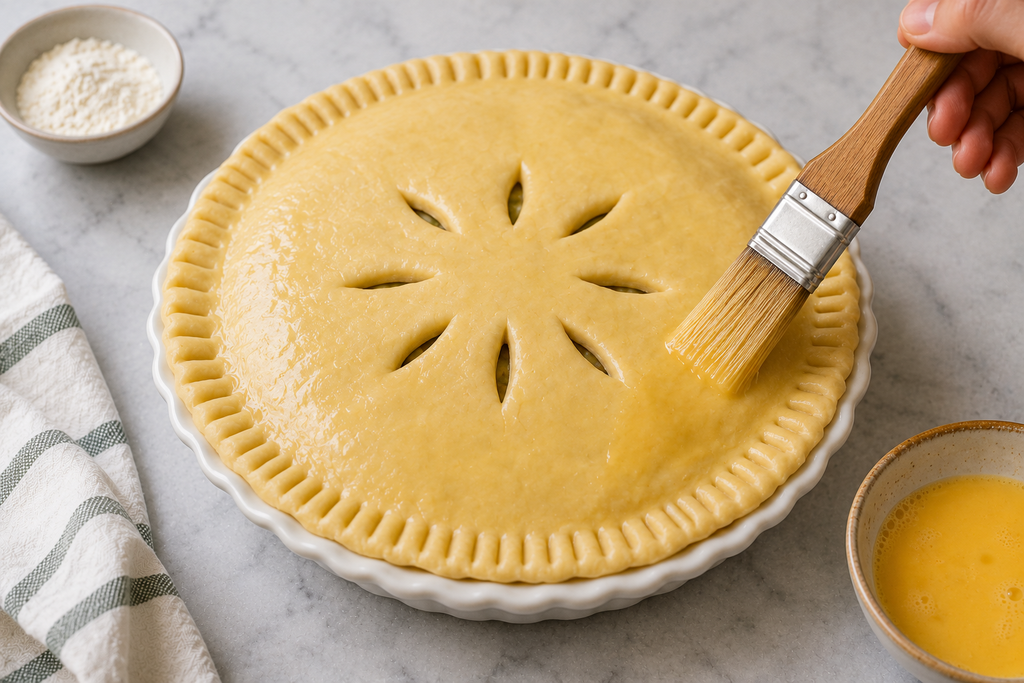
Mix one tablespoon of water or milk with the egg.
Brush a thin layer over the top crust. You don’t need a thick coating. A light egg wash is enough to help the crust develop an attractive golden-brown finish.
9. Bake the Pie
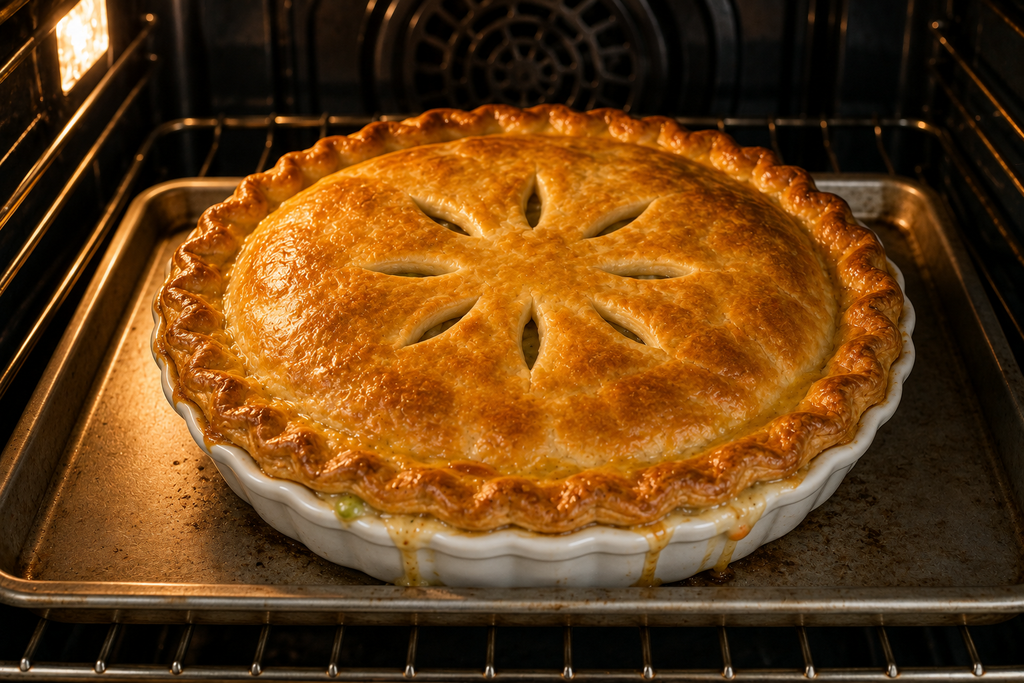
After transferring the pie to a baking sheet, place it in the oven. Bake for approximately 40 to 50 minutes, or until the crust is deeply golden and the filling is bubbling around the edges.
Start checking the pie toward the earlier end of the cooking range. Every oven behaves slightly differently. If the crust becomes brown before the filling is fully heated, loosely cover the top with aluminum foil and continue baking.
10. Rest Before Serving
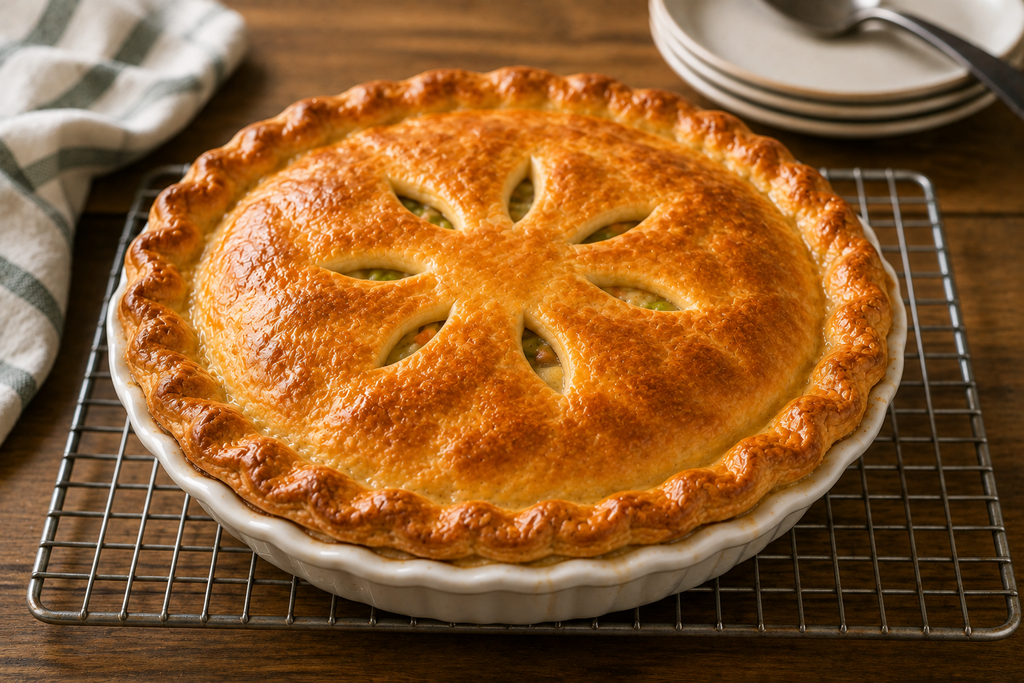
After taking the pie out of the oven, give it 15 to 20 minutes to rest.
This allows the filling to settle and slightly thicken. It also makes the pie easier to serve without the filling immediately spreading across the plate. Serve warm.
Expert Tips for Making Easy Chicken Pot Pie
Keep the Filling Thick Before Baking
This is one of the most important rules for a successful chicken pot pie. The oven will heat the filling, but it won’t magically turn a thin sauce into a thick one.
Before assembling the pie, the filling should coat the back of a spoon and hold its shape reasonably well.
Cool the Filling Before Adding the Crust
Hot filling and pastry are not the best combination. Allowing the filling to cool reduces the chance of the butter in the pastry melting before the crust has a chance to bake and become flaky.
Don’t Overcook the Chicken
If cooking chicken specifically for this recipe, use gentle heat and check the internal temperature. Chicken breast can become dry when cooked far beyond the point of doneness.
Season in Layers
Don’t wait until the very end to season the filling. As you go, season the chicken, sauce, and vegetables; taste the final filling and adjust as necessary.
Use a Baking Sheet
Pot pie filling can bubble over during baking. Setting the pie on a rimmed baking sheet makes cleanup much easier.
Give the Crust Enough Ventilation
A few small cuts in the top crust allow steam to escape. Without vents, pressure can build underneath the pastry and cause uneven baking.
Recipe Variations for Easy Chicken Pot Pie
Chicken Pot Pie with Puff Pastry
Use puff pastry on top of the creamy filling for a very flaky topping.
After the filling has cooled, transfer it to one big baking dish or several ovenproof dishes, and cover with puff pastry. After brushing the crust with egg, bake it until it is puffed and thoroughly golden.
Rotisserie Easy Chicken Pot Pie
Rotisserie chicken is one of the easiest shortcuts. Remove the meat from the bones, discard the skin if desired, and shred the chicken.
Because rotisserie chicken can already contain a fair amount of salt, taste the filling before adding additional seasoning.
Chicken and Mushroom Pot Pie
Add sliced mushrooms with the onions, carrots, and celery. Cook until the mushrooms release their moisture and begin to brown slightly, then add the flour.
Herbs for easy Chicken Pot Pie
For a more aromatic filling, add fresh thyme, parsley, and a small amount of sage. Fresh herbs are especially good when paired with a creamy chicken sauce.
Individual Chicken Pot Pies
Divide the filling among four to six ovenproof ramekins or small pots. Add a pastry lid to each one and bake until golden and bubbling.
Individual portions are particularly convenient for entertaining or freezing.
Serving Suggestions
Easy chicken pot pie is already a complete meal, so you don’t need an elaborate side dish.
For a lighter dinner, serve it with a crisp green salad dressed with a simple vinaigrette. The fresh vegetables and acidity help balance the richness of the creamy filling.
Other good options include:
- Steamed or roasted green beans
- Simple roasted broccoli
- A fresh garden salad
- Glazed carrots
- Sautéed green vegetables
- Homemade dinner rolls
- A light cucumber salad
If you’re serving the pie for a holiday or weekend gathering, keep the sides simple. The major attraction of the meal should continue to be the pot pie.
Storage & Reheating
Refrigerating Leftovers
Allow leftover easy chicken pot pie to cool before covering it tightly and placing it in the refrigerator.
For best quality, eat refrigerated leftovers within 3 to 4 days.
Reheating in the Oven
If you want to restore part of the crisp texture of the crust, the oven is the best choice. Place the leftovers in an oven-safe dish and cover loosely with foil. Depending on the size of the portion, reheat at 350°F for 20 minutes or until the middle is heated. Remove the foil during the final few minutes if you want the crust to crisp further.
Freezing Easy Chicken Pot Pie
You can freeze the pie before and after baking. When assembling an unbaked pie, use fully cooled filling, securely wrap, and freeze for up to three months. Thaw it overnight in the refrigerator before baking.
If the pie has already been baked, allow it to cool completely before wrapping and freezing.
Common Mistakes to Avoid
Making the Filling Too Thin
A watery filling can make the crust soggy and difficult to serve. Before putting the sauce on the pie, simmer it until it is thick enough.
Adding Hot Filling to the Pastry
Very hot filling can soften the pastry and interfere with flakiness. Let the filling cool before assembly.
Adding Too Much Flour
More flour isn’t always the solution to a thin sauce. Too much can produce a heavy, pasty filling. Instead, give the sauce time to simmer and thicken naturally.
Skipping the Vent Holes
Steam needs somewhere to escape. Before baking, cut a few tiny vents into the top crust.
Overfilling the Pie Dish
Leave a little space at the top. Overfilling can cause the creamy sauce to bubble over and make a mess in your oven.
Burning the Crust
If the pastry is getting dark while the filling still needs more time, loosely tent the top with foil.
Serving It Immediately
The filling needs time to settle. Resting the pie for 15 to 20 minutes makes it easier to portion and serve.
Frequently Asked Questions
Can I use rotisserie chicken for easy chicken pot pie?
Yes. Rotisserie chicken is an excellent shortcut. Remove the meat from the bones and shred or chop it before adding it to the creamy filling. Since rotisserie chicken is usually already seasoned, taste the finished filling before adding extra salt.
Can I make chicken pot pie with frozen vegetables?
Green beans, corn, carrots, and peas are all readily available and highly effective when frozen. Do not thaw them before incorporating them into the filling.
How do I keep chicken pot pie from becoming watery?
The most important step is to thicken the filling before assembling the pie. The sauce should be creamy and spoonable rather than runny. Also, allow the filling to cool slightly before placing it in the crust.
Can I use puff pastry instead of pie crust?
Yes. Puff pastry makes an excellent topping. For the best rise, keep the filling cool before adding the pastry and avoid pressing the pastry down too firmly over the surface.
How long does easy chicken pot pie last in the refrigerator?
Properly covered leftovers can generally be kept refrigerated for about 3 to 4 days. Reheat only the amount you plan to eat rather than repeatedly heating and cooling the entire pie.
Why should chicken pot pie rest after baking?
Resting allows the hot filling to cool slightly and become more stable. This makes the pie easier to cut and helps prevent the filling from immediately running out when you serve it.
Nutrition Information (Approximate)
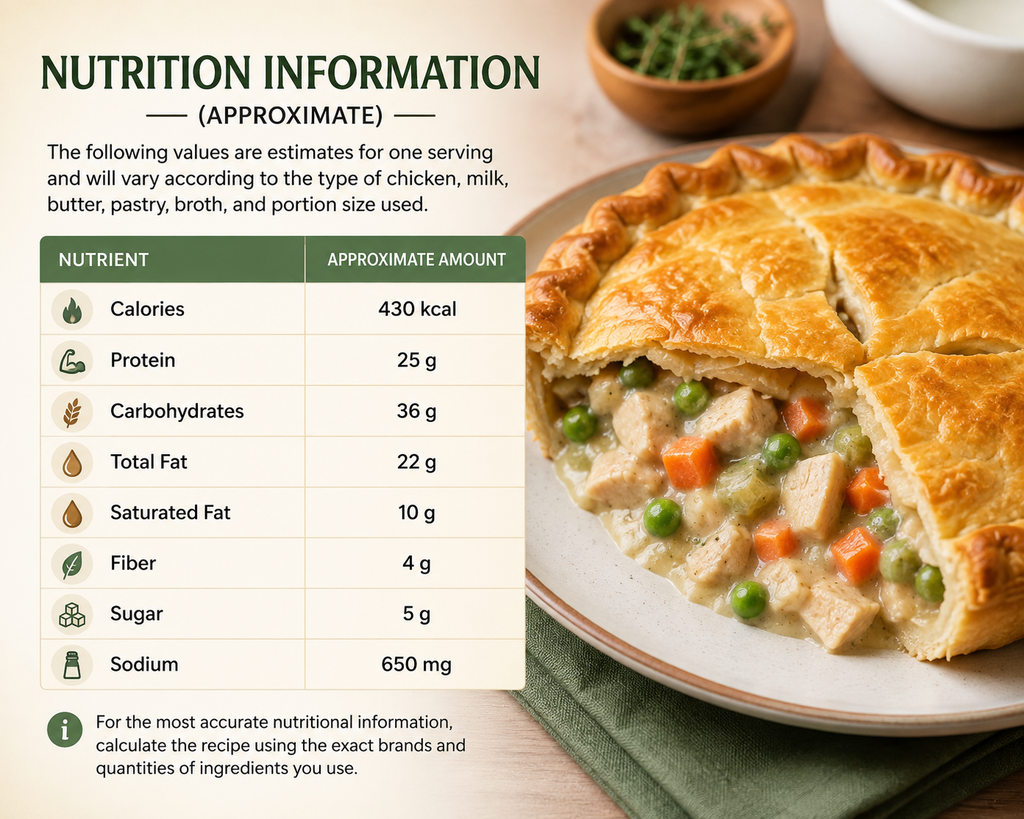
The following values are estimates for one serving and will vary according to the type of chicken, milk, butter, pastry, broth, and portion size used.
| Nutrient | Approximate Amount |
| Calories | 430 kcal |
| Protein | 25 g |
| Carbohydrates | 36 g |
| Total Fat | 22 g |
| Saturated Fat | 10 g |
| Fiber | 4 g |
| Sugar | 5 g |
| Sodium | 650 mg |
For the most accurate nutritional information, calculate the recipe using the exact brands and quantities of ingredients you use.
Recipe Card (Printable Summary)
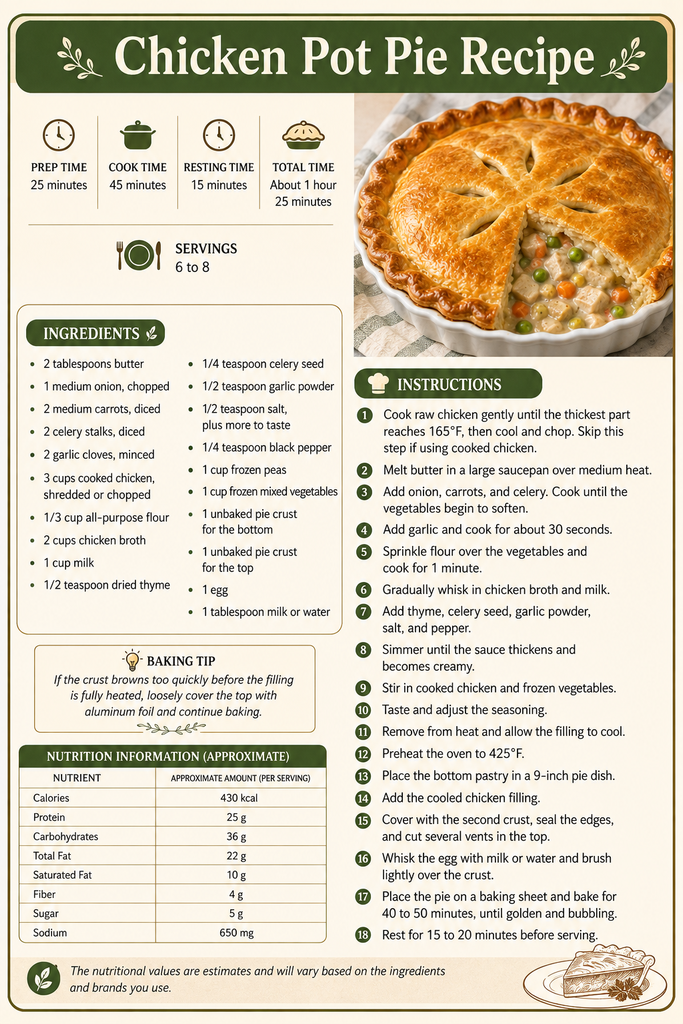
Easy Chicken Pot Pie Recipe
Prep Time: 25 minutes
Cook Time: 45 minutes
Resting Time: 15 minutes
Total Time: About 1 hour 25 minutes
Servings: 6 to 8
Ingredients
- 2 tablespoons butter
- 1 medium onion, chopped
- 2 medium carrots, diced
- 2 celery stalks, diced
- 2 garlic cloves, minced
- 3 cups cooked chicken, shredded or chopped
- 1/3 cup all-purpose flour
- 2 cups chicken broth
- 1 cup milk
- 1/2 teaspoon dried thyme
- 1/4 teaspoon celery seed
- 1/2 teaspoon garlic powder
- 1/2 teaspoon salt, plus more to taste
- 1/4 teaspoon black pepper
- 1 cup frozen peas
- 1 cup frozen mixed vegetables
- 1 unbaked pie crust for the bottom
- 1 unbaked pie crust for the top
- 1 egg
- 1 tablespoon milk or water
Instructions
- Cook raw chicken gently until the thickest part reaches 165°F, then cool and chop. Skip this step if using cooked chicken.
- Melt butter in a large saucepan over medium heat.
- Add onion, carrots, and celery. Cook until the vegetables begin to soften.
- Add garlic and cook for about 30 seconds.
- Cook the vegetables for one minute after sprinkling them with flour.
- Gradually whisk in chicken broth and milk.
- Add thyme, celery seed, garlic powder, salt, and pepper.
- Simmer until the sauce thickens and becomes creamy.
- Stir in cooked chicken and frozen vegetables.
- Taste and adjust the seasoning.
- Remove from heat and allow the filling to cool.
- Preheat the oven to 425°F.
- Fill the bottom layer of pie with pastry.
- Add the cooled chicken filling.
- Cover with the second crust, seal the edges, and cut several vents in the top.
- Whisk the egg with milk or water and brush lightly over the crust.
- Bake the pie for 40 to 50 minutes until its look golden and becomes bubbling.
- Rest for 15 to 20 minutes before serving.
Conclusion
A great easy chicken pot pie recipe doesn’t need complicated ingredients or difficult techniques. The magic comes from building a flavorful, creamy filling, using tender chicken and vegetables, and giving the pastry enough time and space to become crisp and golden.
If you want the most traditional result, use a double pie crust. If you’re looking for something quicker and extra flaky, puff pastry makes an excellent topping. You can also use rotisserie chicken or frozen vegetables when convenience matters. Once you understand the basic method, chicken pot pie becomes one of those recipes you can easily adapt to whatever you have in the kitchen.
Make the filling thick, cool it before adding the pastry, season it well, and let the finished pie rest before serving. Those simple steps are what turn a good homemade pot pie into the kind of cozy dinner everyone looks forward to.

Homemade Cream of Chicken Soup Recipe 2026

Keto Brownies Recipe: Fudgy, Easy And Low Carb

Chicken Alfredo Pasta Recipe (homemade & creamy)

Chicken Broccoli Pasta Bake: Creamy, Easy One-Dish Dinner

Chocolate Lava Cakes Recipe with Delicious Center

The Best Homemade BBQ Chicken Pizza Recipe 2026

Simple Fried Chicken Recipe: Crispy, Juicy, and Easy

Healthy Chicken Soup Recipe With Vegetables and Tender Chicken

Gluten-Free Chicken Nuggets Crispy And Homemade

Chicken Biryani Recipe: Flavorful and Easy to Make
-
 Baked Chicken2 weeks ago
The Best Homemade BBQ Chicken Pizza Recipe 2026
-
 Chicken Recipes2 weeks ago
Simple Fried Chicken Recipe: Crispy, Juicy, and Easy
-
 Soups and Salad2 weeks ago
Healthy Chicken Soup Recipe With Vegetables and Tender Chicken
-
 Fried Chicken2 weeks ago
Gluten-Free Chicken Nuggets Crispy And Homemade
-
 Chicken Recipes1 week ago
Chicken Biryani Recipe: Flavorful and Easy to Make
-
 Soups and Salad1 week ago
Classic Chicken Salad Recipe – Creamy, Flavorful And Delicious
-
 Chicken Recipes4 days ago
Chicken Broccoli Pasta Bake: Creamy, Easy One-Dish Dinner
-
 Soups and Salad18 hours ago
Homemade Cream of Chicken Soup Recipe 2026