
Chicken Recipes
Easy Fried Chicken Strips Recipe (Crispy & Golden)


Homemade Fried Chicken Strips Recipe
Homemade fried chicken strips are hard to beat when you want something crispy, juicy, and full of flavor. They have a golden, crunchy coating on the outside and tender chicken inside. The best part is that you can prepare them using basic items that you most likely already have in your home.
This easy fried chicken strips recipe uses boneless chicken breasts, Italian-seasoned breadcrumbs, eggs, and flour to create a delicious double coating. Each strip is served with your preferred dipping sauce after being deep-fried till golden. The preparation takes about 10 minutes, and the whole recipe is ready in around 40 minutes.
I’ll walk you through choosing the right chicken, preparing the coating, frying at the correct temperature, and keeping your chicken strips crispy. You’ll also find helpful storage tips, serving ideas, and easy variations to make this recipe your own.
What Makes These Homemade Fried Chicken Strips So Crispy?
The secret to crispy fried chicken strips is a good coating and the right frying temperature. This recipe uses three simple ingredients for the breading process: flour, beaten eggs, and seasoned breadcrumbs. Each one has a different job.
Flour creates a dry layer that helps the egg stick to the chicken. The egg works like glue, holding the breadcrumbs in place. Finally, the breadcrumbs create the crunchy golden crust that makes every bite so satisfying.
I recommend using Italian-seasoned breadcrumbs because they already contain herbs and seasonings. They add extra flavor without requiring a long list of spices. Garlic powder in the egg mixture gives the chicken another layer of savory flavor.
Another important trick is double coating the chicken. After the first layer of breadcrumbs, dip each strip into the egg again and coat it with breadcrumbs one more time. This creates a thicker crust that covers the chicken more evenly.
Frying temperature also matters. Oil that is too cool can make the breadcrumbs absorb too much oil and become greasy. Keeping the temperature around 325°F (163°C) helps create an evenly cooked, crispy result.
Ingredients For Fried Chicken Strips
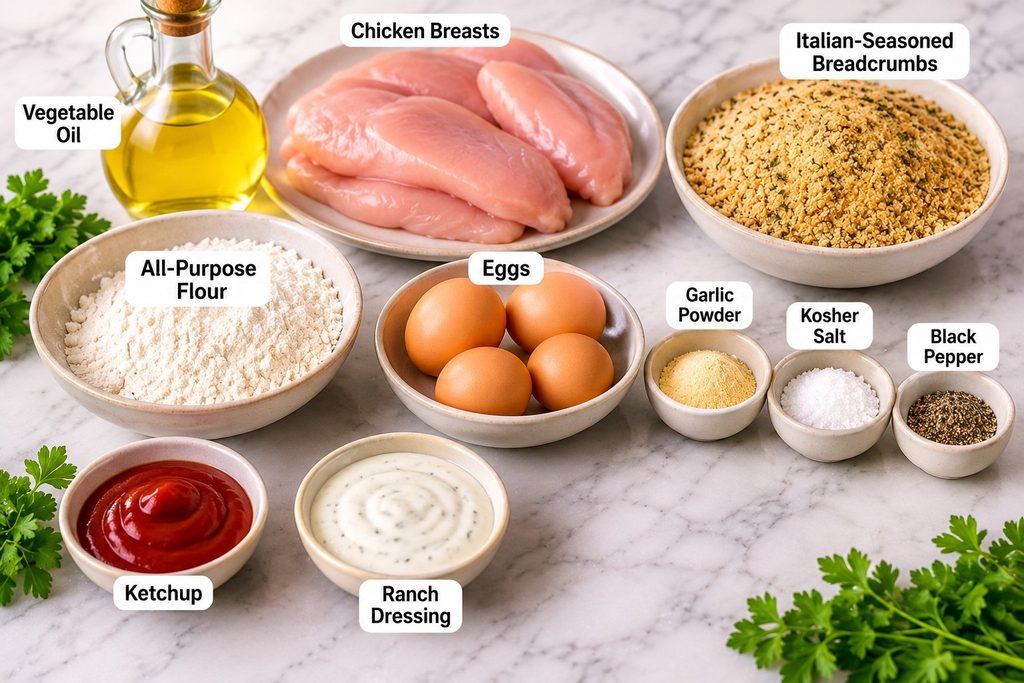
You only need a handful of everyday ingredients to make these homemade chicken strips. Each ingredient helps create the flavor, texture, or golden coating.
- Chicken breasts (2 large, about 1 lb or 450 g): Boneless, skinless chicken breasts are easy to cut into strips and cook evenly. Choose larger pieces so you can make long, thick strips.
- Italian-seasoned breadcrumbs (2 cups): These create the crispy outside and add a savory herb flavor. Plain breadcrumbs also work if you season them yourself.
- Eggs (4 large): The breadcrumbs adhere to the chicken and form a solid covering thanks to the beaten eggs.
- All-purpose flour (½ cup or 60 g): Flour absorbs surface moisture and gives the egg mixture a better base to hold onto.
- Garlic powder (1 teaspoon): Adds a mild garlic flavor to the coating.
- Kosher salt: Brings out the flavor of the chicken and breadcrumbs. Adjust the amount to your taste.
- Freshly ground black pepper: Adds a little warmth and balances the other seasonings.
- Vegetable oil: Needed for deep frying. It has a neutral flavor and works well at the required cooking temperature.
- Simple serving options: include ketchup and ranch dressing, but you can use any dipping sauce you like.
If you prefer a stronger flavor, you can add paprika, onion powder, or dried oregano to the breadcrumbs. Start with small amounts so the seasoning does not overpower the chicken.
Best Chicken to Use for Fried Chicken Strips
Boneless, skinless chicken breasts are my first choice for this recipe because they are easy to prepare and have a mild flavor that works well with seasoned breadcrumbs. They also hold their shape when sliced into strips.
Cut the chicken breasts lengthwise into strips about ½ inch thick. Try to keep the pieces similar in size. Even strips cook at a similar rate, which helps prevent smaller pieces from drying out while larger ones finish cooking.
Chicken tenderloins are another good option. They are naturally tender and can save you some cutting time. However, their size can vary, so check them carefully while frying.
Fresh or fully thawed chicken works best. If you use frozen chicken breasts, thaw them completely in the refrigerator before slicing. Pat the chicken dry with paper towels to remove extra surface moisture.
How to Make Fried Chicken Strips
Making homemade fried chicken strips is simple when you prepare everything before frying. Set up your breading bowls, cut the chicken, and heat the oil carefully. Working in batches also makes the process easier.
Step 1: Prepare the Breading Station
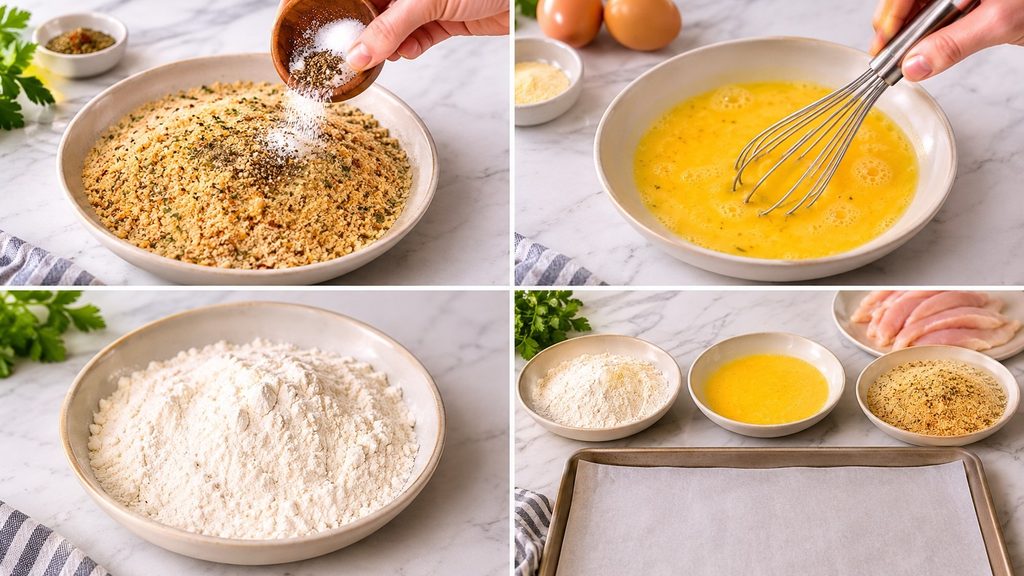
Place the Italian-seasoned breadcrumbs in a shallow bowl and season them with salt and freshly ground black pepper. Crack the eggs into another bowl and whisk until smooth. Add the garlic powder and mix well.
Pour the all-purpose flour into a third shallow bowl. Arrange the three bowls next to each other in the order you’ll use them: flour, egg, and breadcrumbs.
Set a large plate or baking sheet nearby for the coated chicken. Keeping everything close makes breading easier and helps prevent a mess in the kitchen.
Step 2: Cut and Coat the Chicken

Slice the chicken breasts into strips about ½ inch thick. Make sure the pieces are close to the same size so they cook evenly.
Coat the chicken strips with flour. Shake off any extra flour, then dip it into the beaten egg mixture. Allow excess egg to drip back into the bowl before placing the chicken in the breadcrumbs.
Press the breadcrumbs gently onto all sides. Dip the strip into the egg mixture again, then coat it with breadcrumbs for a second time.
Place the coated chicken on your prepared plate or tray. Repeat the process with the remaining strips. Try not to stack the pieces because this can disturb the coating.
Step 3: Heat the Frying Oil

Pour vegetable oil into a large, heavy-bottomed Dutch oven or deep frying pan until it reaches a depth of about 2 inches.
Heat the oil over medium-high heat until it reaches 325°F (163°C). Use a thermometer to check the temperature.
I recommend using a thermometer rather than guessing. Keeping the oil at a steady temperature helps the coating turn golden without burning before the chicken is cooked.
While the oil heats, place a wire rack over a baking sheet and line the area underneath with paper towels to catch excess oil.
Step 4: Fry the Chicken Strips

Carefully lower a few coated chicken strips into the hot oil. Work in small batches so the pan does not become crowded. Too many pieces at once can lower the oil temperature and make the coating less crispy.
Fry the strips for approximately 5 minutes, turning them halfway through so both sides cook evenly. The coating should become golden brown and crisp.
The thickness of the chicken and the temperature of the oil might affect how long it takes to cook. Check the thickest part of a strip with a food thermometer. Chicken should reach an internal temperature of 165°F (74°C) for safe eating.
Avoid placing raw chicken into the oil too quickly or dropping it from a height. Lower each piece gently to reduce splashing.
Step 5: Rest and Serve

Use kitchen tongs to remove the cooked chicken strips from the oil. Place them on the prepared wire rack and allow them to rest for about 5 minutes.
A wire rack helps air move around the chicken, keeping the bottom from becoming soggy. Serve the strips while they are still warm and crispy.
Add ketchup, ranch dressing, or honey mustard on the side for dipping. Homemade French fries or a fresh salad also make great additions.
Tips for Extra Crispy Fried Chicken Strips
A few small details can make a big difference in the final texture. Keep these tips in mind whenever you prepare fried chicken at home.
- Cut evenly sized strips: Similar thickness helps all the pieces cook at the same speed. Aim for strips around ½ inch thick.
- Use the double-coating method: Dipping the chicken in egg and breadcrumbs twice creates a thicker, crunchier crust.
- Shake off extra flour: Too much flour can create a thick, uneven layer that does not hold together well.
- Maintain the oil temperature: Keep it close to 325°F (163°C). Check between batches and adjust the heat when needed.
- Use a wire rack: Resting the chicken on a rack prevents steam from collecting underneath and softening the crust.
- Check the internal temperature: Always make sure the chicken reaches 165°F (74°C).
One more helpful tip is to let the coated chicken sit on the tray for a few minutes before frying. This can help the coating settle and reduce the chance of it falling off during cooking.
What to Serve with Fried Chicken Strips
Even though fried chicken strips are satisfying on their own, they may be made into a whole family meal with the appropriate side dishes. Their savory flavor works well with potatoes, vegetables, salads, and fresh bread.
Homemade French fries are a classic choice. Their crispy texture pairs naturally with the crunchy chicken. You can also serve potato wedges, roasted potatoes, or mashed potatoes if you want something different.
For a lighter meal, try homemade coleslaw or a fresh green salad. The cool, fresh vegetables balance the warm fried coating and make the meal feel less heavy.
Other good options include macaroni and cheese, corn on the cob, steamed broccoli, and buttered vegetables. If you are serving children, add a small bowl of dipping sauce and some fries for an easy meal everyone can enjoy.
Best Dipping Sauces for Fried Chicken Strips
A good dipping sauce adds another layer of flavor to homemade chicken strips. Since the coating is already seasoned, you can choose creamy, sweet, smoky, or tangy sauces.
Here are some easy options:
- Ranch dressing: Creamy, cool, and slightly tangy. It is a popular choice for crispy chicken.
- Ketchup: A straightforward classic with a tart and sweet flavor.
- Honey mustard: Combines the sweetness of honey with the sharp flavor of mustard.
- Garlic mayonnaise: Adds a rich, creamy garlic flavor.
- BBQ sauce: A smoky and slightly sweet option that pairs well with fried chicken.
- Chick-fil-A style sauce: A creamy blend of mayonnaise, honey, mustard, and barbecue flavors.
You can serve two or three sauces together so everyone can choose their favorite.
How to Store and Reheat Fried Chicken Strips
Fried chicken strips taste best when freshly cooked because the breadcrumb coating is at its crunchiest. However, you can save leftovers for another meal if you store them properly.
Allow the chicken to cool slightly, then transfer it to an airtight container. Refrigerate within 2 hours of cooking and keep it in the refrigerator for up to 3 days.
For reheating, preheat your oven to 350°F (177°C). Place the chicken strips on a baking sheet and heat for about 7 minutes, or until they are hot throughout. Thicker pieces may need a little more time.
An air fryer is another good choice. Reheat the strips in a single layer until hot and crispy again. Avoid stacking them because the hot air needs room to circulate.
Always check that reheated chicken reaches 165°F (74°C). I recommend avoiding the microwave when possible because it can make the breadcrumb coating soft and chewy.
Can You Freeze Homemade Fried Chicken Strips?
Yes, you can freeze homemade chicken strips, although freezing is not part of the original recipe’s storage instructions.
For best results, freeze the cooked strips after they have cooled. Place them in a single layer on a baking sheet and freeze until firm. Then transfer them to a freezer-safe container or bag, separating layers with baking paper to prevent sticking.
Label the container with the date so you can keep track of storage time. For best quality, use them within 2 to 3 months.
Reheat frozen cooked strips in an oven or air fryer until they are hot throughout and reach an internal temperature of 165°F (74°C). Avoid leaving cooked chicken at room temperature for long periods.
Common Mistakes to Avoid When Frying Chicken Strips
Even a simple fried chicken Strips recipe can go wrong if a few important details are missed. Avoid these common mistakes for better results.
Using chicken strips of different sizes: Thick pieces take longer to cook, while thin pieces can dry out quickly. Cut them as evenly as possible.
Skipping the double coating: A single layer of breadcrumbs can still taste good, but double coating creates a thicker, more satisfying crust.
Adding chicken to cold oil: Oil that is not hot enough can make the coating absorb too much oil. Wait until it reaches 325°F (163°C).
Overcrowding the pan: Too many chicken strips lower the oil temperature and prevent even browning. Fry in batches instead.
Using too much heat: Very hot oil can burn the breadcrumbs before the chicken cooks through. Keep the temperature steady and check it regularly.
Removing chicken too early: A golden coating does not always mean the inside is cooked. Use a thermometer and check for 165°F (74°C) in the thickest part.
Resting on paper towels alone: A wire rack allows air to circulate around the chicken. This helps keep the bottom crisp instead of letting moisture collect underneath.
Frequently Asked Questions
How Do You Keep Fried Chicken Strips Crispy?
Use a double breadcrumb coating, maintain the oil temperature around 325°F (163°C), and avoid overcrowding the pan. After frying, place the chicken on a wire rack instead of stacking the pieces. These steps help prevent excess moisture from making the coating soggy.
What Is the Best Oil for Frying Chicken Strips?
Vegetable oil is a great choice because it has a neutral flavor and works well for deep frying. Canola oil, sunflower oil, and peanut oil are also suitable options. Choose an oil that can handle the frying temperature without smoking.
What Temperature Should Oil Be for Fried Chicken Strips?
The recommended oil temperature for this recipe is 325°F (163°C). Use a deep-fry thermometer to monitor the heat. If the temperature drops too much, allow the oil to heat again before adding another batch.
How Long Does It Take to Fry Chicken Strips?
Chicken strips take approximately 5 minutes to fry, depending on their thickness and the oil temperature. Turn them halfway through cooking so both sides become golden brown. Always check that the thickest part reaches 165°F (74°C).
How Do You Know When Chicken Strips Are Fully Cooked?
The safest way is to use an instant-read food thermometer. Insert it into the thickest part of a chicken strip without touching the pan. The internal temperature should reach 165°F (74°C). The coating should also look golden and crisp.
Can You Make Chicken Strips Without Italian Breadcrumbs?
Yes. Regular breadcrumbs work well as a replacement. Add dried oregano, parsley, garlic powder, salt, and black pepper for a similar Italian-style flavor. Panko breadcrumbs are another option if you want a lighter, crunchy texture.
Can You Make Fried Chicken Strips in an Air Fryer?
Yes. Coat the chicken as directed, lightly spray the strips with cooking oil, and arrange them in a single layer in the air fryer basket. Cook at around 400°F (200°C), turning halfway through. Cooking time depends on the size of the chicken pieces and your air fryer. Check for an internal temperature of 165°F (74°C).
Homemade Fried Chicken Strips Recipe Card
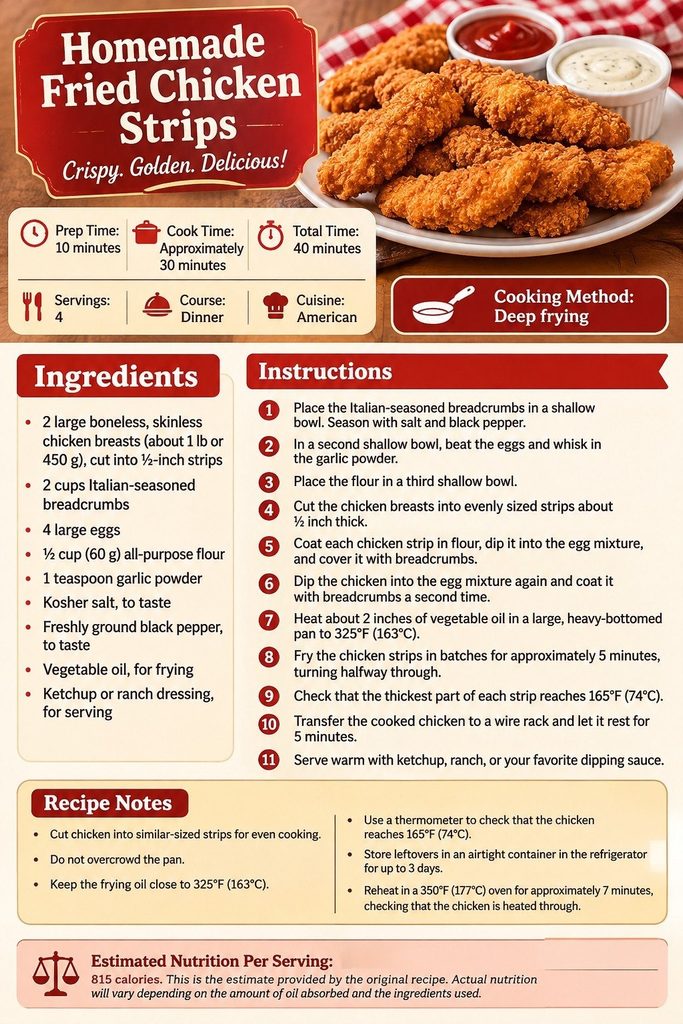
Prep Time: 10 minutes
Cook Time: Approximately 30 minutes
Total Time: 40 minutes
Servings: 4
Course: Dinner
Cooking Method: Deep frying
Ingredients
- 2 large boneless, skinless chicken breasts (about 1 lb or 450 g), cut into ½-inch strips
- 2 cups Italian-seasoned breadcrumbs
- 4 large eggs
- ½ cup (60 g) all-purpose flour
- 1 teaspoon garlic powder
- Kosher salt, to taste
- Freshly ground black pepper, to taste
- Vegetable oil, for frying
- Ketchup or ranch dressing, for serving
Instructions
- Place the Italian-seasoned breadcrumbs in a shallow bowl. Season with salt and black pepper.
- In a second shallow bowl, beat the eggs and whisk in the garlic powder.
- Place the flour in a third shallow bowl.
- Cut the chicken breasts into evenly sized strips about ½ inch thick.
- Coat each chicken strip in flour, dip it into the egg mixture, and cover it with breadcrumbs.
- Dip the chicken into the egg mixture again and coat it with breadcrumbs a second time.
- Heat about 2 inches of vegetable oil in a large, heavy-bottomed pan to 325°F (163°C).
- Fry the chicken strips in batches for approximately 5 minutes, turning halfway through.
- Check that the thickest part of each strip reaches 165°F (74°C).
- Transfer the cooked chicken to a wire rack and let it rest for 5 minutes.
- Serve warm with ketchup, ranch, or your favorite dipping sauce.
Recipe Notes
- Cut chicken into similar-sized strips for even cooking.
- Do not overcrowd the pan.
- Keep the frying oil close to 325°F (163°C).
- Use a thermometer to check that the chicken reaches 165°F (74°C).
- Store leftovers in an airtight container in the refrigerator for up to 3 days.
- Reheat in a 350°F (177°C) oven for approximately 7 minutes, checking that the chicken is heated through.
Estimated Nutrition Per Serving: 815 calories. This is the estimate provided by the original recipe. Actual nutrition will vary depending on the amount of oil absorbed and the ingredients used.
Final Thoughts on Homemade Fried Chicken Strips
Homemade fried chicken strips are a simple way to bring a favorite restaurant-style meal into your kitchen. The seasoned breadcrumbs create a crunchy golden coating, while the chicken breast stays tender and juicy when cooked properly.
I recommend making a batch for family dinners, weekend lunches, or casual gatherings. Serve them with homemade fries, coleslaw, and a few dipping sauces for a meal everyone can enjoy.
Once you learn the simple flour, egg, and breadcrumb coating method, you can use it for other chicken recipes too. Keep the oil temperature steady, cook the strips in batches, and enjoy your homemade crispy fried chicken!

Homemade Montreal Chicken Seasoning is an easy way to add bold flavor to chicken without spending time preparing a marinade. It combines garlic, onion, black pepper, herbs, and citrus for a savory blend with a little warmth and freshness. You can make it in just 10 minutes using simple pantry ingredients.
I love the idea of keeping homemade spice blends ready for busy days. This seasoning can be added to roasted vegetables, mixed with olive oil for a quick marinade, or sprinkled over chicken before grilling. In this recipe, I’ll show you how to make a flavorful blend, choose the right ingredients, store it properly, and use it in different meals.
What Is Montreal Chicken Seasoning?
Montreal Chicken Seasoning is a popular spice blend made with dried garlic, onion, black pepper, salt, and aromatic herbs. It is also known as Canada Chicken Seasoning or Quebec Chicken Seasoning. The blend is inspired by the bold flavors of Montreal-style seasonings, with added herbs and citrus that make it especially good for chicken.
Rosemary, thyme, paprika, coriander, and orange zest give this seasoning its special flavor. Garlic and onion provide a rich savory base, while black pepper adds gentle heat. Orange zest adds a light citrus note that balances the stronger spices.
Montreal Chicken Seasoning is different from Montreal Steak Seasoning. Both blends use garlic, onion, and black pepper, but the chicken version usually has more herbs and citrus notes. This makes it a great choice for chicken breasts, thighs, seafood, pork, and vegetables.
Why You’ll Love This Homemade Seasoning
There are several reasons to keep this seasoning in your kitchen. First, it takes only about 10 minutes to prepare, and you do not need to cook anything. Simply measure, mix, and store the ingredients.
Another benefit is that you control the flavor. Some store-bought seasoning blends can be quite salty or peppery. When you make your own, you can adjust the salt, pepper, and herbs to suit your taste.
I also like how versatile this blend is. You can use it as a dry rub, mix it with oil for a quick marinade, or stir it into sour cream to make a simple dip. Making a larger batch also saves time when preparing meals during the week.
Ingredients You’ll Need

This recipe makes approximately ½ cup of Montreal Chicken Seasoning. Each ingredient adds something important to the final flavor.
- 3 tablespoons dehydrated onion: Adds a sweet, savory flavor. Small dried pieces also give the blend a texture similar to store-bought seasoning.
- 2 tablespoons dehydrated garlic: Provides a strong garlic flavor that works well with chicken and grilled vegetables.
- 2 teaspoons ground black pepper: Adds gentle heat and a bold, peppery taste.
- 2 teaspoons salt: Helps bring out the flavors of the other ingredients.
- ½ teaspoon ground coriander: Adds a mild earthy and slightly citrusy flavor.
- ½ teaspoon ground rosemary: Gives the seasoning a fresh, woody herbal taste.
- ½ teaspoon ground thyme: Adds a warm, earthy flavor that pairs well with chicken.
- ½ teaspoon paprika: Provides mild sweetness, color, and depth.
- Zest of 1 orange: Adds fresh citrus flavor and balances the savory spices.
For the best results, use fresh, good-quality spices. Dried garlic and onion pieces are especially useful because they give the blend a texture similar to commercial seasoning mixes.
Ingredient Substitutions and Variations
You can adjust this seasoning with ingredients already available in your kitchen. If you do not have dehydrated garlic or onion, replace each with half the listed amount of garlic powder or onion powder. For example, use 1 tablespoon garlic powder instead of 2 tablespoons dehydrated garlic.
Red pepper flakes or Aleppo pepper can also be used to give a little heat. Start with ¼ teaspoon and increase it if you prefer a spicier blend. Dried parsley can add another layer of herbal flavor, while a small amount of turmeric gives the mixture a warmer color.
If you want a stronger lemon flavor, add a little lemon pepper and reduce the amount of regular salt if your lemon pepper already contains salt. Always taste and adjust carefully to keep the blend balanced.
How to Make Montreal Chicken Seasoning
Making this homemade seasoning is simple. You only need a medium mixing bowl, a spoon or whisk, measuring spoons, and an airtight spice jar.
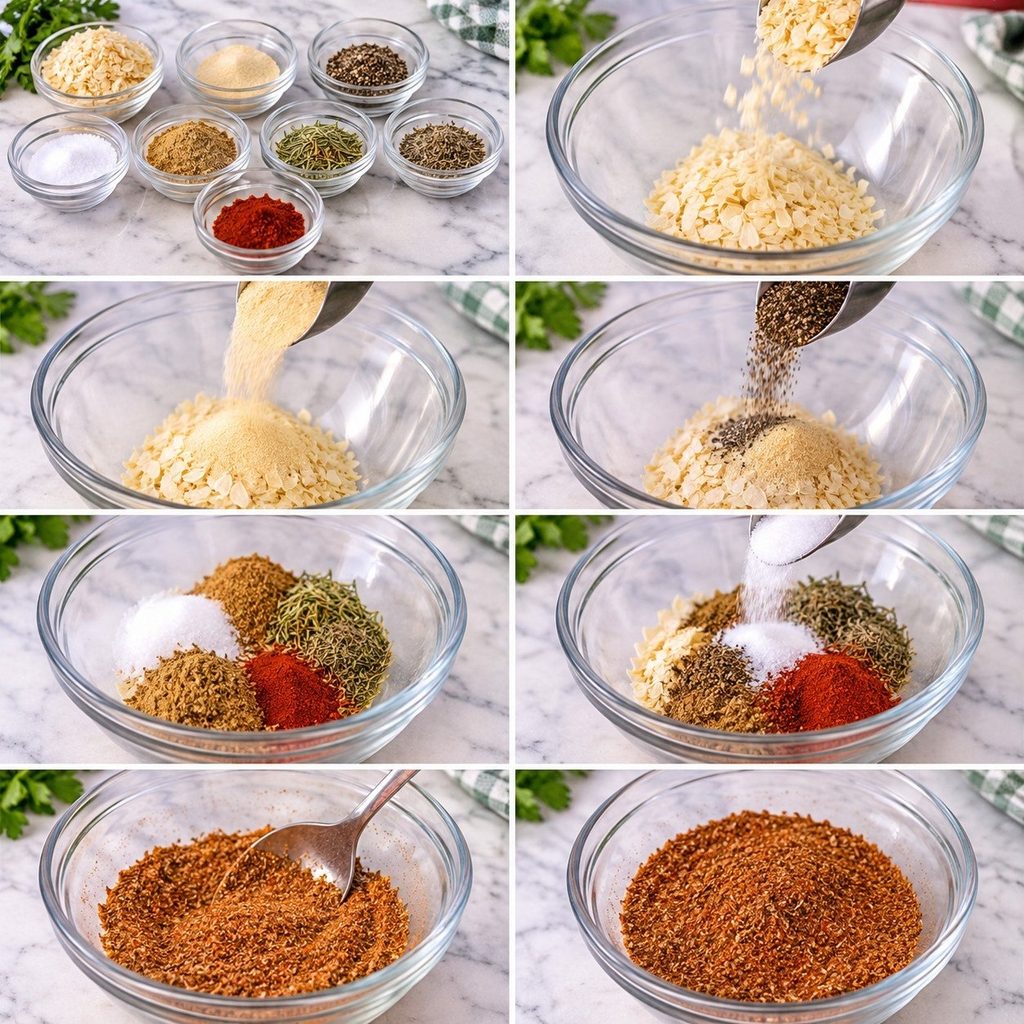
- Measure the ingredients: Add the dehydrated onion, garlic, black pepper, salt, ground coriander, rosemary, thyme, and paprika to a medium bowl. Measure carefully so no single spice overpowers the others.
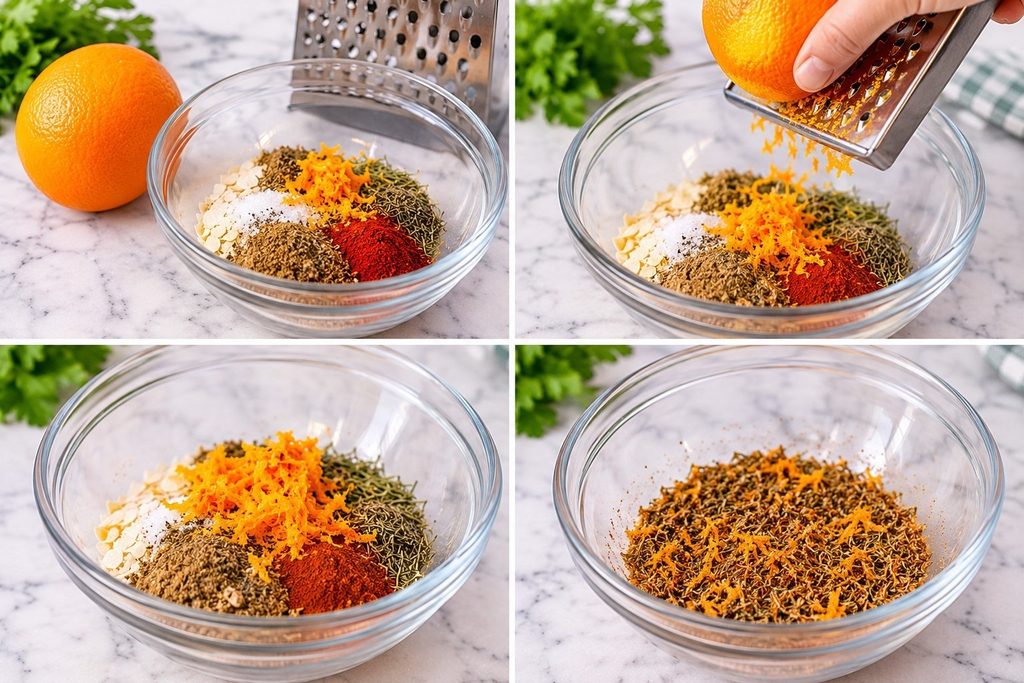
- Add the orange zest: Zest one fresh orange directly into the bowl. Avoid adding too much of the white part beneath the orange skin because it can taste bitter.
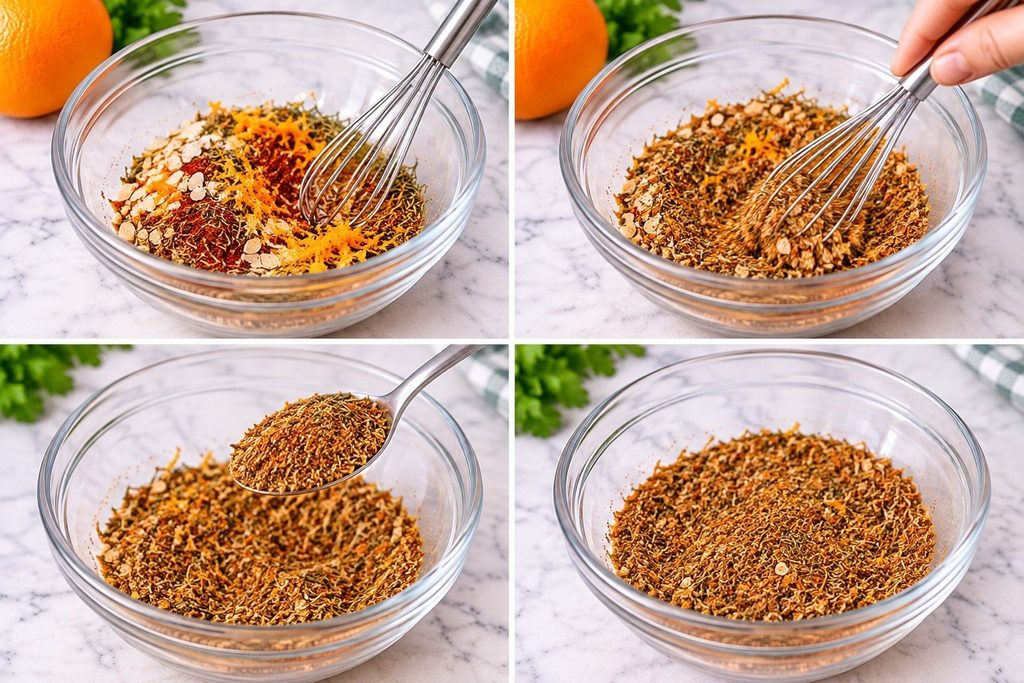
- Mix everything together: Use a small whisk or spoon to combine the ingredients until the herbs and spices are evenly distributed.
- Allow the mixture to rest: Give the seasoning 20 to 30 minutes at room temperature.
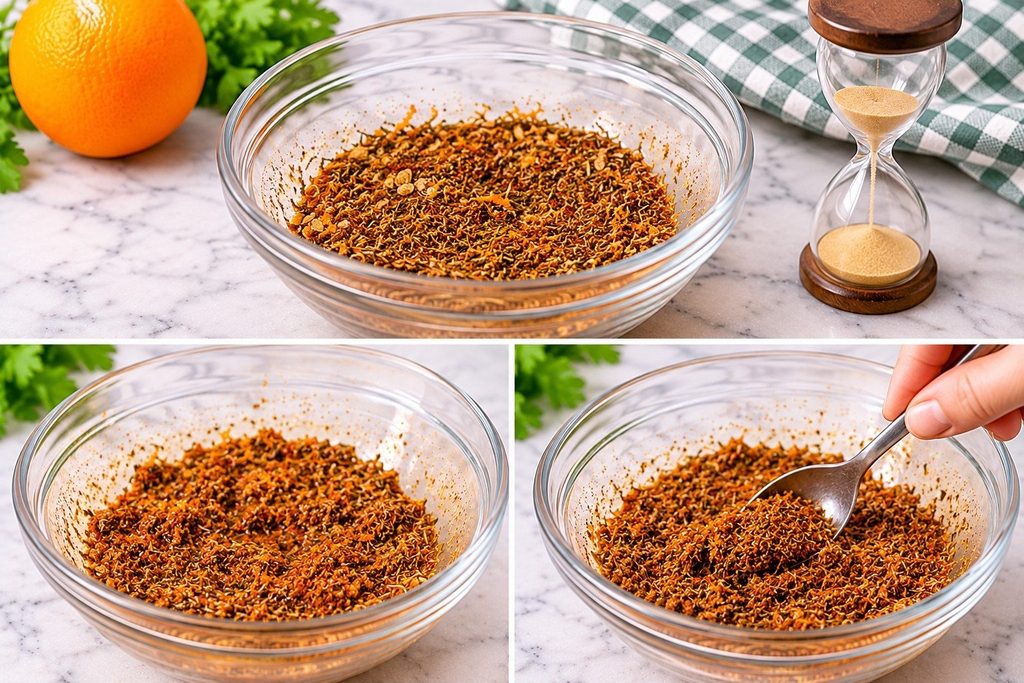
- During this time, the salt draws out moisture and natural oils from the orange zest. Break apart any clumps that form.
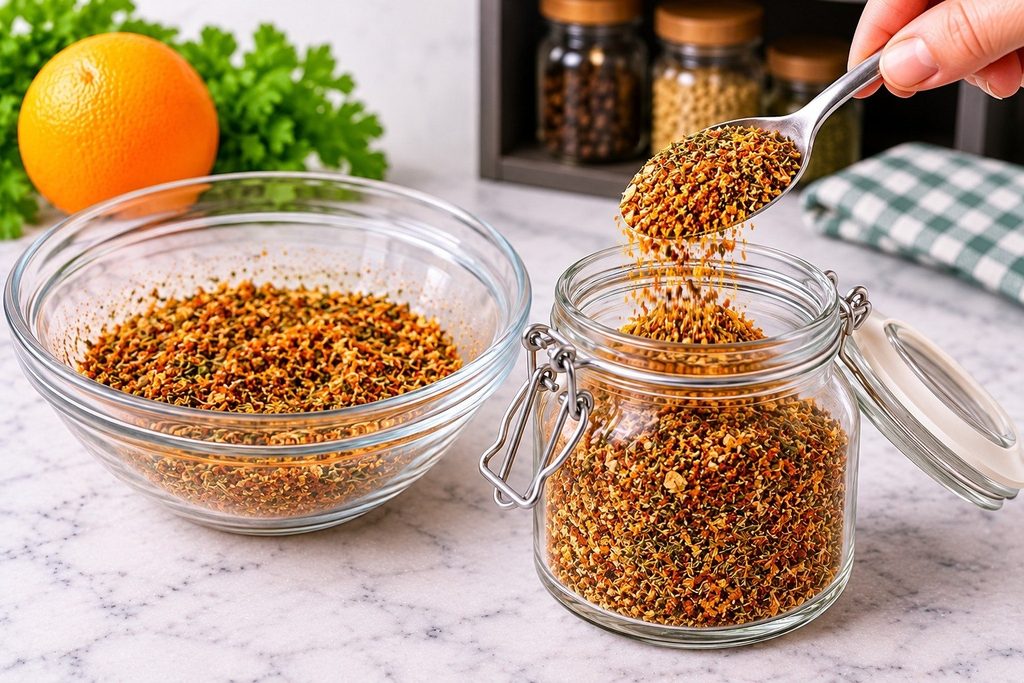
- Transfer and store: Spoon the finished seasoning into a clean, airtight container. Keep it in a cool, dry, dark place until you are ready to use it.
How to Use Montreal Chicken Seasoning
This seasoning is not just for grilled chicken. Its garlic, pepper, herb, and citrus flavors work with many everyday foods.
Seasoning for Grilled Chicken
For a simple grilled chicken dinner, use about 2 tablespoons of seasoning for 1 to 1¼ pounds of boneless chicken. Add 2 teaspoons of olive oil and toss until the chicken is evenly coated.
Preheat your grill and cook the chicken until the thickest part reaches 165°F (74°C) internally. Cooking time depends on the thickness of the pieces and your grill. Before slicing and serving, let the chicken rest for approximately five minutes.
Seasoning for Vegetables and Other Meats
Sprinkle this blend over potatoes, carrots, zucchini, bell peppers, or broccoli before roasting or grilling. A little olive oil helps the seasoning stick and gives the vegetables a nice coating.
You can also use it on shrimp, fish, pork chops, and beef roasts. Start with a small amount, then add more according to your taste.
Making a Quick Marinade or Dip
For a quick marinade, mix 1 tablespoon of seasoning with 2 tablespoons of olive oil and 1 tablespoon of vinegar. Coat your chicken and refrigerate it while you prepare the rest of your meal.
For an easy dip, stir a small amount into sour cream. Let it sit for a few minutes so the flavors can blend, then serve with fresh vegetables or roasted potatoes.
Tips for the Best Montreal Chicken Seasoning
- Use fresh spices because older spices eventually lose their flavor and scent.
- Measure carefully: Too much black pepper or salt can overpower the herbs.
- Choose dehydrated ingredients: Dried garlic and onion pieces provide a better texture than powders.
- Use fresh orange zest: It gives the blend a bright citrus flavor.
- Break up clumps: Stir the mixture again before storing if the orange zest causes clumps.
- Adjust the heat: Add red pepper flakes if you enjoy a little extra spice.
How to Store Homemade Montreal Chicken Seasoning
Transfer the seasoning to a clean, airtight glass jar or spice container. Keep it away from sunlight, heat, and moisture. A kitchen cabinet or pantry is usually a good storage spot.
Because this recipe contains fresh orange zest, I recommend using it within 3 months for the best quality. Always use a clean, dry spoon when taking seasoning from the jar. If you notice an unusual smell, visible mold, or signs of spoilage, discard the mixture.
Frequently Asked Questions
Is Montreal Chicken Seasoning the Same as Montreal Steak Seasoning?
No. Both blends contain garlic, onion, and black pepper, but Montreal Chicken Seasoning usually includes more herbs and citrus flavors. Rosemary, thyme, and orange zest give it a slightly fresher taste.
What Does Montreal Chicken Seasoning Taste Like?
It has a savory, garlicky, and peppery flavor with earthy herbs and a light citrus touch. Paprika adds mild sweetness, while coriander gives the blend extra depth.
Can I Use Garlic Powder Instead of Dried Garlic?
Yes. Replace 2 tablespoons of dehydrated garlic with 1 tablespoon of garlic powder. You can make the same adjustment when replacing dehydrated onion with onion powder.
Can I Make Montreal Chicken Seasoning Without Salt?
Yes. Simply leave out the salt and prepare the rest of the recipe as directed. You can add salt separately when cooking so you have better control over the flavor.
Is Montreal Chicken Seasoning Spicy?
This recipe has a mild peppery flavor rather than strong heat. You can add red pepper flakes or Aleppo pepper if you want a spicier seasoning.
How Much Seasoning Should I Use for Chicken?
Start with about 1 to 2 tablespoons for every pound of chicken, depending on your taste. To ensure that the spice coats the meat evenly, add a small amount of olive oil.
Can I Use This Seasoning on Vegetables and Seafood?
Absolutely! It works well with shrimp, fish, potatoes, carrots, zucchini, and other vegetables. Adjust the amount depending on the food and your preferred flavor.
How Long Does Homemade Montreal Chicken Seasoning Last?
This version is best used within 3 months because it contains fresh orange zest. Keep it somewhere dry, cool, and dark in an airtight container.
Homemade Montreal Chicken Seasoning Recipe Card
Prep Time: 10 minutes
Cook Time: 0 minutes
Total Time: 10 minutes
Yield: About ½ cup (4 oz.)
Course: Seasoning, Spice Blend
Cuisine: Canadian-inspired
Servings: Approximately 24 teaspoons
Ingredients
- 3 tablespoons dehydrated onion
- 2 tablespoons dehydrated garlic
- 2 teaspoons ground black pepper
- 2 teaspoons salt
- ½ teaspoon ground coriander
- ½ teaspoon ground rosemary
- ½ teaspoon ground thyme
- ½ teaspoon paprika
- Zest of 1 orange
Instructions
- Add dehydrated onion, garlic, black pepper, salt, coriander, rosemary, thyme, and paprika to a medium bowl.
- Add the orange zest and whisk until everything is evenly combined.
- Let the mixture rest for 20 to 30 minutes, then break apart any clumps.
- Transfer to a clean, airtight spice jar.
- Store in a cool, dry, dark place and use within 3 months for the best quality.
Recipe Note: For a milder citrus flavor, start with half the orange zest. If using garlic or onion powder instead of dehydrated pieces, use half the listed amount.
Final Thoughts
Homemade Montreal Chicken Seasoning is an easy way to bring bold, savory flavor to your everyday meals. With simple pantry spices, fresh orange zest, and just 10 minutes of preparation, you can make a flavorful blend without relying on store-bought mixes. I love how easily it works with grilled chicken, roasted vegetables, seafood, and pork. Make a batch, store it in your spice cabinet, and enjoy deliciously seasoned meals whenever you need them!

Introduction
Italian chicken pasta is a comforting, flavorful meal that brings together tender chicken, perfectly cooked pasta, garlic, herbs, tomatoes, and Parmesan in a rich, savory sauce. It is the kind of dinner that feels special enough for guests but is simple enough for a busy weeknight. The creamy sauce, juicy chicken, and Italian-inspired seasonings make every bite satisfying.
This Italian chicken pasta recipe uses straightforward ingredients and simple cooking techniques, so you do not need advanced culinary skills. Season and sear the chicken until golden, while the pasta cooks separately. Then combine everything with a flavorful sauce that coats the pasta beautifully. With a few practical tips, you can have a homemade pasta dinner on the table in around 35 minutes.
Why You’ll Love This Italian Chicken Pasta Recipe
There are plenty of reasons to add this Italian chicken pasta to your regular dinner rotation:
- Easy to prepare: The recipe uses basic ingredients and uncomplicated steps.
- Ready in about 35 minutes: It works well for busy evenings.
- Rich and flavorful: Garlic, Italian herbs, Parmesan, and chicken create a delicious combination.
- Family-friendly: The creamy sauce and tender chicken appeal to both adults and children.
- Customizable: You can easily add vegetables, adjust the spice level, or change the pasta.
- Great for leftovers: It reheats well when stored and warmed correctly.
Italian Chicken Pasta Ingredients

For approximately 4 servings, you will need:
- 12 ounces (340 g) penne or fettuccine pasta
- 1 pound (450 g) boneless, skinless chicken breasts
- 2 tablespoons olive oil
- 3 cloves garlic, finely minced
- 1 cup heavy cream
- ½ cup chicken broth
- ¾ cup freshly grated Parmesan cheese
- 1 teaspoon Italian seasoning
- ½ teaspoon paprika
- ½ teaspoon salt, or to taste
- ¼ teaspoon black pepper
- ½ teaspoon red pepper flakes, optional
- 1 cup cherry tomatoes, halved
- 2 cups fresh spinach, optional
- 1 tablespoon chopped fresh parsley
- 2 tablespoons butter
Italian Chicken Pasta Equipment Needed
You only need a few basic kitchen tools:
- Large pot for boiling pasta
- Large skillet or frying pan
- Colander
- Cutting board
- Sharp knife
- Measuring cups and spoons
- Wooden spoon or spatula
- Grater for Parmesan
Step-by-Step Instructions for Italian Chicken Pasta
1. Prepare the Chicken
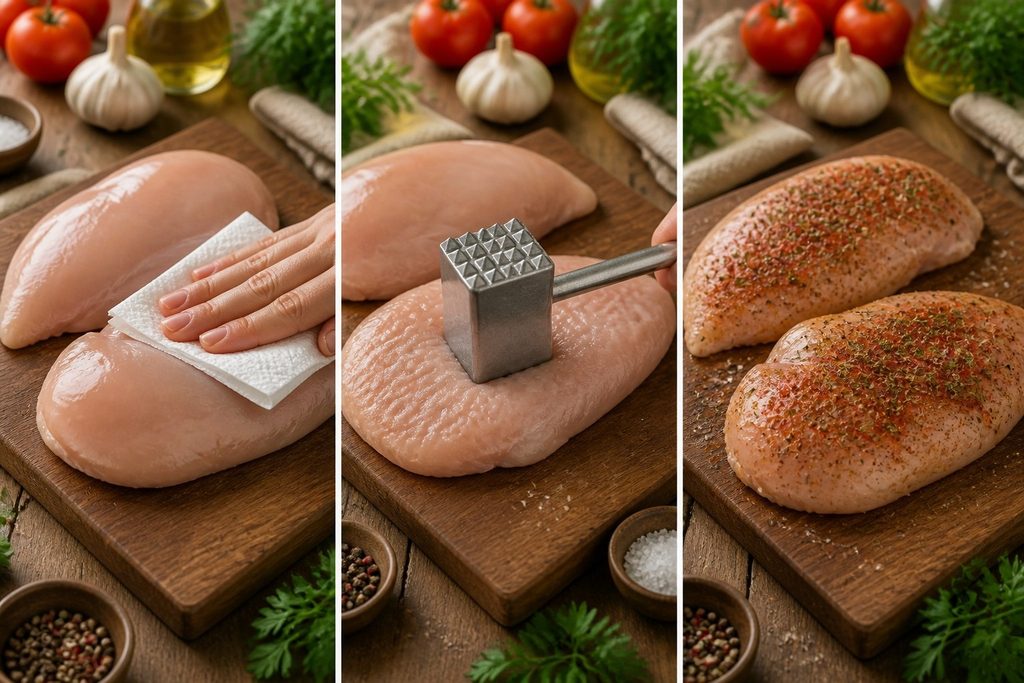
Pat the chicken breasts dry with paper towels. If they are particularly thick, carefully pound them to an even thickness so they cook more consistently.
Season both sides with Italian seasoning, paprika, salt, and black pepper. Let the chicken sit for a few minutes while you prepare the other ingredients.
2. Cook the Pasta
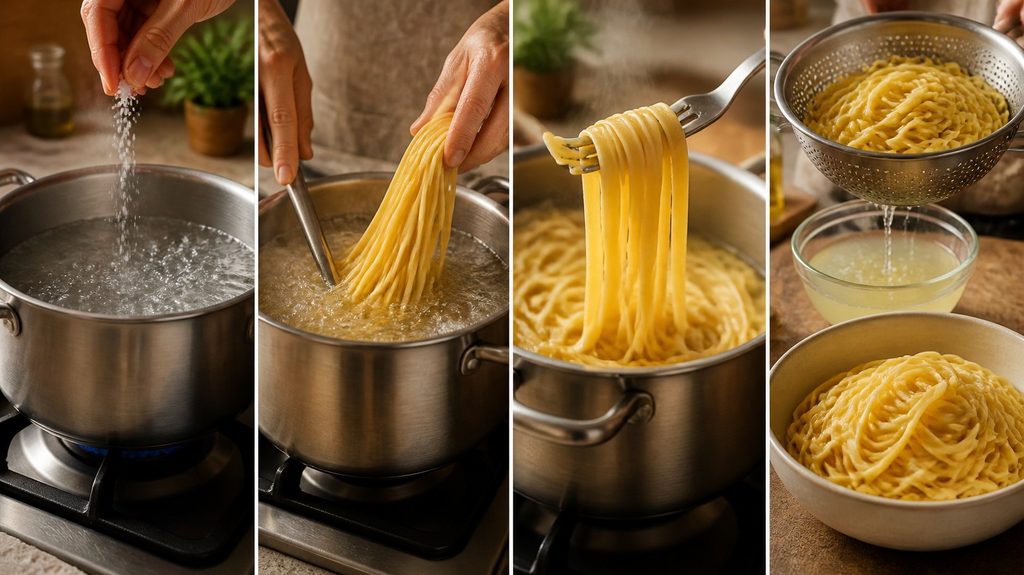
For pasta making add small amount of salt in water and boil pasta. Add the pasta and cook according to the package directions until al dente.
Before draining, reserve about ½ cup of pasta water. Drain the pasta and set it aside.
The reserved pasta water can help loosen the sauce later if it becomes too thick.
3. Sear the Chicken
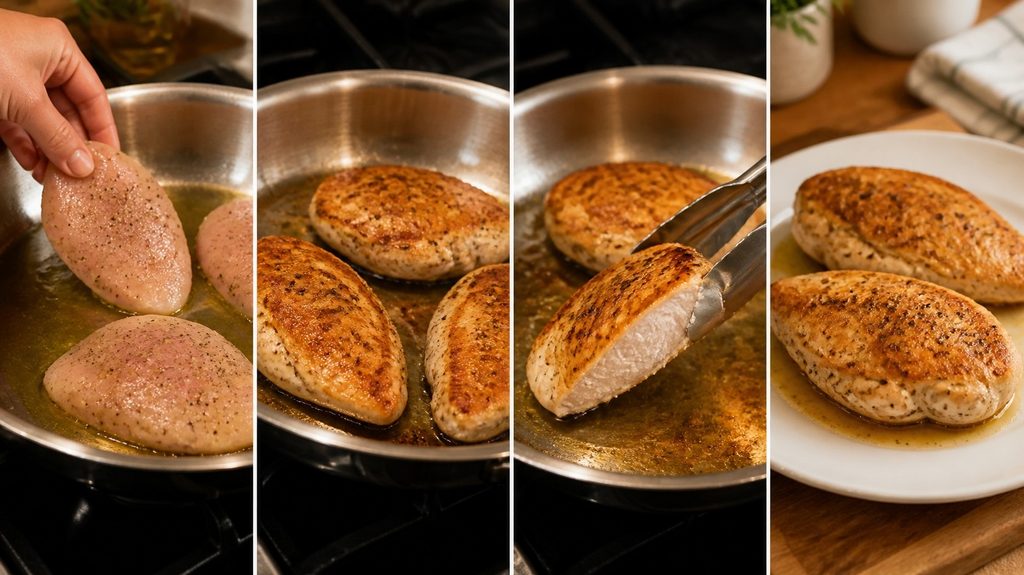
Heat the olive oil in a large skillet over medium-high heat. Add the seasoned chicken and cook for approximately 4–6 minutes per side, depending on thickness.
The outside should become golden brown, and the chicken should be cooked through. For food safety, chicken should reach an internal temperature of 165°F (74°C).
Transfer the chicken to a clean plate and allow it to rest for a few minutes before slicing.
4. Make the Italian Pasta Sauce

Reduce the heat to medium and add the butter to the same skillet. Once melted, add the minced garlic and cook for about 30 seconds until fragrant.
Pour in the chicken broth and gently scrape the browned bits from the bottom of the skillet. These bits add extra flavor to the sauce.
Add the heavy cream and stir. Allow the mixture to simmer gently for 2–3 minutes.
5. Add Parmesan and Vegetables

Lower the heat and gradually stir in the Parmesan cheese. Continue stirring until it melts into a smooth, creamy sauce.
Add the halved cherry tomatoes and spinach, if using. Cook until the spinach wilts and the tomatoes become slightly tender.
Avoid boiling the sauce vigorously after adding Parmesan, as excessive heat can cause the cheese to become grainy.
6. Combine the Italian Chicken Pasta
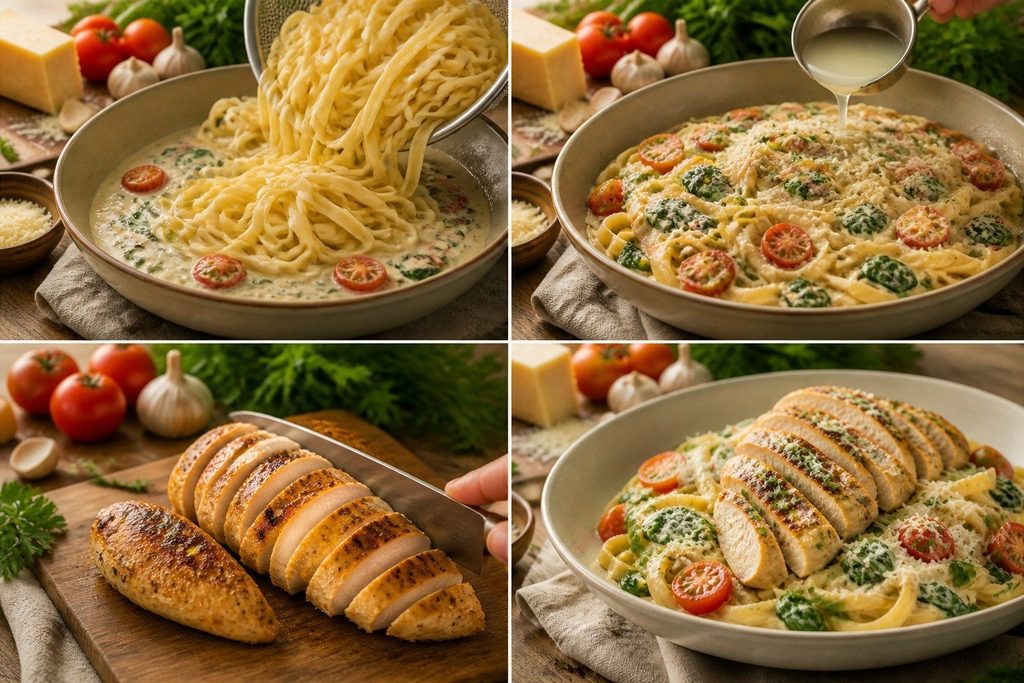
Add the cooked pasta to the skillet and toss gently until it is completely coated in the sauce.
If the sauce is too thick, add a small amount of reserved pasta water until you reach your preferred consistency.
Slice the rested chicken and arrange it over the pasta. Sprinkle with fresh parsley and additional Parmesan before serving.
Expert Tips for Italian Chicken Pasta
Get Better Flavor and Texture
- Do not overcrowd the skillet: Give the chicken enough space to brown properly.
- Use freshly grated Parmesan: It melts more smoothly than wide pre-shredded varieties.
- Salt the pasta water: This seasons the pasta from the inside as it cooks.
- Reserve pasta water: A small splash can help create a smoother, silkier sauce.
- Do not overcook the chicken: Remove it from the pan once it reaches a safe internal temperature.
- Let chicken rest: Resting helps the juices redistribute before slicing.
- Keep the sauce at a gentle simmer: High heat can make a cream-based cheese sauce separate.
Italian Chicken Pasta Recipe Variations
Make It Spicy
Add extra red pepper flakes or a pinch of cayenne pepper for a pleasant kick.
Add More Vegetables
Broccoli, mushrooms, bell peppers, zucchini, or sun-dried tomatoes can add flavor, texture, and color.
Make It Lighter
Use half-and-half instead of heavy cream. The resulting sauce will be lighter, although it may not be quite as rich.
Use Different Pasta
Penne, fettuccine, linguine, rigatoni, or spaghetti can all work. Choose a shape that holds plenty of sauce.
Make It Extra Cheesy
Add a little shredded mozzarella along with the Parmesan for an even creamier pasta dish.
Serving Suggestions for Italian Chicken Pasta
Serve the pasta immediately while the sauce is warm and creamy. A few simple side dishes can turn it into a complete meal.
Consider serving it with:
- Garlic bread or toasted Italian bread
- A simple green salad
- Roasted broccoli
- Steamed vegetables
- Sautéed mushrooms
- Fresh tomato and cucumber salad
Finish each serving with freshly grated Parmesan and chopped parsley.
Storage & Reheating
Allow leftover Italian chicken pasta to cool before transferring it to an airtight container. Refrigerate within a reasonable time and use leftovers within 3–4 days.
To reheat, place a portion in a skillet over low to medium heat. Add a splash of milk, cream, broth, or water and stir gently until heated through.
You can also microwave it in short intervals, stirring between each interval. Avoid overheating, because cream-based sauces can become thick or separate.
Common Mistakes to Avoid
- Overcooking the pasta: Cook it until al dente, so it does not become mushy when mixed with the sauce.
- Using high heat for the cream sauce: Gentle heat produces a smoother result.
- Skipping the pasta water: Reserved pasta water is useful for adjusting sauce consistency.
- Cutting chicken immediately: Let it rest briefly before slicing.
- Adding Parmesan over high heat: This can make the sauce grainy.
- Using too much seasoning: Parmesan and chicken broth can already contain salt, so taste before adding more.
- Overloading the pan: Too many ingredients at once can prevent the chicken from browning properly.
Frequently Asked Questions About Italian Chicken Pasta
1. Can I use chicken thighs instead of chicken breast?
Yes. Boneless, skinless chicken thighs work very well and tend to remain juicy because they contain more fat. Make sure the chicken reaches 165°F (74°C) internally.
2. Can I make Italian chicken pasta without heavy cream?
Yes. You can substitute half-and-half or use a combination of milk and a little extra Parmesan. The sauce will be lighter and may require more careful heat control.
3. What pasta works best for this recipe?
Penne and fettuccine are excellent choices, but linguine, spaghetti, rigatoni, or other pasta shapes can also be used.
4. Can I prepare Italian chicken pasta ahead of time?
You can prepare the chicken and sauce components ahead of time, but the pasta is best cooked close to serving. If preparing the complete dish ahead, keep some extra liquid available for reheating.
5. How can I make the sauce thicker?
Simmer the sauce gently for a few additional minutes, or add a little more Parmesan. You can also toss the pasta directly in the sauce to help it naturally thicken.
Nutrition Information for Italian Chicken Pasta
Approximate nutrition per serving, based on four servings:
- Calories: 650–700 kcal
- Protein: 40–45 g
- Carbohydrates: 55–60 g
- Fat: 28–32 g
- Fiber: 3–5 g
- Sodium: Varies depending on the chicken broth, Parmesan, and added salt
Nutrition values are estimates and can vary depending on the specific ingredients and portion sizes used.
Italian Chicken Pasta Recipe Card
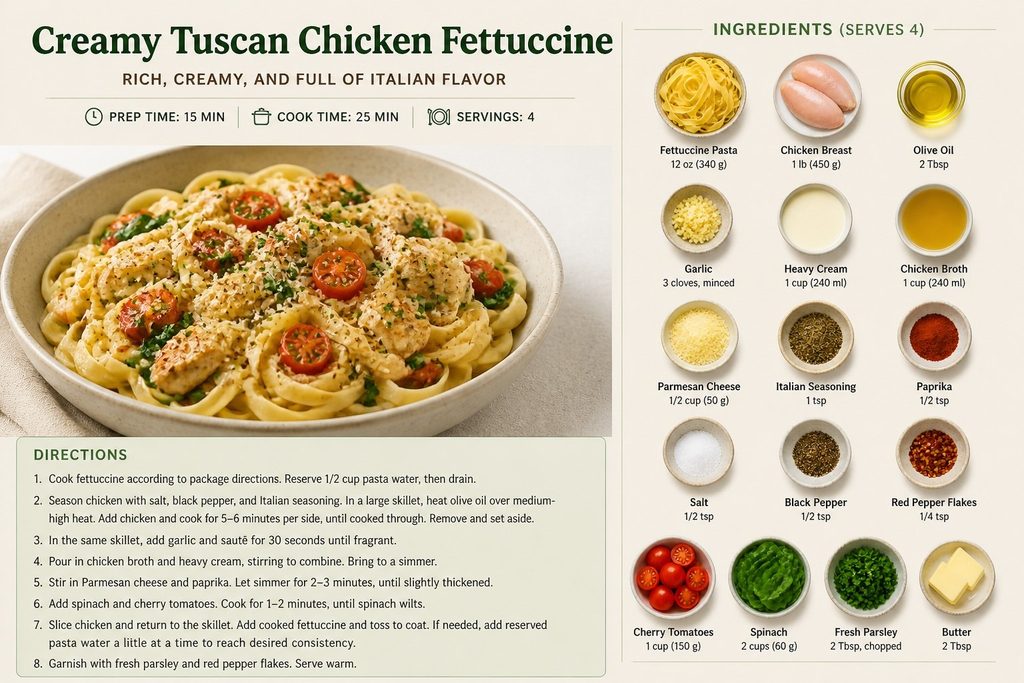
Prep Time: 15 minutes
Cook Time: 20 minutes
Total Time: About 35 minutes
Servings: 4
Course: Dinner
Cuisine: Italian-inspired
Ingredients
- 12 oz pasta
- 1 lb boneless, skinless chicken breasts
- 2 tbsp olive oil
- 3 garlic cloves, minced
- 1 cup heavy cream
- ½ cup chicken broth
- ¾ cup grated Parmesan
- 1 tsp Italian seasoning
- ½ tsp paprika
- ½ tsp salt
- ¼ tsp black pepper
- ½ tsp red pepper flakes, optional
- 1 cup cherry tomatoes
- 2 cups spinach, optional
- 2 tbsp butter
- 1 tbsp fresh parsley
Instructions
- Season the chicken with Italian seasoning, paprika, salt, and pepper.
- Cook the pasta in salted water until al dente. Reserve ½ cup pasta water, then drain.
- Sear the chicken in olive oil until golden and cooked through. Rest, then slice.
- Melt butter in the same skillet and sauté garlic briefly.
- Add chicken broth and scrape up the flavorful browned bits.
- Add cream and simmer gently.
- Stir in Parmesan until smooth.
- Add tomatoes and spinach, if using.
- Toss the cooked pasta through the sauce.
- Add pasta water if needed, top with sliced chicken and parsley, and serve warm.
Conclusion
This Italian chicken pasta is an easy way to make a comforting, restaurant-style dinner at home without complicated techniques. Tender seasoned chicken, creamy Parmesan sauce, garlic, herbs, and pasta come together in one satisfying meal.
The recipe is also flexible enough to suit your family’s preferences. Add vegetables for variety, increase the red pepper flakes for heat, or switch pasta shapes based on what you have in your pantry. Once you master the basic sauce, this Italian chicken pasta can become a reliable homemade dinner whenever you want something hearty, creamy, and flavorful.
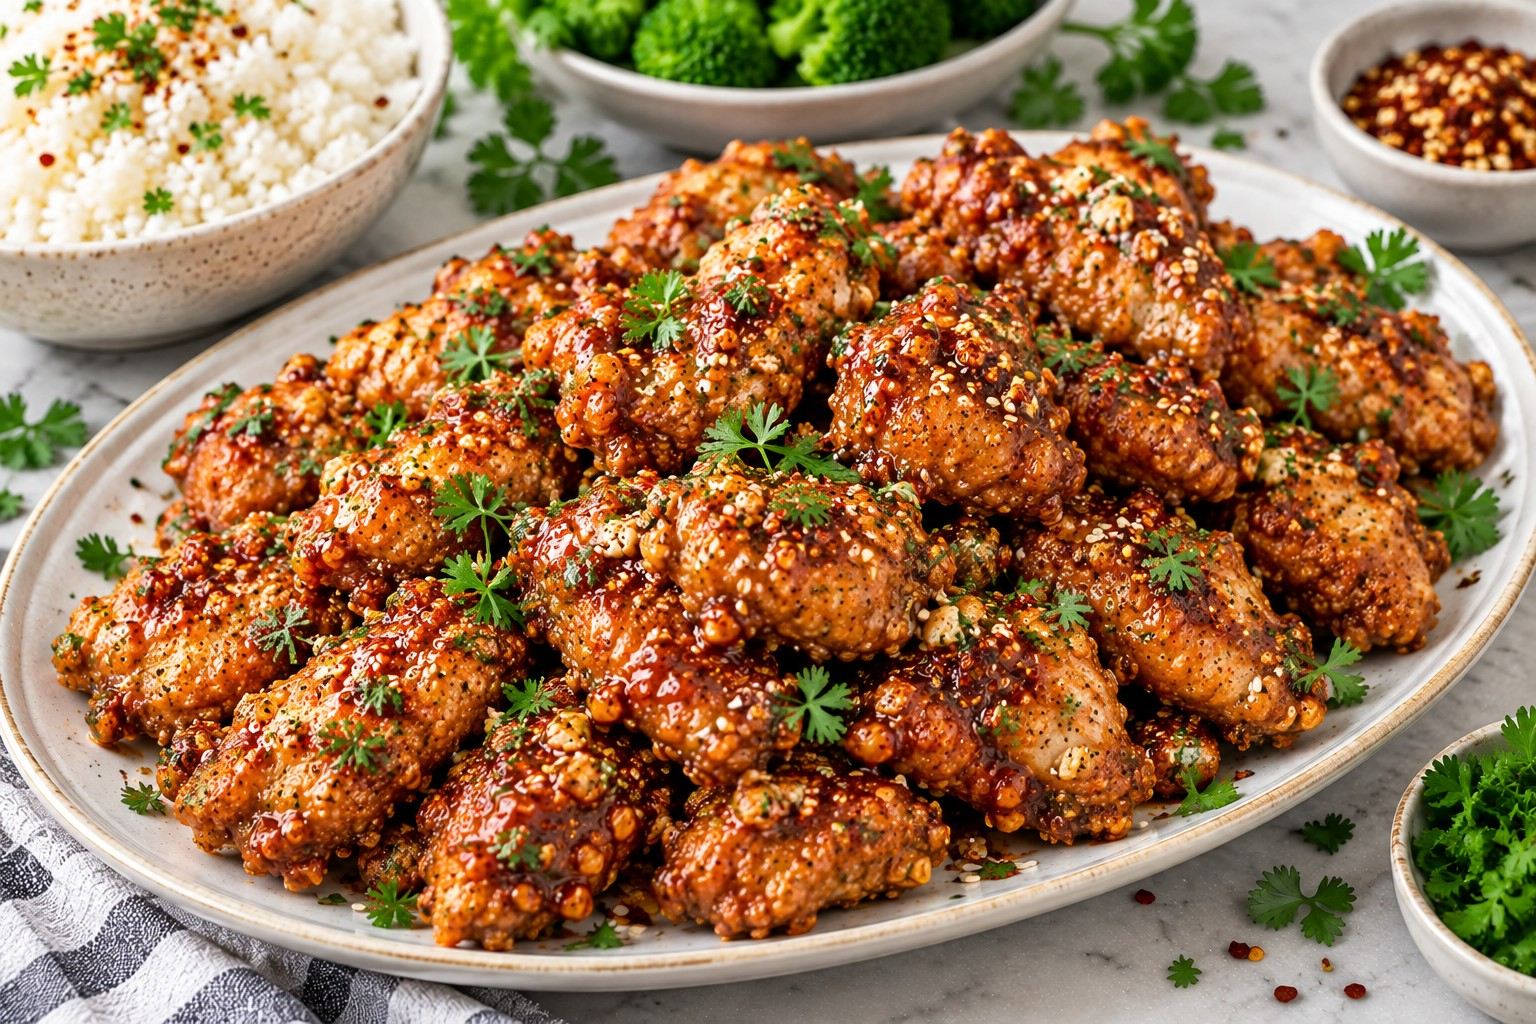
If you love crispy chicken coated in a sweet, spicy, and buttery sauce, this Hot Honey Garlic Chicken recipe is a must-try. It combines golden, crunchy chicken pieces with a delicious homemade hot honey garlic sauce that is sweet, slightly tangy, and full of flavour.
This easy chicken dinner is perfect for busy weeknights, family meals, weekend gatherings, or whenever you want something more exciting than ordinary chicken.
The best part? You can prepare this hot honey chicken recipe using simple ingredients that are easy to find in most American and British supermarkets.
Serve it with fluffy rice, crispy fries, roasted vegetables, or a fresh salad for a satisfying meal. You can also use the chicken to make delicious sandwiches, wraps, or rice bowls.
Whether you enjoy sweet and spicy chicken, crispy chicken tenders, or Hot honey garlic chicken, this recipe brings all those flavours together in one irresistible dish.
Why You’ll Love This Hot Honey Garlic Chicken
There are plenty of reasons to add this recipe to your weekly dinner menu.
- Crispy and juicy: The chicken develops a golden, crunchy coating while staying tender inside.
- Sweet and spicy: Honey balances the heat from hot sauce and red pepper flakes.
- Easy to prepare: The recipe uses everyday ingredients and straightforward cooking steps.
- Perfect for dinner: Serve it with rice, potatoes, vegetables, or your favourite side dish.
- Customizable heat: Adjust the amount of hot sauce and chilli flakes to suit your taste.
- Great for meal ideas: Use leftovers in sandwiches, wraps, salads, or lunch bowls.
Ingredients for Hot Honey Garlic Chicken

This recipe makes four servings.
For the Crispy Chicken
- 1 lb (450 g) boneless, skinless chicken breast or chicken thighs
- 1 cup (125 g) all-purpose flour
- ½ cup (60 g) cornstarch
- 1 large egg
- ½ cup (120 ml) milk or buttermilk
- 1 teaspoon garlic powder
- 1 teaspoon paprika
- ½ teaspoon onion powder
- ½ teaspoon salt
- ½ teaspoon black pepper
- Oil, for frying
For the Hot Honey Garlic Sauce
- ⅓ cup (110 g) honey
- 2 tablespoons unsalted butter
- 2 tablespoons hot sauce
- 3 cloves garlic, finely minced
- 1 teaspoon red pepper flakes, or to taste
- 1 tablespoon apple cider vinegar
- ¼ teaspoon salt, or to taste
For Garnishing
- 1 tablespoon chopped fresh parsley
- 1 teaspoon sesame seeds, optional
- Extra red pepper flakes, optional
Equipment You’ll Need
- Large mixing bowl
- Two shallow bowls
- Whisk
- Sharp knife and cutting board
- Large frying pan or deep skillet
- Tongs
- Paper towels or a wire rack
- Small saucepan
How to Make Hot Honey Garlic Chicken
Follow these simple steps to prepare crispy chicken with homemade hot honey garlic sauce.
Step 1: Prepare the Chicken
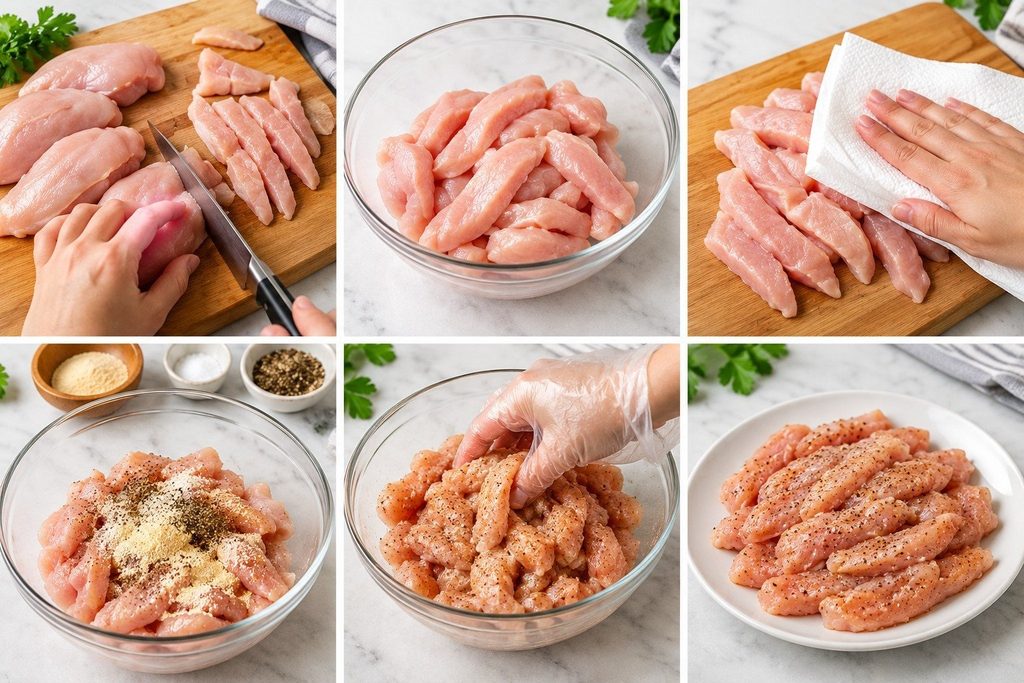
Cut the chicken thighs or breast into uniform strips or bite-sized chunks. Pat the chicken dry using paper towels. This promotes a crispy texture and aids in the coating’s appropriate adhesion. Season the chicken lightly with a little salt, black pepper, and garlic powder.
Instead of chopping the chicken into bite-sized pieces, cut it into long strips if you prefer chicken tenders.
Step 2: Prepare the Coating
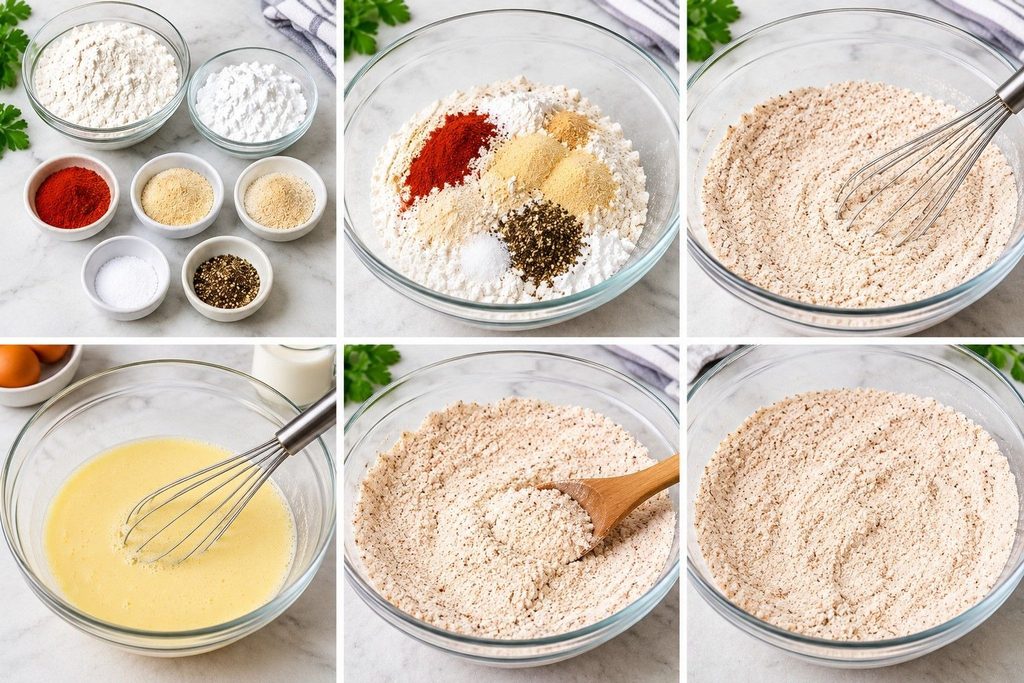
Mix the flour, cornstarch, paprika, onion powder, garlic powder, salt, and black pepper in a shallow basin. Mix everything until evenly combined.
In another bowl, whisk the egg and milk together until smooth. The flour and cornstarch combination helps create a crunchy coating, while the egg mixture helps the coating stick to the chicken.
Step 3: Coat the Chicken
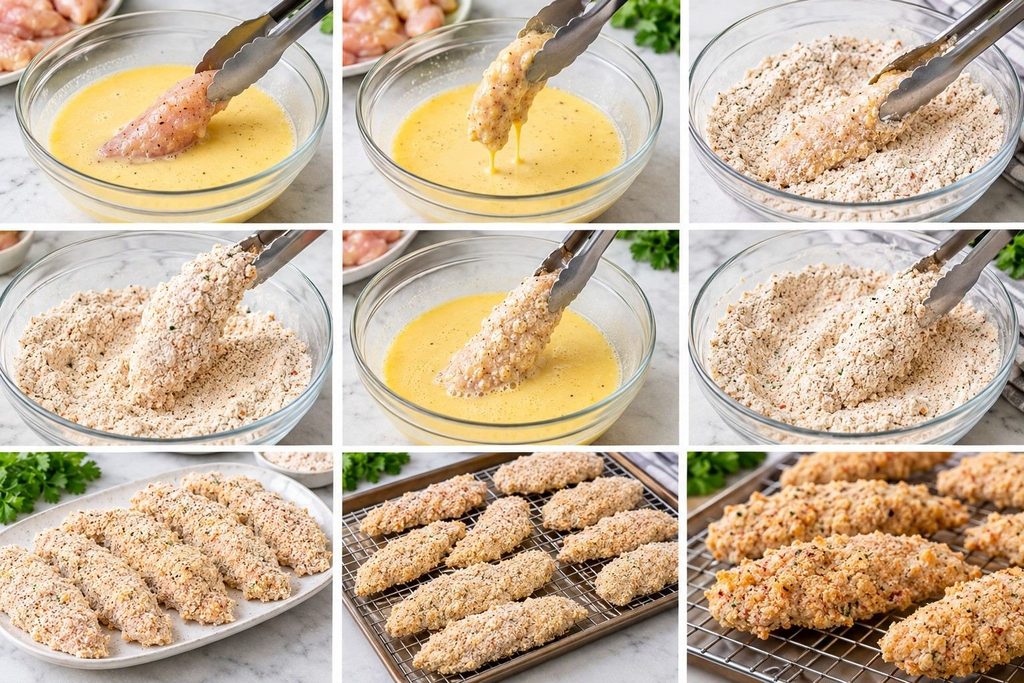
Dip each chicken piece into the egg and milk mixture. Allow any excess liquid to drip off. Next, transfer the chicken into the flour mixture and coat it thoroughly. Press the flour mixture gently onto the chicken to help it adhere.
Re-dip the chicken into the egg mixture and then again into the flour mixture for an additional crispy coating. Arrange the coated chicken pieces on a wire rack or platter.
Step 4: Fry the Chicken Until Crispy
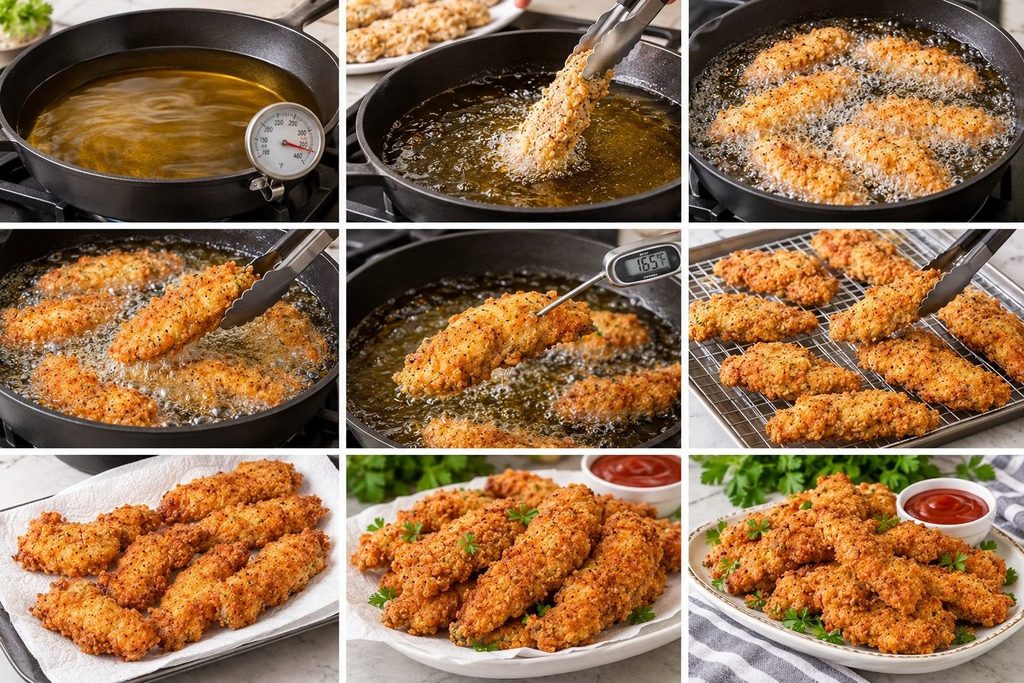
Heat approximately 1 inch of cooking oil in a large skillet over medium heat.The oil should reach approximately 350°F (175°C).
Carefully add the chicken pieces in batches. To avoid lowering the oil temperature and making the coating mushy, avoid packing the pan too full.
Small chicken pieces should be fried for around 4 to 6 minutes, rotating occasionally, until they are cooked through and golden brown. Larger chicken strips may require additional cooking time.
Use a food thermometer to find the thickest area of the chicken. The internal temperature must reach 165°F (74°C). Place the cooked chicken on a paper towel-lined platter or a wire rack. Allow excess oil to drain.
Step 5: Make the Hot Honey Garlic Sauce
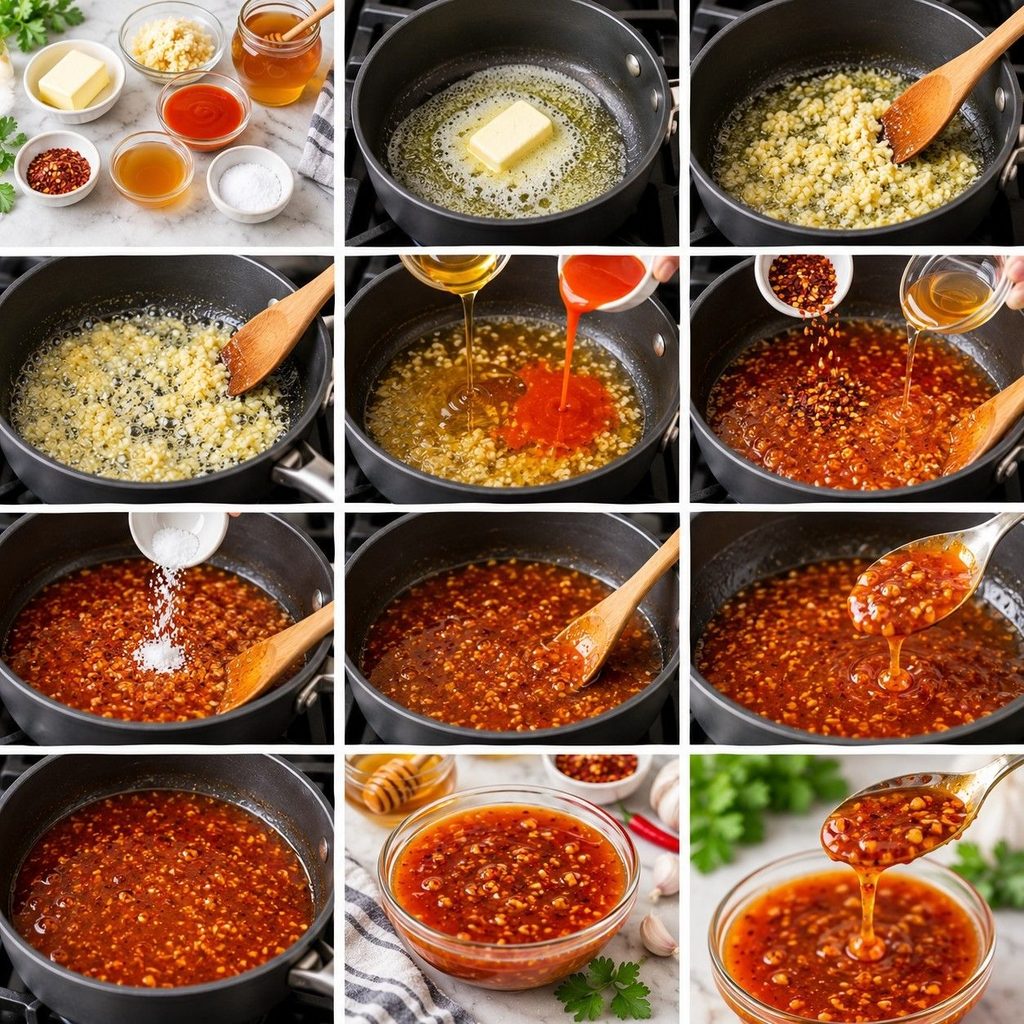
While the chicken is cooking, prepare the sauce. Add the butter to a small saucepan over low heat. Once the butter melts, add the minced garlic.
Cook for approximately 30–45 seconds, stirring continuously. Avoid browning the garlic, as it can become bitter. Add the honey, hot sauce, red pepper flakes, apple cider vinegar, and salt.
Give the sauce a little stir and let it warm for one to two minutes. Do not boil the sauce for too long. The honey can become overly thick and sticky. Taste the sauce and adjust the flavors as necessary. For more sweetness, add a little extra honey.
For more heat, add additional hot sauce or red pepper flakes. For extra tanginess, add a small splash of apple cider vinegar.
Step 6: Toss the Crispy Chicken in the Sauce
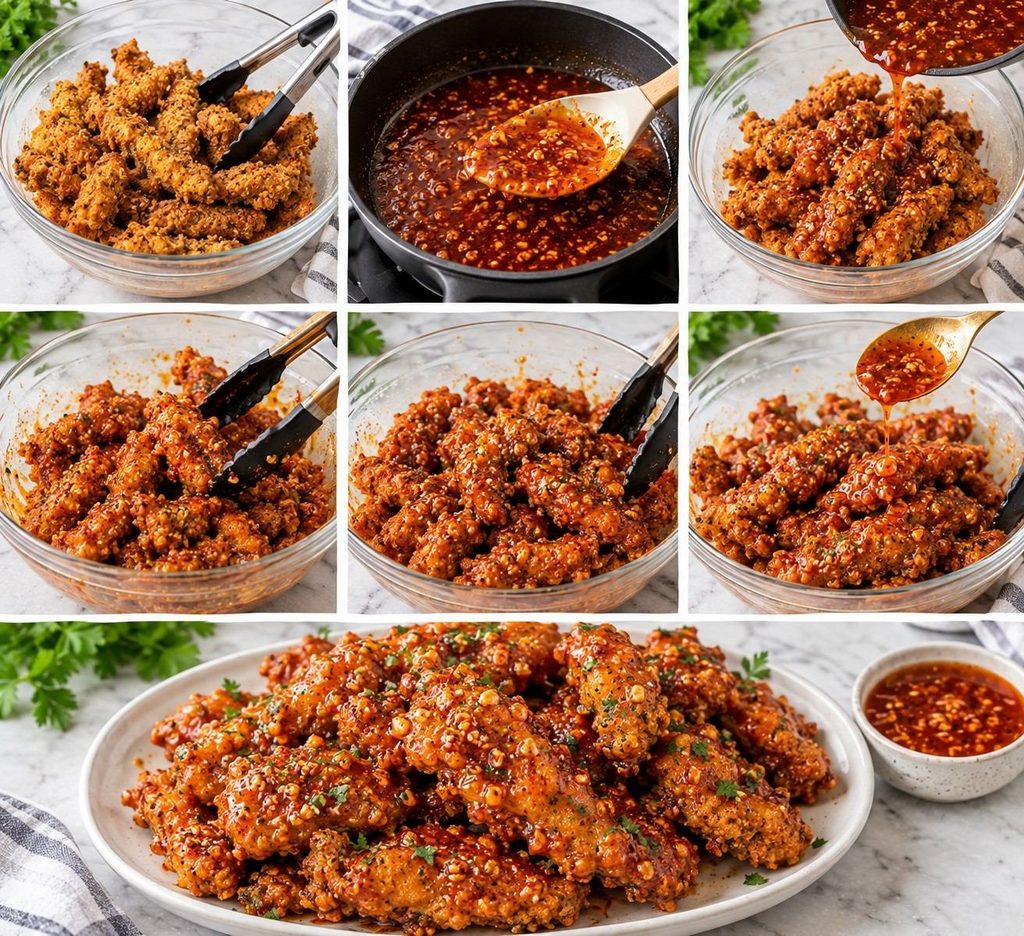
Put the newly cooked chicken in a big mixing basin. Cover the chicken with the heated honey garlic sauce. Gently toss until every piece is evenly coated.
For the crispiest texture, add the sauce immediately before serving rather than letting the chicken sit in it for too long.
Just before serving, save aside some additional sauce and sprinkle it over the chicken if you would like.
Step 7: Garnish and Serve
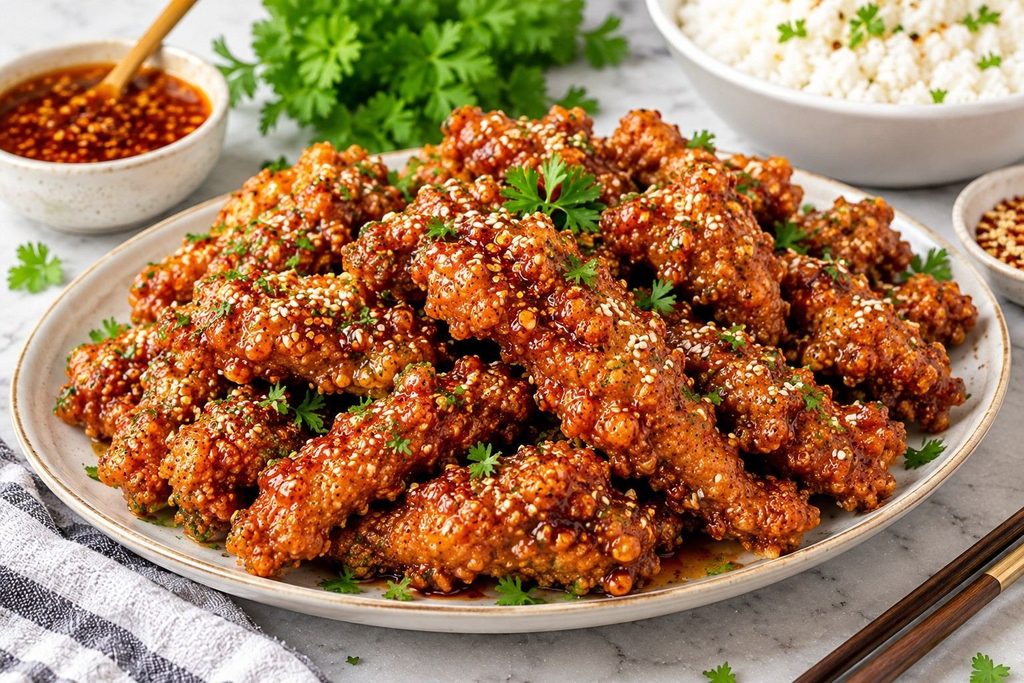
Place the hot garlic chicken with honey on a platter for serving. Add more red pepper flakes, sesame seeds, or finely chopped fresh parsley. When the chicken is heated, crispy, and juicy, serve it right away.
Enjoy it with your favourite side dish for a delicious homemade dinner.
Tips for Making the Best Hot Honey Garlic Chicken
1. Use Chicken Pieces of Similar Size
Cutting the chicken into evenly sized pieces helps everything cook at the same rate.
This prevents smaller pieces from becoming dry while larger pieces are still cooking.
2. Keep the Oil at the Right Temperature
Oil that is too hot can burn the coating before the chicken cooks through.
The chicken may become oily if the oil is too cold. Use a thermometer when possible to maintain approximately 350°F (175°C).
3. Avoid Overcrowding the Pan
Fry the chicken in small batches.
This allows the oil temperature to remain steady and helps the coating become crispy.
4. Make the Sauce Just Before Serving
The greatest hot honey garlic sauce is made fresh. Toss the chicken in the sauce immediately before serving to maintain the best texture.
5. Adjust the Heat to Your Preference
If you prefer mild flavours, use less hot sauce and skip the red pepper flakes. Add some cayenne pepper or extra chili flakes for a hotter version.
Air Fryer Hot Honey Garlic Chicken
If you prefer a lighter cooking method, you can make this recipe in an air fryer.
Prepare the chicken and coating as directed. Preheat the air fryer to 400°F (200°C).
Place the breaded chicken pieces in the air fryer basket in a single layer. Lightly spray the chicken with cooking oil.
Depending on the size and thickness of the chicken pieces, air fry for 10 to 15 minutes, rotating halfway through. Check that the internal temperature reaches 165°F (74°C).
Prepare the hot honey garlic sauce separately. Toss the cooked chicken in the sauce just before serving.
Oven-Baked Hot Honey Garlic Chicken
This recipe can also be made in the oven. Preheat the oven to 425°F (220°C). Arrange the coated chicken pieces on a lightly greased baking sheet or wire rack. Spray the chicken lightly with cooking oil.
Bake for approximately 18–25 minutes, depending on the size of the chicken pieces. Turn halfway through cooking if needed.
Make sure the chicken reaches 165°F (74°C) by checking its internal temperature. Toss with the freshly prepared sauce before serving.
What to Serve with Hot Honey Garlic Chicken
This spicy and sweet chicken goes nicely with many other sides.
Rice
Serve the chicken over steamed white rice, brown rice, or jasmine rice.
The rice absorbs the extra sauce and creates a satisfying dinner bowl.
Crispy Fries
French fries, potato wedges, or sweet potato fries are delicious alongside hot honey chicken.
Roasted Vegetables
Try roasted broccoli, carrots, green beans, or bell peppers for a colourful and balanced meal.
Fresh Salad
The richness of the sauce can be counterbalanced with a straightforward green salad of lettuce, cucumber, tomatoes, and a mild dressing.
Sandwiches and Wraps
Add the chicken to a brioche bun or tortilla with lettuce, sliced tomatoes, and mayonnaise for a tasty lunch.
Variations of Hot Honey Garlic Chicken
Hot Honey Chicken Tenders
Cut the chicken into long strips and follow the same coating and cooking instructions.
Serve the chicken tenders with ranch dressing, blue cheese dressing, or a creamy garlic dip.
Hot Honey Chicken Sandwich
Place the sauced chicken inside a toasted brioche bun.
Add lettuce, pickles, and a little mayonnaise for a delicious crispy chicken sandwich.
Hot Honey Chicken Rice Bowl
Add cooked rice to a bowl. Add shredded carrots, spring onions, cucumber slices, and hot honey chicken on top. Drizzle with extra sauce before serving.
Extra Spicy Hot Honey Chicken
To the sauce, add more red pepper flakes or cayenne pepper.
Garlic Parmesan Hot Honey Chicken
Take the sauce off the heat and stir in two tablespoons of freshly grated Parmesan cheese. Add more Parmesan and toss with the chicken.
Common Mistakes to Avoid for Hot Honey Garlic Chicken
Using Wet Chicken
The coating may not adhere correctly if there is too much moisture present. Before seasoning and coating, always pat the chicken dry.
Adding the Sauce Too Early
The coating may soften if the chicken is left in the sauce for an extended period of time. Toss immediately before serving.
Overcooking the Chicken
If a chicken breast is cooked for too long, it may turn dry. Use a food thermometer and remove the chicken once it reaches 165°F (74°C).
Burning the Garlic
Garlic cooks quickly. Keep the heat low and stir continuously while preparing the sauce.
Making the Sauce Too Thick
Honey thickens as it cools. If the sauce gets too thick, reheat it slowly and add a teaspoon of water at a time until the right consistency is achieved.
Storage and Reheating Instructions
How to Store Leftovers
Allow the chicken to cool slightly. Place leftovers in an airtight container and refrigerate within 2 hours of cooking.
You can keep it in the fridge for three to four days. For the best texture, store the chicken and extra sauce separately when possible.
How to Reheat
Depending on the size of the pieces, reheat the chicken in an air fryer at 350°F (175°C) for three to six minutes.
It can also be thoroughly heated by reheating it in an oven at 350°F (175°C). The coating might get softer if you use a microwave. Ensure leftovers are reheated to 165°F (74°C).
Frequently Asked Questions For Hot Honey Garlic Chicken
What is hot honey garlic chicken?
Hot honey garlic chicken is a chicken dish made with crispy or cooked chicken coated in a sweet, spicy, and savoury sauce prepared with honey, garlic, butter, and hot sauce.
Is hot honey garlic chicken spicy?
It can be mild, medium, or spicy depending on the amount of hot sauce and chilli flakes used. You can easily adjust the heat to suit your preference.
Can I use chicken thighs instead of chicken breast?
Yes. Boneless, skinless chicken thighs work well in this recipe and can remain juicy and tender. Cut them into evenly sized pieces before coating and cooking.
Can I make hot honey garlic chicken without frying?
Yes.
You can prepare it in an air fryer or oven. The texture may differ from deep-fried chicken, but the sweet and spicy sauce will still provide plenty of flavour.
Can I use store-bought hot honey?
Yes.
If you already have hot honey, you can use it instead of regular honey and hot sauce. Add the garlic, butter, and vinegar to balance the sauce.
How do I make the sauce less spicy?
Reduce the hot sauce and omit the red pepper flakes. You can also add a little extra honey to balance the heat.
Is hot honey garlic chicken good for meal prep?
Yes. Prepare the chicken and sauce separately and store them in airtight containers. Reheat the chicken and toss it with the sauce just before serving for the best texture.
What can I use instead of cornstarch?
You can use additional all-purpose flour, but the coating may not be as crisp. A combination of flour and cornstarch generally provides a lighter, crunchier texture.
Nutrition Information For Hot Honey Garlic Chicken
The following nutrition information is an estimate for one serving, assuming the recipe makes four servings.
| Nutrient | Approximate Amount |
| Calories | 520 kcal |
| Protein | 32 g |
| Carbohydrates | 48 g |
| Fat | 21 g |
| Sugar | 20 g |
| Fiber | 2 g |
| Sodium | 650 mg |
Actual nutrition values depend on the chicken cut, amount of oil absorbed during frying, ingredients, and portion size.
Printable Recipe Card: Hot Honey Garlic Chicken

Prep Time: 15 minutes
Cook Time: 20 minutes
Total Time: 35 minutes
Servings: 4
Course: Main Course, Dinner
Cuisine: American-Inspired
Cooking Method: Frying
Calories: Approximately 520 kcal per serving
Ingredients
For the Chicken:
- 450 g boneless chicken breast or thighs
- 125 g all-purpose flour
- 60 g cornstarch
- 1 large egg
- 120 ml milk
- 1 teaspoon garlic powder
- 1 teaspoon paprika
- ½ teaspoon onion powder
- ½ teaspoon salt
- ½ teaspoon black pepper
- Oil for frying
For the Sauce:
- 110 g honey
- 2 tablespoons butter
- 2 tablespoons hot sauce
- 3 garlic cloves, minced
- 1 teaspoon red pepper flakes
- 1 tablespoon apple cider vinegar
- ¼ teaspoon salt
Instructions
- Cut the chicken into evenly sized pieces and pat dry.
- Combine flour, cornstarch, garlic powder, paprika, onion powder, salt, and black pepper.
- Whisk the egg and milk in a separate bowl.
- Dip the chicken into the egg mixture and coat with the flour mixture.
- Heat oil to 350°F (175°C).
- Fry the chicken in batches until golden and cooked through, approximately 4–6 minutes for small pieces.
- Check that the chicken reaches an internal temperature of 165°F (74°C).
- Melt butter in a small saucepan over low heat.
- Add garlic and cook for 30–45 seconds.
- Stir in honey, hot sauce, red pepper flakes, vinegar, and salt.
- Warm the sauce for 1–2 minutes.
- Toss the crispy chicken with the sauce.
- Garnish with parsley or sesame seeds and serve immediately.
Notes
- Adjust the amount of hot sauce according to your taste.
- For extra crispy chicken, coat the pieces twice.
- For an air fryer version, cook at 400°F (200°C) until crispy and cooked through.
- Store leftovers in the refrigerator for up to 3–4 days.
Final Thoughts
This Hot Honey Garlic Chicken recipe is a delicious way to enjoy crispy chicken with a homemade sweet and spicy sauce.
It is easy enough for a weeknight dinner but flavourful enough to serve at a weekend gathering.
Whether you serve it with rice, fries, roasted vegetables, or inside a sandwich, this recipe offers a satisfying combination of crunchy chicken, buttery garlic, sweet honey, and spicy heat.
If you enjoy easy chicken recipes, save this recipe and try it for your next dinner.

Homemade Montreal Chicken Seasoning Recipe

Easy Fried Chicken Strips Recipe (Crispy & Golden)

Grilled Chicken Salad Recipe (Easy & Healthy)

Easy Pumpkin Bread Recipe with Cinnamon

Butternut Squash Soup Recipe: Easy, Creamy, and Delicious

Simple Fried Chicken Recipe : (Crispy and Juicy)

The Best Homemade BBQ Chicken Pizza Recipe 2026

Healthy Chicken Soup Recipe With Vegetables and Tender Chicken

Classic Chicken Salad Recipe – Creamy, Flavorful And Delicious

Huli Huli Chicken Recipe: Hawaiian-Style Grilled Chicken
-
 Chicken Recipes2 months ago
Simple Fried Chicken Recipe : (Crispy and Juicy)
-
 Baked Chicken2 months ago
The Best Homemade BBQ Chicken Pizza Recipe 2026
-
 Soups and Salad2 months ago
Healthy Chicken Soup Recipe With Vegetables and Tender Chicken
-
 Soups and Salad1 month ago
Classic Chicken Salad Recipe – Creamy, Flavorful And Delicious
-
 Chicken Recipes1 month ago
Huli Huli Chicken Recipe: Hawaiian-Style Grilled Chicken
-

 Chicken Recipes1 month ago
Chicken Biryani Recipe: Flavorful and Easy to Make
-

 Soups and Salad1 month ago
Homemade Cream of Chicken Soup Recipe 2026
-

 Cakes and Cupcakes1 month ago
Chocolate Lava Cakes Recipe with Delicious Center