Chicken Recipes
Simple Fried Chicken Recipe: Crispy, Juicy, and Easy

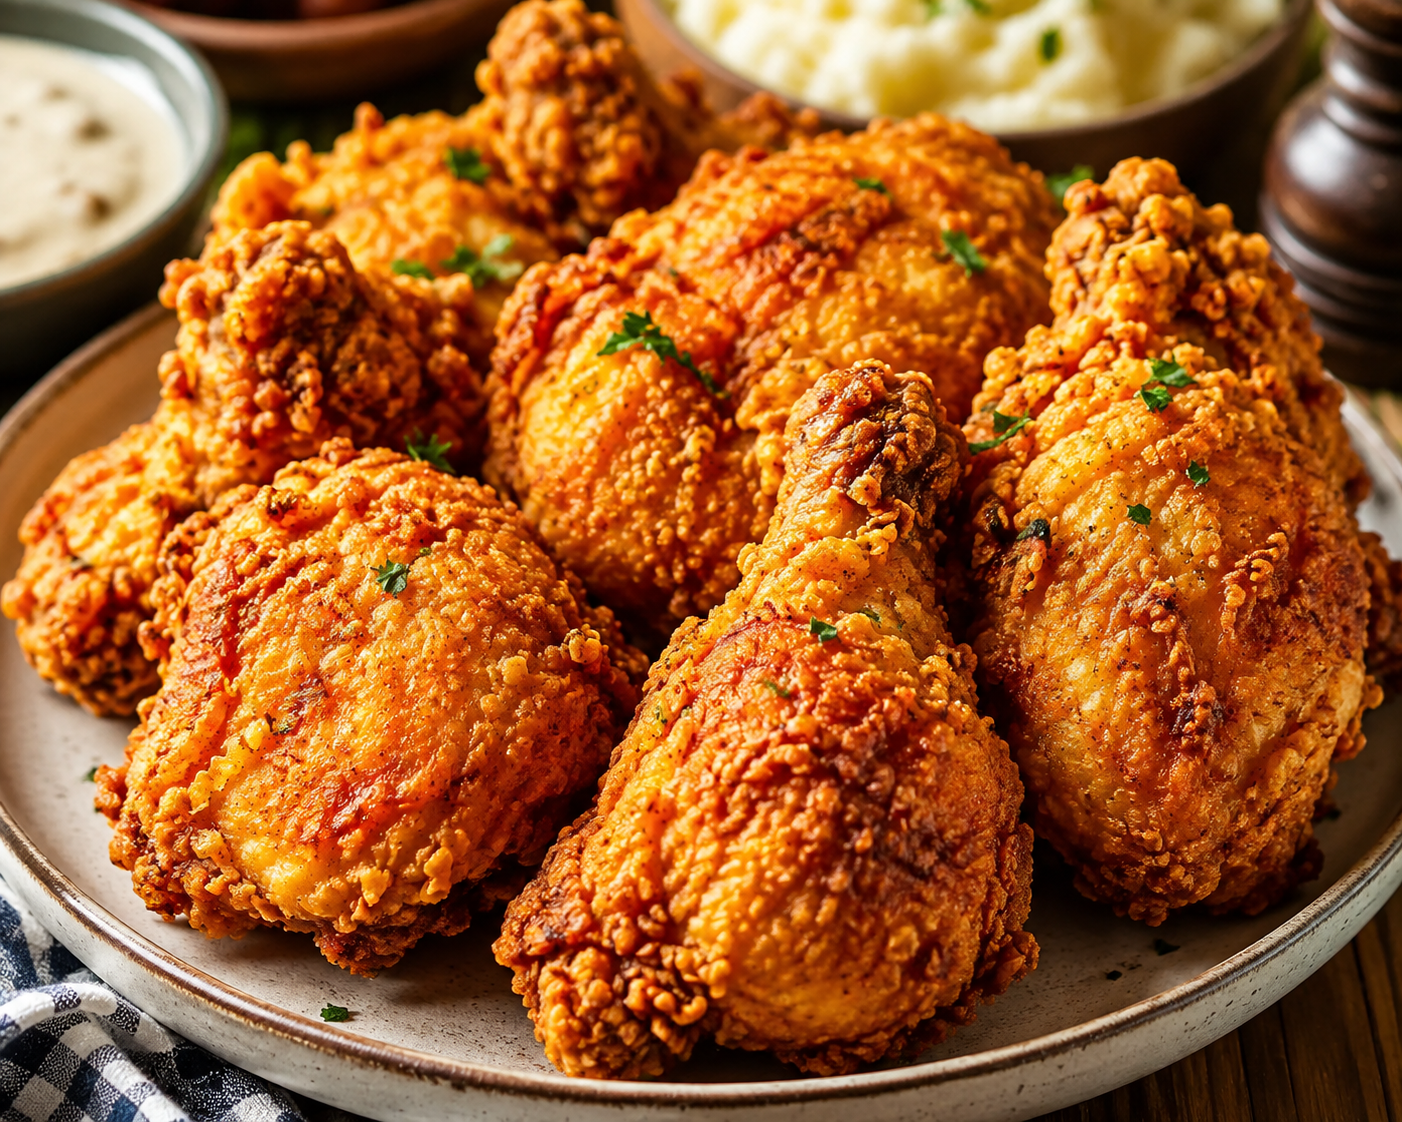
This simple fried chicken recipe proves that you do not need a long ingredient list to make a great dinner. With tender chicken, seasoned flour, a few basic spices, and hot oil, you can create golden, crispy chicken that feels like classic comfort food. The key is not complicated seasoning. It is using the right technique, keeping the oil at the proper temperature, and giving the chicken enough time to cook evenly.
I’ve found that the most reliable simple fried chicken recipes keep the process straightforward. Some versions use a whole chicken and just salt and pepper, while others use thin chicken breasts, buttermilk, egg, and a double flour coating. This recipe brings together the best practical ideas from both styles so you can make crisp, flavorful chicken at home without unnecessary steps. You’ll learn how to season the chicken, build a crunchy coating, control the frying temperature, check for doneness, and make an easy country gravy to serve alongside it.
Why You’ll Love This Simple Fried Chicken Recipe
There is a lot to like about this simple fried chicken recipe, especially when you want a satisfying family meal without complicated preparation.
- Simple ingredients: Chicken, flour, salt, pepper, and frying oil form the foundation.
- Crispy coating: A generous flour coating creates a golden crust with plenty of crunch.
- Juicy chicken: Proper oil temperature and careful cooking help keep the meat tender.
- Easy to customize: You can keep the seasoning basic or add garlic powder, hot sauce, or other spices.
- Flexible cooking methods: Use a large skillet, cast-iron skillet, or deep fryer.
- Great for family dinners: Fried chicken pairs naturally with mashed potatoes, vegetables, biscuits, and macaroni and cheese.
- Homemade gravy: Reserved frying oil can be turned into a creamy country gravy.
- Good hot or cold: Leftover chicken can be enjoyed chilled or gently reheated.
The biggest advantage is that the recipe teaches you a method rather than asking you to rely on a complicated spice blend. Once you understand how the coating and oil temperature work, you can use the same basic technique for different cuts of chicken.
Ingredients For Simple Fried Chicken Recipe
Main Ingredients
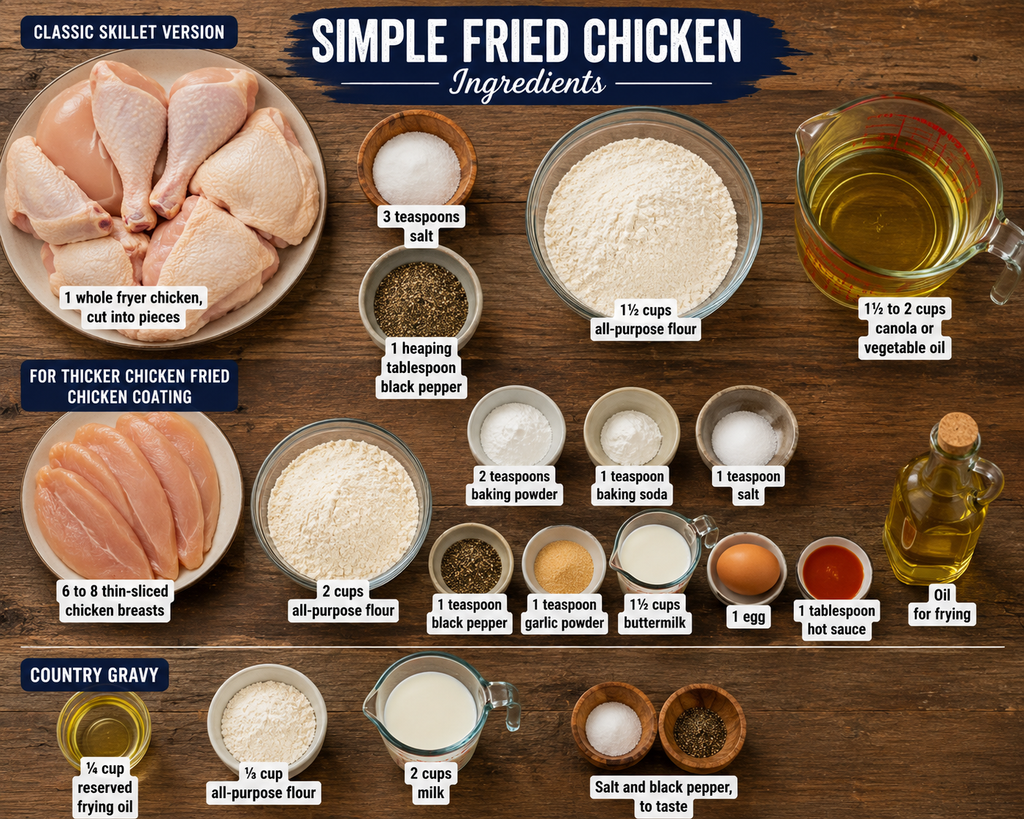
For a classic skillet version, you’ll need:
- 1 whole fryer chicken, cut into breasts, thighs, drumsticks, and wings
- 3 teaspoons salt
- 1 heaping tablespoon ground black pepper
- 1½ cups all-purpose flour
- 1½ to 2 cups canola or vegetable oil, depending on the skillet and number of batches
For a thicker chicken fried chicken coating, you can use:
- 6 to 8 thin-sliced chicken breasts
- 2 cups all-purpose flour
- 2 teaspoons baking powder
- 1 teaspoon baking soda
- 1 teaspoon salt
- 1 teaspoon black pepper
- 1 teaspoon garlic powder
- 1½ cups buttermilk
- 1 egg
- 1 tablespoon hot sauce
- Oil for frying
The country gravy requires:
- ¼ cup reserved frying oil
- ⅓ cup all-purpose flour
- 2 cups milk
- Salt and black pepper, to taste
Ingredient Notes & Substitutions for simple fried chicken recipe
Chicken: A whole fryer chicken gives you a traditional mix of bone-in pieces. Chicken breasts, thighs, drumsticks, and wings all work, but they do not cook at the same rate. Larger pieces usually need more time.
For a faster version, use thin-sliced chicken breasts. They are especially useful for chicken fried chicken because they cook quickly and give you evenly sized portions.
Flour: Regular all-purpose flour works perfectly. There is no need for a specialty flour.
Salt and pepper: The basic version uses only salt and black pepper. I recommend trying it this way first. The simple seasoning lets the chicken and crispy coating stand out.
Oil: Canola and vegetable oil are both suitable for frying. Use enough oil to create roughly a ½-inch layer when shallow frying in a skillet. If you are deep frying, the oil should not fill the pot more than halfway.
Buttermilk: Buttermilk is useful when making a thicker chicken fried chicken coating. It helps the second layer of flour stick to the chicken.
Hot sauce: Hot sauce adds flavor to the buttermilk mixture. You can reduce it or leave it out if you prefer a mild flavor.
Gravy fat: Reserved frying oil gives the gravy a savory taste. If you prefer not to use it, butter or bacon fat can be substituted.
Equipment Needed For Simple Fried Chicken Recipe
You do not need a large collection of special kitchen tools. Basic equipment is enough.
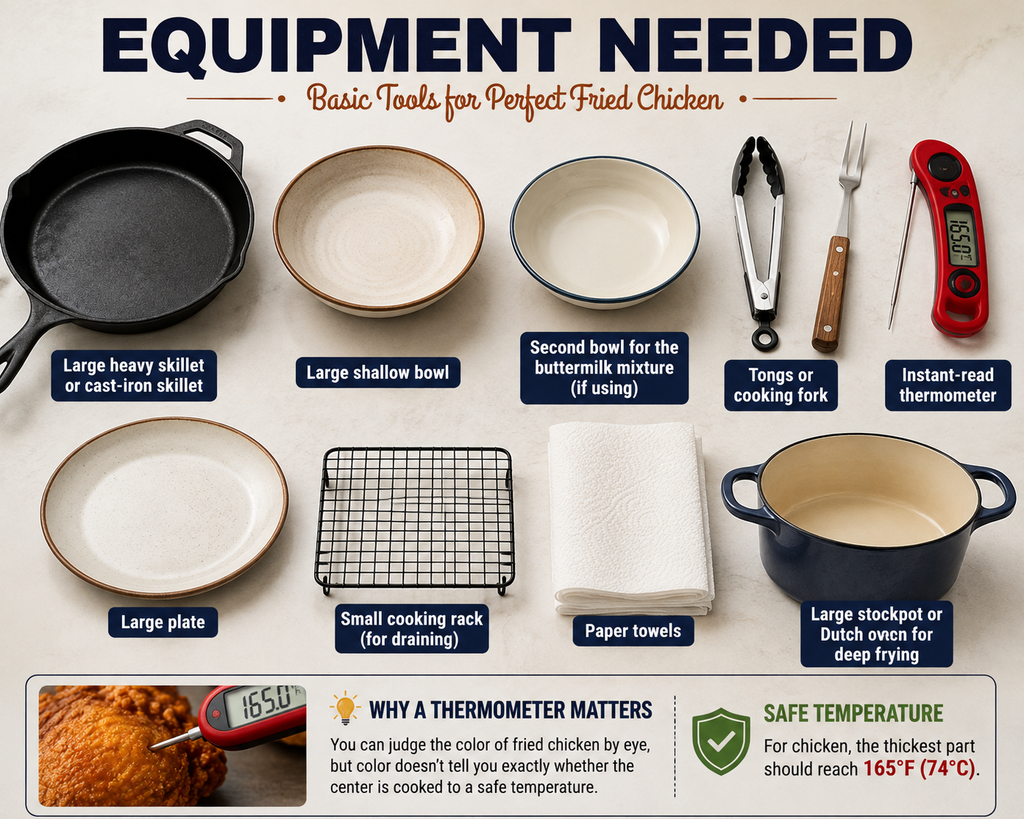
- Large heavy skillet or cast-iron skillet
- Large shallow bowl
- Second bowl for the buttermilk mixture, if using
- Tongs or cooking fork
- Instant-read thermometer
- Large plate
- Small cooking rack
- Paper towels
- Large stockpot or Dutch oven for deep frying
A thermometer is one tool I strongly recommend. You can judge the color of fried chicken by eye, but color does not tell you exactly whether the center has reached a safe temperature.
For chicken, the thickest part should reach 165°F (74°C).
Step-by-Step Instructions
1. Prepare and Season the Chicken for Simple Fried Chicken Recipe
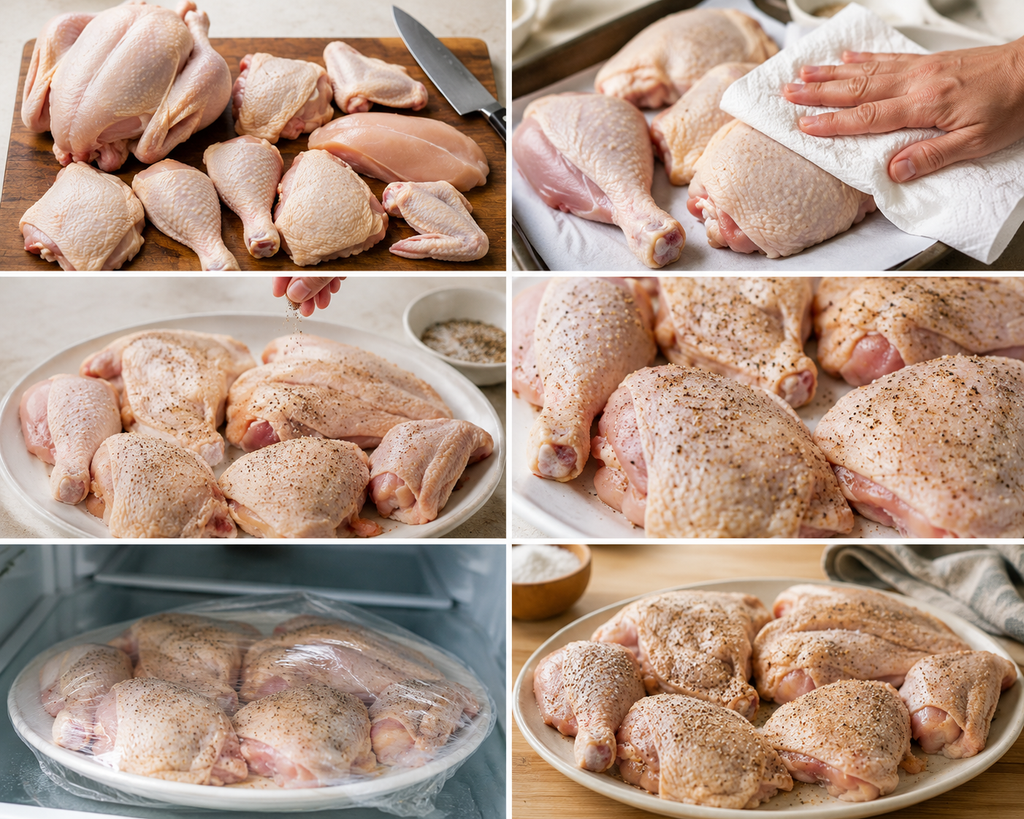
If you are using a whole fryer chicken, cut it into breasts, thighs, drumsticks, and wings. Remove any remaining feather pieces and unwanted organs if necessary.
Pat the chicken thoroughly dry with paper towels. This small step helps the flour coating stick properly.
Season both sides of every piece with salt and black pepper.
For deeper seasoning, cover the chicken and refrigerate it for about 2 hours. Take it out of the refrigerator and let it sit at room temperature for 30 to 60 minutes before frying. If you are short on time, you can season and coat the chicken immediately. The longer resting period simply gives the seasoning more time to work into the meat.
2. Prepare the Flour Coating for Simple Fried Chicken Recipe
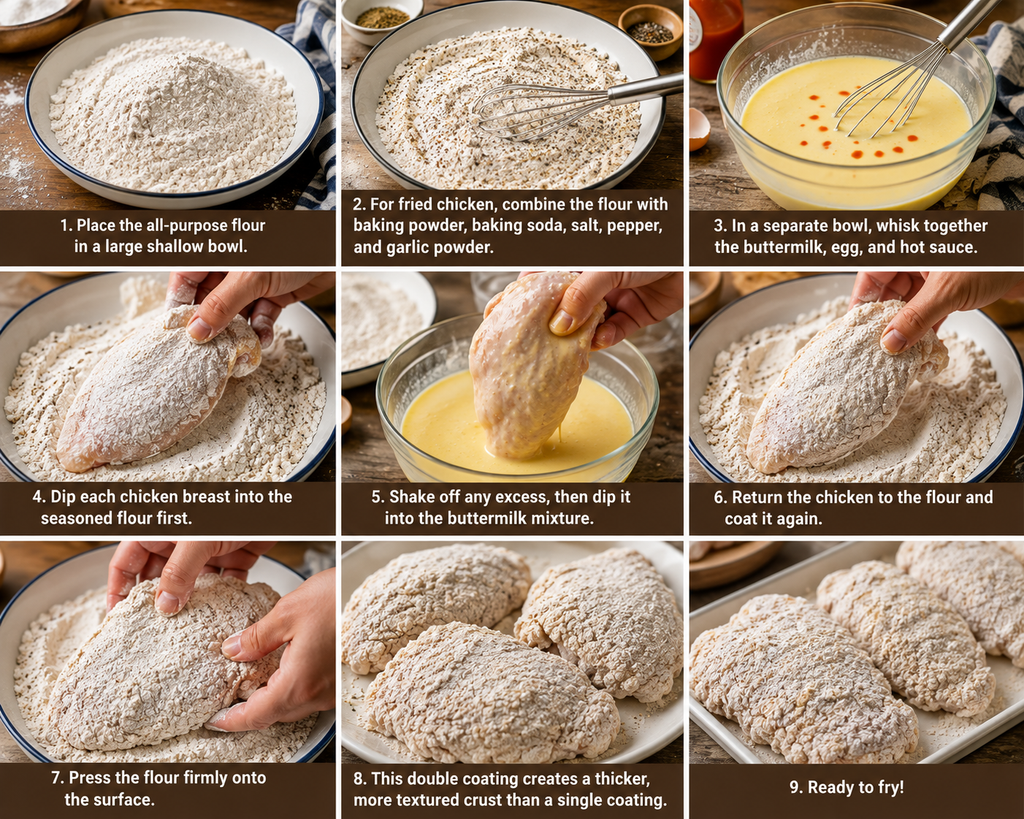
Place the all-purpose flour in a large shallow bowl.
Coat each piece of chicken generously. Press the flour onto the surface so it adheres well.
For fried chicken, combine the flour with baking powder, baking soda, salt, pepper, and garlic powder.
In a separate bowl, whisk together the buttermilk, egg, and hot sauce.
Dip each chicken breast into the seasoned flour first. Shake off any excess, then dip it into the buttermilk mixture.
Coat the chicken in the flour mixture again for a second, even layer. Press the flour firmly onto the surface.
This double coating creates a thicker, more textured crust than a single flour coating.
3. Heat the Oil for making simple fried chicken recipe
For the simple skillet method, pour enough canola or vegetable oil into a large skillet to make a layer about ½ inch deep.
Heat the oil over medium heat.
If you are using a deep fryer or large pot, heat the oil to approximately 365°F to 370°F for traditional bone-in fried chicken.
For thin fried chicken, the method uses oil heated to about 325°F.
A thermometer makes this step much easier. The chicken will lower the oil temperature when it enters the pan, so avoid adding too many pieces at once.
4. Test the Oil for making simple fried chicken recipe
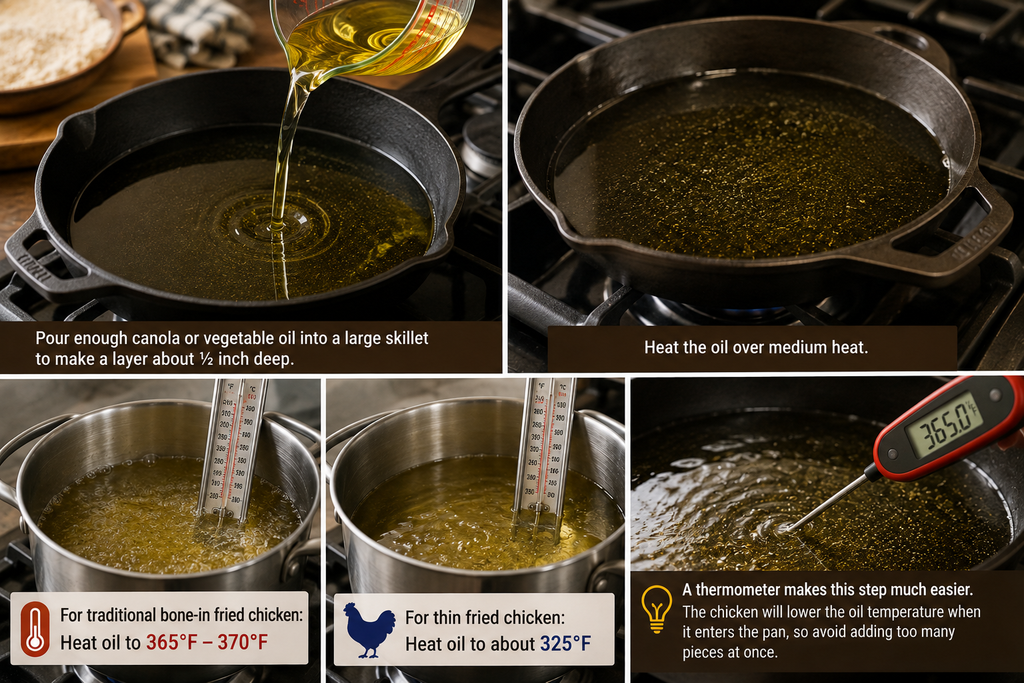
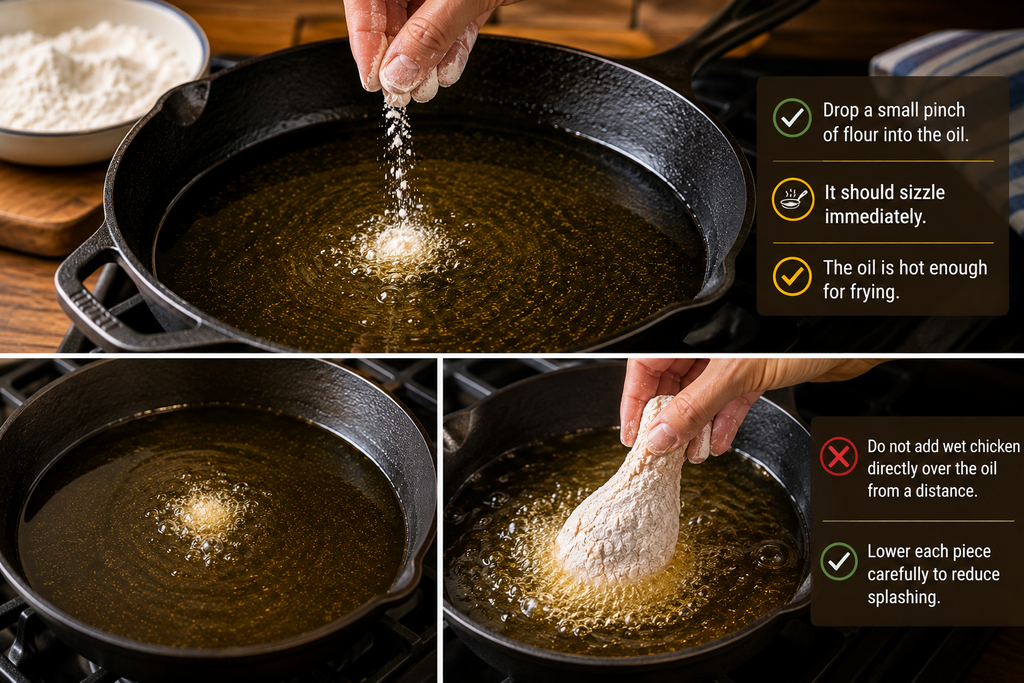
Before adding the chicken, drop a small pinch of flour into the oil.
It should begin to sizzle immediately. That tells you the oil is hot enough for the coating to begin frying.
Do not add wet chicken directly over the oil from a distance. Lower each piece carefully to reduce splashing.
5. Fry the Chicken in Batches
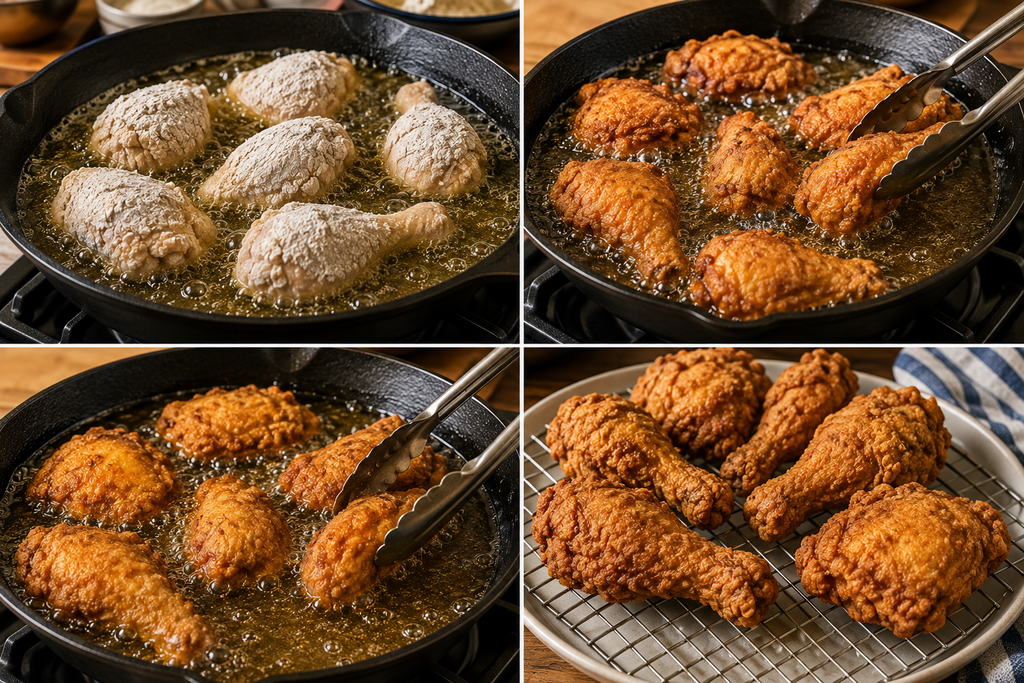
Place the coated chicken into the hot oil, leaving space between the pieces.
Overcrowding the pan can prevent the chicken from crisping properly and leave it greasy.
Too many cold pieces can quickly lower the oil temperature, preventing the coating from crisping properly.
For bone-in chicken, turn the pieces regularly as they become golden brown. The entire process may take approximately 30 to 40 minutes, depending on the size of the pieces and the oil’s heat.
Thin chicken breasts cook much faster. They may need around 3 to 5 minutes per side when fried at about 325°F.
Keep an eye on the color. If the chicken becomes dark brown very quickly, lower the heat.
6. Check the Internal Temperature
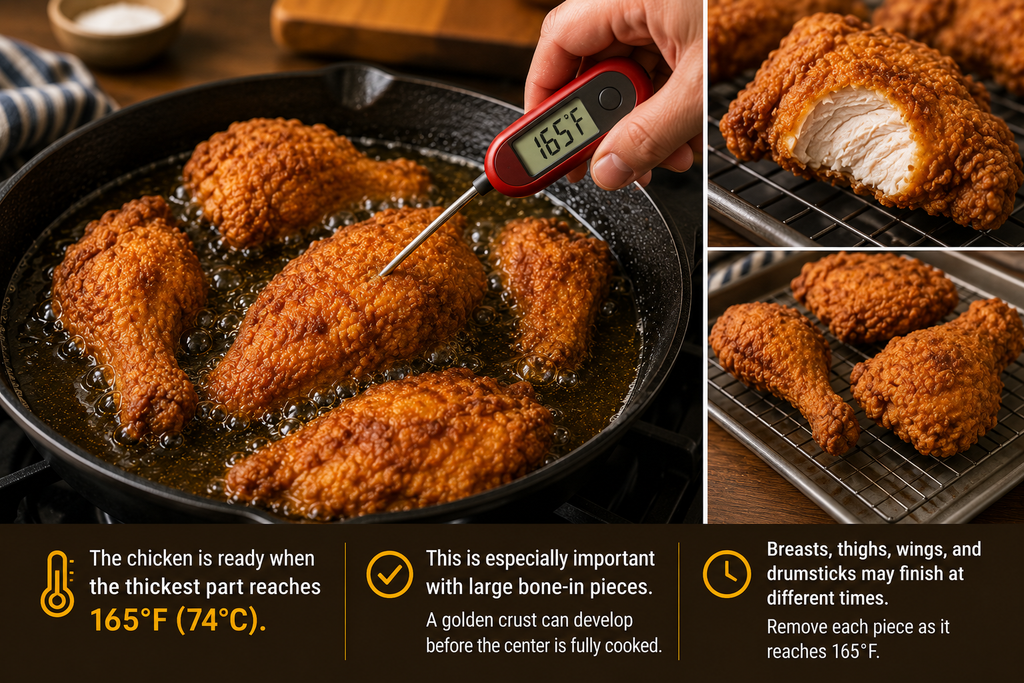
The chicken is ready when the thickest part reaches 165°F (74°C).
This is especially important with large bone-in pieces. A beautifully golden crust can develop before the center has finished cooking.
Breasts, thighs, wings, and drumsticks may all finish at different times. Remove individual pieces as they become fully cooked rather than waiting for every piece to finish simultaneously.
7. Drain the Fried Chicken
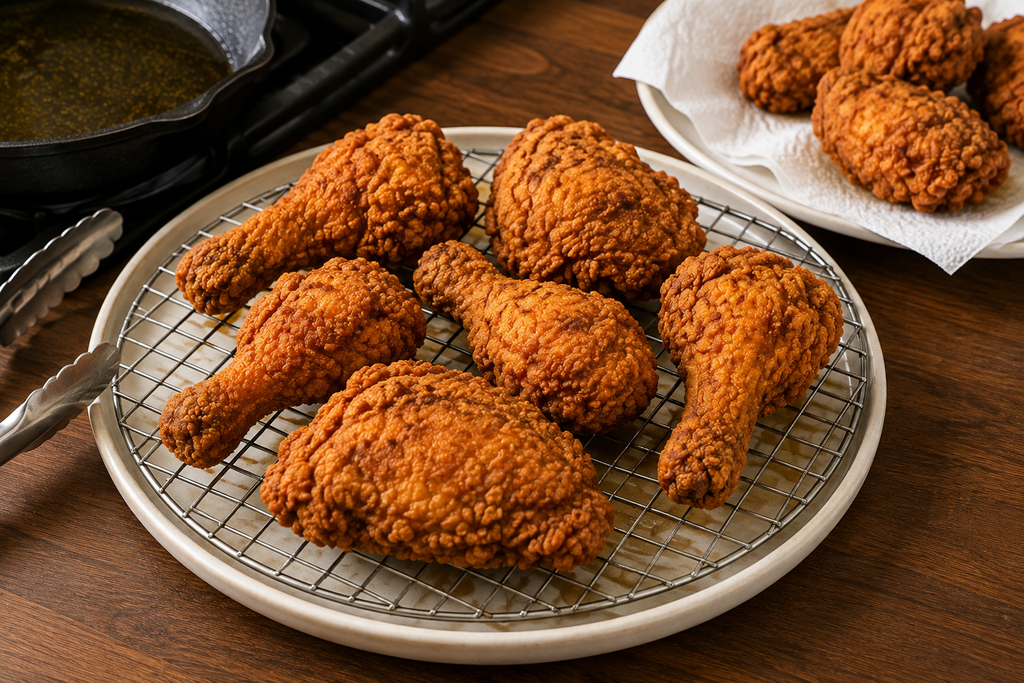
Transfer the cooked chicken to a small cooking rack placed over a large plate.
A rack allows excess oil to drip away and prevents the bottom of the chicken from sitting directly against a flat surface.
You can also use a paper towel-lined plate if a rack is not available.
Let the chicken drain briefly, then serve it while warm.
8. Make the Country Gravy for Simple Fried Chicken Recipe
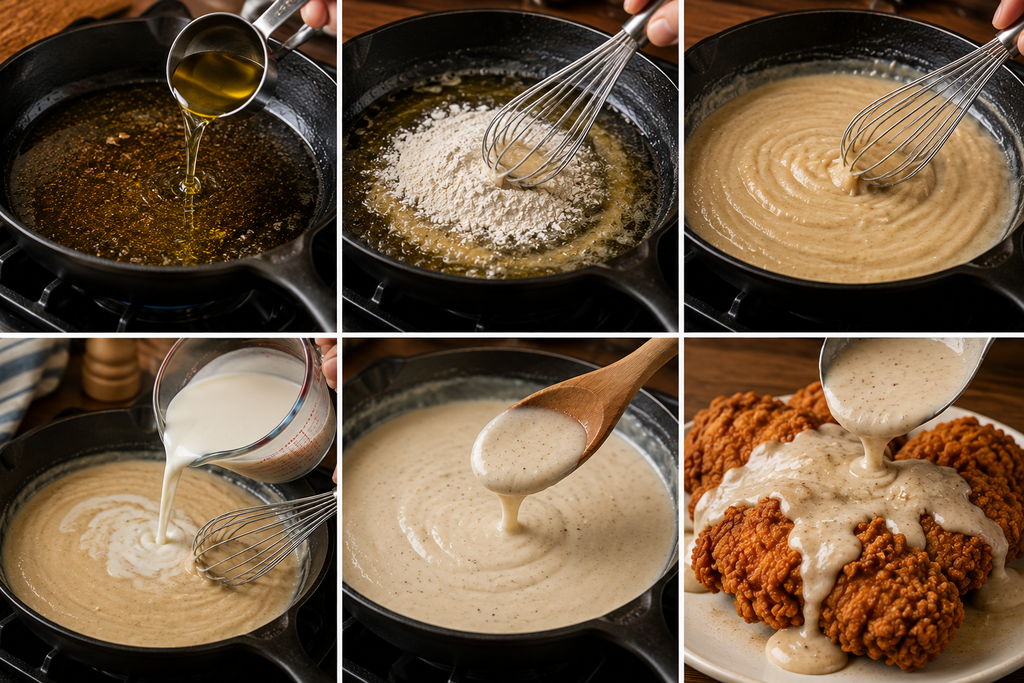
Reserve about ¼ cup of the frying oil.
Heat it in a heavy skillet over medium heat. Whisk in ⅓ cup flour and cook for about 1 minute.
Slowly pour in 2 cups milk, whisking continuously.
Continue stirring until the gravy thickens. Season with salt and black pepper to taste.
If the frying oil contains very dark or burnt crumbs, strain it before making the gravy. The browned bits can add flavor, but burnt particles can make the gravy bitter.
Pour the finished gravy over the chicken just before serving.
Expert Tips for Simple Fried Chicken Recipe
Season Ahead When You Have Time
For bone-in chicken, seasoning it about 2 hours before frying gives the salt time to penetrate the meat. This produces more evenly seasoned chicken than sprinkling salt on the outside immediately before cooking.
Keep the Chicken Dry Before Flour
Excess moisture makes the flour coating harder to control. Pat the chicken dry before seasoning and dredging.
Press the Flour Onto the Chicken
Do not simply roll the chicken through the flour and move on. Press the flour onto every surface. This helps create a more substantial crust.
Maintain the Oil Temperature
Consistent oil temperature is one of the most important parts of successful fried chicken.
If the oil temperature is too low, the coating may soak up too much oil and become greasy.
If it is too hot, the outside can become dark before the inside is cooked.
For classic deep frying, maintain the oil temperature between 365°F and 370°F for a crisp, golden coating.
For the thinner chicken breast method, approximately 325°F is used.
Do Not Overcrowd the Pan
Give the chicken room. If necessary, cook two or more batches.
It is better to spend a few extra minutes frying a second batch than to compromise the texture of the entire meal.
Use a Thermometer
An instant-read thermometer removes the guesswork. Check the thickest part of the chicken and make sure it reaches 165°F.
Turn Carefully
For bone-in chicken, a cooking fork can be used to turn pieces carefully. Try to work near the outer edge rather than repeatedly piercing the center of the meat.
Tongs are also practical, especially for thin chicken breasts.
Watch the Color
The crust should become a medium to dark golden brown. If it turns very dark before the chicken is cooked, lower the heat.
Drain on a Rack
A rack keeps the crust elevated and allows excess oil to drain away. This helps preserve the crisp texture.
Recipe Variations: Simple Fried Chicken Recipe
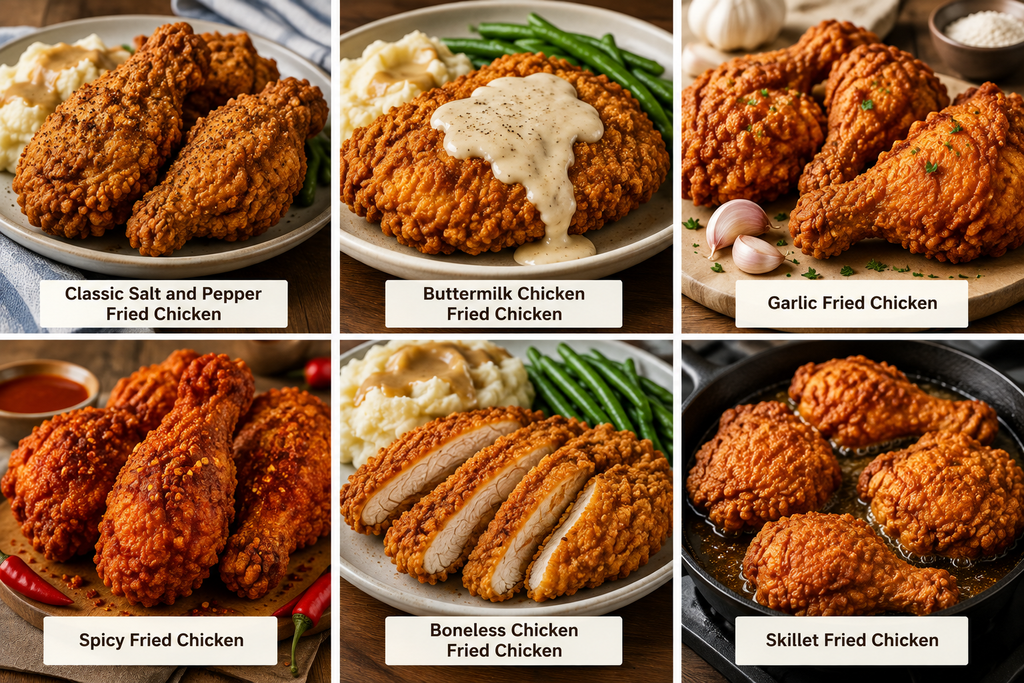
Classic Salt and Pepper Fried Chicken
Keep the seasoning very simple with just salt and black pepper. This is the best option when you want an old-fashioned fried chicken flavor.
Buttermilk Chicken Fried Chicken
Use thin chicken breasts and a double coating of seasoned flour and buttermilk. The egg and buttermilk mixture helps create a thicker, crunchier crust.
Garlic Fried Chicken
Add garlic powder to the flour mixture for a stronger savory flavor. This works particularly well with the buttermilk version.
Spicy Fried Chicken
Add hot sauce to the buttermilk mixture, increasing the amount to suit your preferred heat level. A little cayenne pepper can also be added to the flour.
Boneless Chicken Fried Chicken
Thin chicken breasts are ideal when you want a quick meal. Slice regular chicken breasts horizontally if thin-cut chicken is not available.
Skillet Fried Chicken
Use about ½ inch of oil in a heavy skillet. This method uses less oil than deep frying and works well for a traditional home-style dinner.
Serving Suggestions
Fried chicken is versatile enough to work with simple side dishes or a larger comfort-food spread.
Classic Comfort-Food Sides
- Mashed potatoes
- Country gravy
- Macaroni and cheese
- Green beans
- Cheddar biscuits
- Roasted or steamed vegetables
Mashed potatoes and country gravy are especially good with fried chicken. The creamy potatoes balance the crunchy coating, while the gravy brings everything together.
For a lighter plate, serve the chicken with green beans or another vegetable.
If you are cooking for a crowd, set the chicken on a large serving platter and offer the gravy separately. This keeps the crust crisp for longer.
Fried chicken can also be served chilled. Leftover pieces make an easy lunch or late-night snack straight from the refrigerator.
Storage & Reheating
Place leftover simple fried chicken in the refrigerator and use it within 3 days.
Cold fried chicken can be eaten straight from the refrigerator, but reheating gives you a warmer, softer center.
To reheat, place the chicken in a 250°F oven until warmed through. Keep the pieces in a single layer so they heat more evenly.
A small rack can be used during reheating to keep the bottom of the coating from sitting against a flat pan.
Avoid reheating the chicken for longer than necessary. The goal is to warm it through without drying the meat or making the coating excessively hard.
If you have different sizes of chicken pieces, check the larger pieces first because they will usually need more time.
Common Mistakes to Avoid in Making a Simple Fried Chicken Recipe
Starting With Wet Chicken
Always pat the chicken dry before coating it. Excess moisture can make the flour coating uneven.
Using Too Much Heat
High heat can brown the coating too quickly. Medium heat gives you more control when using a skillet.
Frying Too Many Pieces at Once
Crowding lowers the oil temperature and prevents even cooking. Work in batches when necessary.
Skipping the Thermometer
A golden crust does not guarantee cooked chicken. Check the thickest part and look for 165°F.
Burning the Flour
If the flour turns very dark quickly, reduce the heat. The coating should become golden rather than black or heavily scorched.
Making Lumpy Gravy
Add the milk gradually while whisking. Pouring it in too quickly can make the gravy harder to smooth out.
Using Burnt Oil for Gravy
The frying oil should be flavorful, not burnt. If the leftover oil contains dark, bitter particles, strain it or use butter instead.
Letting Chicken Sit in Oil After Frying
Transfer the chicken to a rack or paper towel-lined plate as soon as it is done. This prevents the crust from becoming overly greasy.
Frequently Asked Questions
What is the easiest way to make a simple fried chicken Recipe?
The easiest method is to season chicken with salt and pepper, coat it generously in flour, and fry it in about ½ inch of hot oil. Cook the chicken in batches, and use a meat thermometer to make sure the thickest part reaches 165°F.
Can I use boneless chicken breasts?
Yes. Thin-sliced chicken breasts are particularly convenient because they cook quickly and evenly. Regular chicken breasts can be sliced horizontally into thinner pieces.
How long should fried chicken cook?
Cooking time depends on the cut and thickness. Thin chicken breasts may take about 3 to 5 minutes per side, while bone-in pieces can take around 30 to 40 minutes in a skillet. Always use internal temperature rather than time alone to determine doneness.
What temperature should the oil be for a simple fried chicken recipe?
Traditional deep-fried chicken is commonly cooked with the oil maintained around 365°F to 370°F. The thin-fried chicken method uses approximately 325°F. The accurate temperature depends on the recipe and cooking setup.
Why is my simple fried chicken recipe not crispy?
The most common causes are low oil temperature, overcrowding the pan, excess moisture on the chicken, or an insufficient flour coating. Keep the oil hot and steady, cook in batches, and coat the chicken thoroughly.
Can I make country gravy with frying oil?
Yes. About ¼ cup of reserved frying oil can be combined with flour and milk to make country gravy. If the oil is too dark or has burnt particles, strain it first. Butter or bacon fat can also be used.
Can I make a simple fried chicken recipe without buttermilk?
Yes. The simple version uses seasoned flour without buttermilk. Buttermilk is not necessary for traditional fried chicken, but it is helpful if you want a thicker, more textured coating.
How long does fried chicken last in the refrigerator?
You may keep leftover fried chicken in the fridge for up to three days if you store it properly. It can be served cold or gently reheated in a 250°F oven.
Nutrition Information (Approximate)
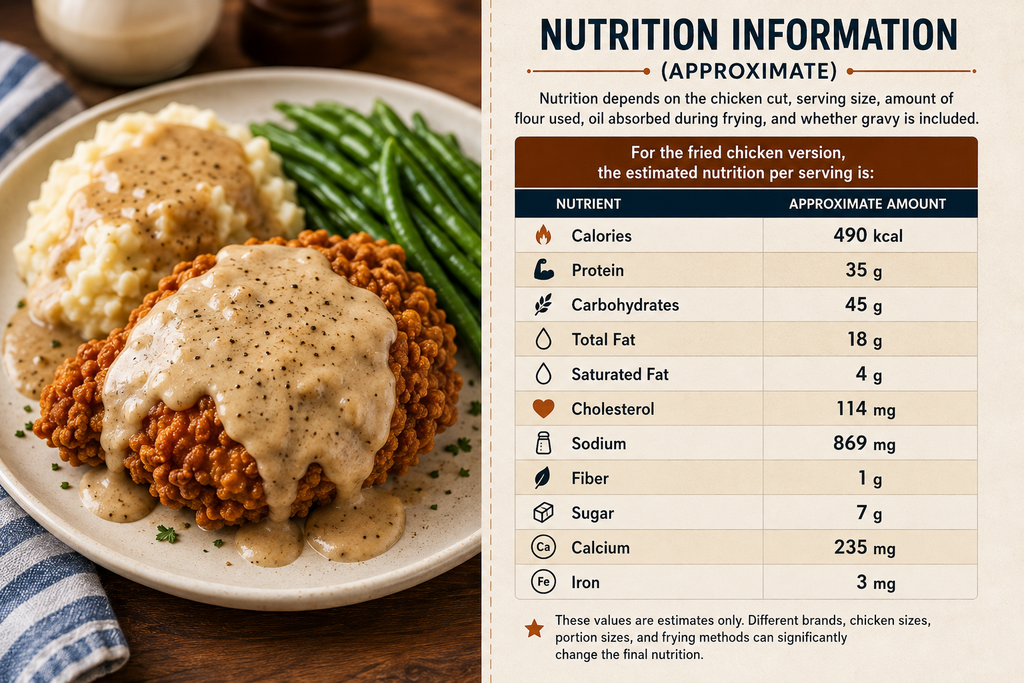
Nutrition depends on the chicken cut, serving size, amount of flour used, oil absorbed during frying, and whether gravy is included.
For this recipe, the nutrition per serving value is:
| Nutrient | Approximate Amount |
| Calories | 490 kcal |
| Protein | 35 g |
| Carbohydrates | 45 g |
| Total Fat | 18 g |
| Saturated Fat | 4 g |
| Cholesterol | 114 mg |
| Sodium | 869 mg |
| Fiber | 1 g |
| Sugar | 7 g |
| Calcium | 235 mg |
| Iron | 3 mg |
These values are estimates only. Different brands, chicken sizes, portion sizes, and frying methods can significantly change the final nutrition.
Recipe Card (Printable Summary)
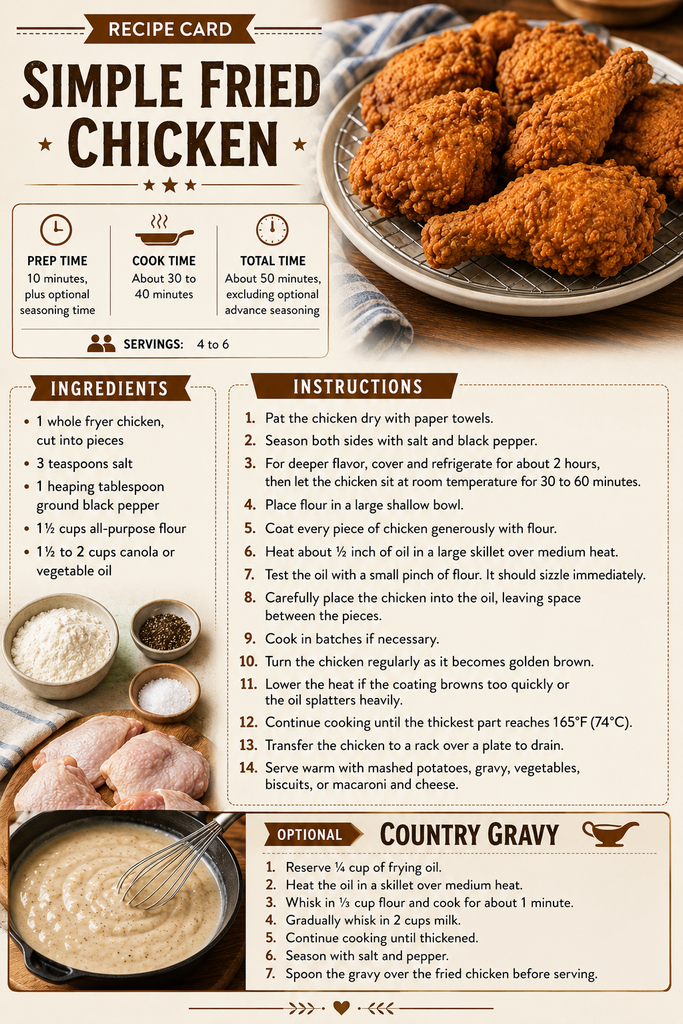
Simple Fried Chicken
Prep Time: 10 minutes, plus optional seasoning time
Cook Time: About 30 to 40 minutes
Total Time: About 50 minutes, excluding optional advance seasoning
Servings: 4 to 6
Ingredients
- 1 whole fryer chicken, cut into pieces
- 3 teaspoons salt
- 1 heaping tablespoon ground black pepper
- 1½ cups all-purpose flour
- 1½ to 2 cups canola or vegetable oil
Instructions
- Pat the chicken dry with paper towels.
- Season both sides with salt and black pepper.
- For deeper flavor, cover and refrigerate for about 2 hours, then let the chicken sit at room temperature for 30 to 60 minutes.
- Place flour in a large shallow bowl.
- Coat every piece of chicken generously with flour.
- In a big skillet, heat about ½ inch of oil over medium heat until it is hot enough to fry.
- Use a tiny pinch of flour to test the oil. It ought to sizzle right away.
- Carefully place the chicken into the oil, leaving space between the pieces.
- Cook in batches if necessary.
- Turn the chicken regularly as it becomes golden brown.
- Reduce the heat if the coating starts to brown too quickly.
- Continue cooking until the thickest part reaches 165°F (74°C).
- Transfer the chicken to a rack over a plate to drain.
- Serve warm with mashed potatoes, gravy, vegetables, biscuits, or macaroni and cheese.
Optional Country Gravy
- Reserve ¼ cup of frying oil.
- Add the oil and heat it over a low flame.
- Put ⅓ cup of flour and cook for about 1 minute.
- Gradually whisk in 2 cups of milk.
- Continue cooking until thickened.
- Season with salt and pepper.
- Spoon the gravy over the fried chicken before serving.
Conclusion
A simple fried chicken recipe is all about technique rather than a complicated ingredient list. Season the chicken well, coat it thoroughly, maintain the right oil temperature, and give each piece enough room to cook properly. Those few steps make a noticeable difference in the final texture.
For a traditional version, salt, pepper, flour, and hot oil are all you really need. For a thicker crust and faster cooking time, thin chicken breasts, buttermilk, egg, and a seasoned double coating are excellent choices. Add mashed potatoes, country gravy, green beans, or macaroni and cheese, and you have a comforting meal that works for an ordinary weeknight or a larger family dinner.
The most important habit to take away is simple: use an instant-read thermometer and cook the chicken to 165°F. Once you combine that safety check with steady oil temperature and a well-attached coating, homemade fried chicken becomes much easier to get right.
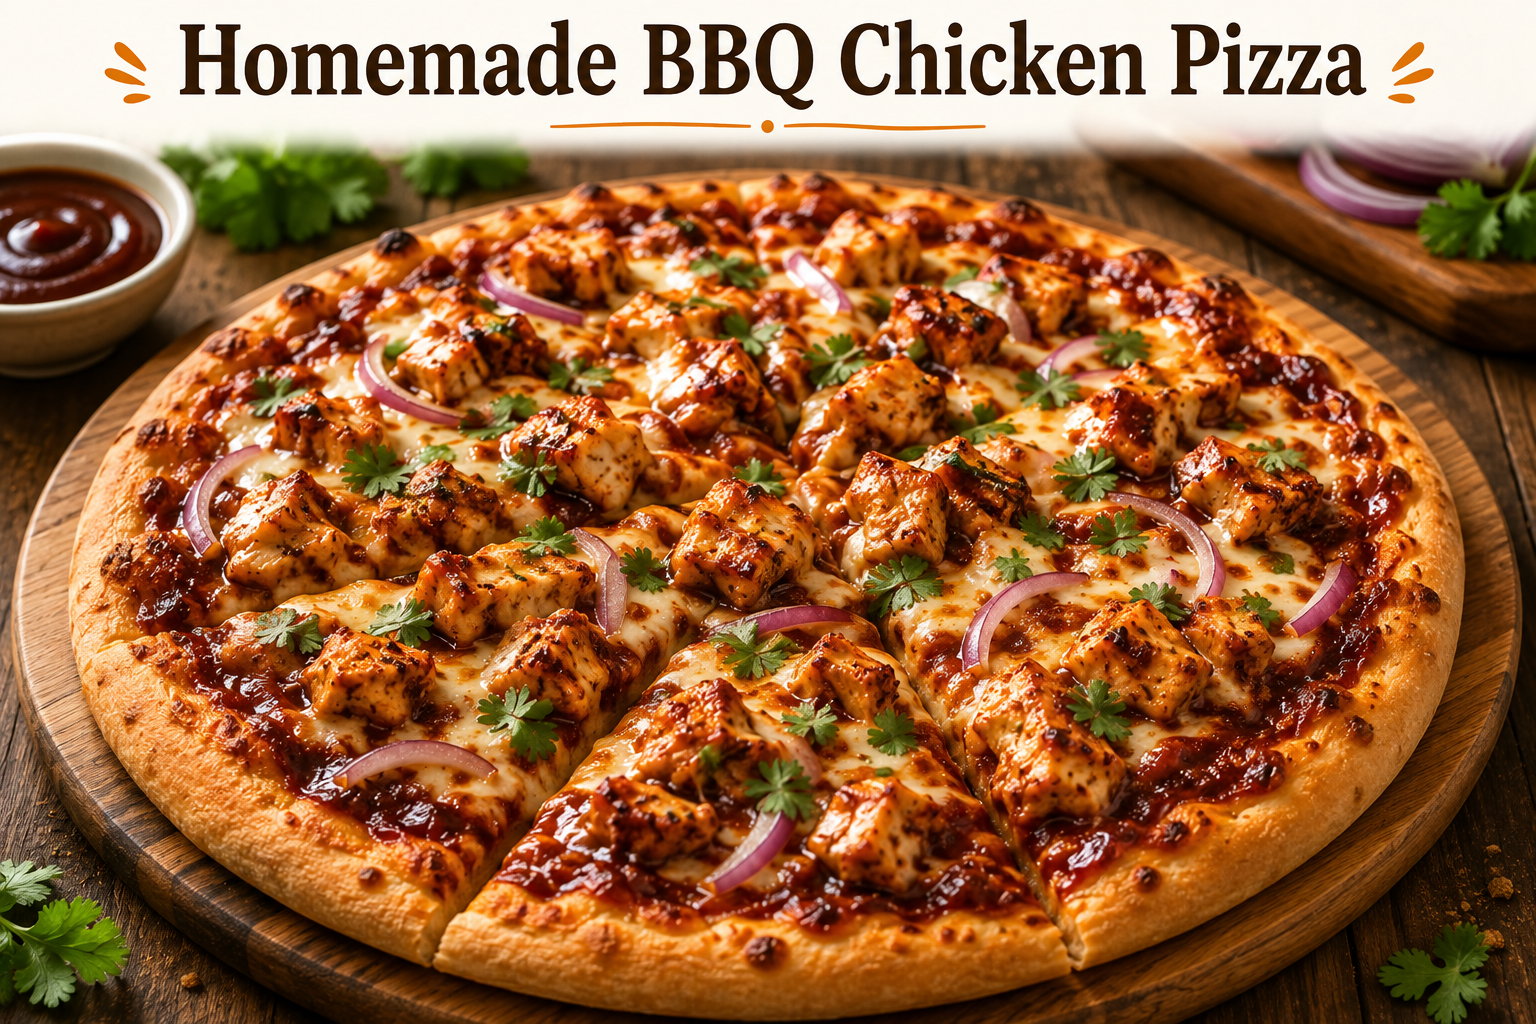
There’s something special about pulling a homemade BBQ chicken pizza from the oven. The bubbling cheese, golden crust, and incredible aroma filling the kitchen instantly make dinner feel like an occasion. While classic pepperoni will always have a place on the table, BBQ chicken pizza offers a delicious twist with its combination of smoky, sweet, tangy, and savory flavors.
This homemade BBQ chicken pizza is inspired by restaurant favorites, made with fresher ingredients and simple techniques anyone can master. Juicy cooked chicken, rich barbecue sauce, melted mozzarella, smoky cheese, crisp red onion, and fresh herbs come together on a perfectly baked crust to create a pizza that’s satisfying enough for family dinner, game day, or weekend gatherings. Best of all, it’s easy to customize based on what you already have in your kitchen.
Why You’ll Love BBQ Chicken Pizza
Once you make this Homemade BBQ chicken pizza at home, you’ll quickly understand why it’s such a favorite. Every bite delivers layers of flavor and texture, from the chewy crust to the smoky cheese and tangy barbecue sauce.
You’ll love this recipe because:
- Better than restaurant pizza with fresh, homemade flavor.
- Ready in about 30 minutes if using prepared pizza dough.
- Perfect for using leftover or rotisserie chicken.
- Smoky cheese and BBQ sauce create an irresistible combination.
- Easy enough for beginners yet impressive enough for guests.
- Family-friendly and great for pizza night.
- Easily customized with your favorite cheeses and toppings.
- Works with homemade or store-bought pizza dough.
- Leftovers taste just as delicious the next day.
- Freezer-friendly for convenient future meals.
Ingredients of BBQ Chicken Pizza
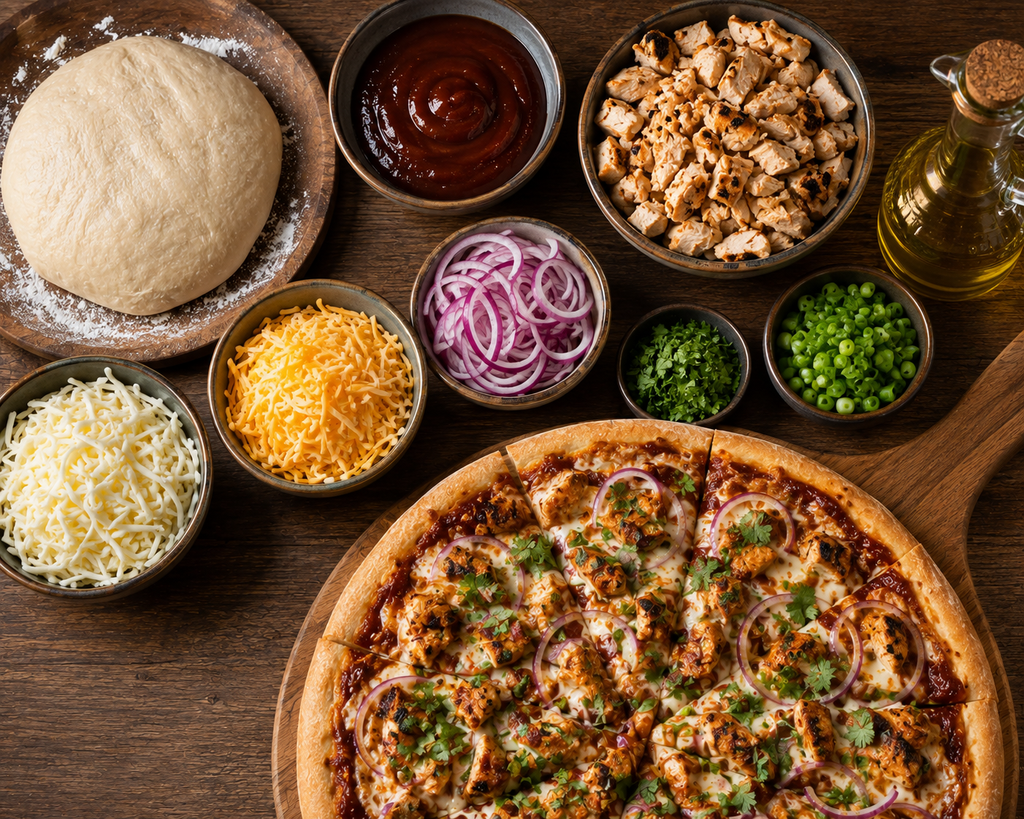
Main Ingredients for Homemade BBQ Chicken Pizza
Pizza Dough
Homemade dough creates a crisp exterior with a soft, chewy interior that holds the toppings beautifully. If you’re short on time, a good-quality store-bought dough works well too.
Barbecue Sauce
Choose a thick, rich barbecue sauce with a balance of sweetness and smokiness. Kansas City-style BBQ sauce is a popular choice because it caramelizes beautifully during baking without making the crust soggy.
Cooked Chicken
Cooked chicken is essential since raw chicken won’t fully cook during the short baking time. Rotisserie chicken is one of the easiest options, while grilled chicken thighs add extra smoky flavor. Chicken breast also works well if that’s what you have available.
Mozzarella Cheese
Low-moisture mozzarella melts evenly and creates the classic stretchy cheese pull everyone loves. Fresh mozzarella can also be used, but be sure to drain excess moisture before adding it to the pizza.
Smoked Cheese
Adding smoked gouda, smoked cheddar, or smoked mozzarella gives the pizza a deeper barbecue flavor. Combining two cheeses creates a richer, more balanced taste than using mozzarella alone.
Red Onion
Thin slices of red onion provide freshness, color, and a slight crunch that balances the richness of the cheese and sauce.
Fresh Cilantro or Scallions
Fresh herbs added after baking brighten the entire pizza. Cilantro is the traditional choice, but sliced scallions or fresh basil also work beautifully.
Olive Oil
A light brushing of olive oil around the crust encourages even browning and adds extra flavor.
Ingredient Notes & Substitutions for Homemade BBQ Chicken Pizza
One of the best things about homemade pizza is how flexible it is. Don’t worry if you don’t have every ingredient exactly as listed. Here are some easy substitutions that still produce excellent results.
Pizza Dough Options
- Homemade pizza dough
- Store-bought fresh pizza dough
- Frozen pizza dough (fully thawed)
- Whole wheat pizza dough
- Thin crust pizza dough
- Cauliflower crust for a lower-carb option
Chicken Options
- Rotisserie chicken
- Grilled chicken thighs
- Grilled chicken breast
- Leftover roasted chicken
- Shredded smoked chicken
Cheese Options
If smoked gouda isn’t available, try:
- Smoked cheddar
- Mild cheddar
- Monterey Jack
- Provolone
- Fontina
- Smoked mozzarella
- Extra mozzarella
BBQ Sauce Options
Different barbecue sauces create different flavor profiles.
- Kansas City style for sweet and smoky flavor
- Honey BBQ for extra sweetness
- Hickory BBQ for deeper smokiness
- Spicy BBQ for more heat
- Homemade barbecue sauce for complete control over flavor
Onion Alternatives
If raw onions aren’t your favorite, you can substitute:
- Caramelized onions
- Sweet onions
- Green onions
- Shallots
Fresh Herb Options
Instead of cilantro, try:
- Fresh basil
- Chopped parsley
- Sliced scallions
- Fresh oregano
Optional Extra Toppings
Customize your pizza with additional toppings such as:
- Crispy bacon
- Pineapple chunks
- Pickled jalapeños
- Roasted corn
- Sliced mushrooms
- Bell peppers
- Banana peppers
- Crumbled blue cheese
- Extra barbecue drizzle after baking
- Crushed red pepper flakes
Equipment Needed for BBQ Chicken Pizza
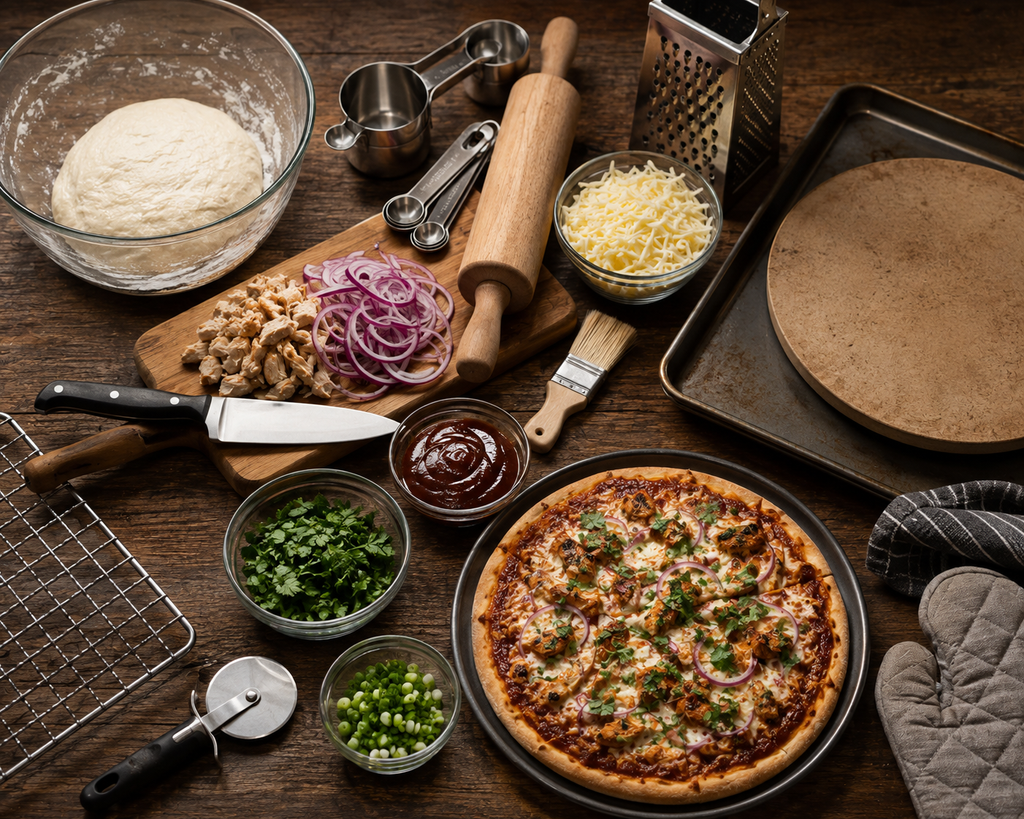
You don’t need professional pizza equipment to make an outstanding BBQ chicken pizza. Most home kitchens already have everything required.
- Large mixing bowl (if making homemade dough)
- Measuring cups and spoons
- Rolling pin (optional)
- Cutting board
- Sharp knife
- Cheese grater
- Large baking sheet or pizza pan
- Pizza stone or baking steel (optional for crispier crust)
- Pastry brush
- Pizza cutter or chef’s knife
- Cooling rack (optional)
- Oven mitts
With just a few simple ingredients and basic kitchen tools, you’re ready to create a homemade BBQ chicken pizza that’s crispy, cheesy, and packed with smoky barbecue flavor. In the next section, you’ll learn exactly how to assemble and bake the pizza for the best results, along with expert tips for a golden crust and perfectly melted cheese every time.
Step-by-Step Instructions for Homemade BBQ Chicken Pizza
BBQ chicken pizza is very easy to make at home. The secret is preparing each component properly and baking the pizza in a very hot oven.
To make the best pizza, follow the steps below.
1. Prepare the Oven for Homemade BBQ Chicken Pizza
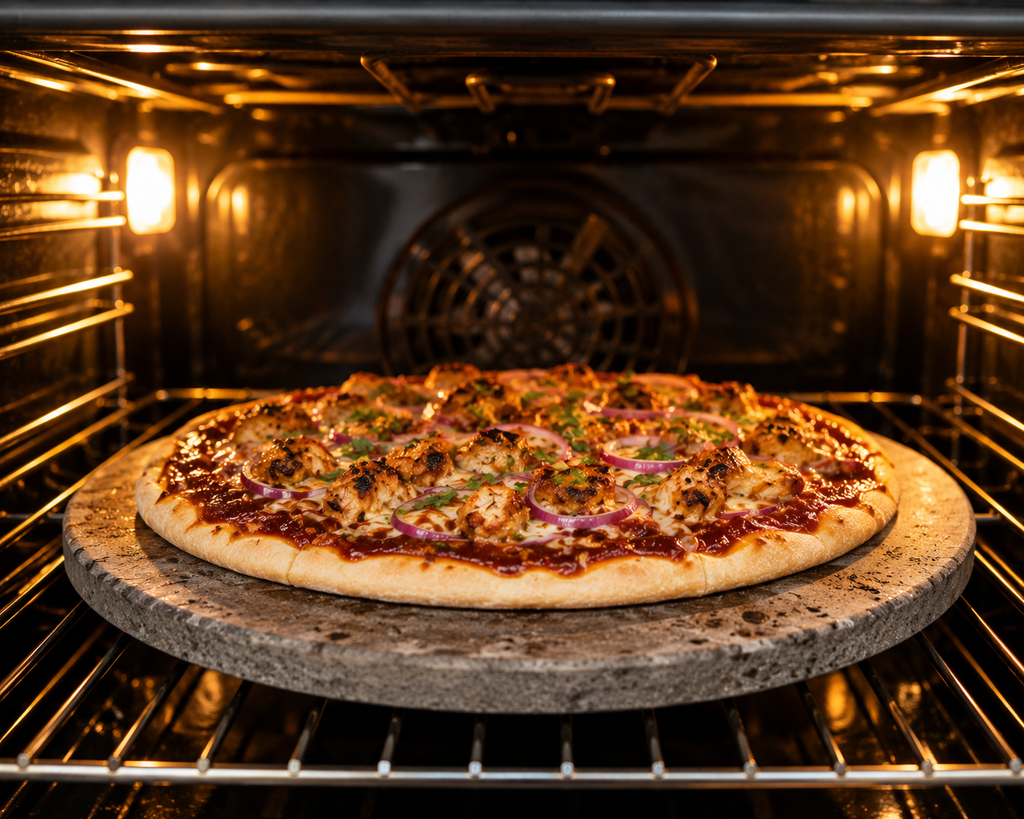
Preheat your oven to 475–500°F (245–260°C) for 20-30 minutes. A fully heated oven helps create a crisp crust while melting the cheese evenly.
If you’re using a pizza stone or baking steel, place it in the oven while it preheats. This gives the crust an extra crispy, pizzeria-style finish.
2. Prepare the Chicken for Homemade BBQ Chicken Pizza
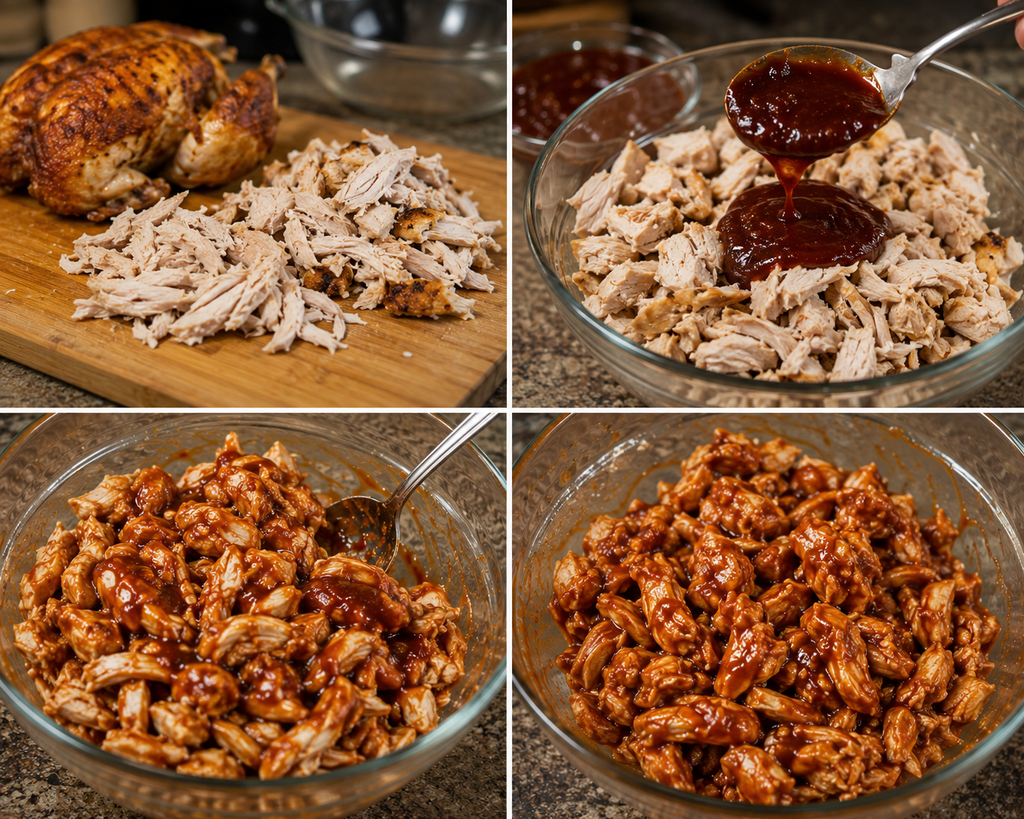
Use fully cooked chicken since the pizza doesn’t bake long enough to cook raw meat safely.
If using rotisserie chicken:
- Remove the skin.
- Shred or chop the meat into bite-sized pieces.
If using grilled chicken:
- Slice or dice it after cooking.
- Allow it to cool slightly before using.
Place the chicken in a bowl with 2 to 3 tablespoons of barbecue sauce and toss until evenly coated. This simple step keeps the chicken juicy during baking and adds flavor to every bite.
3. Prepare the Dough for Homemade BBQ Chicken Pizza
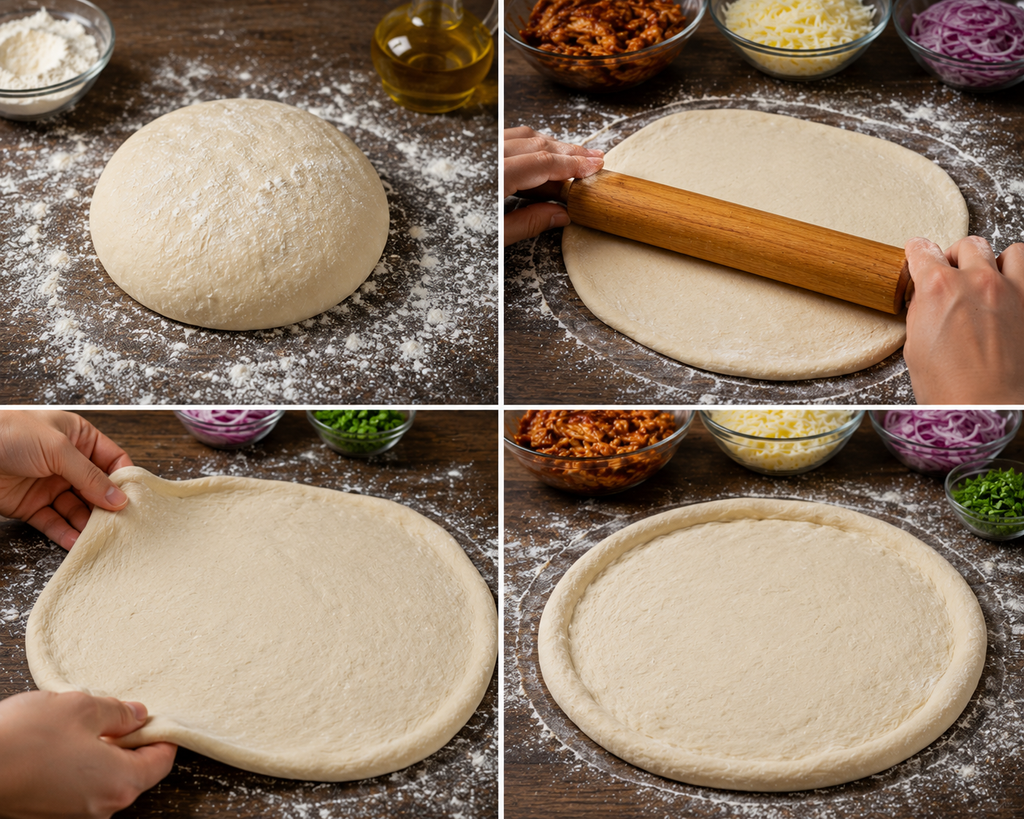
Lightly flour your work surface and gently stretch or roll the pizza dough into a 12-inch circle.
Aim for:
- Slightly thicker edges for a chewy crust.
- Even thickness throughout the center.
- A small raised rim around the outside.
If the dough keeps shrinking, let it rest for 5 to 10 minutes before stretching again.
4. Prepare the Pizza Pan for Homemade BBQ Chicken Pizza

Lightly grease a pizza pan or baking sheet with olive oil.
For extra crunch, sprinkle a thin layer of cornmeal over the pan before placing the dough on it. The cornmeal helps prevent sticking while adding texture to the crust.
5. Brush with Olive Oil for Homemade BBQ Chicken Pizza
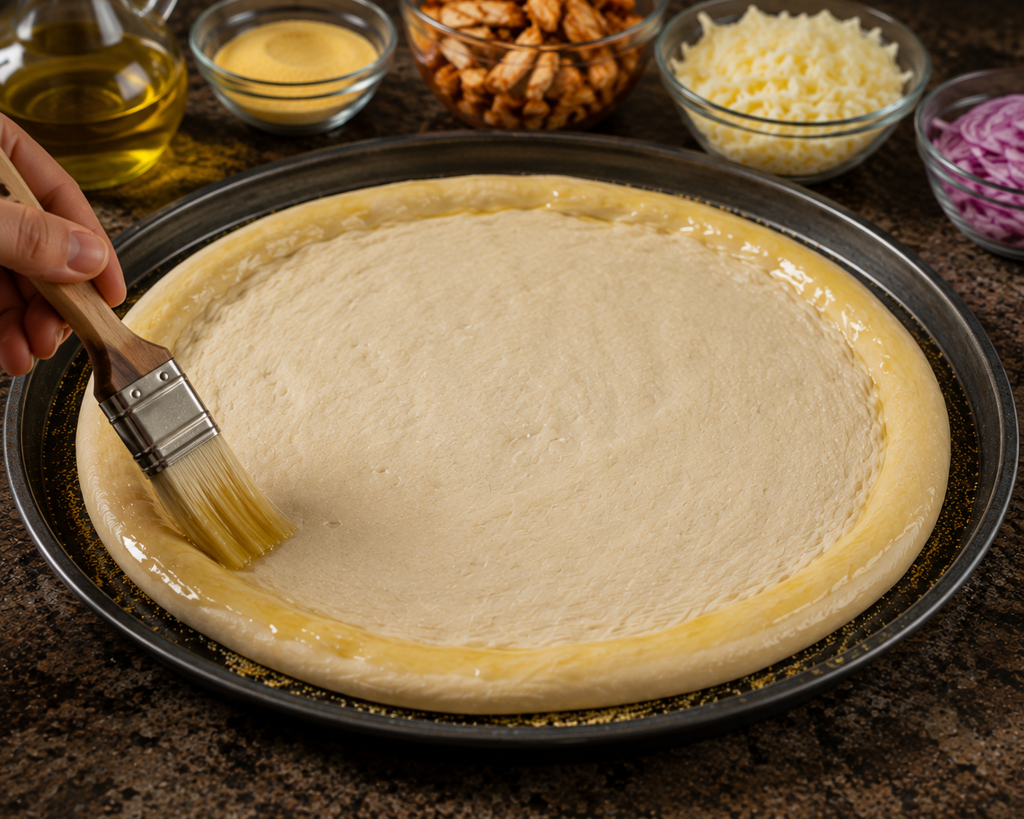
Lightly brush the outer edge of the dough with olive oil.
This helps:
- Create a golden crust.
- Add flavor.
- Prevent the edges from drying out.
6. Spread the BBQ Sauce for Chicken Pizza
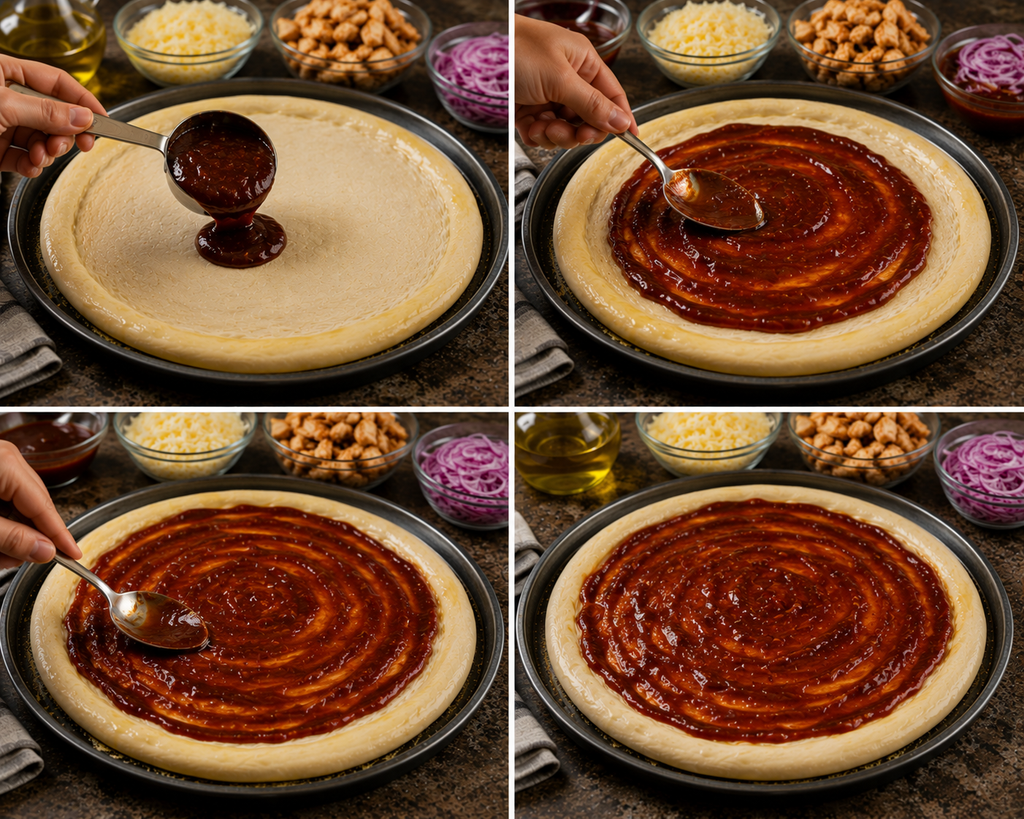
Spread about ⅓ cup of barbecue sauce evenly over the dough.
Leave about ½ inch around the edges without sauce to create a crisp outer crust.
Avoid using too much sauce, as it can make the center soggy.
7. Add the Toppings for Homemade BBQ Chicken Pizza
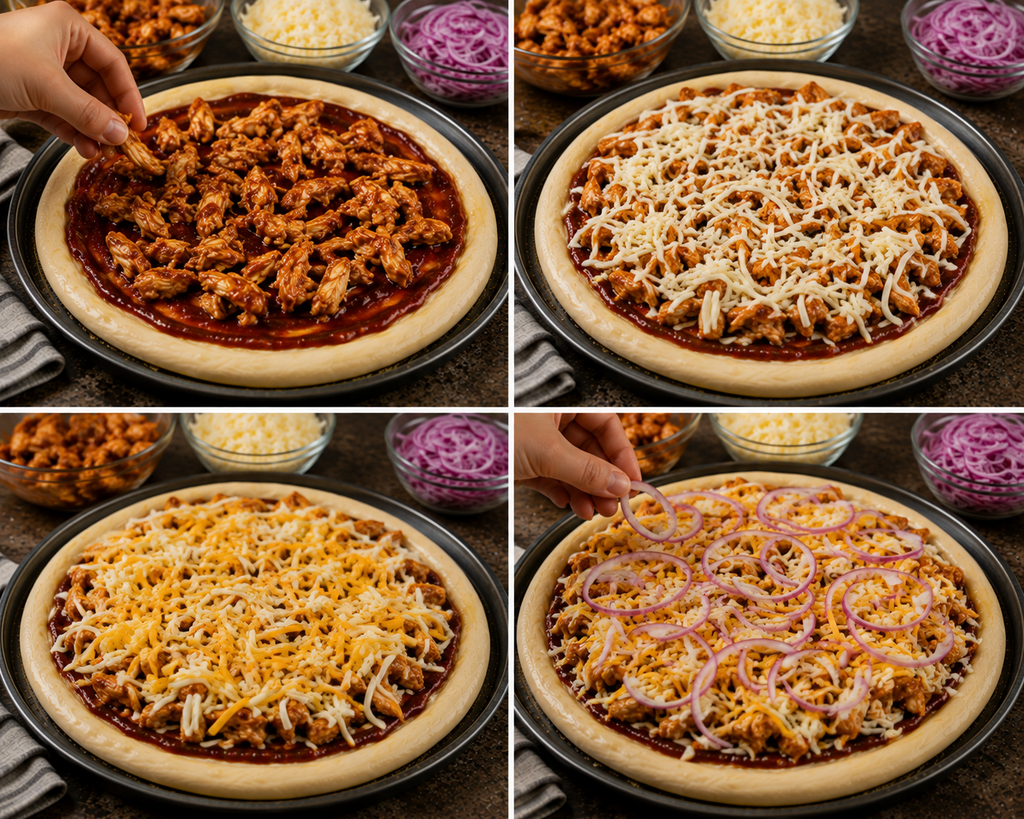
Layer the toppings evenly across the pizza.
Start with:
- Sauce-coated chicken
Then add:
- Shredded mozzarella
- Smoked gouda or smoked cheddar
- Thinly sliced red onion
Distributing the toppings evenly ensures every slice has the perfect balance of flavors.
8. Bake the Pizza
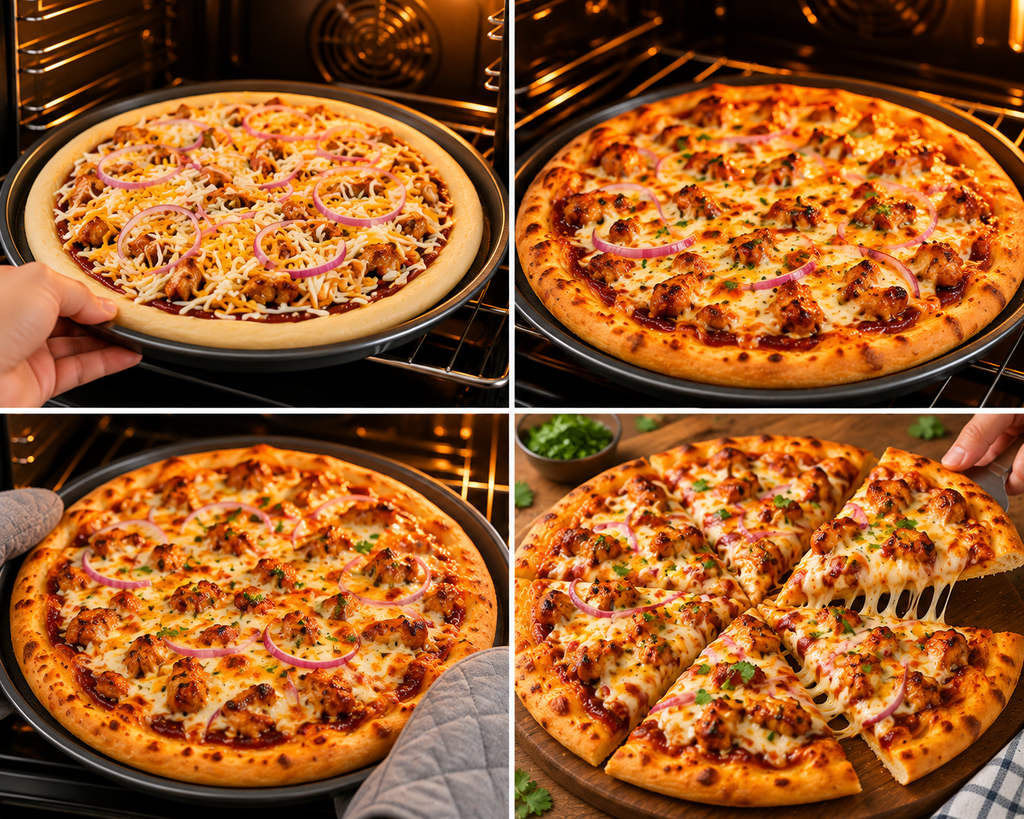
Bake for 10 to 15 minutes, depending on your oven and crust thickness.
The pizza is ready when:
- The crust is deep golden brown.
- The cheese is melted and bubbling.
- Some cheese develops lightly browned spots.
- The bottom crust feels crisp.
9. Finish with Fresh Herbs for BBQ Chicken Pizza
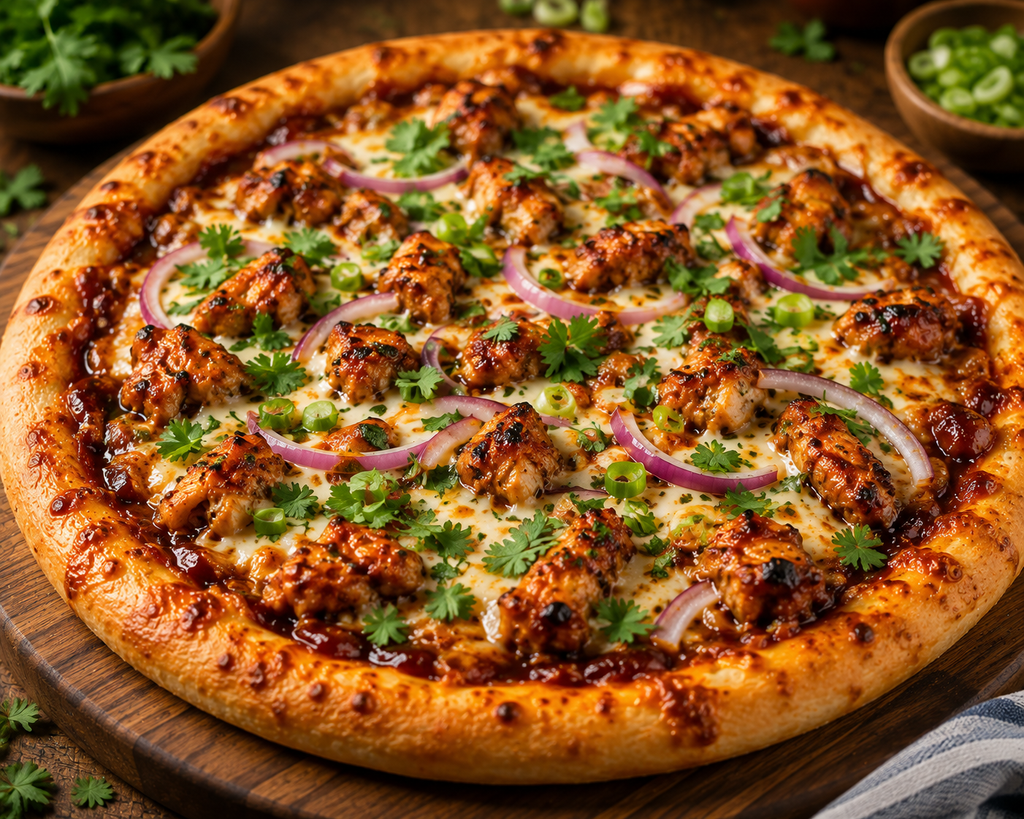
Remove the pizza from the oven and let it rest for about 5 minutes.
Sprinkle with:
- Fresh chopped cilantro
- Sliced scallions
- Fresh basil (optional)
The fresh herbs brighten the rich barbecue flavors and add beautiful color.
10. Slice and Serve Homemade BBQ Chicken Pizza
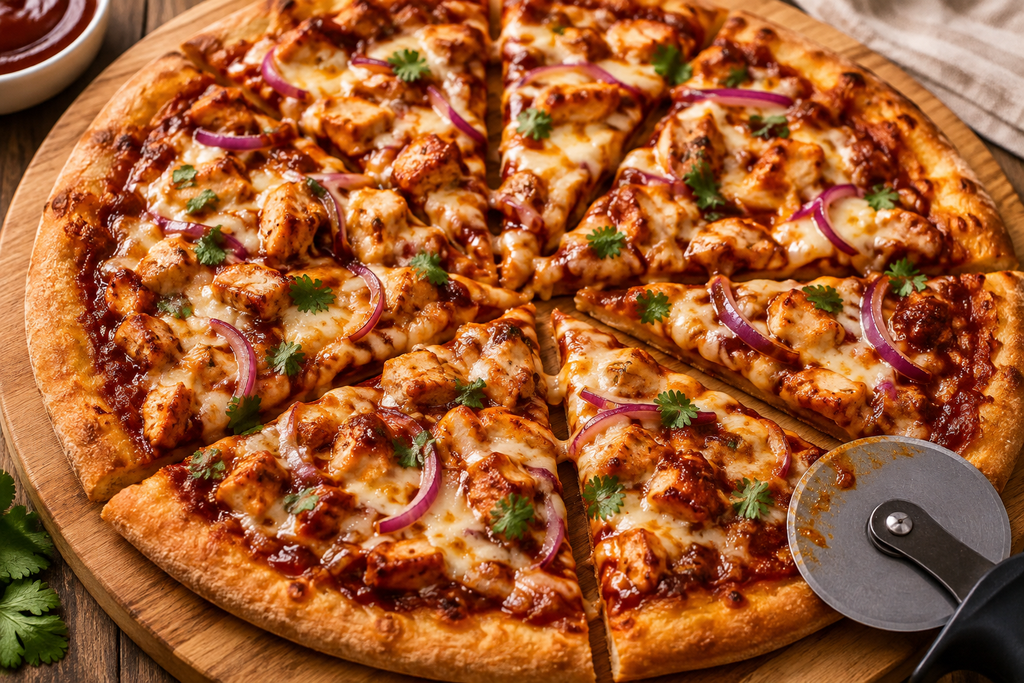
Use a pizza cutter or sharp chef’s knife to slice the pizza.
Serve immediately while the cheese is hot and stretchy.
For even more flavor, drizzle a little extra barbecue sauce over the top before serving if desired.
Expert Tips for Making Homemade BBQ Chicken Pizza
Small details make a big difference when making homemade pizza. These tips will help you achieve consistent, restaurant-quality results.
Use High Heat
A hot oven creates a crisp crust without overcooking the toppings. Always allow enough time for the oven to preheat before baking fully.
Cook the Chicken First
Never place raw chicken on pizza. The short baking time isn’t enough to cook it safely, so always use fully cooked chicken.
Toss Chicken with BBQ Sauce
Coating the chicken with a little barbecue sauce before adding it to the pizza keeps it juicy and prevents it from drying out in the oven.
Use Two Cheeses
A blend of mozzarella and smoked cheese creates a richer, more balanced flavor than mozzarella alone.
Slice the Onion Thinly
Thin slices soften nicely during baking while still adding texture and a slight bite.
Don’t Overload the Pizza
Too many toppings can prevent the crust from cooking properly and make the pizza difficult to slice.
Let the Pizza Rest
Allowing the pizza to cool for 3 to 5 minutes helps the cheese set slightly, making cleaner slices.
Add Fresh Herbs After Baking
Fresh cilantro, basil, or scallions lose their bright flavor when baked for too long. Add them just before serving.
Recipe Variations for BBQ Chicken Pizza
One of the best things about BBQ chicken pizza is how easy it is to customize.
Spicy BBQ Chicken Pizza
Add extra heat with:
- Pickled jalapeños
- Fresh jalapeño slices
- Hot barbecue sauce
- Crushed red pepper flakes
Bacon BBQ Chicken Pizza
Top the pizza with crispy cooked bacon for extra smoky flavor and crunch.
Hawaiian BBQ Chicken Pizza
Add pineapple chunks for a sweet contrast to the smoky barbecue sauce.
Buffalo BBQ Pizza
Mix barbecue sauce with buffalo sauce for a spicy, tangy flavor combination.
Caramelized Onion Version
Instead of raw onions, slowly caramelize sliced onions until soft and golden. They add a rich sweetness that pairs beautifully with barbecue sauce.
Extra Smoky Pizza
Replace smoked gouda with smoked cheddar or smoked mozzarella for even deeper smoky flavor.
Veggie BBQ Pizza
Add vegetables like:
- Bell peppers
- Mushrooms
- Corn
- Spinach
- Roasted zucchini
Whole Wheat Pizza
Use whole wheat pizza dough for extra fiber and a slightly nutty flavor.
Thin Crust Version
Stretch the dough thinner and reduce baking time by a few minutes for a crispier pizza.
Cheese Lover’s BBQ Pizza
Combine several cheeses, including:
- Mozzarella
- Smoked gouda
- Cheddar
- Monterey Jack
- Provolone
Serving Suggestions for Homemade BBQ Chicken Pizza
Homemade BBQ chicken pizza is satisfying on its own, but pairing it with simple side dishes creates a complete meal.
Fresh Salads
A crisp salad balances the pizza’s rich flavors.
Good options include:
- Caesar salad
- Garden salad
- Arugula salad
- Cucumber and tomato salad
- Coleslaw
Vegetable Sides
Serve with roasted or grilled vegetables such as:
- Broccoli
- Asparagus
- Brussels sprouts
- Green beans
- Corn on the cob
Appetizers
Complete pizza night with:
- Garlic bread
- Cheesy breadsticks
- Mozzarella sticks
- Stuffed mushrooms
- Baked potato wedges
Dipping Sauces
Popular choices include:
- Extra barbecue sauce
- Ranch dressing
- Garlic butter
- Honey mustard
- Chipotle mayo
Drinks
Pair this pizza with refreshing beverages like:
- Iced tea
- Sparkling lemonade
- Cola
- Root beer
- Fresh fruit smoothies
Storage and Reheating
Proper storage helps maintain the pizza’s flavor and texture.
Storing Leftovers
Allow the pizza to cool completely before storing.
- Refrigerate in an airtight container for up to 4 days.
- Separate slices with parchment paper to prevent sticking.
Freezing
BBQ chicken pizza freezes well.
- Wrap individual slices tightly in plastic wrap.
- Place them in a freezer-safe bag or container.
- Freeze for up to 3 months.
For easy tracking, label the container with the manufacturing and expiry date.
Reheating in the Oven
The oven gives the crispiest crust.
- Preheat to 350°F (175°C).
- Place slices on a baking sheet.
- Bake for 8–10 minutes until heated through.
Reheating in an Air Fryer
The air fryer is one of the quickest ways to revive leftover pizza.
- Heat at 350°F (175°C) for 3–5 minutes.
The crust gets crispy, and the cheese melts nicely.
Reheating in the Microwave
Microwaving is convenient but produces a softer crust.
Heat slices for 30 to 60 seconds, depending on thickness.
If possible, place a cup of water in the microwave alongside the pizza to help keep the crust from becoming too chewy.
Common Mistakes to Avoid When Making Homemade BBQ Chicken Pizza
Even simple pizza recipes can go wrong without a few basic precautions.
- Using raw chicken instead of cooked chicken.
- Skipping the oven preheating time.
- Adding too much barbecue sauce.
- Overloading the pizza with toppings.
- Using thick onion slices that don’t soften during baking.
- Forgetting to coat the chicken with barbecue sauce.
- Cutting the pizza immediately after baking instead of letting it rest.
- Baking at too low a temperature, which can leave the crust pale and soft.
- Avoid too much excess moisture in the fresh mozzarella when you are making this recipe.
- Stretching the dough too thin, causing tears or uneven baking.
Avoiding these common mistakes will help you make a perfectly crisp, flavorful BBQ chicken pizza every time.
Frequently Asked Questions
Can I use store-bought pizza dough?
Yes, you can use store-bought pizza dough from the refrigerator, and it saves time when you are making the pizza. Let the dough sit at room temperature for about 20 to 30 minutes before stretching it. This makes it easier to shape and helps create a more even crust.
Can I use rotisserie chicken?
Yes. Rotisserie chicken is one of the easiest and most convenient options. Simply remove the skin, shred or chop the meat, and toss it with a little barbecue sauce before adding it to the pizza. This helps keep the chicken moist while baking.
What is the best cheese for Homemade BBQ chicken pizza?
A combination of mozzarella and a smoked cheese creates the best flavor. Smoked gouda and smoked cheddar are excellent choices because they complement the sweet and smoky barbecue sauce. If you don’t have smoked cheese, you can use all mozzarella or mix in Monterey Jack, provolone, or mild cheddar.
Can I make Homemade BBQ chicken pizza ahead of time?
Yes. You can assemble the pizza up to one day in advance. Prepare the dough, add the sauce and toppings, then cover it tightly and refrigerate. When you’re ready to eat, bake it as directed. This makes it a great option for parties, busy weeknights, or meal prep.
Can I freeze Homemade BBQ chicken pizza?
Yes. You can freeze either the fully baked pizza or individual slices. Let the pizza cool completely, wrap it tightly in plastic wrap and foil, and place it in a freezer-safe container or bag. It will keep well for up to 3 months. Thaw overnight in the refrigerator or bake directly from frozen, adding a few extra minutes to the cooking time.
Can I use chicken breast instead of chicken thighs?
Definitely, chicken breast is lean and works well, especially if it’s grilled or roasted first. However, chicken thighs tend to stay juicier and have a richer flavor, making them a favorite for BBQ chicken pizza.
Which barbecue sauce works best?
A thick, sweet, Kansas City-style barbecue sauce is ideal because it caramelizes nicely in the oven and pairs perfectly with smoked cheese. However, you can use honey BBQ, spicy BBQ, smoky hickory, or your favorite homemade sauce depending on your taste.
How do I keep the pizza crust crispy?
Put the pizza in a fully heated oven with a high heat setting. If you can, use a pizza stone or baking steel to get even better results. Avoid adding too much sauce or too many toppings, as extra moisture can make the crust soggy.
Nutrition Information For Homemade BBQ Chicken Pizza (Approximate)
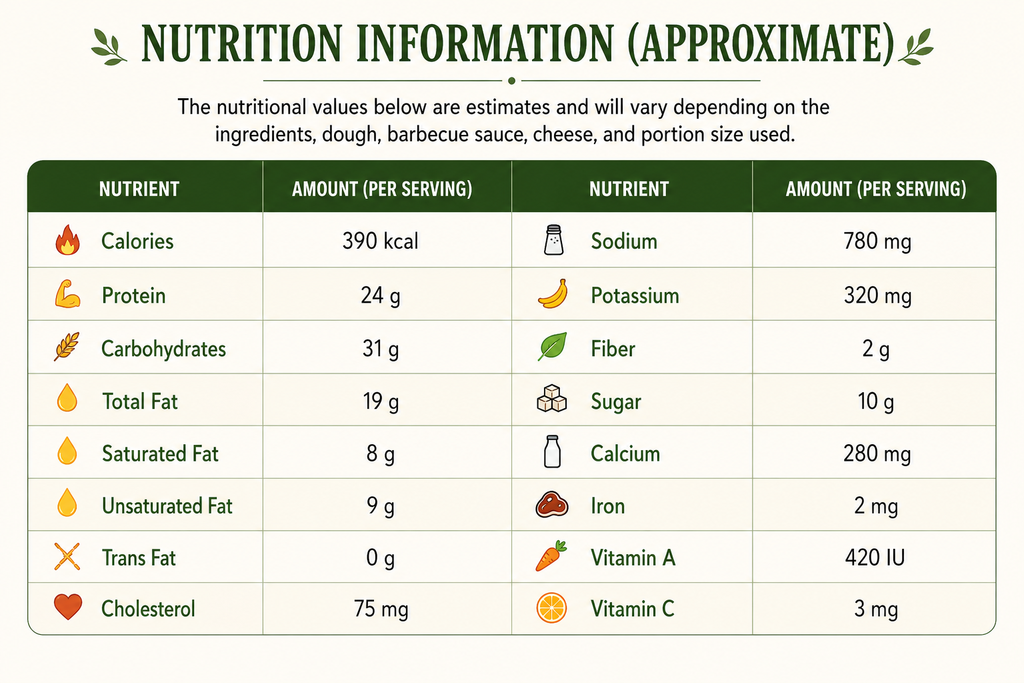
| Nutrient | Amount (Per Serving) |
| Calories | 390 kcal |
| Protein | 24 g |
| Carbohydrates | 31 g |
| Total Fat | 19 g |
| Saturated Fat | 8 g |
| Unsaturated Fat | 9 g |
| Trans Fat | 0 g |
| Cholesterol | 75 mg |
| Sodium | 780 mg |
| Potassium | 320 mg |
| Fiber | 2 g |
| Sugar | 10 g |
| Calcium | 280 mg |
| Iron | 2 mg |
| Vitamin A | 420 IU |
| Vitamin C | 3 mg |
Recipe Card (Printable Summary)
Homemade BBQ Chicken Pizza
Prep Time: 15 minutes (plus dough rising if making homemade dough)
Cook Time: 12–15 minutes
Total Time: 30 minutes (or longer if preparing homemade dough)
Yield: 1 (12-inch pizza)
Servings: 4
Ingredients
- 1 ball pizza dough (homemade or store-bought)
- 1 tablespoon olive oil
- ⅓ cup barbecue sauce, plus 2 tablespoons for the chicken
- 1½ cups cooked shredded chicken
- 1 cup shredded mozzarella cheese
- ½ cup shredded smoked gouda or smoked cheddar
- ¼ red onion, thinly sliced
- 2 tablespoons chopped fresh cilantro or sliced scallions
Instructions
- Preheat the oven to 475–500°F (245–260°C).
- Roll the pizza dough into a 12-inch circle.
- Brush the dough with olive oil.
- Spread the barbecue sauce evenly over the crust.
- Toss the cooked chicken with the remaining BBQ sauce.
- Add the chicken, mozzarella, smoked cheese, and sliced red onion.
- Bake for 10–15 minutes until the crust is golden and the cheese is melted and bubbly.
- Remove from the oven and garnish with fresh cilantro or scallions.
- Slice and serve immediately.
Recipe Notes
- Rotisserie chicken works perfectly.
- Smoked gouda adds incredible flavor, but smoked cheddar is equally delicious.
- Don’t overload the pizza with toppings.
- For the crispiest crust, bake on a preheated pizza stone or baking steel.
- Leftovers can be refrigerated for up to 4 days or frozen for up to 3 months.
Conclusion
Homemade BBQ Chicken Pizza is proof that you don’t need to order takeout to enjoy a restaurant-quality meal. With a crispy crust, tangy barbecue sauce, juicy chicken, melted cheese, and fresh toppings, every slice is packed with bold flavor and satisfying texture. Whether you’re using homemade dough or a convenient store-bought crust, this recipe is simple enough for beginners and delicious enough to become a regular part of your meal rotation.
One of the best things about this pizza is how easy it is to customize. You can experiment with different cheeses, sauces, vegetables, or even spice levels to create a version your family loves. It’s also a fantastic way to use leftover chicken and makes an excellent option for weekend pizza nights, casual gatherings, or quick weeknight dinners.
Once you try this homemade BBQ chicken pizza, you’ll discover just how rewarding it is to make pizza from scratch. Serve it fresh from the oven with your favorite salad or dipping sauce, and enjoy a meal that’s full of smoky, cheesy, barbecue flavor in every bite.

Healthy Chicken Soup Recipe With Vegetables and Tender Chicken

Simple Fried Chicken Recipe: Crispy, Juicy, and Easy

The Best Homemade BBQ Chicken Pizza Recipe 2026
The Best Homemade BBQ Chicken Pizza Recipe 2026
Simple Fried Chicken Recipe: Crispy, Juicy, and Easy